Wednesday, September 30, 2020

Spooky Skyline Challenge...Last Chance!!

 Good Morning Everyone!

September 30th which means it's the last day to enter the Spooky Skyline Challenge over at the Sparkle Blends Fan Club on Facebook!  You do have to join the club to enter but it's free and a great place to gather inspiring projects using sequins and shaker card ideas.

Today I wanted to share my final Spooky Skyline with you and encourage you to enter. 


Isn't this such a fun spooky Halloween scene?
I just love those little trick or treaters in those big scary woods.


I made it by sprinkling Color Burst powders over a piece of watercolor paper. I didn't want them to blend too much, just enough to make a nice transition so I had my spritzer bottle in one hand and my heat tool in the other. I "pushed" the water back when I thought they were blending too much so everything stayed where I wanted.

I stamped the trick or treat image along the bottom. Next I stamped the moon on a piece of cream shimmer piece of cardstock that was floating around in my stash. It was trimmed then glued securely to the background. I say securely because I didn't want any of the shakie bits to get stuck behind the moon.

As you can see I diecut the trees from black cardstock, added a piece of acetate and foam tape. I poured the You Make Me Batty sequins mix in the center of the card then affixed the shaker front to the panel. I know this isn't the traditional way to make a shaker but sometimes it's the only way to get the frame positioned correctly on a scene card.  


I had so much fun making this...and you know what?
Some of the bats glow in the dark!!!
How fun is that :)


I must say this is one of my favorite shakers I've made.


Hope you join in on the fun!!


Supplies:

Sparkle Blends Limited Edition Sequins Mix - You Make Me Batty

Gina Marie Designs - Trees

Crackerbox & Suzy - Trick or Treat

Lavinia - Moon

Colorburst

Cardstock, Watercolor Paper, Acetate, Foam Tape


Tuesday, September 29, 2020

Steampunk Octopus Earrings

Oh I am so excited to share my project today....

It was made using Oscar from Fairy Hugs, check it out...


As you all know I love the Steampunk look which is why I instantly fell in love with Oscar when I first saw him. I knew he'd be perfect paired with anything Steampunk hence my Oscar Earrings! While they are quite impressive they are really very easy to make. 

Let's first talk about earring card/holder.  First I colored a piece of white cardstock with a bit of watercolor paint which I glued to a piece of chipboard.  Oscar was stamped then embossed.  I  trimmed around Oscar and dipped the edges first onto a VersaMark ink pad then into copper embossing powder,  which I heat to set.  Finally I made a couple holes and set the eyelets with a Crop-a-Dile tool.


Next the earrings. This is so easy you're not going to believe me when I tell you how quickly they came together. So first - stamp Oscar onto a piece of shrink plastic of your choice x2. Cut around the image leaving an extra bit of space at the top for a hole. Punch a hole in the top with the Crop-a-Dile. Heat to shrink the plastic x2.

Now all you have to do is add your desired jewelry findings - I used copper findings and jet black beads and a couple little copper gears.  


Hard to believe but it only took 20 minutes to make the earrings. 
It actually took longer to make the earring holder.

So are you ready to take the plunge into Steampunk goodness or 
are you already a Steampunk aficionado?

Supplies:


Be sure to stop by our Fairy Hugs Facebook Group 


Friday, September 25, 2020

A Bushel and a Peck Shaker Card


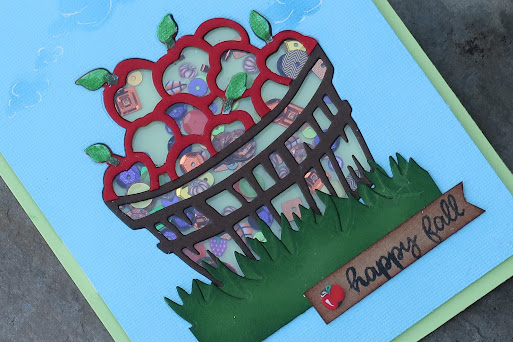
Happy Fall my friends! Today I wanted to share this fun shaker card with you... Isn't that bushel of apples so sweet. It is from Cheapo Dies - Apple Basket and I thought it would make a perfect shaker card.  What do you think?


It's filled with a limited edition sequins mix from Sparkle Blends called Autumn Harvest. I just love it - it's got little fimo pumpkins, leaves, red and green apples, grapes and more!  That's on top of the amazing blend of styles, colors and printed sequins.


I cut the diecut from red, white and brown cardstock and pieced it together for these results. The grass diecut is from MFT. I stamped the sentiment (Honey Bee Stamps) and added one of the apples from the sequins mix.  The clouds were made using a cloud stencil from Gina Marie Designs.


Supplies:

Doodles Paper Playground Sparkle Blends - Autumn Harvest

Cheapo Dies - Apple Basket

MFT - Grass Diecut

Honey Bee Stamps 

Gina Marie Designs - Cloud stencil

Cardstock, acetate, card blank

Thursday, September 24, 2020

Leaping for Joy!

  Hello my friends!

Jumping for joy with this fun stamp from Fairy Hugs...Spinner! 

Isn't he great? I had loads of fun making this card...hope you enjoy.


Spinner the dolphin...I wanted to make it look like he was leaping out of the water. I think I have achieved that.  Here's what I did...


I thought it would be fun to make a clean and simple card so Spinner would shine. I found a mat with the word thanks printed on it in my stash so I stamped Spinner so it looked like he was leaping over the top of it. 

I then used a water stencil and a bit of blue ink to create a swirl of water surrounding him. 

Finally I added a bit of Sky Fairy Hugs Powder glitter here and there. You can really see it on the waves but I dusted a bit on Spinner himself. It doesn't show up here as much as it does IRL but he's got a nice shimmer. I was hoping it would look like water sliding off his body.


I popped this panel onto a light blue card mat and a dark blue card blank. Added a bit of ribbon and called it done! 

I know some people may not consider this truly CAS but if you've seen some of my other cards this is great. I have not mastered CAS but I'm trying!

Hope you all have a lovely day and thanks for stopping by!


Supplies:


Be sure to stop by our Fairy Hugs Facebook Group 


Wednesday, September 23, 2020

The Man Cave

 There's a new challenge at Lost Coast Designs....

#107 The Man Cave!

Here's my creation....


Isn't he great?


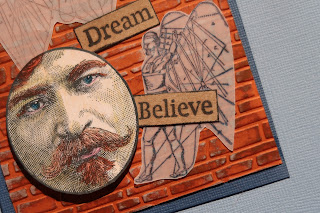
The Steampunk Fliers are both stamped on vellum - one with Morning Mist (grey) and the other with Paradise (blue) VersaFine Clair Inks.


The background is a piece of terracotta cardstock which was run through a brick embossing folder. I then swiped brown to dirty it up, grey to age it a bit and a bit of white acrylic paint that I applied by lightly rubbing my finger over the embossing.


Finally I colored my guy with a variety of colored pencils!

I hope you join in on the fun...


Monday, September 21, 2020

Harvest Blessings

 Hello Friends...I hope you're enjoying the start of another fine week.  Today I wanted to share a couple Autumn pumpkin cards with you....  Both cards were made using a combination of peg stamps from Rubber Stamp Tapestry as well as the Sparkle Blends sequins mix Autumn Harvest.


Harvest Blessings was created by stamping and masking the pumpkins into a nice little pile. I added a few curly vines, leaves and branch. 


These were then colored using Prima watercolors which I also flicked over the background.


The sentiment was stamped and embellished with the Limited Edition Autumn Harvest sequins mix.


My second card I wanted to add a bit more than just pumpkins so I stamped a few gourds, mums, grasses and bittersweet to round out this little fall card.


These were all colored using a variety of colored pencils.


The sentiment is from the Prima collection called Pumpkin and Spice. 
This panel was mounted on a die-cut card from Gina Marie Deisngs.
It too was finished off with the Limited Edition sequins mix Autumn Harvest.

Supplies:

Rubber Stamp Tapestry - Pumpkins, Bittersweet, Grass Sprigs, Mums, and more.

Doodles Paper Playground Sparkle Blends - Autumn Harvest

Gina Marie Designs - Loopy Rectangle Die

Prima - Hey There Pumpkin (Pumpkin & Spice Set)

Saturday, September 19, 2020

Evil Eye...Spooky Skyline Challenge

Today I have another fun Spooky Skyline for the September Sparkle Blend challenge from Doodles Paper Playground!

Isn't this a fun card? Normally I don't use a lot of purple but I was so inspired by the brand new limited edition sequins mix - Monster Mash that I just had to give it a go!

How I made the background....


I started off by squirting my Fireworks! spray onto a piece of plastic wrap and pouncing it all over a white cardstock panel. I did this with Bahama Blue, Lilac Posies and Lilac Walnut Ink.


Then to add the spook factor I made a "frame" using Marabu Art Crayons and Gelatos blending with my finger as I went.


Then I used a couple dies from Gina Marie Designs to create the front frame of the shaker. The witch cut from black cardstock and the spooky pumpkin frame was cut from a piece of purple cardstock that I had enhanced with more Marabu Art Crayons.


Once I made the shaker and filled it with the Monster Mash sequins blend I framed the card with Grape Fairy Hugs Powder glitter.


Don't you just love that creepy green eyeball?
It really pops on that purple background.


 Supplies:


Doodles Paper Playground Sparkle Blends - Monster Mash


Wednesday, September 16, 2020

Sweet Autumn Sunflowers

Hello Friends and welcome! I hope you are all doing well, staying safe and feeling great today. I wanted to share this fun Autumn card celebrating sunflowers in all their glory.  I've been enjoying paper piecing dies recently and this is a favorite. I have paired it with one of the new limited edition Sparkle Blend mixes called of course - Sunflowers.


This blend is full of lovely colors, shapes and some darling little Fimo Sunflower bits! I thought it would be fun to use those bits to fill in the centers of each of the sunflowers....


I just love the mix of color and textures - it really gives the sunflowers a magical quality.


The sunflower/fence die is from Cheapo Dies and the frame & grass dies are from MFT.


The little sentiment is from Honey Bee Stamps - Sending you Sentiments. I used it here along with a couple of the little Fimo Sunflowers from the mix.

Sending you sweet Autumn Greetings from Indiana 
my inky friends!!

Supplies:

Cheapo Dies - Sunflower


Tuesday, September 15, 2020

Friendly Little Sea Turtle

Hello my friends! Today I wanted to share my Friendly little sea turtle - Raphael! He's one of the lovely stamps from Fairy Hugs!


Raphael is such a regal looking beast don't you think? 
He's perfectly content to keep watch over his watery kingdom.


The first step to creating this card was drawing an oval on a white cardstock panel using a pencil. I then stamped the shells, coral and sea weed peg stamps (all from Rubber Stamp Tapestry) around that oval using various colors of VersaMagic ink (chalk ink). I then diecut the shape from the panel and inked the edges and center of the oval.  


I wanted to give the illusion of swirling water in the center of the oval so I drew swirls with a fine tip liquid glue which I sprinkled Sky and Pixie Dust Fairy Powder on top. The two colors swirling together creates the feeling of movement.


I placed Raphael on my stamping platform. I then used Memento Dual Tip markers to color each area of the image stamping them one by one. For example I colored the shell using Coca and stamped, I then colored his belly using Cottage Ivy and stamped, his flippers were colored with 3 different shades of green then stamped, etc.  After the entire image was stamped I then colored him in again using the markers.  I added a bit of black and white using acrylic paint pens and then he was fussy cut. I added him to the panel using foam tape.

The blue mat was cut to size then inked with a small shell stencil.  This mat was affixed to a black card blank and the turtle panel was then mounted on the card.


I hope you have enjoyed this little tutorial featuring the very handsome Raphael.
Thanks for stopping by! See you next week.

Supplies:


Fairy Hugs Store Stamps - Raphael


Fairy Hugs Store Fairy Powder - SkyPixie Dust
Rubber Stamp Tapestry - Shells, Coral, Sea Weed Peg Stamps
Gina Marie Designs - Nested Label #1
Imagine - VersaMagic, Memento Dual Tip Markers, Sponge Dauber

Be sure to stop by our Fairy Hugs Facebook Group