Showing posts with label recycle. Show all posts

Wednesday, June 10, 2020

Rinea Foiled TP Roll Owls - Upcycled Kids Craft!


Hello Friends!

I hope you're doing well and are safe from the wicked storms rolling through the central part of the states courtesy of Hurricane Cristobal. Today I wanted to share a fun craft to make with your children...my Foiled TP Roll Owls! Aren't they darling? I had so much fun making them and with a little prep work you will have a parliament of owls in no time at all!


All you need is a 4x6" piece to wrap around the toilet paper roll, several circles cut from your favorite color(s) of Rinea Foiled Paper, a 3"x3" piece to cut out some wings (not shown) and circles cut for the eyes.  That's it! Easy peasy!


I made this owl using the Peacock Foiled Variety Pack...I just LOVE these colors. They are beautiful together and I rather like my Peacock Owl.


This cutie was made using two of the colors from the Floral Variety Foiled Paper Pack - Violet and Fuchsia.  I also used a scallop circle die to cut these circles...I thought it was a fun way to add a bit of texture to her feathers.


And my final traditional little guy was made using Mocha/Gold Glossy and Mocha/Mocha Starstruck foiled papers. I used the reverse side of the Mocha/Gold Glossy for his chest feathers.


If you'd like to give these little critters a go, you can find complete details here: Rinea Foiled Paper Owls with Roni.

Have a lovely day my friends!!!


Wednesday, July 10, 2019

Light Your Way...Fairy Lantern

Good Morning Friends!


I hope you're all having a wonderful week.
Today I want to share a fun project I made recently that will have you saving your glass jars!


This is what it looks like in daylight...I wish you could see the shimmer - it is covered in a layer of Sparkle Mboss Embossing Powder. This embossing powder has a beautiful iridescent glitter sparkle which is just lovely.


And when it gets dark it's just as lovely when you switch on the little LED Tea Light!!

You can see full supply list and detailed instructions here:


Have a magical day friends!

Wednesday, June 26, 2019

Memories Upcycled Wooden Box


It's been a while since I've done any "upcycling"...no, this has nothing to do with the gym ;) LOL!! So I thought it would be fun to do so.

This is a mixed media lovers delight...
Stamping, embossing, a "skin" for the cover and more!

If you'd like to see how I made it you can find the directions, step by step photos and complete supply list here:


Imagine -

VersaFine Clair Inkpad – Fallen Leaves, Tulip Red, Blue Belle, Pinecone, Nocturne, Golden Meadow
VersaMark Inkpad
Mboss Embossing Powder – Gold, Hologram, Birthday Party, Princess Party
Fantastix
Fireworks! Shimmery Craft Spray – Ivy Cottage
Creative Medium
Palette Knife
Stipple Brush


Friday, September 28, 2018

TP Advent Calendar?

Yep!  That's what I'm making today...an Advent Calendar by upcycling toilet paper rolls and they turned out pretty cool even if I do say so myself.


How did I make these goodies? 
You'll have to hop on over to the Imagine blog to find out :)
I'll give you a hint with the supply list though....

Supplies:
Imagine - irRESISTible Texture Spray - Lady Bug, Wedding Dress, Bamboo Stalk; Memento Dye Inks; VersaFine Clair - Nocturne
Rubber Stamp Tapestry - Candy Cane, Gingerbread Man, Holly, Stocking, Gift Peg Stamps
Club Scrap - Large Number Stamps
MFT - Circle & Scallop Circle Dies
Rinea - Ruby/Gold Glossy Foiled Paper; Emerald/Gold Glossy Foiled Paper
Seam Binding

Friday, May 25, 2018

Tissue Paper Upcycle

Recently I received an art order in the mail and it was wrapped up in a really cute piece of tissue paper.  Well you know me and paper - I couldn't stand the thought of tossing it in the trash so I put it into my stash. 

As it happens I needed a birthday card for my DIL and that tissue paper was just the ticket!


I start by cutting a piece of the tissue paper roughly the size I needed.  To give it a big more character I crumbled it up several times so it was more crinkly.  Next I trimmed a piece of cardstock to 4 x 5.25" and through my Xyron.  I carefully placed the tissue paper over the panel and smoothed it out making sure it was secure.

 Since all of the owls were different I wanted maximum owls, minimum coverage so I stamped the sentiment on a little leaf tag and added some free-hand pen work. The tag was then tied onto the panel using a bit of Prima's navy twine.  The panel was then affixed to a green card blank. 

I am so tickled with how it turned out, those owls are just darling!  I hope she likes it :)

OH, I just got a package with tissue paper that had cute little kitten faces all over it....I see another card in the near future!  

When you get pretty tissue paper do you keep, keep & use or toss???


Thursday, July 6, 2017

No Sew Upcycled Tote Bag

Happy Day!  Hope you all are having a wonderful day.  I have a fun project for you that is fun, quick and oh so easy!  A "no-sew" tote bag with a little pineapple flair!  Pineapple you say?  Yep, pineapple is the color of the month at Imagine so I thought it would be fun if I colored the tote to resemble the colors of a pineapple.


I was so surprised how much the finished tote will hold!  I stuffed in 4 beach towels, a couple suntan lotions and still had room for more!  I'm thinkin about makin' a few of these puppies for Christmas gifts. They would be so handy for all sorts of things.

Here's a quick run-down on how I did it....


Trim arms & neck to form a "V" in the center.


Wet.


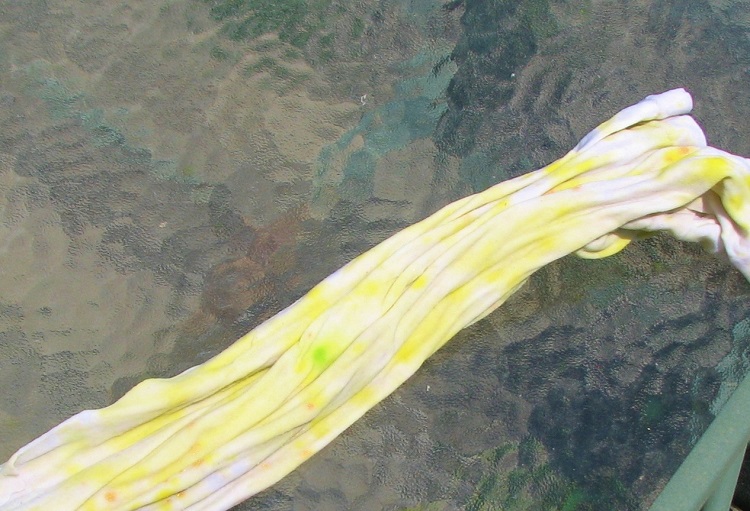
Flick a couple colors of green, yellow and gold All Purpose Ink on the wet T.


Scrunch up the shirt and squeeze.
(this will distribute the ink giving it a tie dyed look.)


Lay flat to dry.
Once dry, iron on both sides to set the ink.


Snip the bottom into 1/2" strips about 3-4" up.


Knot and you're tote is done!!
Told you it was easy :)

Supplies

Imagine

All-Purpose Ink – Lemon Yellow, Vegas Gold, Spring Green, Green Apple
Doodlestix

Other

T-shirt
Scissors


Friday, June 16, 2017

Upcycled Mirror...

A few weeks ago Mom and I went to the town wide garage sale. I am always on the look-out for items I can upcycle. This time I found this stained glass mirror (the center part is the mirror even though it looks black).   The center panels had an iridescent quality about them which looks colored in the photos - they were actually clear with the iridescents on the back of each piece of glass.


I needed a mirror for the spare room so I went with the current color scheme...


It's amazing how the sun casts such a lovely design over the entire room! You wouldn't think such a small piece would have such an impact but it really does.  I was going to hang it on the wall but I think I'm going to leave it in the window...it's just too pretty with the light streaming through it.


Supplies:

Imagine: StazOn Studio Glaze - Tangerine; Cactus Green, Blue Hawaii

Other: Stained Glass Mirror

Tuesday, October 28, 2014

Curly Witches Hat Home Decor Tutorial

Trying to squeeze all of the Halloween goodness I can before time is up.  Today I have a Snapguide for you on how to make your own Curly Witches hat made using a knitting cone, muslin and some paint!  


You can add a variety of embellishments to the finished hat to match your Halloween theme or decor.  I have finished this one off 3 different ways....

A simple Halloween design...


A more elaborate design for the discriminating
witch who likes her bling...


And finally a Steampunk Witch...


Thursday, March 13, 2014

Stamped Tea Bag Idea #2

Tuesday I shared my idea for using a stamped tea bag as a focal point of your card.  Today I wanted to share another idea I had - a cut out card with the tea bag mounted in the cut out!

I started off by inking up & stamping the tea bag as I did in the original technique.


 Next I cut and folded a card.  I then die cut a scallop oval from the card.  I cut a matching oval from 2 sheets of a darker shade of blue cardstock.

I mounted one of the darker pieces of cardstock on the inside of the card, then glued the stamped tea bag over the opening.


Here is what it looks like so far.... Kinda rough but that's o.k.


because we're going to use the second die-cut piece to cover the messy parts.


And I added a bit of stamping to the inside of the card....


and a few extra bits to the front as well.  You can see the sentiment through the tea bag when the card is flat (it wasn't all the way down in this photo).


So, what do you think?  
The possibilities are endless aren't they?
Gotta get dh to drink some more tea...he's not drinking it fast enough - LOL!!

Wednesday, March 5, 2014

Easter Tin Can Project - Finished!!

LOL...so many people e-mailed about my tease :)  I hadn't done that in a long time but it was fun!  I hope you're all ready to see the finished project...

I added some mesh lace around the top to cover the lip of the can since it was so sharp...I'd hate for anyone to get cut while digging for jelly beans!  At the time I took the photos I didn't have the handle attached.  I was waiting for some beads to dry before threading them on the wire & attaching it.  I'm thinkin' I'm having a chemical reaction because they don't seem to be drying like they should...oh well...I may have to go to a plan B for the handles.

Anyway, here you go....  (the pink really isn't as neon as it looks in the pics).


The front...
The rub-ons, pattern Easter paper n stickers and Dew Drops are from Robin's Nest; Collage Image, tags are Altered Pages, Vintage Seam Binding and lace were from my own collection.


I added bees & butterflies around the sides.


Each of the flowers has a Dew Drop at it's center.


And just another shot of that cute little bunny!
I love this image ~ reminds me of a 50's Easter Card.


So, there you go...
A fun "green" Easter container you can make ahead of time for all your "peeps"!

Have a wonderful day!!

Tuesday, March 4, 2014

Easter Tin Can

Hey All...

Hope you're all staying warm and having a great day...  I have the beginnings of a project for you ~ a recycled tin can turned into a bit of Easter goodness!

I started off by washing the can thoroughly...a word of caution though...don't stick your hand down in it and swish the dish rag around.  I did and cut my hand ~ of course!  Anyway, after you get the bleeding stopped, dry the inside and out really well.

If desired, punch a couple of holes in the can so you can add a handle at some point.


Next, cover the outside of the can with one or more coats of gesso... I ended up with 3 ~ you could add more or less depending on the look you're going for.


Squirt on a couple colors of inky mist...I'm using Dylusions but you can use what you have.


I dried each layer between coats of color then when it was all dry I sanded away bits here and there for a well-loved look.


I added some fun glittery paper around the center then added a border (sticker) strip of flowers.


I made a little collage tag for the front using all sorts of Easter-y colors, images and papers.  I dyed the ribbon with the same inks I used on the can, added a few dew drops, a bee sticker and...


Well, that's all I'm going to show you for now :)  tee hee hee...you'll have to wait to see the finished can till later!

Wednesday, February 26, 2014

Big Deal!! - February Club Scrap Blog Hop

Welcome to February's
featuring this months kit -
Big Deal.

As you can tell from the name, this month's kit theme was games...
mainly cards but there were nods to dice, chess and bingo as well!

(Click on the photos to be taken to the CS web site for more information)

and the stamps for this kit are wonderful....
so versatile and fun to boot...

Big Deal UM Collection


Big Deal Greeting UM


Big Deal Art Nouveau UM


and
Big Deal Borders & Background UM


When I first saw the kit I instantly in love with it!  I can think of so many fun ways to use this kit...which actually led to a different problem ~ I couldn't decide what to do with it!!!  Honestly, I had so many ideas I was petrified to start on something in case I came up with an even better idea.  I finally decided to do what I love - recycle...  I know what you're thinkin'...what the heck is she talkin' about?!?!?  Well, this month's project is based off of the pizza box that the Club Scrap kit comes in!!!


And here is what I created!!!     A Big Deal Shadow Box.....

I cut off the lid of the box and set it aside for use later; painted the box inside and out with burnt umber acrylic paint and then started creating my pieces.  The individual items were stamped or cut from existing patterns from the paper and then mounted using the cardboard from the lid...some are matted with a single layer while other elements are popped off the background with 2, 3, up to 5 layers of cardboard.

The "deck" of cards is actually stamped, 6 times and layered with a piece of the cardboard lid between each layer... 


the various elements....


One of the pattern papers in the kit was made up of images of vintage cards which I cut up, inked then glued in the bottom of the shadow box to make it look like someone was playing cards right there!


And of course here's my little gnome friend ~
all "decked out" (sorry - couldn't resist) in his invisible crown!


The next stop on the hop is 

If you get lost along the way the complete list of participants is listed on the 
Club Scrap Blog - Club Scrap Creates!

Happy Scrappin' Friends!!!