Showing posts with label Gesso. Show all posts

Sunday, February 11, 2024

Kindred Spirits

 Playing with the Gothic image of the month at Gecko Galz...

A gothic take on Little Red Riding Hood...I love it!


A bit of gesso, watercolors, acrylic paint, vintage ephemera, washi tape, some stamping, stencils, Creative Medium and more!

Gecko Galz Monthly Gothic Challenge 0224

Wednesday, March 29, 2017

Delft Club Scrap Blog Hop

Welcome to this month's Club Scrap Blog Hop featuring the lovely Delft Kit!  If you're following along with the hop you should have arrived by way of Trica - The Efficient Crafter and her beautiful creation.

This month I have a fun mixed media project to share which combines this kit with a bit of ink, gesso, Shimmer Pico Embellisher and sand.  Yes I said sand...


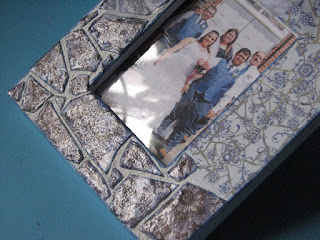
Since the blue from the kit matched the blue from Bob & Morgan's wedding so well I wanted to make a frame to hold our family photo. I wish you could touch this frame as it has so much texture, depth and dimension created by the "faux" tiles.  The photo above shows how sparklie the Shimmer Pico Embellisher made the tiles.


And these two photos show just a bit of the dimension.
It really is fun to not only look at but touch as well.


Here's how I did it....


One of the prints has this lovely dark blue broken tiles that I trimmed and inked the edges of each piece using Club Scrap Sapphire ink.


I used a plain wood frame - the top half was covered with a light blue cracked tile print; the bottom portion was covered with a mixture of gesso and sand to create a faux grout look - perfect for our faux tiles!


Once everything had dried I inked the inside and outside edges with the Sapphire Ink.


Next I began gluing the tiles down using book binding glue. It dries quickly which is very handy for this project.


Finally once all the tiles were in place I covered each with a layer of Shimmer irRESISTible Pico Embellisher to give it shine and dimension.

Have a creative day friends!

Your next inspirational stop on the hop is 


and if you get lost along the way
you can find the complete list here...


Supplies:


Club Scrap March 2017 - Delft Kit
Club Scrap Book Binding Glue
Club Scrap - Sapphire Ink
Wood Frame
Gesso
Sand
Imagine - irRESISTible Pico Embellisher - Shimmer

Tuesday, January 10, 2017

2017 Texture Calendar - March

Welcome back to the next installment of our Texture Calendar!  I am so excited about today's texture we're going to create...mainly because it fits March perfectly.


Today's texture is a combination of gesso and embossing powder 
with a little help from a heat tool.  
Let's go!


Paint your foundation black (or other desired color).

Secure your calendar page and stencil to your work surface.


Cover the page/stencil with gesso.


Quickly remove the stencil and place the calendar page in an embossing pan, 
on a paper plate or other container to catch the excess powder.


Sprinkle with a combination of Gold and Verdigris powders.
The still wet gesso will hold the powders in place.


Shake off excess and begin heating.


As the wet gesso and embossing powders warm, they will both begin to bubble up creating an amazing texture.  If you look closely you can see this texture begin to form.


A couple different views of the texture created...


It really is stunning in person - the combination of the raised gesso paired with the bubbled up gesso/embossing powder creates a very dimensional texture that can be used on virtually any foundation material.  I especially like to use this technique on vintage canvases...it's got a great look when you use copper or bronze EP for a very steampunk feel.

Supplies:

Deco Art - Gesso, Black Acrylic Paint
Imagine - Embossing Powders - Gold, Verdigris
Club Scrap - Stencil
Heat Tool, Chipboard

Monday, January 2, 2017

2017 Texture Calendar - January

Welcome to the 2017 Texture Calendar project!


Today I thought I'd start out easy with a really fun - can't screw it up technique.  Why can't you screw it up?  Because there is no right or wrong that's why!  It's really easy all you need is some gesso, texture tools, a substrate and embellishments.


Now when I say texture tools I don't mean you have to run out and buy a bunch of expensive tools...look around, see what you've got laying around the house.  These are just a few of my favorites...old dried up paint brushes (the stiff bristles are perfect for this); an old toothbrush; a flower frog is GREAT for making interesting textures, I found a silicone basting brush at the Dollar store that makes some really cool textures.  

You can use die-cuts, deco scissors or cutting wheels to make interesting texture tools - get a piece of cardboard, cut one edge with your die/scissors/etc. to create a fun edge.  I actually cut a bunch of pieces of heavy cardboard the same size and punched a hole in one corner, added a book ring so I can use them for gesso, paint, my gelli plate, etc.

There are lots more fun "tools" laying around the house...forks, the tip of a pencil, scrubbies (like the net things from the kitchen), potato mashers, slotted spoons, stylus tools (for embossing), and so many more.  Just look around, you'll be surprised at what you find.


Start off by applying a thick layer of gesso, modeling or embossing paste to your substrate.


Now drag, pounce, swish, twist, squish your tools through the wet medium.  I started off with one of my handmade cardboard pieces.  It's a very tiny zig-zag design that I gave a short twist several times.  It made a really cool pattern along the edge.


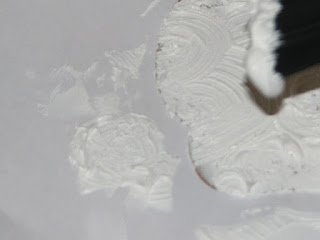
The next "tool" I used was an old toothbrush that was actually really stiff (from using it on a glued project).  I pounced it over and over in the thick gesso.  The more I pounced, the more gesso the toothbrush picked up and moved along as I went. 


Finally I took a really stiff dried up bristle brush and twisted it in circles.  This ended up making a really pretty rose looking impression.  I repeated this over and over to fill up the remaining space on my calendar page.


I think it turned out really pretty.


And here's what my calendar page looked like with all of the different textures.  Of course you don't have to use 3 different tools, you could use one over the entire page for a more uniform look or you could go wild and use as many as you want.  Like I mentioned - there is no right or wrong with this page...just mess around until you're happy with the look.


Since this is for the January calendar page I wanted to go with a traditional color scheme so I choose black and gold to ring in the new year.  So I painted the textured page with black acrylic paint then sponged Golden Glitz Delicata Ink over the ridges, bumps and humps.  The ink really highlighted all of the luscious texture!  I added my calendar, a fun die-cut clock design and a few gold sequins for a bit of bling - it is the new year after all ;)

Now it's your turn!  
Pull out your favorite texture medium, 
some improvised texture tools and play!

Monday, August 29, 2016

By the Sea....

Before summer disappears into your memory I wanted to share a few "salty" cards to help ease you into Autumn....  all of the stamps are from Just For Fun Rubber Stamps.


This card was so much fun to make...the mermaid is mounted on a vellum frame that covers a sea kelp panel.  I know it's difficult to tell but that panel was a bit of gesso through a sea kelp stencil that was colored with Brusho Colour Crystals.  You can see the texture behind the vellum IRL.  Couldn't get it to show up no matter how many pics I took.  My red head mermaid has tiny faux gems and pearls scattered in her hair.


A watercolor sunset... The white "foam" is really Pico Embellisher.


My blond mermaid on a stenciled background with a few sea treasures thrown in for good measure.


Finally...a walk along the beach with a few more terns.

Gosh, makes me want to go to the beach and cool off now...

Supplies:

Just For Fun Rubber Stamps - all images
Imagine - Memento Inks, Memento Dual Tip Markers, StazOn Ink, irRESISTible Pico Embellisher
Kuretake Watercolors
The Crafters Workshop - Stencil
Spellbinders - Circle, Scallop Circle Dies
MFT - Stitched Frame Die
Other - Gesso, Button, Twine, Faux Gems, Vellum

Monday, January 25, 2016

2016 Watercolor Calendar - May

We're up to May in our watercolor calendar and today I have a bit of mixed media going on.  Don't worry if you don't have the exact same supplies...use what you have :)


I wanted to create depth and texture prior to adding the color medium because when you do so you get some really cool pooling of color around the texture.  I used both Creative Medium from IMAGINE Crafts and Modeling Paste by DecoArt Media.  You could also use gesso in place of either.


For this example I taped the piece down...sometimes I prefer to leave it loose so I can manipulate the water/color medium by lifting it up and tilting here and there. 


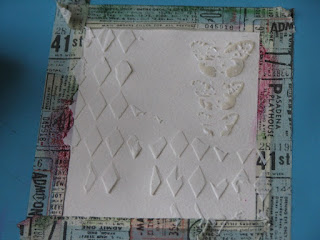
Apply the gesso, Creative Medium, and/or modeling paste over some of your favorite stencils.  Both of these are The Crafter's Workshop.  Let your chosen medium dry. 


For my watercolor today I decided to use Magenta's Nuance powders but you could also use Color Burst, Bister or Brushos as well.  If you don't have a powdered watercolor medium you could achieve a similar effect with watercolor paints and a brush. You would do so by flooding your paper with water; load up your brush with lots of color and float it around the page as desired.  You can add one or more color but be sure not to go overboard and create mud.


Once it has dried you can remove the tape.


I added a bit of detail by adding a bit of ink through a stencil here and there over the panel.


The calendar page was made in the same way.


I ended up using 4 Nuance colors for the calendar page since it was larger.


A bit of text...


And for this example I added a touch of DecoArt's silver Metallics paint to the harlequin.


Don't forget to use a few tags to sop up the excess watercolor medium.


Are you enjoying this calendar so far? 
I know I am having fun making it...hope you are too.

Tuesday, September 29, 2015

2015 Mixed Media Technique Calendar - November

Today we're going to work on November's page in the 2015 Mixed Media Technique Calendar.


This technique adds some fun hidden dimension to any mixed media project and the best part it uses trash to do so!!  The following 2 photos show some of the texture not captured in the first photo.


As you can see there is a hidden leaf pattern which I'll show you how to achieve right now!


Now I mentioned that I used garbage to create the hidden texture on the calendar page.  No, I didn't go dumpster diving but I did save some paper headed for the trash bin.  Earlier this month I needed several small leaves for a project I was working on (which you'll see sometime next month).


 And I had all of these strips of paper left over.  I hate throwing this stuff away but I normally do because what are you gonna do with it right?  Well, I trimmed as close as possible to the edge of each strip of cardstock. 


And I glued it down to my Gothic Arch!


I varied the pattern up a bit, flipped some over so the leaves were going in different directions.  Once it had dried I trimmed off the excess from the edges and glued down any little bits that weren't adhered the first time.


Next, a coat of gesso or white acrylic paint just to tone the cardstock down a bit.


To add some color I squirted on a few colors of StazOn Studio Glaze.  It adds dimension, a bit of shine and color all at the same time.


If you don't have Studio Glaze you can use a bit of watered down acrylic paint or watercolor paints for this step.


Next, a bit of stamping...text


Dots (in bronze Delicata ink)


A little inking around the edges and here and there to highlight the leaves.


Next I stamped a fun Stamptangle Pumpkin onto several colors of orange cardstock, cut & pop-dotted it together; used a few of the extra leaves I had left over and added the calendar.  And there you have it!  A fun way to add hidden texture and dimension to virtually any project! Hope you give it a try.