Showing posts with label Chipboard. Show all posts

Saturday, December 12, 2020

12 Days of Christmas Shakers Day 6 - Deer Me

 Back with another shaker for the 12 Days of Shakers...

Deer Me ornament


Today I have another fun shaker kit from Creative Embellishments - Deer Head Shaker!!


I created this shaker in the same fashion as I did the Santa Boot Shaker Ornament on Day 2. I covered the back piece with Mocha/Gold Glossy foiled paper from Rinea then filled with the shaker mix Eggnog with Nutmeg from Sparkle Blends! I love this mix!

I added a few extra sequins to the front for his little nose and holly; I also added a gold stretch cord to be used as a hanger.  I sponged a bit of Acorn VFC ink on his horn and around the edges for a bit of extra depth!

Hope you have enjoyed the 12 Days of Christmas Shakers so far - half way through - more fun to come :)

Friday, December 4, 2020

12 Days of Christmas Shakers Day #2 - Santa's Boot Ornament

Welcome friends to my 12 days of shakers!! Today instead of a shaker card I have a shaker ornament to share with you... Santa's Boot! I thought it would be nifty to make a few shaker ornaments to shake things up a bit. LOL!! (sorry, couldn't resist!!)


This is a shaker element kit from Creative Embellishments - Santa Boot. These Shaker Kits have everything you need to make the basic shaker - background, 3 "outlines" and the window, no foam adhesive necessary. Creative Embellishments have a whole host of shaker kits in many different themes for all seasons, all reasons. I love them because they have such clever pieces that would be almost impossible to create otherwise.  I chose to turn mine into an ornament but of course you can use them for cards, scrapbook layouts and so much more.

I started off by covering the back piece with Silver/Silver Starstruck foiled paper from Rinea. I then glued two of the outline pieces to this backer.  I added the limited edition shaker mix called Mulled Wine from Sparkle Blends


Once the shaker has been filled with your desired shakie bits (yes, that is a technical term there), it's time to glue the window to the shaker and finally the last chipboard outline to finish it off.  

Now you can decorate these shakers any ole way you would like - paint, ink, markers, etc. For this particular shaker I wanted to bling it up a bit because after all it is Christmas.  I added Fairy Hugs Powder glitter to the rim - Raven for the heel/sole and Currant for the upper portion of the boot.  To finish off the embellishments for this shaker I cut a small bit of a marabou feather boa and glued it to the top of the boot. Finally I added a piece of gold stretch cord to the back of the boot to act as a hanger for this ornament.

Supplies:

Creative Embellishments - Santa Boot

Sparkle Blends - Mulled Wine

Fairy Hugs - Fairy Hugs Powders - Raven, Currant

Rinea - Silver/Silver Starstruck 

Marabou Feathers

Beacon 3 in 1 Adhesive

Gold Elastic Stretch Cord

Friday, October 30, 2020

The Poison Apple Exhibit....Just One Bite

 Hello and welcome to the Poison Apple Exhibit...be sure to read to the end for a complete list of exhibits and a chance to win a wonderful prize package from Gecko Galz.


A collection of frightfully delightful Halloween creations for you to enjoy....

and here is mine...

Just One Bite - 

because that's all it takes from a Zombie.


It is a vintage cigar box that I painted with black acrylic paint then stenciled purple ink over top. It's very subtle in the photos but shows up very well IRL.


The Skull Flourish Corner was painted with white acrylic paint then aged with inks. I really wanted to make the roses and flourish  pop so I covered them with glitter (from Fairy Hugs) Currant and Emerald.


Open it up and this is what is revealed!!!  The entire inside of the box was painted with black acrylic paint. I then created the moon using Champagne Ice Metallic Luster from DecoArt. Fab Fuchsia was used for the sky and Lavish Green was used on the bottom section for the grassy area.


All of the Bats were painted black then covered with Raven glitter. The ghost from the Graveyard Set was painted and distressed similarly as the skull on the front of the box.


I had so much fun with this. In addition to the bats, a couple pieces from the Graveyard Set (coffin, tombstone) were used as well as the ZombiesZombie Hand Set.  The Coffin was covered with black acrylic paint then enhanced with more glitter (who says glitter can't be spooky?) - Gold Nugget on the cross, Shiny Penny along the edges and Silver Lightning for the nails in the coffin. 


I colored the hands with a variety of paints and colored pencils and the rest of the items were painted with black acrylic paint.  All of these items were positioned using foam core board pieces. I added bits of moss to help cover one more item....


Tiny lights!!  Woo Hooo.... Yes, my Zombie graveyard scene is lighted. I have to say it looks so freakin" cool in the dark....really scary and such fun! I hope you have enjoyed what I have to offer in the Poison Apple Exhibit!!

Supplies:

Creative Embellishments - Skull Flourish Corner Set, BatsGraveyard Set, Zombie Hand Set, Zombies, Tiny Lights

Fairy Hugs - Fairy Powder (glitter) - Currant, Emerald, Gold Nugget, Shiny Penny, Silver Lightning, Raven

DecoArt - Americana Acrylic Paint - Black, White; Metallic Luster - Lavish Green, Fab Fuchsia, Champagne Ice

Beacon - 3in1 Glue

Other - Moss, Vintage Cigar Box

Don't forget to take a stroll through the rest of the exhibits from these wonderful designers....

It's Oddly Appealing

Creatif Edges  

Ink Stained Roni - You Are Here 

Helen Angel-Cullum  

Chaitali Dekhtawala 

Louise Thompson 

Moniques Pretty Dark Art 

Lynes Laboratory  

ZoeB 

Rituparna 

Angel B

 Savvy Handmade 

Monica Longard  

On to the goodies.....


We have a wonderful digital prize package up for grabs, courtesy of Gecko Galz! You'll receive: Face To Face Jewel It Collage Set, Steam Punk Collage Set, Picture Perfect ATC Set, Clockwork Christmas ATC Set, and Spellbound Digital Stamp Set (which has 25 images!).

To have a chance of winning, leave a comment on this post, along with your email address or social media contact (IG, FB, etc) from now through Monday, 2 Nov. One lucky winner will be picked randomly from all comments left from all of the artist's participating! The winner will be contacted via email or social media so it's important you leave your address/social media contact info! Good luck and enjoy the hop!

I would like to enter this into the October Challenge at Creative Embellishments :)

Thursday, October 29, 2020

Steampunk Halloween Skull

 As the month is winding down I find my self in a hurry to fit in all of my Halloween creations before the big day arrives. I always seem to have far more Halloween ideas and plans than I do time. BUT I was able to check this off my list. My Steampunk Halloween Skull....


What do you think? I am tickled with how he turned out which of course isn't anything like what I had planned!  I had originally thought to make him more of a character by giving him a mustache and a blinged out Steampunk hat but as things progressed I decided he needed Mr. Octopus instead. I'm glad I made the switch...I like this much better.


All of the gears were colored using Craft T Metallic Rub-On Paints which that have been in my stash for years and years. They were one of the first things I bought over 20 years ago and they are still great! Amazingly enough these things work better than many of the current far more expensive metallic waxes and rubs on the market today.  Just do a search for the above name and you'll see what I mean.


All of the chipboard pieces as well as the wood skull are from Creative Embellishments. I love their selection and imaginative offerings.   I added a couple little sequins and crystals (from Sparkle Blends LE Sequins Mixes) for the skulls eye as well as the octopus eye (shown in the photo before this one).  


A few brads for the hinges and DecoArts acrylic paint for the spider web caught in his eye socket and the skull it's self. I wanted to give it a worn distressed look so I used a bit of burnt umber applied with my fingers (messy on purpose) which I then went over with a bit more white to blend it all together. I love how it aged the stark white to something long ago forgotten.


I drew on some cracks in the skull and smudged a bit with more white paint just to give a more aged look. The gears and parts are to help him hold it all together. I feel like I need them sometimes.


So there you have it...my Steampunk Halloween Skull.
Hope you enjoy this make.

I am going to enter this into the following:


Craft T Products - Metallic Rub Ons
DecoArt - Americana Acrylic Paints - White, Black, Burnt Umber
Mini Brads

Thursday, October 15, 2020

RIP Creative Embellishments Tombstone

 Mid-way through October already...can you believe it? I sure can't. This year has just disappeared in the blink of an eye. Half way to Halloween so today I have a spooky creepy tombstone for your approval.  

Creative Embellishments Monthly Challenge for October is to take inspiration from at least one portion of this image... with the added twist of adding wings or something with wings.


Well now any Halloween lover would have a field day with this because it is chock full of fun spooky, creepy goodness!  Here is what I have made...


Isn't that great - even if I do say so myself!  I wanted a creepy, ancient tombstone and I think I've achieved that.  The Tombstone it's self is cut from 3/16" plywood so it's very sturdy and takes lots of layers very well.


The skull is actually from the Skull Shaker kit. It was on my desk waiting to be turned into a shaker but it was the perfect size for this project so you gotta do what you gotta do. I sacrificed the shaker for the tombstone.  I also used these highly detailed Angel Wings. I purposely attached them upside down to give it a more menacing look. The skull also has a Raven sitting on top his head which can be seen in the first photo.


I cut the letters from foam core board freehand. 


I also added the Corner Spider Web, Thorn Flourish Pair and a worn and weathered Crow Skull.


This is one of my favorite Halloween pieces I've ever made! I'm thinkin' I need to make more of these and set them out on Halloween.


Here are some "in the process" photos - they are pretty self explanatory.


Foam Core Board (1/4") - used for the bottom of the tombstone to give it depth and for the letters as well. Very easy to cut into any shape and adds lots of dimension.


Grey acrylic paint with sand added.


Sponged on darker grey and green to add shadows and "mossy" look. 
Dripped watered down black acrylic paint for years of filth...also used on both of the skulls.


Flicked on watered down white acrylic paint for specks of gunk - LOL!!


So there you have it....my creepy, ancient tombstone!


Supplies:

Creative Embellishments - Tombstone, Skull Shaker, Raven, Angel Wings, Corner Spider Webs, Thorn Flourish Pair, Crow Skull

DecoArt - Acrylic Paints - Grey, Green, Black, White

Foam Core Board 1/4"

Beacon 3in1 Adhesive

Sand

Monday, October 5, 2020

Creative Embellishment Holiday Truck

 Good Monday Morning Friends!

I hope you all had a wonderful weekend! Today I have a fun project for you featuring one of Creative Embellishments fun large size wood pieces - Pick Up Truck.  It measures almost 5" x 12" so it's much larger than their chipboard pieces making it great for wall art, home decor and gift ideas.


I did something a bit different to color it. It's something I've been doing for a while now and just never thought to share it.  I use this technique on both wood and chipboard. It seems to give the finished piece a nice vintage look which as you know I love.


I start off by painting the piece white - either using white acrylic paint or for smaller pieces white paint pen.  It doesn't have to be perfect, just get most of it covered with a bit of paint. It doesn't matter if the wood/chipboard shows through a bit, it will be covered in the coming layers.


Next use dye inks to color in the various portions of the truck. I started off with the wheels  but then got so engrossed with the process I forgot to take additional photos! I used Memento Dual Tip Markers and Memento Dye inks to color this piece. I just kept layering different colors on top of the previous until I achieved the look I was going for.


As you can see some of the white shows through in some areas while others are completely saturated. I used 4 different shades of red, a few shades of brown, black and even a touch of purple here and there to add deep shadows.   It's all very fluid and I blend most of it with my fingers/hands to get the "look". 

Now of course this is really cool as it is but I had an idea. I wanted my truck to haul various items for each season. Yes I could have just glued whatever I wanted to haul to the back of the truck BUT I had an idea.  


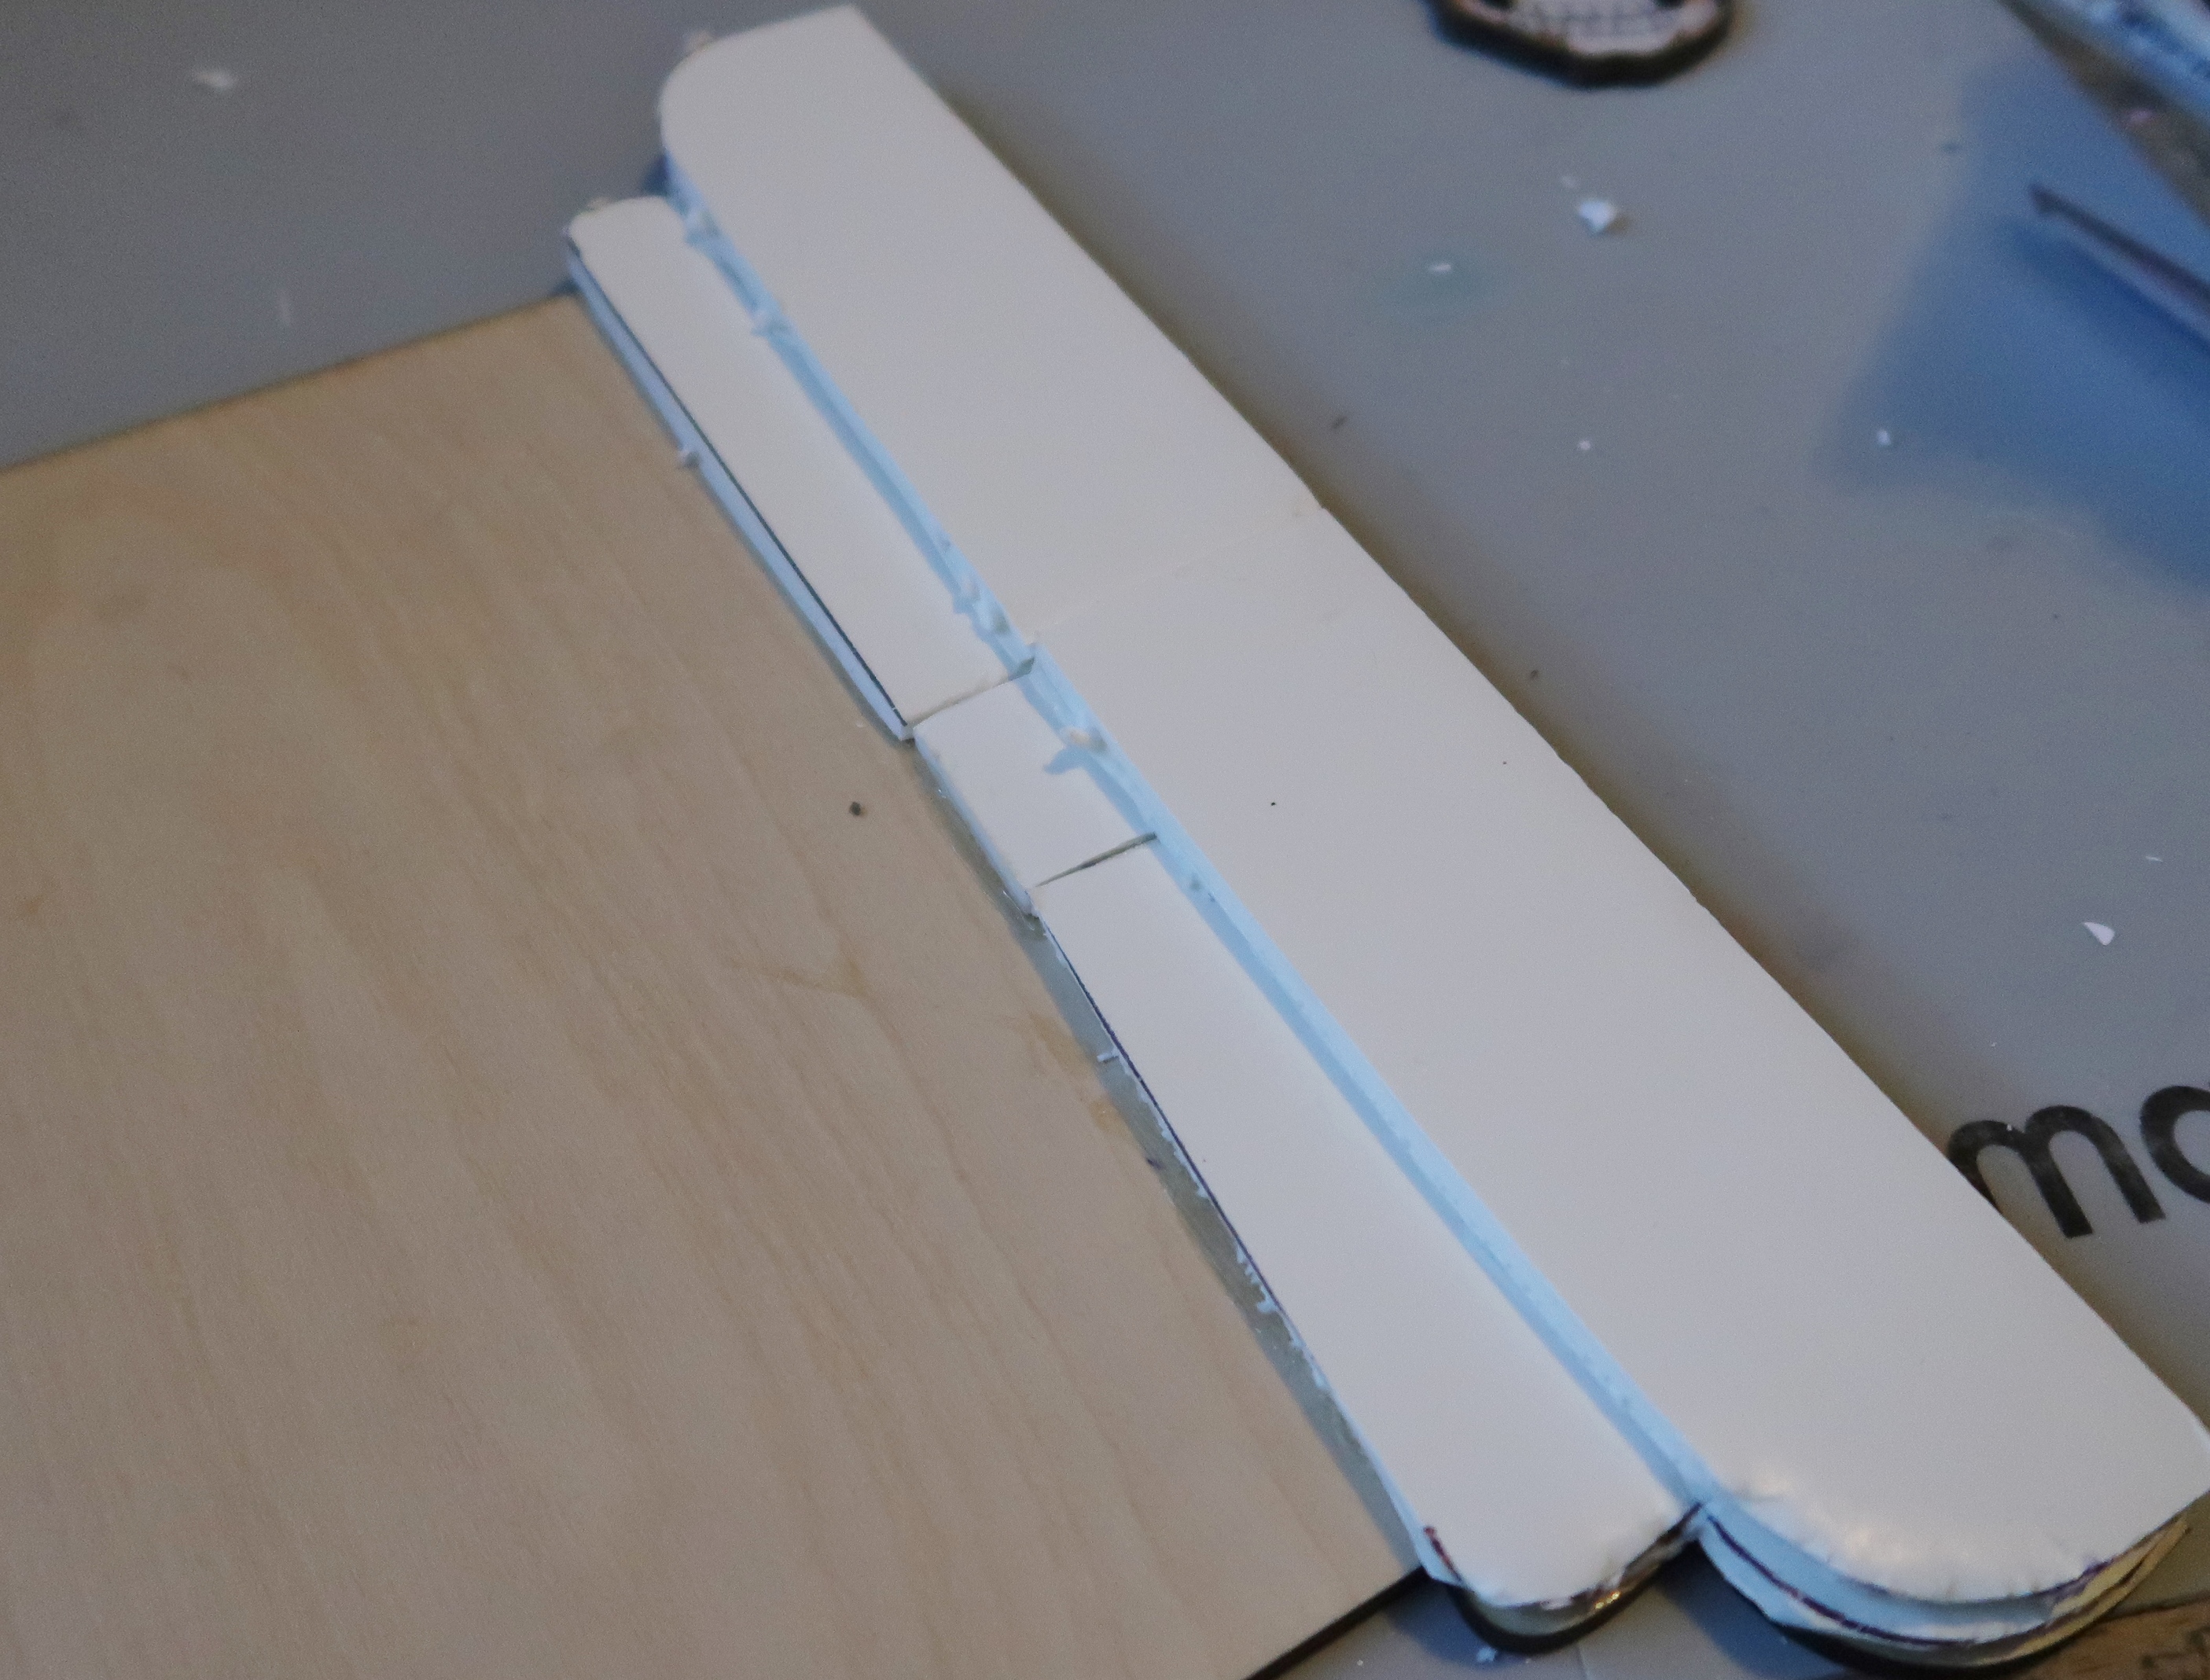
I glued a strip of foam board to the back of the truck right under the rack.


I then painted a piece of chipboard black on one side (the side that would show in the back of the truck) and glued it to the foamboard.


This created a little pocket between the rack and the chipboard.
 Just enough space to slip in my load.


I painted some chipboard pumpkins (Pumpkin Set) in the same way I did the truck. 
When dry I glued them together to form a stack.


Slide them into the pocket....


And now my truck is hauling it's very first load of pumpkins to market!


I had some pine trees (Tall Trees) in my stash so I painted those up as well, 
glued them together and....


I've got all sorts of ideas of things to haul for other holidays and seasons. 
I can't wait to fill it all year long!

Supplies:

Creative Embellishments - Pick Up Truck, Pumpkin Set, Tall Trees

DecoArt - White Americana Acrylic Paint

Imagine - Memento Dye Ink, Memento Dual Tip Markers