Showing posts with label Ephemera. Show all posts

Monday, May 5, 2025

Wish Upon A Star

 Hello Friends

Today is the day I get to share my inspiration makes for this months theme over at Gecko Galz.

That theme is Wish Upon A Star!

Gecko Galz - Wish Upon a Star, Starlight ATC Sheet

I started off with this card I made using glitter paper to really make these lovely images pop. 


My next project was this layout in my art journal. I layered on vintage papers and the constellation papers from the Starburst ATC.  I stenciled on snow paste through a star stencil and sprinkled on glitter then spritzed the entire page with a couple shades of blue spray inks. I Then added the image, sentiment, other bits and pieces and finally the sentiment.

My next creation is a Waterfall card...when you pull on the ribbon it flips up the next image on the flap as you can see in the photos...
And finally I have a home decor piece in this plaque I made. I just LOVE this image - she is so very lovely. She has been matted with glitter paper and was mounted on a plaque that I covered with paper from the Starburst ATC collection.  The little paper stars are from the Sun Moon & Stars collage sheet which I inter-mixed with some metal screen stars.

Hope you are inspired and enjoyed taking a peek at my Wish Upon a Star creaitons.


Thursday, November 9, 2023

Elegant Ladies Pocket Letter

 I have a fun new project to share with you...My Elegant Ladies Pocket Letter!

I absolutely love making and sharing pocket letters but I hadn't made one in quite some time. One of the current challenges over at Gecko Galz is Victorian Fantasy...and this is my rendition...


I had such fun making this. I used images from Pretty Victorian's 1 & 2, Ladies in Cream and Ladies in Yellow. Another current GG challenge is Color/Texture - use a solid color and create a damask type texture. I used an embossing folder from Darice and my Golden Glitz Delicata ink pad for the background of each card.


I then added all sorts of goodies - flowers of various descriptions, lace, pearls, charms, ribbon and more.


I also had some pretty silver leaves that I cut down and made them fit the cards.


I even added an old key to one of the cards.


I used some lovely fibers, chain and charms to create a little dangle to attach in the top hole of the card sheet.


Hope you enjoy my Elegant Ladies Pocket Letter!


Saturday, November 30, 2019

Baby Things....

Happy Day Friends 

I hope you all survived Thanksgiving and Black Friday.
We had a nice Thanksgiving with family and didn't even attempt any Black Friday shopping. I can't stand crowds on a good day much less on a day where everyone is crazy with the day after Thanksgiving sales. I do about 98% of Christmas shopping on line - it's quite, calm and best of all - no people pulling things out of my hands :)  LOL!!!

It's not often I get to make things for/related to babies so recently it was a nice challenge. The lady that heads up the Craft Therapy program at our local library adopted a sweet little guy recently, her first class back Mom and I gave her a few gifts.

I wanted to make something that they could hang in his room now and that he could enjoy later on in the future so I made this...


I used Creative Medium to adhere bits from a map of Indiana.


As it turns out she loves Scrabble so spelling his name out in the tiles was perfect.


I added some keys...as he holds the keys to his parents hearts!
These are a die from Gina Marie Designs. Love how intricate they are and since they were cut from Rinea Foiled Papers they really look like they are metal.

I made this card to go along with. I used Rinea Foiled Papers for the background, pin and sentiment. The dies are all from a set by MFT.

It's fun to step out of the norm and create something a bit different.
Have you had the opportunity to create for a little one recently?

Supplies:

Rinea Foiled Papers - Sapphire/Gold Glossy, Sapphire/Sapphire Starstruck; Silver/Gold Glossy; Turquoise/Turquoise Starstruck, Ruby/Gold Glossy
Imagine - Creative Medium, VersaFine Clair - Blue Belle, Sponge Daubers
Gina Marie Designs - Key, Heart
MFT - Baby sentiment, Pin, Diaper dies
MDF Letter
Scrabble Tiles, Twine, Indiana Map
Cardstock

Friday, July 26, 2019

Playing - Masterboards!


Recently I decided I just wanted to play with inks and embossing powders and well, let's just say I wanted to get inky. I decided that making a masterboard would fulfill my needs.


I started out from a page from an old atlas...the pages with all the city listings. I love these pages - so much potential!  I started inking...scraping the ink across the page with a squeegee this way and that. Dragging lots and dragging a little.


Next a bit of stenciling


Some stamping, some embossing even a bit of pen work and doodling.


And I ended up with a whole sheet of inky goodness to create with.
I made 5 cards, 2 ATC's and I even had left overs that I'm going to use as book marker/tags.

If you'd like to see the full tutorial, please check out -


Stamp - Craft Consortium - Wildflower Meadow - Fresh Cut

Stamps: Sunny Studio - Lemons; Rubber Stamp Tapestry - Sentiments

Stamp - Unity - flower; Stamplorations - Leaf Stencil; Circle Grid - vintage unknown

Stamps - Rubber Stamp Tapestry

Stamps - Sunny Studios

Collage Images & Sentiments - Finnabair

Have a lovely day friends!


Friday, March 30, 2018

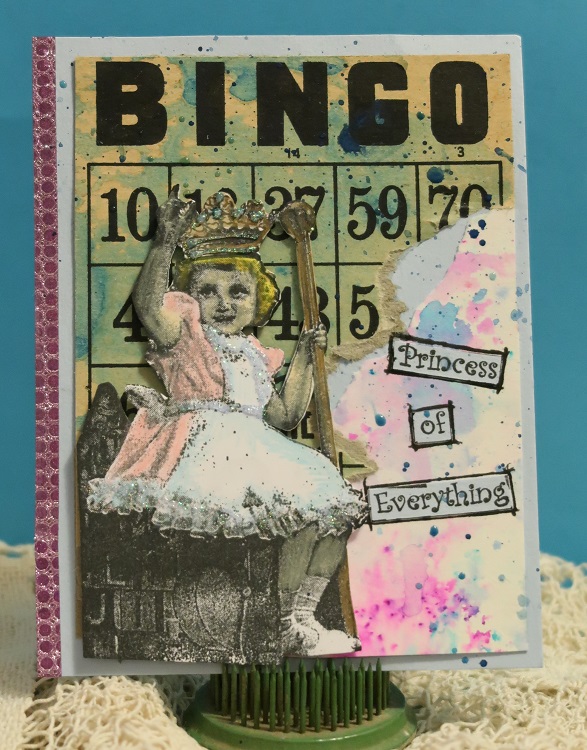
Princess of Everything!

Just playin' around with one of my stamps I haven't used in a while...Princess of Everything!  Isn't she great? 


The card is assembled using an old bingo card that I swished around some watercolor paint, the white piece in the lower right corner was made by sprinkling on a bit of Nuance powdered pigments on watercolor.   After I stuck them down to the card I flicked on a bit of blue watercolor paint.  

The little princess was stamped with VersaFine Clair Nocturne ink and then colored with Prismacolor colored pencils.   I fussy cut her then pop dotted her onto the card.  The sentiment which is actually below the image when stamped was cut, glued then outlined.

I added the sparklie washi tape to the side just for an extra bit of bling.  You can't see it in this photo very well but her pinafore has a bit of micro fine glitter along the edges as well.

This card fits into the challenge over on Lost Coast Portal to Creativity's challenge: Say What??


Supplies:

Lost Coast Designs - Princess of Everything
Imagine - VersaFine Clair - Nocturne; On Point Glue; Tear It Tape
Nuance Pigment Powders
Prima - Watercolor Paints
Prismacolor Colored Pencils
Washi Tape 
Vintage Bingo Card

Thursday, February 15, 2018

Steampunk Inventor Gothic Arch

Last Sunday was Thomas Edison's birthday...he was and in my mind will probably always be one of the great inventors of our time.  In honor of his birthday they named February 11th National Inventors Day and I made this fun Gothic Arch to celebrate them both!


There's a little bit of everything on the arch...vintage ephemera, stamping, die-cuts, Vintage Creative Medium (my favorite), Metallic Creative Medium (Bronze, Silver, Gold and Copper); lots of embossing powders on the Gothic Arch base (red, copper and patina) as well as the fun vintage images.  I love when I can mash 'em all together to make something like this.

If you'd like step by step instructions 
and a complete list of supplies you can find it here - 


Tuesday, February 23, 2016

...what makes you Beautiful.

This month over at Our Creative Corner the challenge was to create a project focused on sewing...


 "Fabrics, wool, threads, lace - this months challenge is all about texture, layers and loveliness!

What scraps have you got hidden away? Any snippets of favorite clothes you can't bare to part with?

Anything sewing related can be used in your piece. You could use hand stitching or get out the sewing machine and don't worry if you are not a fan of sewing - why not try drawing in some fake stitches?  

Don't forget to get out your sewing themed stamps and dies.
Have fun and create something!"

*****************

SEW...I decided to take up the challenge
and here is what I created...


I started off with a piece of chipboard for my base to which I started adding layers.  A bit of white paint to start off with, then I adhered a bit of vintage sewing pattern tissue, bits and pieces from the envelope the pattern came in.  These were adhered using Sparkle Collage Pauge which has glitter in it to add a bit of sparkle!  After it had dried, I stamped stitches and sentiment (ClubScrap), and added  all sorts of vintage sewing items from my collection!   It's been a while since I made a collage and it felt so good!   I'm so glad I decided to join the challenge.


I added a couple of eyelets at the top and a pretty ribbon to hang it from.

Take It, Make It Challenge
TEXT ME!

As it happens this also fits into the challenge at Craft Stamper Magazine as their challenge this month is TEXT ME....use text in somewhere in your project.  I used the text from both the vintage pattern tissue paper and the text that was cut from the vintage pattern envelope it's self in the background.

and

Our Players Badge for Your Blog

Glitter!

I'd also like to enter it into the Mixed Media Monthly Challenge as the collage glue I used had glitter in it - making it sparklie all over!


Supplies:

ClubScrap.com - cardstock, rubber stamps, ribbon, heart brad
IMAGINE Crafts - Memento Ink, StazOn Ink
DecoArt - White Acrylic Paint
Sizzix - Die-Cuts
Collage Pauge - Sparkles
Vintage Sewing Pattern, Buttons, Lace, Sewing Ephemera - My Collection
Cardboard, Eyelets

Monday, September 28, 2015

Autumn Mixed Media Frame

Today I wanted to share a fun project with you that incorporates some of my favorite mediums in a nifty frame fit for all of your Autumn memories!


Let's begin!


I am using a frame that I found at Darlington Farms a couple years ago...it had a giant rubber band which was meant to hold the photos to the frame.  I took those off and will use them for another project someday.  So I'm left with a nice white canvas to begin.  Now since I know you can't go back in time to buy a couple of these frames yourself there are lots of alternatives - you could get a piece of MDF cut to size, use a canvas, a piece of book board, chipboard, game board, heck you can even use an old book cover if it's large enough for your needs.  Like I always say - use what you have on hand.


Tear up a couple pages from a book - they can be old, new, or in between.  I am using some pages from a really old book I have that's in a foreign language (no clue which one).  I am using Antique Creative Medium to adhere the pages to the frame making sure I work out any bubbles under the pages.


When I had the pages glued down I smeared a bit extra Creative Medium on the right side of the frame as well to add instant age to the piece.  Be sure to apply it to the sides of your frame as well as they will show once it is on display.  If you're an over achiever you can add it to the back if you'd like.  I'm not that ambitious so I just did the sides ;)


While the frame is drying I embossed a few Stamptangle Leaves with gold embossing powder.


Which I colored with a few different colors of Brusho Colour Crystals - Orange, TerraCotta, Scarlet, and Yellow Ocher. 


As the leaves were drying I tied on a bit of orange raffia.


Then glued on the leaves and added a few sequins.  It was o.k... but it was still a bit plain for my taste ~ you know I have a hard time with white spaces.


Soooo I pulled out my Spiced Chai StazOn and stamped a crackle design here and there; used a Sponge Dauber and added a touch of Ganache StazOn and finished it off with a spritz of Bronze irRESISTible Texture Spray!


And there you have it!

Supplies:

IMAGINE Crafts featuring Tsukineko: Antique Creative Medium; Diamond Trowel; Sponge Daubers; StazOn - Spiced Chai; Ganache; irRESISTible Texture Spray - Bronze; VersaMark Ink; Gold Embossing Powder
Just For Fun Rubber Stamps - Stamptangle Oak Leaf; Stamptangle Maple Leaf; Crackle Background
Brusho Colour Crystals
Watercolor Paper, Vintage Text, Frame, Sequins, Raffia

Friday, February 13, 2015

Steamy Valentine's Card w/ IMAGINE Crafts

I am so excited to share my favorite Valentine's card I have made this year....and it's featured on the IMAGINE Crafts/Tsukineko blog today!


You all know how much I love Steampunk goodness, well this card is full of it!  I made it using all of IMAGINE Crafts/Tsukineko's new Delicata Inks quad ink pad which includes Gold, Silver, Bronze and my personal favorite COPPER!

You can find the complete detailed instructions and supply list here - Steamy Valentine - over on the IMAGINE Crafts/Tsukineko web-site.

Sunday, February 1, 2015

UnRulyPaperArts Inspire Your Hear with Art!


Hello Friends - This weekend at UnrulyPaperArts they are hosting a fun art link up party - Inspire your Heart with Art and I thought I'd join in the fun.  Here is a canvas I made that I love...it's fully of inky, gooey, stamped goodness which is what makes my heart sing :)


This is an "in the process" photo - it's bits of all things I love - vintage ephemera, pattern tissue papers, ink, sparklie sprays, stamped images, shimmery textures and more. 

What type of art makes your heart happy?


Thursday, January 8, 2015

True Love...ATB

Today I have a fun project to share with you...
and Artist Trading Block!

I am using products from DecoArts Media line.  This is a fun newer line of products from DecoArts that is geared towards the mixed media artist.  I have to say I was very excited when I heard about these products.  Lots of fun mediums all designed to work together or on their own.  I have used several on this block....

I started off using the Matte Medium to glue down the vintage text and collage images.  I really like the matte finish - it allows you to use other mediums on top of it without issue.  I have found that many glossy collage glues have compatibility issues - especially when it comes to acrylics or color mediums you want to add on top of your collage.  The Matte Medium doesn't have any trouble and it can be used as a clear ground on many projects besides collage.  This allows your foundation to show through the upper layers you might want to add. 


Next I painted on  a layer of the Crackle Glaze which produces a fine crackling over the entire surface.  Now you might ask why I did so directly over the collage instead of a layer of paint.  Well, I wanted the fine lines but I still wanted to high light the collage underneath.


Once it had dried I rubbed DecoArt Antiquing Cream (Raw Umber) over the crackle which gives a beautiful vintage look.... 


This close up shows the lovely crackling pattern the glaze created!  I love it...very cool effect I think.


Next I cut out a heart shape from chipboard and roughed up the edges...


I then applied a layer of DecoArt Media Crackle Paste... I used a palette knife but you could use a paint brush if desired.  I wanted really big cracks so I used a very thick coating.  Thinner coats will yield more and finer cracks.


After it had dried I painted with DecoArt Media Fluid Acrylics and finished it off with a coat of the Titanium White Antiquing Cream again to highlight the cracks as I did with the Crackle Glaze but it also highlights the texture I achieved with the Crackle Paste.


And here's my finished block....


I am very excited to play with these mediums some more to test their limits and see what I can do with them.