Monday, December 31, 2007

DING DING DING!!!!

Some of you may not know what the ding means so I'll explain... I belong to a message board along with a very good friend...she started a little thing several years ago that when someone hit a "00" post in one of her swap threads she would "Ding Ding Ding" them and they would recieve a little goodie. I carried it one step further and every time I saw someone post an "00" thread I would "ding" them just for fun.


Anyway...
Ding Ding Ding
for Ink Stains!!
~ ~ ~ ~

Today in a little over one months time I had my 1,000th visitor!!! I started keeping track of it on Nov. 30th. so I could see what people were most interested in and where everyone was coming from. In that months time I have had visitors from of course the United States, Canada, England/UK, Australia, New Zeland, Sweden, Guam, Germany, and more! It's been fun to see everyone stop in and can't wait to see what the coming year brings.

I hope you've all been enjoying
my little spot on the web
as much as I have!!
Happy New Year!!!!

Crackled Perpetual Calendar for 2008!!


Another fun calendar project to welcome in the New Year! This perpetual calender is a great chance to dig those Crackle Paints out and put them to use. You know you've been wanting to ;) All components of this calendar were coated with various shades of the Crackle Paint to show the colors available and what lovely creations you can make with them.

Another plus to making this type of calendar is that everything is stored on the inside of the baking sheet!! No keeping track of various little pieces which inevitably get lost in the shuffle ;) Sooo, let's begin!

Supplies:

Ranger Crackle Paints - Various Colors
Ranger Metallic Dabbers - Silver
Ranger Archival Inks - Various Shades to match Paints
Rubber Stamps - Various stamps used to match months/seasonal themes - Autumn Leaves, TAC, Hero Arts, Inkadinkado, etc.
Calendar Rubber Stamp - Purple Onion Designs
Die Cuts - Cricut Stamped Alpha
Vintage Baking Sheet (new works but you don't get the cool patina of a vintage pan.)
Chipboard, lots and lots of chipboard!
Magnetic strips
E-6000 or other strong adhesive
Rub-ons if desired.

Instructions:

1. Measure twice, cut once ;) You will need to determine what size your finished months and days will be. This will dictate how to go about several of the following steps. The pan I used was fairly large so I was able to make my month headers 2" x needed length and numbered days 1 1/2"x 1". You will need to adjust these measurements to the size of pan you have.

To do so, measure across your pan width and divide by 7. Now subtract 1/4" from that measurement. This will be the width of your days. For example if your pan is 10" wide divide by 7 = 1.43" Now take off .25 (1/4") = 1.18" A bit over 1".

To determine height, you will go about it in the same fashion using 2/3's of the pan height. The upper 1/3 will be used for a frame & year calendar if desired.

2. Once you have determined how large your letters and numbers can be begin by cutting all numbers and months with your preferred die-cut machine. I love Cricut's "Stamped" font so that's what I used. You will need 15 - 1's (actually 14 but I like to cut an extra just in case); 14 - 2's; 6 - 3's and 4 of each additional number including "0". You will also need to cut letters for each month.

3. While your letters & numbers are being cut, it's time to start on the chipboard. Cut out 31 days plus as many extra holiday markers as desired. I tried to make at least one for each month as well as one for birthdays and anniversary's.

4. Once your chipboard is cut, paint every piece with silver or other desired Metallic Dabber.

5. It's time to Crackle**!! I used Broken China for the photo frame and numbered pieces, Faded Jeans for the day header as well as the special occasion markers (birthdays, valentines, etc.). For each month I used a color that best fit that time of year. You may choose to use one color for your entire set. It's totally up to you. This is a great opportunity to personalize it to your tastes. Set aside to dry.

**Tips on Crackle Paint

- The thicker the paint the larger the cracks. You don't want to use a very thin layer as you would acrylic paints. If you do you will get very tiny tiny cracks or no visible cracks at all. You need to have a good layer of paint in order for it to do it's job.

- Don't worry about getting an even layer, for the most part it is self-leveling and will do that for you. Actually - I didn't paint the entire piece as I wanted a more distressed look.

- Crackles take time! Don't get in a hurry...the cracks will appear, it just takes a bit of time. If you want, after you see a dull "skin" form over the paint you can hurry it along a bit by using a bit of heat on the BOTTOM side of your piece. (I normally do this because I don't want to wait ;) lol!!)

6. This step is totally optional but adds a lot of character to the calendar. Stamp various images onto each month using Archival Ink. For example, I used snowflakes for January, hearts for February, etc.

7. Now that you've achieved amazing crackles and stamped cool little designs on your months, apply the letters and numbers to each piece. (set aside the special day pieces for now.) To help me make sure I didn't repeat or skip any days I laid them out side by side after I made each one. Trust me, if you don't it will get very confusing!

8. Special Days - You may personalize these days with whatever materials you like. I used several rub-ons and stamps but you can also use stickers, printed images, ephemera, etc. Whatever your heart desires.

9. Optional - Stamp or print the entire year onto a piece of chipboard that has been coated with silver Metallic Dabber.

10. Apply magnetic strips to each piece using a strong adhesive. Set aside to cure.

11. Stamp flourish or other designs to the baking sheet. I used Autumn Leaves Fancy Flourishes & Silver Dabber paints.

11. Assemble the current month on the "front" of the baking sheet and store the remaining pieces on the back side.

Your calendar is now ready to be used!! :)

Hope you enjoy this project...if you decide to give it a try, please be sure to share your creation with us by posting a link in the comments section. We'd love to see your take on this project!
Wishing you all the very best in the New Year!!!!!!
Happy Inking Friends!!

Wednesday, December 26, 2007

Wine Glass Charms


Here is a fun and timely little project that will satisfy your inky craving while avoiding the guilty feelings of "Oh, I should really be doing...".

Why you might ask? Well, they are not only inky fun but they are practical and useful as well. Wine Glass Charms! They can be given as hostess gifts or used at your own parties and come in perfect time for all of your New Year's parties you may be hitting in a few days.

These little gems are fairly quick to make, use a few supplies which you may already have on hand and can be personalized by using any stamps you have in your arsenal!


Supplies Needed:

Rubber Stamps (Image in the example is from B-Line Designs)
Ranger Adirondack Alcohol Inks
Ranger Adirondack Metal Mixatives
Ranger Archival Ink (Jet Black)
Ranger Posh Accent Pen
Shrink Material
Sizzix Large Dog Tag Die
Hoop Earring or Wine Glass Charm Findings
Jump Rings
Beads

Instructions:

1. Begin by cutting several tags from the shrink material using the Sizzix large size Dog Tag die. I used 8 for this set but you can make as many as needed.

2. Stamp desired image (images) onto the tags using Archival Ink. You may use the same image on each of the tags as I did or mix it up.

3. *Shrink the tags according to mfg. recommendations.

4. Place the tags on the Non-Stick Craft sheet. You will flip your tags over so that side that has not been stamp is facing up. This is the side that you will add apply the alcohol inks on.

5. Apply Alcohol Inks in desired color combinations on each tag. For this example I used Cranberry, Butterscotch, Terra Cotta, Pesto, Denim & Wild Plum. You may also apply a Metal Mixative as well. I used the Silver Metal Mixative with each color.

6. Once all of the tags have been colored with the Alcohol Ink, use the Posh Accent Pen to highlight the edges and tag hole. Set aside to dry.

7. Add beads to the wire findings.

8. Using a jump ring, attach the shrink material charms to the beaded findings.

You're done!
It's time to give them a test run ;)


Additional Tips & Helpful Hints:
-Stamped Images - If you don't want to use the same image for each charm, mix em up! Make a set to match the particular holiday or theme. Use various sayings for each charm. Personalize the charms by adding each guests name to the charm. The possibilities are endless!

-*Shrink first - Alcohol Ink later!! You will want to apply the inks AFTER you shrink the tags. If you don't the color will become so intense as the tags shrink you won't be able to see the image stamped on the other side. You will be able to control the color application far better once the tag has been shrunk.
-Many places sell wire findings specifically for Wine Charms but it may pay you to look around a bit. You may find that wires for hoop earrings come in larger packs for less money! I know that was the case when I was shopping. I was able to purchase a bulk package of hoop earring wires (48) for the same amount it would have cost for 12 "Wine Charm" wires!

-Beads - Unless you're going with a specific color scheme or theme, don't be afraid to mix the beads up a bit! This will be an additional characteristic to help your guests keep their drinks straight. Besides, it's a great way to use up all of those spare beads left-over from previous projects!
Happy Inking Friends!!

Monday, December 24, 2007

Merry Christmas To All!!

Wishing you all the very Merriest of days
spent with family and friends!!


(((((((((((((((((HUGS)))))))))))))))))

Roni

Sunday, December 23, 2007

Last Minute Gift Ideas!

For those of you like me who may still be trying to find that perfect gift for someone on your list here are a few quick and easy Christmas gifts. By using supplies you may already have in your stash you can spruce up those bargain finds from your local dollar store or discount shop.

The first gift you can make are Personalized Stamped Candles!

Supplies you will need: Pillar candle; tissue paper; rubber stamps; inks & pigment markers; heat gun; embellishments (if desired).


Instructions:

*Stamp images onto tissue papers. *Color images if desired. *Wrap stamped tissue paper around the candles. *Heat the tissue paper and candle until you notice the tissue starts to disappear into the wax. *Continue moving the heat gun over the entire piece of tissue paper until it has completely disappeared. *Embellish if desired.


The next quick and easy gift is an Embossed Tin Star with a bit of cheer! This is just one of those inexpensive tin stars that can be found at most discount stores or craft shops. I covered alternating sides with Perfect Pearls in Forever Blue and Perfect Pearl (white). Added Stickles to each hill and valley. Attached a gemstone to the center and called it done! It's a perfect little hostess gift or for unexpected company.


This is one of my favorite gift ideas because it is made with alcohol inks! You can take any glass frame and spruce it up to make a wonderful gift for anyone on your list. This particular frame was very nice but it lacked something. By covering the back of the glass with Wild Plum, Eggplant and Denim Alcohol Inks along with a touch of Silver Metallic Mixative it gave it that added spark needed to create a beautiful frame. I also added some Prima flowers and gemstone centers for a finishing touch.


The last quick gift is a decorated light switch....I know, sounds odd but my 14 yr old niece LOVED hers!!

You can pick up embossed light switches at most any home improvement, discount or hardware store for a few dollars. They come in many designs in all of the usual combinations. To decorate, simply fill in the embossed areas with coordinating colors of Stickles Glitter Glue and let dry. It will take a few hours until it is completely dry because there is no paper to soak up the extra moisture as usual but the results are well worth the wait! It makes for a fun and funky gift in minutes for under $5.00!


I hope these quick and easy gift ideas will help you out with any last minute gifts you might need :)


Wishing You Inky Fingers!!!

Friday, December 21, 2007

Alcohol Inked Coasters

Coasters are a quick and easy gift for anyone on your list or just to have on hand for those "just in case" moments! Here is a quick little how to on whipping up a set of coasters in no time.


If you know me, you know how much I LOVE Alcohol Inks. They are just so much fun and there are endless possibilities on color combinations you can come up with. The cool thing about Alcohol Inks is it's NEVER the same look twice. Yes, the techniques are the same but the look it's self is always different. You can add color, remove color, blend colors, puddle colors, etc. The more you play, the more looks you achieve. They are just remarkable!


I like to use the "tumbled" tiles as they have a bit more character than the plain tiles but virtually any tile will work. You can use the 4" size for coasters but the larger 12" tiles work great for trivets and can be made in the same fashion as the coasters.

When you're at your local home improvement store you might want to check, it's usually less expensive to go ahead and buy a box of the tiles as opposed to purchasing smaller quantities. I saved almost half the cost by buying in bulk.


Supply List:

Ceramic Tiles (from local home imp. store)
Ranger Adirondack Alcohol Inks
Ranger Alcohol Blending Solution
Ranger Alcohol Ink Applicator/Felts
Ranger Archival Inks
Rubber Stamps
Acrylic Spray Sealer (Krylon or Plaid)
Self-Adhesive Cork (for base)

Instructions:


1. To begin I always clean my tiles using plain water and a soft cloth. This removes any dust, dirt and debris that may have gotten on the tiles during the manufacturing process and storage at the home improvement store (they aren't the cleanest places in the world).

2. Apply Alcohol Inks as you would on any other project. Use 1-3 inks as desired in any color combination you wish. (this is the fun part!!)


3. Stamp images using Archival Inks. I like black because it shows up the best on Alcohol Inks but you can use other colors. Let this dry. It may take a while so don't get impatient. I like to speed up the process some by heating with a heat tool but it's not necessary.


4. Edge the tiles with Post Accent Pens or leave plain.


5. Mist with a light coat of Acrylic Spray Sealer. I find that Krylon or Plaid varieties work best. Let dry.


6. After the tiles are dry, attach cork to the bottom of each coaster.


Your coasters are ready for use or gifting!! :) These tiles are always a big hit whenever I have given them as gifts. Something practical but still artistic and fun!

Take time today and Get Inky!! :)

Holiday ATC Swap Cont.

Here are the ATC's I made for the Holiday ATC Swap :)


Ranger - Alcohol Ink, Distress inks, Archival Ink (black), Glossy Accents, Accent Pen; Images - Clock - Frances Naeve - Hearts In Touch; Hand & Calendar - Purple Onion Designs; Sentiments - TAC.
Ranger - Alcohol Inks, Archival Jet Black Ink, Stickles; Stamps - TAC

Ranger - Alcohol Inks, Archival Jet Black Ink; Stamps - TAC; Watercolor Pencils - Staedtler

Ranger - Archival Jet Black Ink, Stickles; Watercolor Pencils - Staedtler; Witch - TAC; Sentiment - Viva Las Vegas

Ranger - Archival Sepia, Jet Black Inks; Distress Inks, Sepia Accents; Turkey - unknown; Sentiment - TAC

Ranger - Archival Jet Black Ink; Distress Inks; Stickles; Stamp - Inkadinkado

Thursday, December 20, 2007

Holiday ATC Swap Results!

I recently hosted a Holiday themed ATC swap on about.com's scrapbook site. The participants could make an ATC for any holiday through the year. Without further delay...here are the results!! Enjoy :)
Spell - Theresa; Noel - Susan; Naughty - Shannon; Merry Christmas - Nanette


All of these were made by Tabitha.

All of these were made by Crystal.

I want to thank these ladies for sharing their wonderful creations! It is so much fun to see what everyone comes up with.

I will be posting pics of mine tomorrow :)

Tuesday, December 18, 2007

Faux Watercolor Stamping

I LOVE this technique!! It is a quick and easy technique that is often over-looked. With just a few basic supplies and a bit of time you'll be creating stamped images that really look like they are mini watercolor masterpieces!

As you will see the results are amazing and it only takes a few minutes to give it a try. Inking up the image is the most challenging part of this technique but after a few trys you'll get the feel for the inking technique that works best for you.

NOTE about the rubber stamp. This technique works best with bold images. Fine line stamps don't yield the same striking results as the bolder images. Keep this in mind when selecting your stamps.

Supplies:

Dye Inks
Rubber Stamps
Mister filled with water
Cardstock
Heat Gun (if desired)

For this example I am using Ranger Adirondack Raspberry, Purple Twilight and Nick Bantock Chrome Yellow Dye Inks.


1. Ink your rubber stamp. You will do this by dabbing on ink onto various sections of the rubber stamp. This may be done in a variety of ways. I prefer dabbing the ink on directly from the ink pad. Start with the lightest color first and continue on gradually adding darker colors. Another method to try would be applying inks using a blending pen. Pick up the ink with the blending pen and "coloring" the stamp in the desired areas. You could also pick up the ink with a piece of Cut & Dry Foam and dab it onto the desired areas as well. Each works equally well, you'll just have to decide which method works best for you.

2. Now that your stamp has been inked mist the stamp with water. I suggest using a fine mist spray bottle such as the Mini Mister from Ranger. A regular spray bottle dispenses much larger droplets of water which may distore the image resulting in poor results.


3. After misting, immediately stamp the image onto your cardstock.


4. Let dry or speed drying using a Heat Tool.


5. Enjoy the results!!


The dragonfly image was stamped using Denim & Lettuce Adirondack Dye Inks.


I hope you will give this often over-looked but stunning technique a try :) Feel free to post a link to your creation in the comments or send me a scan of your card and I'll be happy to share it here with everyone!

Happy Inking my Friends!!

Monday, December 17, 2007

Background Stamp Tips

Background Stamps - you know those very large stamps (usually 4-6”+) with multiple images or a pattern across the entire stamp. They look so neat in the stores but once you get them home they usually end up sitting in the draw forgotten and unloved.

Large and unhandy, they just aren't as fun to stamp with as some of my smaller images. It's hard to get good image quality because you don't know if they're inked completely. I can't get my image stamped straight, it just won't line up on my paper. My stamp isn't large enough for the card so it looks funny with white edges. All common complaints I hear about background stamps

Well....Dig em out! It's time to start using them again!!

Here are 5 tips for making them easier to use:


*Instead of taking the stamp to the ink pad, bring the ink to the stamp. Don’t try to ink up these types of stamps as you would a normal sized stamp. Instead, place the background stamp on your work surface and pick up your ink pad instead. This is a much more efficient way to ensure the entire image is covered with ink rather than finding it out after you‘ve already tried stamping the image.

*Stamp more of the background than you think you will need or stamp off the edges of the paper. By doing so it will add a certain flow to the back ground and give natural look that you just won’t get other wise. This will also erase any mistakes caused by a stamp that wasn’t properly aligned or missed the mark.

*Edge your stamped background with black ink or the same color of ink that you used to stamp the background. It will soften harsh edges and give it a finished professional look. Try the Ink Blending Tool - it will also help erase any misaligned images by covering those mistakes up with ink ;)

*Try mounting your background stamped papers with a piece of black, white or complimentary colored cardstock. This will really help your background piece pop!

*Clean background stamps in the same manner as inking.

Now, it's time to go and dig those stamps out and fall in love with them all over again!!

Saturday, December 15, 2007

Random Winners for 12/9 - 12/15

Woo Hoo!!

We have a couple of random winners for the week :)

I gave each person a number (by the order posted) and had Random Number .org pick our winners :)

The first winner is.....

are you ready????

She

is

Ann - VexedAngel :) Woo Hoo ~ congrats Ann!!

and

our

second

lucky

winner

is....

Karen L !!! Yeah Karen!!

Congrats to you both :) Your goodies will be in the mail on Monday!!

Remember everyone you all have a chance to win simply by posting your comment on any thread you wish :) Every time you post is another chance to win!!

Good luck and congrats ladies!!

Friday, December 14, 2007

Mini Color Album

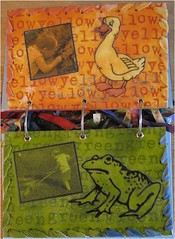
Here is a great gift idea for the little ones on your Christmas list!! It's a personalized mini Color Book. It makes a great gift to help learn colors, animals and get to see themselves in a REAL book :) This book was made for my nephew Matthew. This is where Ranger's Adirondack color line come in sooooooo handy. You can dye your papers, images, photos, twill, etc. with the Color Wash Dye Inks then stamp with their coordinating Ink Pads! It makes this project so easy because there is no time wasted trying to find inks and dyes to match!


My Color Bookby Roni Johnson

Size: 5"x8" + book rings & ribbon


Supplies:


Ranger Adirondack Color Wash Dyes - Red Pepper, Terra Cotta, Butterscotch, Lettuce, Denim, Eggplant & Espresso

Ranger Adirondack Dye Inks - Red Pepper, Terra Cotta, Butterscotch, Lettuce, Denim & Eggplant, Black, Espresso
Ranger Adirondack Pigment Pens
Ranger Decor-It White Ink

Ranger Archival Ink - Jet Black
Ranger - Stickles, Glossy Accents, Sepia Accents

Chipboard (several sheets, enough for each page + front & back covers)

White & Colored Cardstock

Printed Coloring Page Animals

Cold Laminate Sheets

Photos of your subject

Alphabet Stamps

Natural Twill (optional)

Ribbon lots and lots of Ribbon

Book Rings

Crop - A - Dial or other Hole Punch

Eyelets

Iron (if desired)


Instructions:


1. Start by printing off desired coloring book pages to be used on each page of your book on white cardstock. I used animals but it could be dinosaurs, kittens, dogs, cars, etc. Whatever you think the little one will like.

2. Print off photos to be used on each page and the front cover.
3. Trim photos & cut out coloring page images. Color any parts of your coloring page images that you don't want to be the color of the dye ink. Once colored, cover with Glossy Accents. If your coloring page images have eyes that need to be white, cover these with Glossy Accents as well. (Note: The GA will resist the dye in later steps. )
4. Determine the size you want your finished pages to be. I made mine 5x8 so I could use 8 1/2x11 sized sheets without any waste. The twill is optional but I think it gives the book a nice edge for little hands. To cut the twill, you will need to measure 3 sides (2 short & 1 long) of a page then multiply by 2 - this will be the length you need to cut your twill for each page.
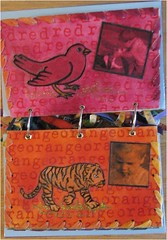
5. I normally don't do a whole lot of writing things down ahead of time but for this project you will need to in order to keep everything straight. Make a list of what images you want to use on each color page - for example: Red, Bird, Photo #2, Orange, Tiger, Photo #3, etc. You will want to label each piece of cardstock, coloring page image and photo on the back side. (Trust me, this sounds like a pain but it will make things go much smoother in the next step.
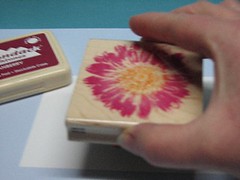
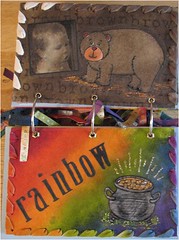
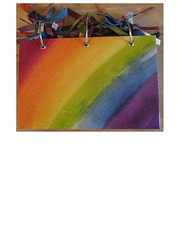
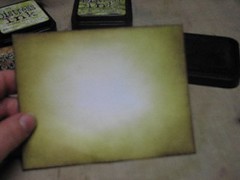
6. It is now time to dye all of your pieces!! You will dye a sheet of cardstock, coloring book image, photo for each color. To dye, lay your pieces out and spritz with the color dyes. If you get an image too dark simply spritz with water to lighten the dye. To dye the rainbow page, front and back covers spray each ink in an arch pattern across the pages.
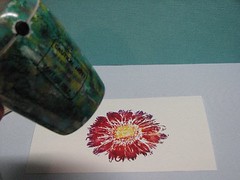
The twill can be dyed in any combination you desire. I dyed my twill 1/2 and half. One color for one side of the page and one for the flip side. Everything must be completely dry before you can move on. (Note: if you're impatient like I am you can use your iron to speed things up!)
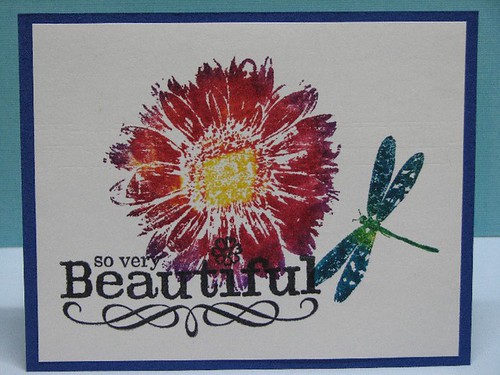
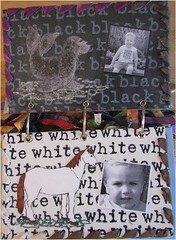
7. Once everything has dried you're ready to start stamping. I used a set of My Sentiments Exactly Alpha stamps for the background color names. Spell out your color and stamp, stamp stamp. Be sure to stamp some off the edges and mix things up a bit so the finished page looks natural. Repeat for each color. Once you have finished with each color, set aside.
8. Time to embellish your coloring page images. Add Stickles, Accents (Glossy, Matte, etc.). If desired, highlight each line with Glossy Accents for added dimension. Set aside to dry.
9. Mount each photo on cardstock. I mounted all of the photos on black cardstock so I didn't detract from the color.
10. Adhere each piece of dyed cardstock to your chipboard pages.
11. Attach dyed photos and coloring page images to the color pages.
12. Cover each page with color laminate sheets. This will protect the pages from dirty little fingers and prolong the life of the book.
13. Attach individual pages to the corresponding following pages. For example, you would attach the "Let's learn our colors" intro page to the Red page, Orange and Yellow back to back, Green to the back of Blue. Make sure all pages are oriented in the correct direction. Now is the time to fix it! After the holes are punched it will be too late.
14. Punch holes in each page using the Crop-A-Dial. You will need 3 holes on the top of the page. Attach eyelets in these holes. If using twill on the edges, holes every 1/2 - 3/4" around the other 3 edges.
15. Weave twill around each page. Cut off any excess and tuck tail between pages.
16. Thread each page onto book rings and tie ribbon around rings.
17. YOU'RE DONE!!! Time to give it to your little one and watch his or her eyes light up :)
Hope you enjoy the book and give it a try. It will become a cherished heirloom passed down for generations!
((((((((INKY HUGS)))))))))

Another Idea for using Rubber Scraps!

Here is variation on using up those rubber scraps left over from cutting apart rubber die sheets.... Tribal African Art .

The Clockwork Cat took her inspiration from her friends decorating style and created a unique piece of art! By using rubber stamp scraps, a foam stamp that she cut apart, some alphabet stamps and a couple design element stamps she created a beautiful piece of black and white tribal artwork for a friend.

It's another very cool way to use up all those scraps :)

Thursday, December 13, 2007

Noteable Quotes

Every so often I run across quotes that I just feel need to be passed on...here are a few of my favs. from some very wise people....

“Whether you think that you can, or that you can't, you are usually right.” - Henry Ford

“If you can dream it, you can do it.” - Walt Disney

"A tail isn't a tail to them, it's just a little bit extra at the back." - Eeyore

"A little Consideration, a little Thought for Others, makes all the difference." - Eeyore

"I never leaf through a copy of National Geographic without realizing how lucky we are to live in a society where it is traditional to wear clothes." - Erma Bombeck

Wednesday, December 12, 2007

Ink Blending Tool


The Ink Blending Tool and Foam by Ranger has to be my favorite tools of all time!


This highly versatile and easy to use tool will enable you to produce many, MANY different looks and techniques. It works not only with inks but with paints, chalks, Perfect Pearls, etc. the list goes on and on. It is well worth the small cost to get started. I promise you it will be one of the few tools you reach for over and over again.


I've had lots of questions about the tool and the foam so before I show you how to use it a bit about the foam it's self.


Someone asked, "Can I re-use the foam or is it a one time use type of thing like the Alcohol Ink Applicator Felts?". Yes, the foam pieces are re-usable. They are also washable so if you decide that you no longer wish to use that color of ink simply toss it in the washing machine or hand wash and it's set to go.


Another question asked was, "Are the foam pads durable and how often do they have to be replaced?". Yes, the pads are VERY
durable. As for the second part of that question I have to be honest and say I can't answer that question. I received my original set of foam pads March 31st of 07 and they are still going strong! I have used them for MANY techniques, inked loads of projects and the foam is no worse for the wear.

"Do I have to have one foam for each color?" No, not unless you want to. I keep a set for each type of ink I use for example, I have a set used for Distress Inks, one for Nick Bantock inks, a set for Adirondack Originals, etc. A "set" consists of 8 pads, one foam pad for shades of Red, Yellow, Orange, Blue, Green, Purple, Browns, and Black. When I am working on a project that I will be using multiple shades of one color I always start by applying the lightest shade first and work my way to the darkest shade.

A frequently asked question is "Is the foam the same as make-up sponges?" NO! They are not the same at all. While you can use a make-up sponge to apply inks they are a totally different animal. Make-up sponges absorb the ink so it will take much more ink for any project you are working on. It also doesn't offer the same control as you get with the Blending Tool Foams as the cellular structure is vastly different.

I did a little side by side comparison of the two. You will notice how the make-up sponge is a bit blotchy in spots. The Ink Blending Foam is a much smoother even finish. You have much more control over light and dark applications and it takes far less ink to do the same job.

Putting the Blending Tool To Work!!

O.k., lets begin :) This will give you the basics on how to use the Ink Blending Tool.

First, place a Foam Pad onto the handle. It is Velcro so it will just stick right on. Don't worry about it coming off. I have never had a pad come off in the whole time I've used it.

Once you have the foam pad attached to the handle, pounce your blending tool on the ink of your choice. (Note: If working with multiple inks, start with the lightest shade first.) For this example I am using Distress Inks.


Starting off the edge of your paper work the ink onto the paper using a swirling or circle motion. Continue to swirl until you feel you need additional ink. Pounce to pick up ink and again start off the edge swirling inwards. (NOTE: For this technique you should avoid starting in the middle of a project with a fully inked foam piece. This will give you a big old inky rectangle where you don't want it.)
Apply as much or as little ink as desired. For this look I leave the center of the paper un-inked as shown in the photo.


You may stop here or if you wish, or you may continue to apply additional inks in the same manner as the first to build up layers of color. In the example, I applied Peeled Paint over Shabby Shutters which was applied in the first coat.

NOTE: Do not cover the entire first coat of ink with the subsequent layers of ink. I usually apply the 2nd coat half way over of the first coat, the 3rd coat half way over the second, etc. This is what gives the gradual lightening appearance on the finished project.

The paper is ready to use at any point. You may wish to stop and create your project with this or you may want to go on to this next step. It is not necessary but I love the vintage worn look so I really enjoy adding this next step and do so quite often.

Working in small sections, run one edge of your paper over a darker shade of ink. In the example I am using Walnut Stain Distress Ink.

Place the paper down on your work surface and with the Ink Blending Tool swipe the Walnut Distress Ink from the outside edge to the center of your paper.

Continue working in sections until the entire outside edge has been inked. By doing this you will create a nice "warm" finished edge to your project.


We will stop here as this piece is now ready to be used on my card. You can see in the finished example I have stamped over this background with several images and added another smaller piece that was made in the same fashion using blue inks (Weathered Wood, Broken China & Faded Jeans) in place of the green.
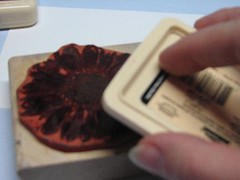
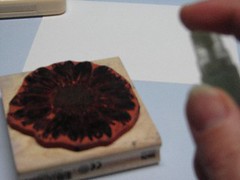
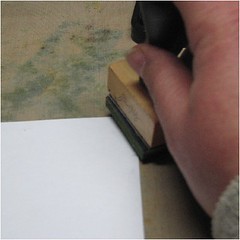
There is another technique called the Burnt Edge Technique that takes the basics of this technique one step further by heavily distressing the edges giving it an even more vintage feel. We will go over this and many other techniques using the Ink Blending Tool in the coming weeks. In the mean time, I hope this has helped clear up some of the mystery around the Ink Blending Tool and entices you to give it a try :)
Wishing you have a wonderful Ink Stained day!!

Tuesday, December 11, 2007

Flocking Part II

In addition to liquid adhesives, flocking can be added to projects using "dry" adhesives. This would include adhesives such as tape runners; ATG's (my fav!); Xyron and the red-line or "magic" tapes. 
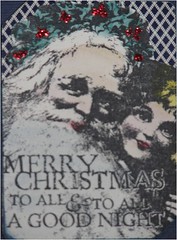
This card was made using 2 different types of dry adhesive. The snowflakes were flocked by running the die-cut through a Xyron machine and the "ribbon" hangers are made with Magic Tape.

When using dry adhesives you won't get total coverage by just sprinkling the flocking on your project as with the liquid adhesives. To coat, place your Xyron covered project (snowflake die cuts for this card example) on a clean piece of scrap paper. Sprinkle on a good amount of the flocking powder. Lift up and shake excess powder off onto the scrap paper. Now, turn the die cut over, adhesive side facing down. Press the die cut into the excess powder. Continue moving and gathering the flocking powder with the die cut. Press in various areas until the die-cut is totally covered.

I used the same method on the Magic Tape lines by applying the tape directly to the card face. Sprinkle with powder, shake off excess & press. The only difference is that I was moving the entire card around coating all three pieces at once instead of piece by piece as above.

Hope you have found this helpful :) If you have any questions, please let me know...I'd be happy to help if I can!

Supplies Used: Glossy Cardstock, Denim & Stonewash Alcohol Inks, Silver Metallic Mixative, Posh Accent Pen - Ranger; Rubber Stamps - Fancy Pants; Flocking - Hobby Lobby.