Showing posts with label Decoupage. Show all posts

Friday, October 4, 2024

If The Shoe Fits...

 Happy October!!

In the past I have participated in the 31 Days of Halloween but I don't have that much time to devote to posting every day but I do have some fun Halloween goodness to share through out the month.

Today I want to start off with a bang...

If the Shoe Fits Altered Vintage Wood Shoe Form


All of the collage images are from Gecko Galz - 


I used a sepia toned decoupage glue to give it the nice vintage look. Added some ribbons, glitter border stickers and of course Mr. Skelly.


I was so happy with my idea to make the heels...foam pumpkins! I stacked 2 "regular" pumpkins and 2 glitter pumpkins. The bottom of the shoe and center portion is covered in black glitter just for some extra shine and shimmer.

So, if the shoe fits....
go kick some Halloween butt!!

Sunday, January 14, 2024

A Lovely Valentine

 With Valentine's Day just around the corner Gecok Galz challenges are just the thing to get going on holiday projects.  Their monthly challenge for January is All You Need is Love so I created this...


It's an 8" wood heart that I decorated with lots of lovely Valentine's.

To begin I covered the heart with some sheet music that I had dipped into pink and red marbling ink. I used Mod Podge and it stayed tacky so I used a bit of mica powder to take the tacky away and add a lovely shimmer.

I then cut a pocket from the Love Me Do Junk Journal and adhered it to the heart.  I then filled it with the image of the couple and lots of fun vintage valentines.  The red hearts are some of the left-over blood from my Gothic journal page from earlier in this month. I didn't want it to go to waste so I covered a vintage book page with the remainder of the ink/glue mix.  It made a nice skin to cut these hearts out of.  

GG Monthly Challenge - All You Need is Love

Tuesday, December 5, 2023

Layers and Layers Ornament Card

 Hello Friends...

New month means new challenges over at Gecko Galz! I just love playing with collage images...there are just so many fun things you can do with them. Today I wanted to share one of them - you can take a flat image, add several layers and make it dimensional or over in the UK this is called 3D Decoupage or simply decoupage. I did that with the December Christmas Challenge image to create this card...


You can see from the photos that I added 3 layers to this ornament both at the top and bottom of the ornament.


I the embellished the card with foliage from Honey Bee stamps and a wired ribbon.


December Gecko Galz Christmas Challenge


Wednesday, March 10, 2021

Faux Blue Delft Bunny - Welcome Spring!!


So excited to share my latest project for Imagine....

Faux Blue Delft Bunny

the perfect way to welcome Spring in style!!


I love the fresh look of Blue Delft pottery and not just because blue is my favorite color either but that's an added bonus! I always associate Blue Delft with spring because of a visit long ago to Holland Michigan and their wonderful shops and of course the tulips. They have a whole area dedicated to Blue Delft pottery and it's such a pleasure to see all of the different items. My favorite have always been the animals and a bunny represents the birth and renewal of the seasons perfectly.


I decided to try to recreate this lovely pottery using a few peg stamps, ink, tissue paper and a paper mache' bunny. I am loving how it turned out. What do you think? Is this a nice welcoming of Spring?


You can find the complete directions and supply list here:


And while it's now quite Spring yet, I wish you all the best.


Happy Spring Everyone!!

Friday, August 14, 2015

Bon Appetit!

It's FRIDAY!!!!  
YEAH :)

Today I am so excited...one of my favorite projects I've made recently is up for viewing on the IMAGINE Crafts blog today.  What is it?  Better yet, the question should be who is it???

Bon Appetit...
my little ceramic French Bull Dog 
all decked out in French inspired decor and quotes from Julia Child!!!

Check him out...


he's even got a little bee on his butt - LOL!!

Hope you stop on over at the IMAGINE Crafts site and check out how he was made.

Have a creative, inky weekend friends!

Tuesday, November 25, 2014

Vintage Ice Skates into Art

Today I have a really fun bit of art to share with you.  Sometime this past summer I bought an old pair of vintage ice skates at a garage sale.  I knew they had potential and for $2.00 I couldn't pass them up!  Yes, they started out a bit grungy... but hey, it's nothin' a little paint, ink and embellishments won't fix!


I used a combination of Craft Attitude Printable Film, Altered Pages Collage Images, IMAGINE Crafts/Tsukineko Creative Medium, Luxe & Brilliance Inks and Deco Art Americana Acrylic Paint, Deco Art Media Crackle Paste & Antiquing Cream.  Throw in a feather boa and some holiday floral pieces and you get this.....


and here is a handy dandy little SnapGuide tutorial on how it was done...

Friday, June 13, 2014

IMAGINE Crafts/Tsukineko Creative Medium

Today I wanted to chit chat a bit about IMAGINE Crafts/Tsukineko's Creative Medium.   I've known about this stuff for a while and wanted to get a demo posted for you but just never got around to it (ya know...way too many things on that old "To Do" list).  BUT, I recently had a chance to play with the Vintage Creative Medium and I knew I could wait no longer!


Creative Medium comes in three different styles - Clear, Shimmer and Vintage (my fav!).  Now here is the Official blurb about it....  

"Use Creative Medium for collage, decoupage and toner-based photo transfers onto a variety of surfaces including paper, acrylic, metal and more.  Easy clean up with water."

Doesn't tell you much does it?  Most people wouldn't give it a second look with the ho-hum description.

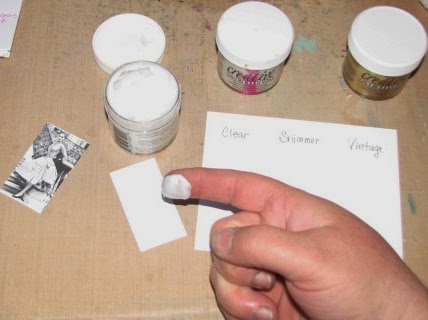
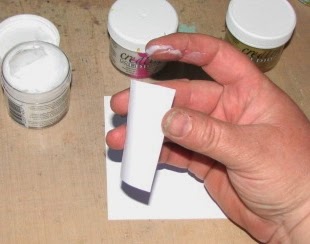
WELL, I'm here to tell you the stuff is awesome!  First off if you can tell from the photo below it's got a really great consistency.  It's got a texture somewhere between face cream and pudding.  I know, it sounds weird but hey, it's what it feels like to me ;)  Now why you ask is that a good thing.  Well if you're like me and really like to dig in and get your hands dirty (inky, painty, etc.) when you're being artsy then you'll love this stuff.  It's not runny like some collage glues/mediums so it's not going to run down your fingers or get all over your desk if you happen to knock it over, etc.  I like to use my fingers for it - you simply scoop a bit out of the jar, smear it wherever you want it and stick whatever you want to it.


Here I wanted to show you how they all three look side by side.  I took one of my favorite collage images (from the AP Collage Sheet - Ladies Who Lunch AP-477) glued it down to a piece of cardstock using the CM then covered the front of the image with the medium and added a blob at the top so you could see what it looks like close up.

Scoop up a bit & smear it on the back of the image...


I tried to show how the medium looks on the back but the flash ruined it...


I glued em down, covered them up and added a dab about each photo.  This is what they look like wet ~ they dry to a translucent finish.  The clear is just that, clear; the shimmer finishes clear/grey tint with a beautiful shimmer anywhere you put the medium (the grey in thicker layers is from all the shimmer going on) and the vintage finishes with a beautiful sepia tone!  All three have a glossy finish and if you use your fingers to apply it you'll see the "brush strokes".  I've used an Ink Blusher (like a make-up sponge) and have gotten a very nice smooth finish ~ but I like the brush strokes myself.  Totally up to you, your tastes and the look you're going for.  I finished on project off with lots of short strokes through the medium to make it look like an oil painting finish!  It was awesome.


This photo shows the mediums "almost" dry... (I couldn't wait any longer - lol!!).   I tried to speed drying with a heat tool and got a bit agressive...the thicker parts ended up bubbling a bit but it too is pretty cool.


The Creative Medium has other uses in addition to collage/decoupage techniques.  You can use it to make image transfers.  Now the jar says it needs to be a toner based image for best results.  Well, not one to follow directions I decided to try it out with an Ink Jet copy.  I was very impressed with the results.  I got a really nice transfer paper to paper - just as you would any other medium.  I tried it Ink Jet paper to Vertigo (a fun plastic type sheet from IC/T) and Ink Jet paper to metal and those worked great as well!.  I even tried a double transfer which had super results!  You'll see all of these later this month when I share another Altered Pages / IMAGINE Crafts/Tsukineko cross promo project.  I can't wait...I had so much fun making it!!

You can also mix goodies into the Creative Medium or sprinkle it on top of the wet medium to use as a binder ~ things like glitter, micro beads, mica chips, pigments or powders and more.   

Another fun thing to try is to use it paired with a stencil for a resist technique.  Simply smear the CM over the stencil, remove the stencil (and wash with soap & water), let the CM dry and then spritz or ink over with desired colors.  The area you applied the CM will resist the inks and show off the stencil design perfectly!

So, there you go ~ a bit more info about a product worthy of a second look!

UPDATE!!!

Once all of the mediums had fully dried I took a new photo which better shows how they look dry.  I think you'll be amazed at the difference....


Clear


Shimmer...


Vintage...


I love how they dry translucent!

Saturday, October 12, 2013

31 Days of Halloween - Day 12 - The Owls's Have it!

Smeared & Smudged
31 Days of Halloween
Day 12
 
Today's project is a chunky ATC...
These are so much fun because they are excellent for display.
 
What's Halloween without an owl or two?
Well I've got this awesome owl from Crafty Individuals ~ Air Mail Owl CI-225 on the front side of my ATC.  I stamped it once on the cardstock and stamped it a second time to pop it off the ATC.  I thought it would be fun to add a bit of depth so I cut out the face and snipped off the tail of the 2nd owl so once it was adhered to the original image with a pop dot the tail looks like it's behind the branch and the face is set in a bit.
 
 
You can sort of see the second owl popped off the original image at this angle.
You can also see the washi tape and stickles I added around the edge.
 
 
And here's the back of the ATC.
The toxic tonic & skull are bits of a paper napkin that I decoupaged onto the ATC.
The red stamp images are all Crafty Individuals from the CI-360 Poison & Danger Bottle Set.
 
 
It's now residing in my living room with my Poe shadow box...
 
Hope you all have a wonderfully creepy weekend!
 

Thursday, April 21, 2011

Cracked Easter Eggs

I have another Easter Egg project for you today...and their Cracked!

Actually they are covered with Tim Holtz Distress Rock Candy ;) 

Here's what I did....

Stamp a desired image(s) on Tissue Paper (or pattern tissue) with Archival Ink.

Crackle Easter Egg 001

Crackle Easter Egg 002

Color the image with a permanent ink.  I am using Bic Markers.

Crackle Easter Egg 004

Slather some collage glue onto your egg (blown or plastic), carefully lay the colored tissue paper on the egg.  Gently smooth out as necessary and let it dry completely. 

I ended up smoothing it out in the center and snipping off a bit of excess tissue paper at the top. 

Crackle Easter Egg 008

After the collage glue is dry, add a layer of the Distress Crackle Paint - Rock Candy and let it dry.

Crackle Easter Egg 009

It worked perfectly...there are tons of awesome looking cracks all over the egg but I had a heck of a time trying to get a photo that would show them.  I took several and these are as good as it gets.  The white of the egg plus the shine of the Rock Candy simply freaked my camera out. 

Crackle Easter Egg 011

Crackle Easter Egg 016

Crackle Easter Egg 017

IRL it looks almost like a stained glass egg!
It's also got a great texture that you can't see in the photos either.  It's like you can feel each little crack in the egg shell.  Almost like what a hard boiled egg feels like once you crack it right before you start peeling off the bits of shell!

Lots of fun and oh so easy!

Tuesday, March 29, 2011

Mom Gothic Arch - #8 Waxed Paper Napkin Collage

Last year I hosted a decorative napkin swap here on Ink Stains and it was a huge success.  Everyone got LOADS of way cool napkins to use on their projects.  Today I wanted to share another fun technique incorporating those napkins paired with an unlikely material....waxed paper. 

If you don't have decorative napkins you could use patterned tissue paper or plain tissue paper that you have stamped.

Waxed Paper Napkin Collage

Before we begin I wanted to talk a bit about the napkins.  Normally most deco napkins have 2 or more of the same pattern per napkin.  You'll be able to tell once you unfold the napkins how often the image/pattern is repeated.  You will only need a portion of each napkin so I normally just tear or cut one section from the entire sheet for my project. 

Mom Gothic Arch - #8 Napkin Waxed Paper 001

Now most napkins are 2-4 ply ~ the top layer has the decoration while the rest of the layers are white.  For most projects you'll want to remove all of the white layers.  For easy removal you can use a piece of tape (I like to use packing tape cause it's really sticky) to help peel each of the white layers from the printed layer.

Peeling away first layer....

Mom Gothic Arch - #8 Napkin Waxed Paper 004

and here you can see there is another white layer...

Mom Gothic Arch - #8 Napkin Waxed Paper 005

so I peeled that layer off as well.  You can see how transparent the final layer really is...

Mom Gothic Arch - #8 Napkin Waxed Paper 006

Supplies:

Decorative Napkins (or patterned / stamped tissue paper)
Waxed Paper
Chipboard
Ephemera
Collage Glue
Embellishments

Instructions:

1. Place your wax paper on your work surface.  I have placed my Gothic Arch template under the waxed paper to give myself an idea on where I wanted to layer each piece of napkin.

Mom Gothic Arch - #8 Napkin Waxed Paper 002

2. Tear away the excess areas of each napkin so you have only the desired image(s) or patterns you want to incorporate into your design.    You will also want to get an approximate idea on placement at this time as well.

Mom Gothic Arch - #8 Napkin Waxed Paper 007

3. Glue and layer all of the various pieces of napkin down to the waxed paper using your choice of collage medium/glue.   Let it dry completely.

Mom Gothic Arch - #8 Napkin Waxed Paper 008

4. Once the glue has dried, crumble the waxed paper 2-3 times to get lots of nice creases worked into the paper.

Mom Gothic Arch - #8 Napkin Waxed Paper 010

5. Glue desired sheet of ephemera down to a piece of light/medium weight chipboard.  Let dry.

6. Glue the waxed paper napkin collage to the ephemera side of your chipboard.  You will notice that the ephemera shows through the waxed paper!  Awesome huh?  Let the glue dry completely.

Mom Gothic Arch - #8 Napkin Waxed Paper 012

7. Trace and cut your Gothic Arch from the paper.

Mom Gothic Arch - #8 Napkin Waxed Paper 013

8. (optional) If desired, ink the edges with black or other color of ink.  I think it gives the Arch a nice finished feel.

Mom Gothic Arch - #8 Napkin Waxed Paper 014

9. Add embellishments, image(s) and sentiment to finish it off...  I added various colors of Stickles to the chandeliers and the woman's head dress and skimpy jeweled top for a bit of zing.  You can also see that I used the pearls I posted about earlier to outline the arch.

Mom Gothic Arch - #8 Napkin Waxed Paper 023

So there you go...8 down
and only 2 more arches left!

Are you keeping up? 

If not they will be here when you're ready...
remember I'm trying to get them finished up before UK's Mother's Day.
Everyone else will have an extra month to finish your Gothic Arch book so no worries!