Showing posts with label Alcohol Ink. Show all posts

Wednesday, January 21, 2026

Up for a Challenge?

 As always Gecko Galz hosts several challenges on their blog each month.  I'm a bit behind getting them done but there is still lots of time to play if you're so inclined!

Here is what I came up with for each of the Challenge images...

Card Challenge...


Christmas Challenge...


Fantasy Challenge...


Gothic Challenge


Steampunk Challenge...


Hope you join in on the fun!
You might just be the lucky winner of a $25.00 Gift Certificate to Gecko Galz!!


Friday, December 11, 2020

Kiss Me in Blue

Oh how I love the current Lost Coast Designs challenge - Winter Blues - where your creations can be filled with winter goodness or BLUE (my fav. color!!)


So today I have this beautiful lady to share with you....


She is Mistletoe Goth and was stamped/embossed on a piece of alcohol inked paper. After she was embossed she was colored with alcohol markers, die-cut and mounted on a blue panel which was stamped using the Daisy Flourish stamp.  That panel was then mounted on a white card base. To finish off the card I added glitter to her fringe.

Hope you join in this month long challenge!!


Sunday, August 16, 2020

Dreaming of Castles...

 Today I have a beautiful card to share that was so much fun to make which I made specifically for the Lavinia Challenge - #33 - Anything Goes.  I hope you enjoy....

 I started off by making the background. For some reason I was feeling green so I got out my Marabu Alcohol Inks and their fun new glitter inks and had a go at them. Further down there is a photo of the glitter inks and what they look like reflecting in the light when tilted to and fro.  The shine is amazing IRL.


After the background had dried I started stamping... It was all stamped using VersaFine Clair Nocturne ink...my all-time favorite black ink. So I began with the Luna Lights, Far World Castle and Pink Orbs (the little circles on the bottom and side).   I used paint pens to extend the landscape around the castle and stamped a couple of the trees from the Tree Scene set. I then stamped the Dragon Mini and finished off with the Stars 1 Mini stamp filling in the open spaces.  I used both a black and white paint pen to add little details here and there.


Before the inks had a chance to dry I dusted the surface with the Sea Foam Fairy Hugs Powder which you can see in the above photo. The blob looking areas are the Glitter AI from Marabu - looks strange here but IRL it adds a lovely shimmer to the finished card.  


And there you have it....I hope you enjoy this card.


Supplies:

Lavinia Stamps - Stars 1 Mini, Dragon Mini, Pink Orbs, Far World Castle, Luna Lights, Tree Scene

Fairy Hugs Powder - Sea Foam

Marabu Alcohol Inks

Black Paint Pen, White Paint Pen, Glossy Cardstock, Black Card Base

Tuesday, July 7, 2020

Lavinia Stamps

Have you ever heard of Lavinia Stamps? Maybe my USA friends haven't because they originate in the UK.  If you don't know about them you need to!! The images are beautiful - fairies, mermaids and the like.  There are a couple big suppliers here in the US that I know of....Lavinia World (which I have ordered from) and Del Bello's Designs (which I recently found).  Of course there may be others but these are the ones I know about.
Well, I stumbled upon these stamps by accident but I instantly fell in love! I am really into fairies and mermaids for some reason right now so these are right up my current alley (obsession). 

So I ordered a few stamps just to see if I'd like them or not and OH MY....LOVE THEM!!!! I have since placed a couple more orders ;)  LOL!!!  

I must say I was a bit hesitant to give them a go...if you look on FB for Lavinia groups you will see some amazing cards. After seeing them I was nervous but I make up a few alcohol ink backgrounds using Marabu AI's and this is the first card I made.....


What do you think?  I know - I went a bit overboard on the glitter...but you know me and my love of glitter - LOL!!  This glitter is a new product available at Lavinia World called Fairy Hugs Powder. They sent a sample with my first order.  OMG it is beautiful...very fine and it sticks to the VersaFine Clair ink like magic.  I didn't think it would adhere to the inks very well so I put loads of it on....needless to say it stuck so well I had to try to scrape some off so you could see the image - LOL!!


All of the images are stamped with VF Clair Nocturne ink, glitter and a bit of white paint pen. I don't know if you can see it very much in the photos but the paper has a puffy texture. Last year when DH and I went on vacation we hit up loads of Traderbakers and similar flea market/antique malls.  Well I found some old HP Glossy Plotter Paper for really cheap. I thought it would be fun to try with AI's and luckily it works great.  I was experimenting one day and I found that if you heat it up with a heat tool you can make it bubble. It holds that bubble/puffy look when it cools. Really fun for something different.  Sadly I can't find this plotter paper anywhere so it must be discontinued but I'm so happy I found it.

I'll be sharing more Lavinia creations in the near future...can't wait - I am so loving these stamps!!

Supplies:

Lavinia Stamps - Luna Lights (top), Moon Pods (bottom)
Lavinia World - Fairy 
Marabu - Alcohol Inks
White Paint Pen, Plotter Paper, Red Card Base

Sunday, June 28, 2020

Creative Embellishments June Challenge

Hello Friends - I hope you're all well and safe where you are. Today I wanted to share a creation I made for the Creative Embellishments June 2020 Challenge.


This is the inspiration photo for the challenge. Beautiful isn't she? For some reason at the moment I seem to be enchanted with faeries and mermaids so this really appealed to me.  I decided to give it a go and this is what I came up with....


I started off by using Marabu's new Metallic Alcohol Inks as well as Neon Blue and some of their glittery blends. to create the background. The clouds were made in layers. Initially I inked them on with Club Scraps White Pigment ink to which I added a bit of Fairy Hug Powder glitter (by Lavinia World).  I then sprinkled with Clear Embossing Powder and heated to set.  This process created a lovely texture.  To bump the color back up I added another layer of the white pigment ink and even more glitter.  A quick blast with the heat tool to set the ink.  


I then set to work on the dragon and fairy.  The dragon was painted with Blue Lagoon acrylic paint from DecoArt.  He was then colored with a variety of colored pencils to add depth and dimension. He also got a bit of white and black paint pen for details.  I painted the fairy black using Americana Lamp Black acrylic paint. Her wings were then coated with more of the Fairy Hug Powder....yes, I do love glitter!!  Once both of these elements were dry I glued the fairy to the dragons back and mounted them on the canvas using foam tape to really give them dimension.   The canvas still needed something so I stamped dandelion bits and the sentiment WISH using StazOn Black ink and a bit of white paint pen work.


Have a lovely day my friends!!

Supplies:

Creative Embellishments - Tiny Fairies, Dragon Set 2
Marabu Alcohol Inks
Club Scrap - White Pigment Ink
DecoArt - Lamp Black, Blue Lagoon
Imagine - Jet Black StazOn ink, Clear Embossing Powder
Unity - Wish set
Colored Pencils
Black & White Paint Pens


Wednesday, November 20, 2019

Woodland Magnetic Candy Tin

Hello Friends!

Can you believe it's only 1 more week until Thanksgiving!!!
I just don't know where the year has gone, it's flown by.

One of my favorite childhood memories with regards to Christmas is getting into our stockings! It didn't matter how early we got up we were only allowed to dig into our stockings until everyone was ready to open gifts (when Mom and Dad said). It was like a pre-game special - LOL!! Shoot Mom still makes us all stockings which is just fine with me :)

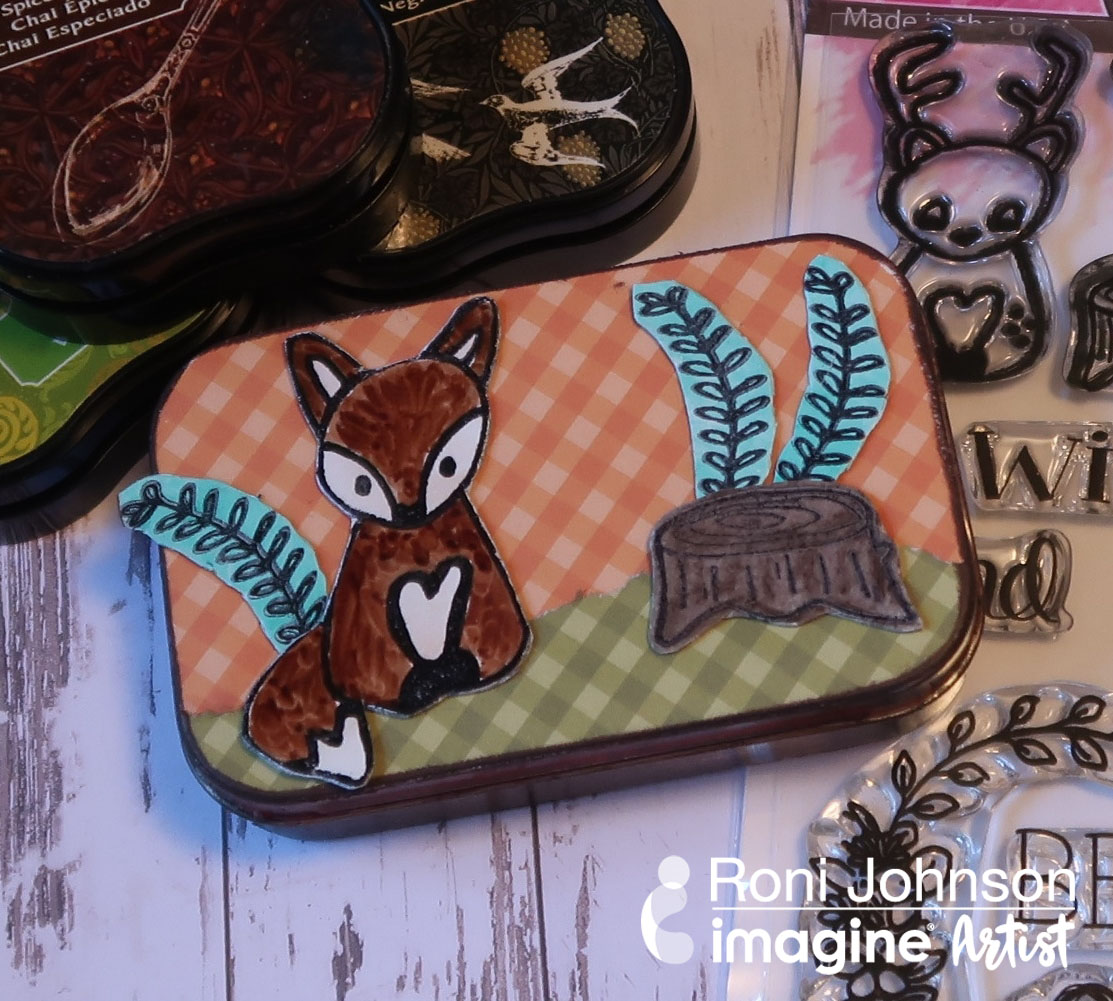
So today's project is something that will fit into any stocking with easy and I think it's a pretty fun idea... a magnetic woodland themed play set all tucked inside an Altoids/candy tin.


So Imagine teamed up with Joy Clair Rubber Stamps this month and I was able to choose the stamp sets I wanted to work with. Once I saw this set of stamps I KNEW I had to make this magnetic play set with them.

I have been saving magnetic sheets that come with some metal dies to use for something and this was the perfect time to pull them out and create. My magnetic sheets had a white back so I was all set to go but if you have a sheet that is just the black magnetic sheet you can simply adhere a sheet of white paper to the magnetic sheet. works perfectly fine and what I've had to do in the past.

I stamped the images onto the magnet using StazOn inks and then colored each image with alcohol markers.


I stamped the images onto the magnet using StazOn inks and then colored each image with alcohol markers.


I think these would be so much fun to play with and make up stories for the little ones - boys and girls alike.


If you'd like the complete instructions and supply list please see:


Have a lovely day my friends!!
Stay Inky :)

Friday, November 8, 2019

Day of the Dead Challenge #87

Hello Friends...

Hope this day finds you hale and hearty enjoying Autumn and all it's glory even though it may feel like winter as it does here!

Today I wanted to share a couple creations I made for the current challenge over at Lost Coast Designs....#87 - Dia de los Muertos which runs until the 14th of November.


My first card was made by playing with some Marabu alcohol inks on a piece of glossy cardstock. I started off by just applying the inks in lines across the cardstock letting them flow together but I wanted something more so I flicked some blue AI across the cardstock which gave it a bit more life.  I then stamped the new DOD Amor  image several times in a variety of VersaFine Clair inks. I fussy cut the images and reassembled them to create the final image. I mounted the computer generated sentiment on black cardstock and popped it all onto a yellow card base.


My next card was made by stamping and embossing the Skull n Bones background image on a piece of textured black cardstock. The texture gives an added hint of dimension and a fun distressed look to the background.  I stamped the Frida Skull image on a piece of white cardstock and colored it using Schpirerr Farben colored pencils (which blend so nicely). She was fussy cut and added to the card using foam tape.


I colored the skull on my Imagine craft mat which has some give to it. It's perfect for that extra little cushion when stamping but it also is pretty cool to use it as a foundation for coloring images with colored pencils because that extra little bit of give yields an embossed texture to the image once you are done.  It's a pretty cool way to achieve a bit of extra dimension without even trying.

So there you go...
I hope you're inspired to play along.
If you do create a DOD project be sure to post it on the Lost Coast Designs blog for your chance to win!!

Monday, October 28, 2019

Good Dog!

Ha...

Beware playing fetch with your dog on Halloween....


You never know what he might bring back!

Stamps - Lost Coast Designs
Computer Generated Sentiment
Background - Alcohol Inks w/marble stamping using Delicata Gold Ink.

Wednesday, August 28, 2019

A little of this...

In an attempt to catch up on several posts I've missed this month I wanted to share a few cards I made for Lost Coast Designs challenges. Although the "Anything Goes" challenge is now past (first two cards) Challenge #82 - Wood is still going on. You have a few days left to join in the fun :)


My first card has a bit of dimension to it...I started off by spritzing my craft mat with Ivy Cottage, Bamboo Leaves and Gold Shimmer Spritz. I then dipped a piece of the Craft Plastic into the ink mix and heated to dry. I continued this process until I was happy with the look.

I stamped the Sketchy Cone Flower onto the Craft Plastic with Piano Black StazOn Pigment Ink.  I stamped the flower a second time onto white cardstock using VersaFine Clair Nocturne. The cardstock flower was colored using a variety of colored pencils, fussy cut and popped onto the Craft Plastic panel using double stick foam tape.


My second card was stamped over an alcohol inked background. This was really fun because I started off just playing with the AI's - sprinkling a bit then blowing it around until I was happy with the design. I then stamped the bicycle chick over the AI's, created a mask and then stamped the grungy background stamp over top. The sentiment is from one of Prima's books of sentiments.


Challenge #82 - Wood


My final card for the day is for the current challenge...Wood.  I'll bet you won't believe it but the background stamp (stamped with blue ink) I used on the Find Your Path card was stamped on the right side panel of this card! Looks totally different using Memento Desert Sand ink huh?  Anyway, that's the inside of the card - I used the Trees background stamp for the main image and a sentiment from Carmen's Veranda as well as a bit of wood pattern paper from Moda Scrap.

You can find the current challenge entry post here - #82 - Wood.  
Your project can be anything related to wood...stamped wood(s), trees, a creation crafted on a wood product, wood pattern paper, etc. Just as long as there is stamping somewhere you're good to go!
Hope you join in on the fun.


Thursday, July 25, 2019

Alcohol Ink Comparison - Marabu, Ranger, Brea Reese

Hello Friends -

I've been reading lots of comments on FB about the various Alcohol Inks that have hit the market recently. I thought I'd do a little side by side to show you what they look like on various materials.

The first thing I want to mention is that each bottle is different as far as the dispensing tip so this is going to make a huge difference on the control and how much ink actually comes out in a single drop.

The tip sizes from smallest to largest -

Marabu tips come sealed and they tell you in the instructions so pierce the tip with a push pin. That gives you some idea about how small it it.

Ranger's tip is about 3-4 times larger than a pin prick for the AI and much larger for the Metallic Mixatives.

Pinata's bottle for the AI is the same size as the Metallic Mixatives dispenser and is difficult to get just one drop.  This ink also has a tendency to shoot out when you're tipping the bottle.

 Brea Reese's tip is huge and VERY hard to control. Most of the time you get 2, 3 or more drops  unless you are extremely careful.

Here are the colors I used:

Marabu

Ranger

Pinata (didn't have their black)

Brea Reese


Glossy Cardstock 

Marabu - all single drops
Ranger - Blue 2 drops, rest single drops
Brea Reese - Blue 2 drops, Red 3 drops, Black 1 drop
Pinata - Blue 2 drops, Red 1 drop


Craft Plastic from Grafix

Marabu - All 1 drop
Ranger - Blue 3 drops, Red 2 drops (plus a drop that shot up by the Marabu Red), Black 1 drop
Brea Reese - Blue 2 drops, Red 3 drops, black 2 drops
Pinata - All 1 drop


Yupo

Marabu - Single Drops
Ranger - Single Drops 
(plus 2 extra tiny drops that shot out as I was tipping the bottle)
Brea Reese - Blue - 2 drops, Black & Red Singles
Pinata - Singles

As you will notice the "spread" for the Marabu was consistent on all 3 materials - similar in size, shape and color. The black is more of a charcoal rather than pure black. 

Ranger's spread was all over the place from one material to the next. On one material it kept it's shape, on the other 2 is varied widely and feathered more than spread.

Brea Reese - I can't explain it but the spread varied the most of any...I have no idea why but it was just so random.

Pinata - Spread the least of any of the inks...they are fairly thick. Not sure if my inks are old stock or ???  It didn't fair very well in this test.


Metallics

I wanted to compare Marabu's Metallic Alcohol Inks to Rangers Metallic Mixatives. I did this to show you why it's not a fair comparison (because so many people are comparing them).  You should also keep in mind dispenser tips....Marabu - Pin Prick; Ranger - Large Hole.


Marabu's Metallic Alcohol Inks are just that...alcohol ink. They are thinner therefore they don't have as much metallic colorant to them.  


Ranger's Metallic Mixatives have far less alcohol and larger and more metallic particles.


Metallics on Glossy Cardstock - You can see right off that Marabu's Silver looks more pearl. They spread like a typical alcohol ink would.  Ranger's Metallic Mixatives are a bit different - not nearly as much movement.


Craft Plastic - Again Marabu is typical AI movement - Ranger's thicker Metallic Mixatives not as much movement but further spread on this as opposed to the glossy cardstock.


Finally the Yupo - basically the same as Craft Plastic Results which makes sense since they are similar substrates.

You can make your own observations by the pictures.
Hope this is helpful for all you inky folks out there.


Wednesday, July 17, 2019

Midsummer Dream Gothic Arch

Good Morning my Inky friends!

I have been playing with more Gecko Galz collage images but this time I paired it with an alcohol ink background. I started off by sprinkling a variety of Brea Reese Alcohol Inks on a piece of Craft Plastic by Grafix.  It's a really cool plastic paper that is (IMO) more sturdy than Yupo and far less expensive. 


After I was satisfied with the look I hand cut a gothic arch shape from the inked plastic/paper.  I edged it with the StazOn Pigment ink and mounted it onto a larger gothic arch that I had covered with Sapphire/Sapphire Starstruck Rinea Foiled Paper.


I fussy cut the lady from her background (from one of the Ophilia collage sheets) and gave her a set of  lovely blue butterfly wings (Butterfly Wings).  I really wanted to highlight the fairy and AI background so I kept the embellishments to a minimum and added the sentiment and a bit of gold thread.  


She looks so serious but lovely at the same time...
I think she's trying to solve the world's problems.


Have a lovely day my friends!

Saturday, February 9, 2019

Shimmering Blue Bird Salutations

Happy Saturday!

I hope you're all doing well and surviving the cold (or heat) depending on where you are located...  Today I wanted to share a fun CAS card I made using some new goodies....Kristie Taylors Sparkle Spirits...shimmering alcohol inks!


You all know how much I like shimmer and sparkle - well these inks have it...unfortunately it's so difficult to capture in photos.  It really is lovely.  I used a few different techniques for applying the ink to the glossy cards. Initially I just shook some on and let it dry.  Next layer I sprinkled the ink on and used a straw to blow it giving a splatter effect.  Finally I added a few more drops and pounced it here and there.  It is just so much fun to play with.

I then stamped the soaring bird and sentiment using Imagine's new StazOn Pigment ink.  I LOVE this ink!! It is so opaque, it covers amazingly well and dries almost instantly.  Wicked cool stuff...can't wait to share more about this ink.


And there you have it...fun new products to get your mojo in go gear.

Supplies:

Kristie Taylor Sparkle Spirits
Imagine - StazOn Pigment Ink - Piano Black
STAMPloration - Trendy Birds
Altenew - Painted Greetings
Glossy Cardstock

I would like to enter this card into the following challenges:


and