Friday, November 28, 2014

Star Mini Album Tutorial

Hope you all had a wonderful Thanksgiving!  If you recall, Wednesday I shared my finished Star Album with you during the Club Scrap blog hop.  Today I am back to show you how to make one of your own!  These albums are the perfect vehicle for displaying favorite collections of pattern paper or colors.  When the album is displayed fully open as a star the papers become the center of attraction with your story coming to life along the outside edge (the lo's in the album).

Just to refresh, here is the album....


and this is what it looks like once it has been completely opened up.


So, let's make one!

Supplies:

8-10 sheets of 12x12 Cardstock  I used Club Scrap Lake Kit for the example but any cardstock will work.
Double Stick Heavy Duty Tape 
Chipboard (for cover)
Ribbon 
Bone Folder

Instructions:

1. Determine how many points/pages you would like in your star album.  I chose 7 but you could use 8 or 9.   If you use 7 pages when the book is completely open each of the pages will be fully open and the second and third layers of paper will be displayed nicely.  The individual pages won't lay flat when opening the pages one by one though.  With each additional page you add the individual pages will be closer to laying flat when viewing like a conventional book but when displayed like a star they won't be as full as the 7 page lay-out.


2. Once you decide how many pages you want to use cut each sheet into 3 pieces -

4" x 12"
4" x 10"
4" x 8"

Keep the cut off pieces - those will make great embellishment pieces for the actual lo's.


3. Fold and score each of the pieces in half.

4" x 12" - score @ 6"
4" x 10" - score @ 5"
4" x 8" - score @ 4"


4. Separate the individual folded sheets into 7, 8 or 9 piles (depending on how many pages/points your album will have).  I know some of my piles look funky (with two greens in each pile) but a few of them are patterned inside.


5. Take a pile of pages and apply really sticky adhesive tape on one end as shown on the 12" and 10" pages.  Remove the tape from the 12" piece and secure the 10" page directly over the 12" page.  Remove the tape from the 10" piece and adhere the 8" piece on the stack and set aside.  Repeat this process for each stack of pages.


6. You should now have 7 (8 or 9) sets of pages for your album.  Since the pages in your book don't lay down flat like a conventional book once assembled I have found it is easier to embellish, stamp, and ink your lay-outs at this time.  This is what I have done above.


7. After you have finished decorating your pages it's time to finish assembling the book.  Apply a strip of the really sticky tape to the 12" and 10" pages on each stack.  Peel off the backing on the 12" page and adhere the 10" page.  Peel off the backing from the strip of adhesive on the 10" page and stick down the 8" page.  Repeat with each of the remaining stacks of paper.


8. You will now have 7 (8 or 9) nifty little 3 layer pages as shown above...


9.   Arrange your pages in the desired order.


10. Flip the first 3 piece page set off the stack of pages.  Apply strips of double stick tape (I ran out of the red so I'm using the kind with white paper backing now) as shown to the 2nd set of pages.  Remove the backing paper and adhere to the first set of pages.  

Next, flip those two sets of pages over and add strips of sticky tape to the 3rd set of pages; remove the backing paper from the tape and stick it to the first two sets of pages.  

Repeat this process until all of the page sets have been stuck together forming the body of your mini star album.


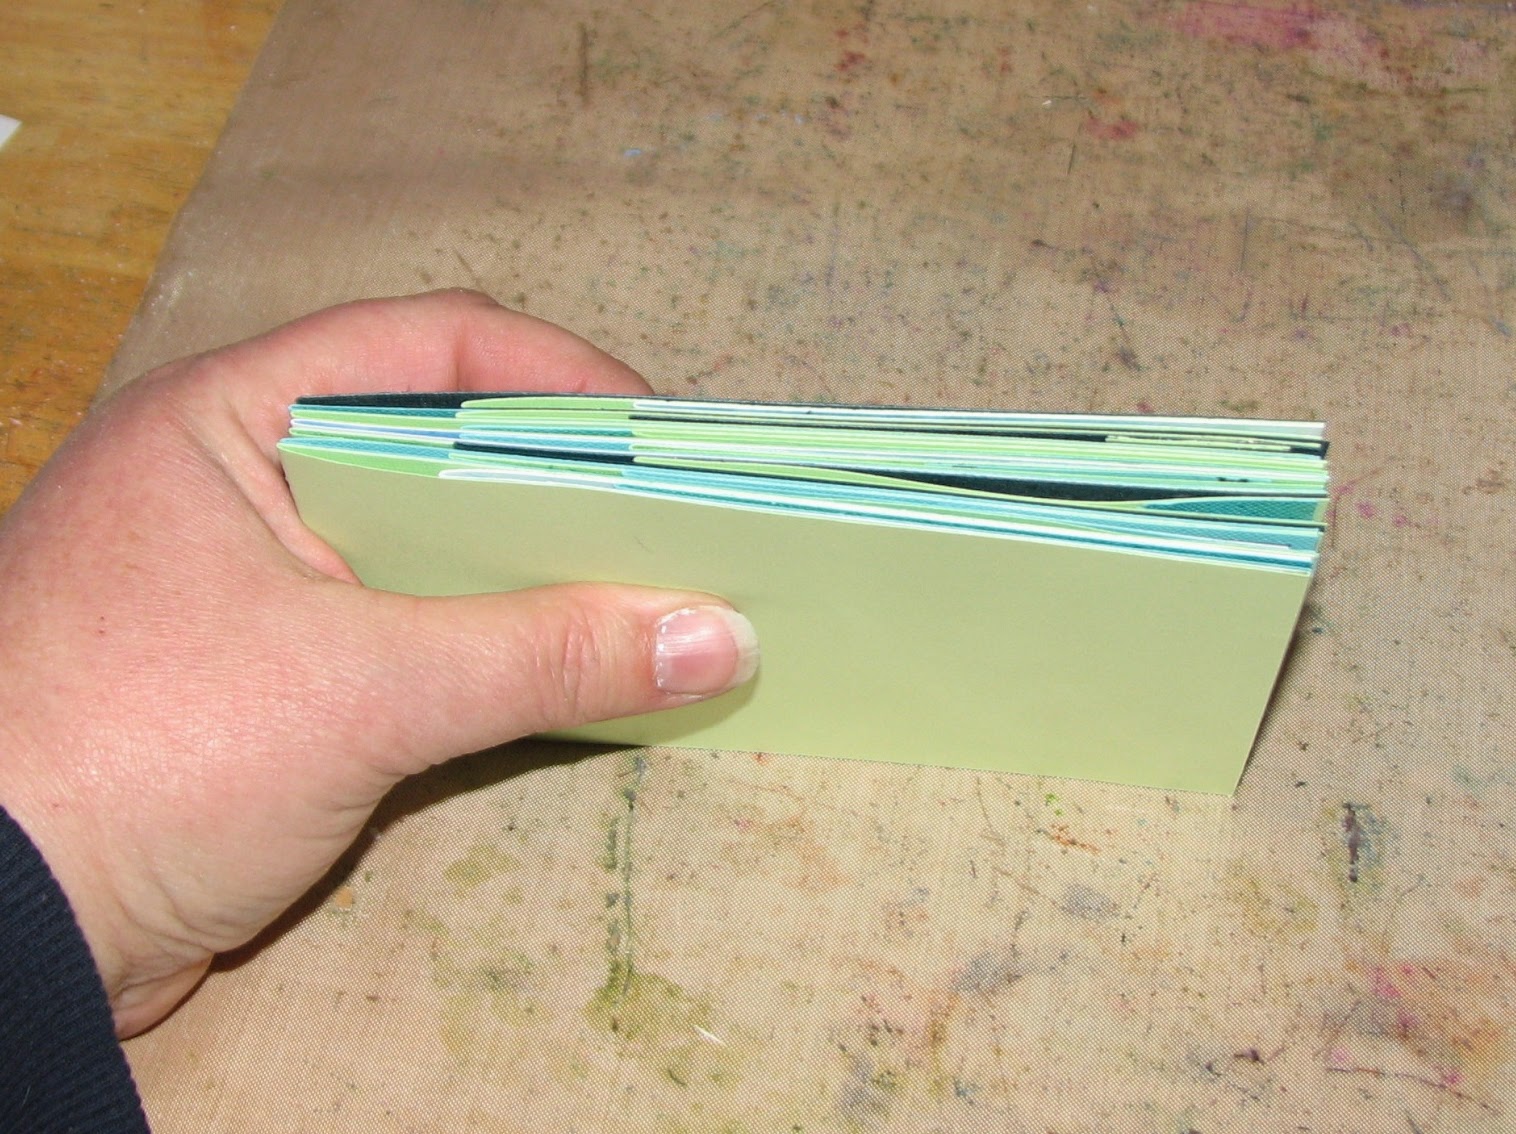
Here is what my stack of page sets looks like once I finished step #10.


11. Time to create the cover pages.  Cut 2 pieces of chipboard 4.25" x 6.25"; cut the last piece of cardstock in half.


12. Adhere the chipboard to the back of the cardstock; miter the corners as shown.


13. Crease and fold each side flap, apply a strong adhesive and secure.


This is one of the covers - repeat steps 12 & 13 to create the second cover piece.


14. Wrap and tie the ribbon around your bundle of pages.


15.  Adhere strips of the stick tape to each of the cover pieces, remove backing paper and stick over the ribbon to the front and back pages of the bundle of pages.  Press to ensure proper adhesion...


16.  Embellish the front cover as desired and you're done!


To display the album as a star, open the book completely so the covers meet and tie the ribbon in a bow to hold it open as shown above.  Once you add photos you'll have a beautiful display piece to keep or give as a cherished gift.

Wednesday, November 26, 2014

Club Scrap Lakes Blog Hop

Happy Wednesday Friends!  Can you believe it's the end of November already?  This month (year) has just flown by.  As you know by now the last Wednesday of the month brings along with it the Club Scrap Blog Hop!  This month's kit - Lakes - is simply beautiful...even if you don't live at a lake you'll find lots of inspiration in these lovely watercolor colors.  


I knew the instant I saw this kit that I wanted to do something that really let the colors and patterns shine.  I tried to think of a project that I could use LOTS of paper so it would pack a big color punch. I finally decided upon a Star Book!  If you've never seen one, it's a super fun way to let the paper become the "star" of the show ;)

At first glance the book looks like any other mini album.


But open it up and it's an explosion of color!
Here's what the book looks like from above....


And looking at it from an angle...
Just look at all those wonderful layers of paper.


And from another angle....
Fun huh?
Sure to make quite an impression with everyone that sees it.


I'll be back on Friday with step by step instructions.
Until then....

Canoe believe it?
It's been a full year following Gnomie on his travels.
This week he's at the lake...


Next month you'll meet Gnomies new friend!
I can't wait :)

Hope you've enjoyed your stop here at Ink Stains...
Happy Thanksgiving Friends - 
Stay Inky :)

It's time to hop on over to 


And if you get lost along the way the complete list of participants can be found on 


Tuesday, November 25, 2014

Vintage Ice Skates into Art

Today I have a really fun bit of art to share with you.  Sometime this past summer I bought an old pair of vintage ice skates at a garage sale.  I knew they had potential and for $2.00 I couldn't pass them up!  Yes, they started out a bit grungy... but hey, it's nothin' a little paint, ink and embellishments won't fix!


I used a combination of Craft Attitude Printable Film, Altered Pages Collage Images, IMAGINE Crafts/Tsukineko Creative Medium, Luxe & Brilliance Inks and Deco Art Americana Acrylic Paint, Deco Art Media Crackle Paste & Antiquing Cream.  Throw in a feather boa and some holiday floral pieces and you get this.....


and here is a handy dandy little SnapGuide tutorial on how it was done...

Monday, November 24, 2014

Gelli Plate Snowman Tags

Last week we played with the 5x7" Gelli Plate and Deco Arts Metallic Acrylic Paints to create some holiday prints for the upcoming Christmas/Winter season.  I promised to share some projects using these prints so I thought I'd start off with a couple tags featuring snowmen...since so many of us here in the northern part of the country have had early snow recently.

I started off with these two tags...one is the positive, the other the negative print.  You can see they are similar but very different.


I started off with the darker of the two tags by adding some highlights around the snowflakes in the print.  To do so I positioned the stencil just as it was on the Gelli Plate when I made the tag print, then used a sponge to add just a bit more ink to really make the snowflakes pop on the metallic paint.


I smoothed out the white ink and blended it into the center of the tag.


I stamped a few images - the snowflakes, snowman and sentiment with blues & black inks.  I then colored the snowman using Wedding Dress (white) irRESISTible Texture Spray.  I spritzed a bit on scrap paper and painted it on with a tiny brush and let it dry completely.


For the second tag I wanted to go blue instead of white so I placed the stencil back over the tag and added blue LUXE ink just as I did with the white ink and a sponge.


I then stamped my snowman image, added white just as I did with the other snowman and covered most of the tag with a layer of Shimmer Creative Medium to give the snowflakes and background a beautiful sparkle!


A few finishing details (glitter, Pico Embellisher over the first snowman, red stamped hearts) and they are done!  

All Stamps - Deep Red Stamps, Stencil - Memory Box; Inks & Embellishments - IMAGINE Crafts/Tsukineko


Thursday, November 20, 2014

Gelli Plate Printing - Holiday Style!

I cannot resist any longer...it's time to start making Christmas projects.  I wanted to start by playing with my 5x7 Gelli Plate and Deco Arts Dazzling Metallics Acrylic Paint.  This paint has a beautiful luster and shimmer that translates very well onto paper (or other surfaces).

Start off by gathering all your supplies...in addition to the Deco Arts Metallics & my Gelli Plate I am using some paper die-cuts, my speedball brayer, various stencils & embossing folders, white and blue acrylics.  The 5x7 Gelli Plate is a perfect size for smaller projects like cards and tags.  I think it goes quicker too because there's less space to fill up at least it feels like it.


A bit of paint...


roll it out and you're ready to start playing.


I placed one of the die cuts in the center then pounced the surface with the bumpy side of an embossing folder.

NOTE: if you do use an embossing folder be sure to clean the paint off.  I don't worry about cleaning stencils off.


And print....


This design was also made using an embossing folder...


here I have added multiple die-cuts.
Made a print pulling off some paint...


peeled them off and added more paint...


and here are those 2 prints side by side...positive & negative.


I was at it for less than an hour and made 19 prints, 


12 tags


 and numerous painted die-cuts!


I love playing with the Gelli Plate, it really makes you feel like you've accomplished something and in such a short amount of time.  In the coming days I will share some projects made using these fun prints!