Showing posts with label templates. Show all posts

Monday, September 21, 2015

Birthday Cake Gift Card Holder

Today I wanted to share a really fun gift card holder I came up with this past weekend.  My Mom and Dad have birthday's very close together (mom's was the 17th and dad's is today - the 21st) so I got them a gift card to a very nice restaurant in our area.  I was going to make them each a card but then who's do I put the gift card in?  It's not fair to put it in one or the other since it's for both of them.  Then I thought I'd make a single gift card holder and since it was their birthday - a cake right? 

So I thought about just how to do it and finally came up with this....


This cake is sized to fit into a standard A2 envelope (approx 4.5 x 5.75").  As far as decorations go, you can go as simple or extravagant as you'd like, it's totally up to you.  


To reveal the gift card, simply pull on the top layer and....


There you go!


Here is a link to the PDF template for the holder (bottom 2 tiers) and card holder (top tier)...Yes, it's upside down - Sorry I don't know how to make it right side up but it all prints the same either way.


Instructions:

1. Print out the template and trim out each piece.

2. Fold a piece of thin chipboard or cardstock in half; position the bottom cake layers along the fold where directed, trace and trim.   Trace and cut the pull out card onto a piece of single ply thin chipboard or cardstock.

3. (Cardstock) If you used cardstock, add a thin bead of glue along the bottom and sides of the cake to seal it up.  Cut slits to hold the gift card, insert the card into the cake and you're ready to go.

3. (Chipboard) If you used chipboard you'll need to cover each layer with a bit of pattern paper or cardstock.  Instead of gluing the sides I simply covered them with pattern paper to seal it up.  I also covered the pull out card with pattern paper as well.  

4. Decorate your cake as desired!  I left mine a bit plain due to time constrains and so it would fit into the envelope.  If you had a box to present the cake in you could really go crazy on how lumpy your embellishments were.

Add a gift card and you're ready to go!

Thursday, July 30, 2015

Card 'n a Box Template

Today I wanted to share the template and instructions for making your own Card 'n a Box from the Club Scrap blog hop yesterday....


As I was looking around for various ideas I saw something similar but it was much smaller and it was an origami project...very complicated, lots of folds and basically lots of work.  As I did a bit more looking it turned out that similar projects while not as complicated as the origami they were still far more involved than they needed to be.  Extra parts and pieces that fit together but no really necessary .


So I did a bit of re-engineering and came up with 
a "KISS" (Keep It Simple Stupid) template 
for basically the same thing with far less work.

Here's what I came up with....


Starting off with the outer case.  This is where so many examples I saw were really complicated - most were made with 2 or more parts fitting together when all you really need is a single sheet of cardstock, a few scores and you're set.


Score 1" line on both of the long sides and one in the center horizontally.


Cut the 1" score marks on either side of the center fold.


Add a piece of double stick tape to both flaps on each side and adhere them to the corresponding flap.  That's it!  Your case is done!  If you're using pretty print cardstock as I did no further decoration is needed.


Next, the drawer...it's basically just a straight forward tray...  1" score lines along each of the 4 sides, cut 1" at each corner as shown.


Since this tray was going into the sleeve I cut out a half circle in the front so it could be pulled out easily.  A bit of tape on the cut & folded corners and you're set to go.


The tray slides in the case easily and is ready to be filled!


I made the card and mounted it on a matted panel and attached it to the top of the box and it's done!  So very easy but such a nice little gift.  I also thought it might make a fun organizer if you used heavy cardstock - you could make several and stack them up to hold pre-cut card mats or panels, bits of extra cardstock, small embellishments, etc.  Really any small bits that need organizing.

Another idea I had was to make 6 or 12 of these cases, stack 'em up and use them to store birthday and/or holiday cards in monthly drawers.  

So many ideas from one simple design.
Hope I've inspired you to give it a try!

Thursday, June 25, 2015

Suitcase Mini Album Dimensions, Directions and Tips

The Suitcase Mini Album I created for yesterdays Club Scrap Blog Hop was quite a success.  I honestly didn't think many people would be interested in re-creating it so I didn't take any in the process photos but I did go back and figure out how I made it so I can share it with you today.  LOL!!  I know that sounds crazy but when I'm making something I just wing it ;)

I did want to mention that the matching Memento Dye Inks are Peanut Brittle, Rhubarb Stalk and Rich Cocoa - all of which were used to embellish this album.


So, here goes....

I cut mine from the pizza box the kit came in.  I used the folded back edge for the bottom of the suitcase since it already had nice creases in it.  The bottom is 2" wide.

You will need to cut a piece of cardboard/chipboard -  6 1/2" wide x 17" long. If you're using your CS ruler it's easy to measure this out because it's got markings in both directions - horizontal & vertical.

Next I laid out each section of the suitcase.  
Working from the left to right mark it out as follows:

4 3/4" - suitcase front
2" - existing bottom
5" - suitcase back
2 1/4" - suitcase top
3" - front flap of the suitcase


You will need to score on each of the lines you just made.  The photo below shows the box cut out, scored and folded into the suitcase form.  The scissors are just there to hold the flap shut...it kept wanting to fly open.


I covered the outside of the suitcase with the dark brown cardstock from the kit.  Since the length of the cover is longer than 12" I had to piece together the cardstock.  I cut it in a way that the seam would meet on the bottom of the suitcase which is also what I did to cover the inside as well.

Cut a piece of dark brown cardstock - 12" x 8.5"wide, cut a second piece 7" x 8.5" long.  Adhere them to the outside of the album cover, crease & fold over and attach to the inside of the album.  

To cover the inside of the album I used the mustard cardstock.  Cut one piece 6" x 11", cut a second piece of cardstock 6" x 6".  Adhere them to the inside of the album again over lapping on the bottom of the suitcase.  


If you look closely at the above photo you can just see where the overlapping pieces (both the cover and inner liner) meet under the album pages.  I decorated the outside of the album with two 1/2" strips of mustard cardstock that I embellished with the map stamp and several vintage travel posters cut from the wine pattern cardstock.

To create the album part of the suitcase I cut a piece of dark brown cardstock 6" x 12" and scored it every 1/2".  This is the album binding.  I glued a page to each mountain in the accordion - mine ended up with 10 pages and 2 extra flaps that I used to glue the accordion album to the bottom of the suitcase.  If you want to add more pages to your album simply crease, fold and glue additional strips to the first.

To keep the accordion from pulling away from the album I used a stretchy cord loop to hold it in place. You can see that in the above photo as well. The album pages can move freely but won't pull away from the album.


To hide the cover seam and stretchy cord I covered the bottom with a strip of the destination cardstock.


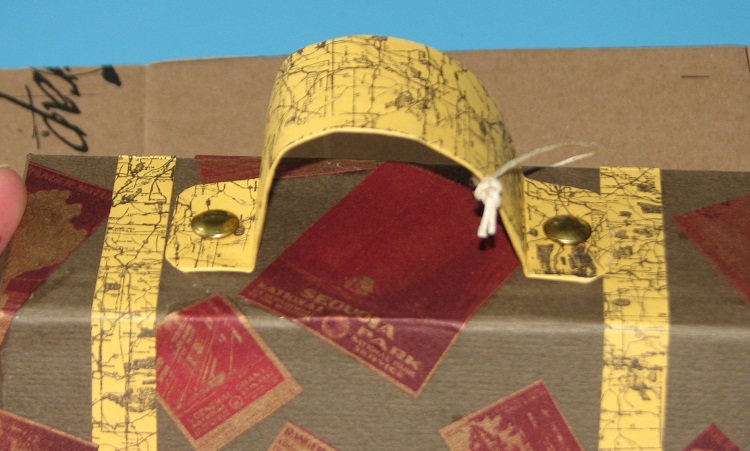
I used a scrap of the mustard cardstock to create the handle.  I scored it, folded and creased it until it was 1" wide.  I folded the ends over and shaped the center to form the curve of the handle.  I used 2 large brads to affix the handle to the suitcase.


I used another strip of the destination cardstock to cover the brads on the inside of the cover.


I finished off the album by adding a few extra bits of left over cardstock and stamped the "Road Trip!" image using Rhubarb Stalk Memento Ink.   The luggage tag was made from a wooden tag (from a recent kit) which was stained with Memento Peanut Brittle, edged with Rhubarb Stalk and then stamped with Rich Cocoa.

The two "buttons" on the front of the album came with the kit and two Velcro dots were used as closures which I lined up with the "straps" on the suitcase. 

I hope you give it a try and have fun making it!


Wednesday, June 3, 2015

Graduation Cap Money Card

Hey Everyone!  Today I have a "Mom" project (my Mom saw it on Pinterest and wanted me to make her a couple) - A Graduation Cap & Money Card rolled into one.....


This finishes at 4" x 5 1/2" - I made it a bit narrow to accommodate the bulky tassel.


You have 2 places for sentiments - under the cap is a small square and you can also write on the money pocket.  I just went with a stamped "Congratulations!" because I didn't have anything graduate related. 


Here is the template - I cut it from black cardstock.  Each of the folds work best if you crease it really crisply with a bone folder.  I cut the white inside panels 1/8" smaller than the actual card.  


I originally made this just a card but Mom wanted the pocket for money so I simply cut a strip of cardstock, scored & folded 1/2" tabs on the bottom & sides then die-cut the top for a pretty finish.


I glued it to the inside panel and waaa-laaaa - a money pocket!


Next we need to add a tassel.  The schools colors for this particular graduate are blue & white - easy peasy...just take some blue & white bakers twine, wrap it around 4 fingers, take a shorter length and wrap it around the top and tie a knot.  To make it more tassel like unravel each strand of the twine....


Affix it to the "cap"  using a brad near the center of the square.


After you have attached the tassel, use the white square panel to cover and hide the brad.

Tuck in a little cash and you're all set to go!


Thursday, January 1, 2015

One Page Brag Book Instructions

Happy New Year Everyone!

I hope you all had a wonderful time last evening welcoming in the new year...be it in person or in dreamland (like I did).  I had planned on having the boys and their fiance's over but things changed yesterday afternoon so dh & I ended up having a quite evening with our 4 legged boys - LOL!!

Today I wanted to share the instructions for the One Page Brag Book I shared yesterday during the Reunion Club Scrap Blog Hop.  

So I challenged myself to make a mini album out of a single sheet of cardstock for the base and here's what I came up with...  This shot is the book opened up...


And here it is completely closed - it measures approx. 4" x 5.25" - small enough to tuck inside your purse and a perfect little gift idea for mailing or giving to friends and family.


Basic Book Supplies:

1 sheet of heavy cardstock
Scor-Pal or Bone Folder & Ruler
Scissors

Instructions:

1. Score your 12x12 piece of cardstock at 2" and 7".

2. Turn the paper a quarter turn and score at 4", 4 1/8", 8 1/8" and 8 1/4".  The photo below is what your piece of cardstock will look like...2 horizontal and 4 vertical score lines.

I know the 1/8" scores sound funky but by the time you add photo mats, photos and any flat embellishments you'll need that extra 1/8" so the book closes properly.


3. The next thing you'll need to do is cut the 1/8" sliver of cardstock from between the 2" sections on the top and the 4" sections along the bottom as shown.    That's it...3 Steps and you're done!!!  How cool is that?


Now all you need to do is add your photos.  I also included photo mats and some stamping here and there to add a little spice but it's totally up to you how simple or fancy you want to make the book.  I added a ribbon to the book as the closure that was covered with the matted quote on the front of the book.  When I was messing around with the design though I had another thought - you could score the left quote flap 1/4" as shown below...


Close up all of the flaps


and fold it shut like a book leaving the flap open...


Then fold the flap down to hold it shut!  I was thinking a round Velcro hook and loop dot (it's so quick & easy) or possibly one of the twisty string closures - you know where you have a circle on the flap and a circle on the front then wind the string around.  Or even a thin magnetic closure.    


I was also thinking it would be fun to make several of these little books and house them in a small case just like the small children book sets.  You could focus each book on a different family member, a different holiday, maybe make 12 - one for each month of the year.  The possibilities are simply endless!

Another possibility I want to explore further is to make and attach small accordion pages to the fold down pages for loads more photo or journaling space.  I'm sure I'll need to re-work the score lines to accommodate the additional paper/photos but it shouldn't be too hard to figure it all out.  When I do I'll be sure to share those new measurements in case you'd like to make one yourself.

Anyway, I hope you give it a try and make a few for yourself or others.  Be sure to leave a comment on yesterday's post - Reunion Club Scrap Blog Hop to be entered to win the brag book I made using that fun kit!

Tuesday, December 16, 2014

Card Organizer - Holder Tutorial

Hey Everyone!  I hope you're all having a fun time getting ready for the holidays...  I am excited, tomorrow I'm going to have my nails done.  First time in a couple years - the place I'm having them done does some cool stuff with glitter so I'm going to see about getting my nails all glittered up :)  

Today however I have a fun project for you...  a card organizer or card holder.  I am making it for Club Scraps holiday blog hop (tomorrow) but I wanted to give you the plain jane instructions today because it makes a great gift idea for loved ones far away.

The basic organizer is going to take 2 pieces of 12x12 cardstock. Heavy cardstock works best because your organizer will be sturdy and stand up to use better.

Instructions:

1. Cut one piece of cardstock in half so you have 2 - 6" x 12" pieces.  Set one aside for later use.

2.  You're going to score the 6 x 12" piece of cardstock as follows:

2"; 4 1/8"; 9 1/8"; 11 1/8"

If you are using the Scor-Pal it's a bit easier...

Score at the 2" mark & fold; Slide the fold over to the edge and score at the 2 1/8" mark and fold; slide the fold over to the edge and score at 5" and 7".


Once you fold at the score marks your sheet of cardstock will form the outer covering of the organizer.


3. Cut the second sheet of cardstock 7" x 12".

4. Score the 12" side as follows: 1"; 3"; 9"; and 11"


5. Turn the cardstock to the 7" side and score at the following marks: 1"; 3"; 6"


6. Turn the scored piece of cardstock so the 12" side is at the top as shown below.  There are 3 small sections in each of the bottom corners that you need to trim away - a 1" square in the corner with 2 - 1" x 2" rectangles as shown.


(the cardstock with the small pieces removed.)


7. Fold the 1" flap along the top down and tack it down.


8. Fold the 2" square flaps down and apply adhesive to each.Stand the 12" piece up and adhere the 2" square flaps to the 2" x 3" sides.


9. The inner container of the organizer is beginning to take shape.  Apply adhesive the the corners of the final flap as shown and adhere to the 1" flaps.


10.  The container slides into the outer shell of the organizer as shown... Glue the bottom and 1" flaps to the organizer.


11.  Cut a 4" x 6" piece from the original piece of cardstock that was set aside.  Adhere it to the 1" flap of the organizer shell.  A pocket will be added to this flap in the decorating stage to hold postage stamps!


Here's what the basic organizer looks like assembled....


and with the lid folded over and shut....


Be sure to stop back tomorrow to see what the finished organizer looks like, how I decorated it with the holiday Club Scrap Kit and the cards I made to tuck inside!  Hope to see you then :)