Friday, April 29, 2016

Thinking of You Washi Card

Today I decided to work on a challenge (since I've been really slacking off on them lately).  And I choose Retro Sketch Challenge #212!


I loved the bottom...one of the DT members made it using a rainbow of pattern papers which really got my creativity going.  I decided it was best not to copy her so I thought it would be fun to switch it up a bit and use washi tape.  I pulled out several black and white designs plus several that had gold foil (they look yellow in the photo though).  

The friend is either a MFT or Simon Says die that I cut with a stitched scallop edge.  The tiny "Thinking of You" is from a previous ClubScrap kit and the little hearts are hand drawn.  It was fun to work with this sketch...  I'm still gonna make one with a rainbow theme soon though - it's just too much fun not to - LOL!!


Have a lovely weekend friends!

Real Women Stamps!

FINALLY - Someone has created real life women stamps!  I don't know about you but I am so over the big head, blank eyed stare, stick figure stamps that qualify as "women" lately.  It's about time there are some stamps that depict real women with realistic proportions.

I say bravo to Unity for coming up with these beautiful women!

ANGIE-1297A-GIANNA-GIRL

ANGIE-1296A-TESS-GIRL

Thursday, April 28, 2016

Pocket Letter Article - GiveAway!

Oh Happy Day!  I received my new copy of Rubber Stamp Madness and the article on Pocket Letters is wonderful!  My pocket letter art takes up one entire page!


The article is 3 1/2 pages long talks about how pocket letters came to be and how stampers and mixed media artists have taken them in a new direction.  They asked me several questions first about pocket letters then about how I made the pocket letter shown!  I'm so happy that maybe it will spread this fun art to others.


Now for a give-away!  I subscribe to RSM so I actually got 2 issues...mine plus an artist copy so I have an extra to give-away!  

Would you like to win a copy for yourself? 

If so, simply post a comment telling us all if you've ever made a pocket letter or if you'd like to give it a try.  I will send not only the magazine but a few supplies (PL/Baseball Sleeves; Glassine Envies (to hold your goodies) and more!)

You have until 5-6-16 to post a comment to be entered to win!

Good Luck Everyone
and 
Happy Creating!


Wednesday, April 27, 2016

Dahlia Club Scrap Blog Hop

The Dahlia kit from Club Scrap features lovely pattern paper created using beautiful watercolor paintings from one of my favorite watercolor artists - Swarup Murthy.  I think you're gonna love this kit!  I know I sure do.


And here's what I made for you.... Originally I had planned on adding several flowers I had left over from the Welcome sign I made but I just loved this dahlia print so much...I couldn't bring myself to cover it up. I added the "Fun" tag off to the side so it wasn't plain yet still showed off most of the flower.


Pop open the lid and what do you know... it's filled with a set of Dahlia cards and envies!  I made this box large enough to hold a set of 6-10 cards + envelopes.  Normally these boxes are sized to just fit A2 size cards but people often forget that the envelopes are a bit larger and never fit quite right.  I did the math and came up with a box that will hold both cards and envies nicely (sizing below).


Each of these were stamped with a sentiment from the Dahlia kit stamps except for the "Find Beauty" that stamp is from last month's Paris Flea Market kit.  I thought it fit this kit nicely as well.

And here's how I made it...


Cut 1 box base - 7 3/4" x 9" 
Score 1 1/2" on all 4 sides.
Snip and crease as shown.
Glue 4 tabs to create the box bottom.


Cut 2 panels 4 5/8" x 7 7/8".
Score at 1.5" on 2 short and 1 long sides.
Snip and crease as shown.
 

Glue tabs on each half of the box top.


Secure the box top pieces to the box base using a bit of tape - I used fabric tape that somewhat matched the box colors but you could use a fancy masking tape or whatever you can adapt that you have in your stash.  You could even use some heavy duty cardstock cut into 2" x 3.5" strips and double stick tape for your hinges.  Whatever you've got that works.


Now you need to cut the following (if you want to cover all sides like I did):

Top of the lids:

(2) Mat - 2 7/8" x 4 5/8"
(2) Pattern Paper - 2 5/8" x 4 3/8"

Short Sides:

(4) Mat - 1 1/4" x 2 7/8" 
(4) Pattern Paper - 1" x 2 5/8"

Long Sides:

(2) Mat -  1 1/4" x 4 5/8"
(2) Pattern Paper - 1" x 4 3/8" 


Adhere all of the pieces to the box as shown...  Add the tag and fill with all sorts of fun cards & envies!

Hope you've enjoyed my little creation and give it a try yourself sometime. It's time to find more inspiration right around the corner...

You can do so by hopping on over to


to see what she has created.

The complete list can be found here:


Supplies:

ClubScrap.com - Dahlia Kit Papers, Stamps, Tag, Fiber
Imagine Crafts - Memento Inks

Tuesday, April 26, 2016

Spring Pocket Letter Swap Update

Hello Friends!

Just wanted to let you Pocket Letter Friends out there that I sent out the info on who you should be sending your pocket letter to   Please let me know if you did not receive an e-mail.  I will resend your info.

Remember mailing date is May 7th!

Have fun creating!!

Springtime Welcome Sign - Paper Flowers Galore!

Today I wanted to share a bit about how I made the Springtime Welcome sign I shared with you yesterday.  


As I mentioned at the time just about everything you see started out as just paper or chipboard.  Now I'll tell you how I did it...


I started off by die-cutting LOTS of petals out of smooth white Club Scrap cardstock...lots and lots and lots.   I did cut a few yellow bases from some scraps I had left over from another project...they won't be seen in the finished flower so it's o.k. they are a different color.


I used several different dies to make the flowers - the Dahlia was made using a combination of petals from the Sunflower (5 bottom layers) and Tiny Daisy (2 center layers + layer wrapped around a bead) dies.  In addition to these dies I used a few Spellbinder flower dies as well.  Some of these flowers were cut out of colored Club Scrap cardstock - deep pink, yellow and a few different greens for the leaves and other foliage.


After all of the petals were cut I colored each petal (or leaf) with PanPastels.  The Dahlia was colored with a couple different shades of purple for the outer petals, as the layers of petals got closer to the center I started using darker and darker shades.  Some of the inner tiny petals were colored on both sides because their curl was deep enough that you could see both sides.  


Here is how each layer was assembled - each layer has 8 petals.  There are 3 layers or the largest petal, 2 layers of the medium size petal and 7 layers of the really tiny petal.  I also used a plastic pony bead for the very center of the dahlia.  There were a couple layers of beads which were colored on the back side with the PanPastels; shaped & curled very tightly, then glued directly to the bead.


I repeated these steps for the rest of the flowers.  I also applied PanPastels and shaped each of the leaves and bits of foliage as well. Most of the flowers have pips, beads or micro beads glued in their centers.  Assembling the flowers and all of the foliage took most of a weekend.


Next I started on the sign it's self...I pulled out a piece of book board (really thick chipboard) that was left over from another project....  It was already the basic size and shape I needed so that was a plus!


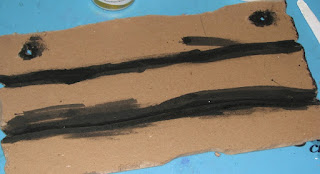
I wanted the board to resemble a wood sign so I pulled out my Exacto knife and started carving the edges and spaces between the "boards".


The edges and spaces were painted with Lamp Black paint.


A thick layer of Deco Art Crackle Paste was applied to the boards.  Remember - thicker layers produce larger cracks once cured.  I also drew a few lines through the medium to mimic the striations you might find on weathered wood boards.


Here are a couple photos of the crackle medium as it dries...


I left it to dry over night....


The next morning the Crackle Paste had completely dried and I was left with lovely crackle finish.  I applied a coat of Renaissance Brown Elegant Finish Metallic Glaze.  I know what you're thinkin' - that sounds pretty fussy for an old wood board.  Nope, this stuff is great!  It's got a rich shimmer chocolate look and once it's applied over the white crackle paste it creates a beautiful finish.  


Since it's a glaze (which is a bit thinner and translucent) and not an acrylic paint the crackle finish is very visible once dry.


I then stamped "welcome" with some foam stamps and more black acrylic paint.


I determined where I wanted everything to go and started gluing it down.  I filled in the design with a few tiny Prima flowers here and there and then tied on the ribbon for hanging.

So there you go...
Spring Welcome sign ready to greet our visitors!

Hope you enjoyed the process.

Supplies:

ClubScrap.com - Cardstock, Book Board, Ribbon
DecoArt - Crackle Paste, Americana Lamp Black Paint, Elegant Finish Metallic Glaze - Renaissance Brown
Spellbinders - Flower & Leaf Dies
Sizzix - Flower Dies
PanPastels
Glue, Micro Beads, Beads, Pips, Foam Tape, Letter Stamps

Monday, April 25, 2016

Springtime Paper Flowers

It's Spring Time here in the States and what better way to celebrate than by making paper flowers!  That is the Artist Team Challenge for the Club Scrap girls this month - paper flowers.  April's kit - Dahlia is what I used to help create my garden of flowers for this new Welcome sign for my front door....


Everything you see with the exception of a couple tiny Prima flowers was die-cut and assembled by me!  I used the Pink, White and Yellow papers from the kit paired with Sizzix and Spellbinders flower dies.  All of the flowers were enhanced with PanPastels and the background "board" is actually a piece of book board (heavy duty chipboard) that I cut, carved and painted to look like wood.


It addition to the paper & pastels I used beads, pips or micro beads for the flower centers.


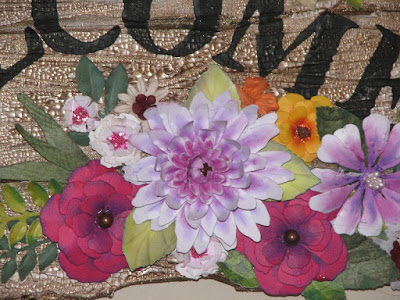
A few close ups of the various flowers... the tiny white (upper right) and tiny maroon (lower left) are Prima flowers - the rest are hand made.


The maroon flower is Prima, the rest are mine.


There are 2 of the maroon flowers here that are primas but the rest is me.


I used a combination of a couple flower dies to create the dahlia flower in the center.  I had planned on making a few more but just this one flower was VERY time consuming.   Each and every flower petal was cut, colored and glued down individually.  There are over 88 flower petals on this one flower alone!  It took a few hours to assemble this one flower - after that, I decided that a single focal point dahlia was good enough  - LOL!!  

Tomorrow I'll be back to share how I created the welcome sign using some lovely Deco Art products and share a few pics of how the flowers were assembled.  Hope you are inspired to celebrate Spring by making a few paper flowers of your own!

Your next creative stop on the hop is 


Remember if you get lost along the way the entire list can be found on the 


Have a wonderful day Friends!!!

Friday, April 22, 2016

Our Creative Corner April Top Talent!!

Today I have the honor of being April's Top Talent over at Our Creative Corner!  I was given the opportunity because the plaque I made for February's Sew and Sew challenge was chosen as the winner.  I was asked to create another piece to share with the OCC followers as well as answer a few questions provided by the OCC staff.  Please be sure to stop over at Our Creative Corner and check out my Q & A's 

Here is what I created....


The theme this month over at OCC is Gypsy Fayre with the following image/colors for inspiration. Beautiful huh?  I thought so too!


I knew right away what I wanted to do! I've only ever seen gypsies on television but the first thing that comes to mind are their arms full of bright, beautiful bracelets! I've been wanting to make myself one of the layered bracelets for so long and I decided this was the perfect time to do so.  I gathered up all of my left over beads and decided to make myself a chunky gypsy bracelet...or at least what I picture they might fancy.  


I started off by slipping a length of cord into the button and securing with a knot.


I then used the ladder stitch to sew on the beads. The hardest part for me was quitting...I just kept wanting to add more beads. I have to be honest though - at first I jabbed my fingers with the needle quite a few times until I got into the groove.  Once I picked up the rhythm it was so much fun. In fact, I was so into that I added way too many beads - I didn't have enough cord left to tie it off so I ended up removing about 8-10 beads just to finish it.


I measured leather cord for a 5 wrap bracelet but never making one before I didn't realize that my beads were so large and chunky that it ended up being a 4 wrap bracelet instead.  You need to keep that in mind when you measure your cord - bead size makes a huge difference.  (They don't tell you that in any of the instructions I found.)  But in the end I love how it turned out and I'm very glad I decided to try it.


Thanks to OCC for inspiring me to finally give it a go!


Thursday, April 21, 2016

Birds, Feathers and More!

Birds, Feathers and more!  
You still have time to join in the fun over at 

I have a few cards to inspire you...


My first little bird card was stamped then colored using Memento Dye Inks and a Sponge Dauber.  I then pounced a bit of ink onto my craft mat, flicked it with water and flicked it onto a piece of white watercolor paper that I had stamped a couple leaves onto.  The bird was then trimmed and mount over a piece of fancy fiber.


For this card I went with pastels.


And finally my feather was stamped & embossed with white EP.  I placed a circle template over the card and filled it in with PanPastels.  I stamped the sentiment and added a bit of glitter here and there over the feather for a bit of shimmer.

Hope you have a lovely day friends!

Wednesday, April 20, 2016

Color Burst Layered Dahlia Birthday Card

Today I have a fun card to share with you...


My Color Burst Dahlia birthday card!  I had so much fun making this card and can see lots of potential for this technique.  So I got the idea when I saw this very large dahlia stamp (3.5 x 4") which was included in the Art Nouveau Stamp Sheet for the Dahlia Kit.  


Over in the UK they have a craft called 3D Decoupage Papertole where they take several copies of a single image and build the image into a dimensional layered design.  I figured I could do the same thing with this dahlia image.  My twist though is to use Color Burst to color the stamped images to give the finished flower even more depth.

And here's how I made it....


I started off by stamping the image 6x with Tuxedo Black Memento Dye Ink.


I then sprinkled Fuchsia and and Orchid Color Burst onto the paper & spritzed with water.  Once it was dry I cut apart each flower.


I started by trimming out one complete flower and set it aside.  This would be the base flower to build upon.  Image 2 - I cut the center most cluster of petals, I then placed this cluster over the 3rd image, traced around the petals I wanted to include on the next layer of petals with a white gel pen and trimmed.  I continued until I had each layer cut out.


I assembled the flower with double stick foam tape for a really dimensional flower.  Of course you could choose to glue the layers together for a mail friendly card.  This is where the variation in color created by the Color Burst really comes into play.  The natural random pattern of the Color Burst give added depth to the flower.


I die-cut some leaves, added highlights & shadows using Pastel Pencils and blended with my finger.  I then used a stylus to give each flower a bit more definition.  

To finish off the card I stamped the sentiment, adhered the flower/leaves and mounted it on a maroon card base.

I would like to enter this card into a couple challenges....

Take It, Make It Challenge

and 


Supplies:

ClubScrap.com - Cardstock, Pattern Paper, Stamps
Imagine Crafts - Memento Dye Ink - Tuxedo Black
Color Burst - Fuchsia, Orchid
Stabilo CarbOthello Pastel Pencils
Spellbinders - Leaf Dies
Double Stick Foam Take