Tuesday, April 30, 2019

Butterflies & Poppies Frame with Rinea Foiled Paper


Check out the frame I decorated using plain old paper straws and Rinea foiled papers!
I am so excited how this turned out...it really does transform the frame into something special.

For complete instructions and supply list see here:


That's my Grandma btw :)

Tuesday, April 23, 2019

Another Year of Fun!!!

Hey Friends -

I can now share the news that I'm back for another year filled with foiled paper fun on the Rinea Design Team!  I love being able to bring you inspiring designs using the bright, shimmery fun Rinea Foiled Papers offer up.  I hope you are as excited as I am!


Congratulations to everyone on the team!
Can't wait to get started.

Monday, April 22, 2019

Happy Earth Day my Friends!

Happy Earth Day!

Here's a little hug for the Earth and all of the ocean lovers out there.


I hand drew the sun and sea; colored it up with a bit of Memento inks then stamped the clouds and birds (Skyward - Rubber Stamp Tapestry) using VersaFine Clair inks.  Those clouds are so much fun to stamp!  I added some pen work in blue and white...


and for the final touch a bit of glitter sprinkled over the ocean for some sparkle!

Hope you all have a lovely day!

Imagine - Memento Ink; VersaFine Clair; Sponge Dauber; On Point Glue; Memento Dual Tip Markers
White Gel Pen
White & Blue Cardstock
Glitter


Saturday, April 20, 2019

Wedding Anniversary Invitation

This month Imagine invited it's design team to create wedding themed projects. Invitations are a big part of weddings so I figured many of us were going to share ideas for different invites.  Me being me, I decided to do something a bit different.  I made a mockup of an invitation for our 35th wedding anniversary!


Mauve and Grey were the colors for our wedding. I wanted to keep the grey and add white on white for an updated classy look. I went with Shimmer Stix, Shimmer Spritz (both in Frost) and heat embossing through out.  I just love the subtle shimmer of those hearts don't you (Pewter = grey heart; Frost = white heart)?


I made the invitation a tri fold, it's just easier to get all of the information on a card like this rather than a traditional open card. I used a pretty nested die to cut out the info which was edged with VersaFine Clair ink called Morning Mist. It's a lovely shade of grey.  


The panel you see on the flap is a full sheet made just like the upper portion of the front of the card (shown above), the only difference was that I used the Shimmer Stix for the front of the card since I wanted just a specific area to shimmer where I used the Shimmer Spritz on the inside panel because I wanted the entire panel colored.  Both were then stamped with VersaMark Ink, sprinkled with white embossing powder and heat to set. Don't you just love the look?  

Something else I wanted to point out is that you might not think the Shimmer Spritz would make much of a difference when talking about white on white but here you can see there is an actual color shift from the stark white of the cardstock to the softened white of the Shimmer Spritz Frost. Of course the embossing powder yields a creamy white.


And finally I mounted the rest of the details on a double mat which were both sprayed with Shimmer Spritz; Frost for the upper mat and Pewter for the bottom mat.  I really do wish I could send you all one so you could see for yourself the beauty of the Shimmer Spritz paired with the white on white embossing.  It's just so lovely and it would make a perfect wedding invitation in addition to my anniversary invite.

I hope this inspires all you brides, bridesmaids, mother of the bride, etc out there to consider hand crafting your own wedding pieces...it really makes for an extra special time of it. 

Monday, April 15, 2019

On Wings She Flies Challenge - Lost Coast Designs!

Good Monday Morning Everyone!

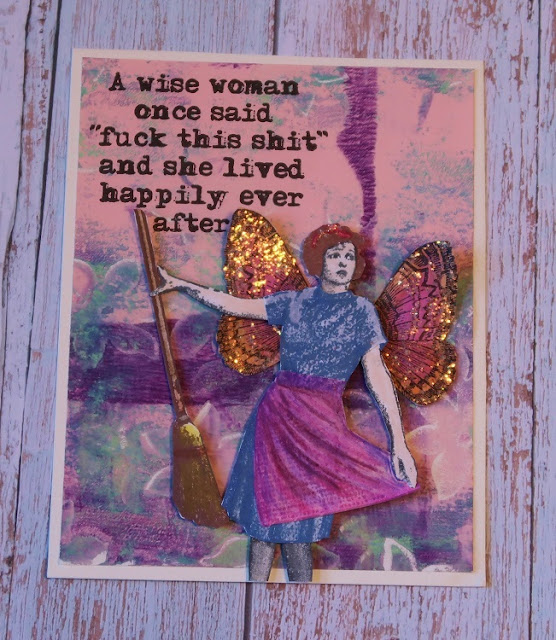
It's the 15th and you know what that means...a new challenge on the Lost Coast Designs blog!!  This time we're featuring women with wings...angels, fairies or just women you've given wings to which is what I have for you today.  Actually she is my cleaning fairy and she's got a bit of an attitude...I guess she's not feelin' it today ;)  LOL!!!

LCD Stamps - Housewife, Butterflies Set
Carmen's Veranda Stamp: Happily Ever After sentiment

I created the card by stamping the Housewife and butterfly on white cardstock. Each image was colored then fussy cut. I decided since she was going to be my cleaning fairy she needed some sparkle so I added a bit of micro fine glitter to the wings and her headband.  She was assembled then set aside to dry.

I mounted a piece from a gelli plate print onto a white card base. The Happily Ever After sentiment was stamped in the upper corner with VersaFine Clair ink. And my fairy was then affixed to the card using foam tape to pop her off the background a bit.

I hope this inspires you to join in the fun!
You have from today until the 31st to add your creation.
Happy Stamping Folks!!

CHALLENGE #74 - ON WINGS SHE FLIES

Sunday, April 14, 2019

Blender Brush Hack

Let's talk blender brushes...
I'm sure some of you may already know about this but I just wanted to put it out there because it just blows me away every time I see an ad for them.  Well, and because I'm cheap. I can't stand to overpay for items just because they are packaged for the craft industry. That is why I have all sorts of funky, off brand objects and tools in my craft room ;)

One of the hottest new trends in the stamping/mixed media world are blending brushes...you know those sleek looking brushes in rounds, ovals, etc. They are offered now by several different companies all for the same basic price(s). A small set of those brushes (5-6 brushes) retails for around $25.00 or you can get the large set which has 8-10 brushes for a whopping $50.00!! 

I had the opportunity to try a set at a make & take and they worked really nice but when I found out the price tag I had to walk away...WAY too expensive for my taste. Crazy money for a set of brushes IMO. So, I went in search of and as it turns out these brushes can be found in the cosmetic world for a fraction of what the "ink blending brushes" cost.


I actually bought 2 different sets to try just to see if random brands worked and they did. I found this set of brushes on Amazon for 9.00 (free shipping) the second set I bought was 15.00 (free shipping) (it was really cute pink which I gave to my DIL after testing them) but that set came with the stand you see in the picture.  Guess what? They are the same exact thing!!! They feel the same, they work the same, the only difference is the price tag!!!   A $35.00 to $40.00 savings FOR THE SAME THING!!!!!!  Doesn't that just fry your taters... I hate it when they take a relatively inexpensive product, slap a "name" on them and charge you 5x what it's worth.


Black Set (brushes only) (8.99 - Free Amazon Shipping w/Prime) - https://www.amazon.com/gp/product/B01M0BJP13/ref=ppx_yo_dt_b_asin_title_o07_s00?ie=UTF8&psc=1


I merged the 9.00 set with the stand from the other set and they now happily reside on the corner of my desk :)


Because the brushes came in a small box one of the brushes (above) has a small blemish along the outer edge of the bristles (to the right of the handle - the bristles stick out a bit) but it doesn't effect how it works at all.


I have tried them with stencils (as I did at the make & take) and I tried them just inking up and blending on paper, I've used the smaller ones to color images and they all work perfectly!

So if you'd like to stay trendy without spending the big bucks give them a try...
I highly recommend them - they work like a charm!


Thursday, April 11, 2019

Patriotic Unicorn Geometric Folded Sculpture

Well, Monday it was a family of deer, yesterday it was a birthday cow and today I've got a patriotic geometric unicorn!  Guess I'm on an animal kick lately.

I am so excited to share this unicorn -
he turned out better than I could have imagined....


I started out searching for a fun pattern and found one on Etsy from the seller - PaperFreak. They are very easy to follow and can be sized to your needs.

I then covered the pattern with foiled papers from the Patriotic Variety Pack.
Creased, folded and glued...in a couple hours I had a Unicorn!

It didn't have a mane in the pattern but I easily added one by cutting a strip of the sapphire foiled paper and snipped lots of little hairs.  It's added to the sculpture with Tear It! Tape from Imagine.


For the rundown on how it was created please see:


It was so much fun I'm going to try my hand at more of these fun paper sculptures.


Supplies:


Wednesday, April 10, 2019

Moo to You!

Today I have a card for you made with the newest challenge over at Rubber Dance Stamping blog....


Isn't he great!  I just love him and his cupcake too!

The challenge was to use Fuschia, Blue and Lime so I pulled out my Nuance powders and created the fun background by sprinkling these colors over the Bubbles stencil from Stamplorations.  I spritzed it with water then removed the stencil and let it dry.

I stamped the moo cow with Blue Belle, Verdant and Glamorous VersaFine Clair inks...a bit of fussy cutting, colored pencils and a touch of glitter and he was done.

I added a few sequins from Sparkle Blends and it's done!


Monday, April 8, 2019

Tunnel Father's Day Card

Happy Monday!
It's been a bit - long story.

Anyway, today I have a fun card for you that I made using the new StazOn Pigment Inks.  It's a great opaque ink that works super on slick non-porous surfaces as well as paper alike.


My card was created by stamping several pieces of acetate using the StazOn Pigment Ink in layers. I started off with the lake view silhouette stamped on the green cardstock.  I then placed each "layer" over the initial image adding elements as I stamped each consecutive layer...below are the layers spread out so you can see the details of each.


After each layer had dried I adhered them to the accordion folded sides to form a tunnel of sorts to look through.

For all of the details on how the card was stamped/assembled please see the Imagine blog here:


Have a lovely day friends!!

Monday, April 1, 2019

Strawberry Delight & Coupon Code!!

Hello Friends!

Happy Monday....
no April's Fool games here.

Yes, a reprieve from all the silliness...I've never been a fan of this particular holiday so I try to keep a low profile so not to get tricked too bad ;)  Hopefully you've not been "gotten" and if you have I hope it's not been too bad.

Today I do want to share a couple cards I made using one of Rubber Stamp Tapestry's newest sets...Strawberry Delight!


My first card is just a fun summery type card. (Can you tell I am so over winter!!)  I used VersaFine Clair inks to stamp the entire card.  The background was stamped using Sunny Studio's Background Basics gingham and the same Tulip Red as I did for the strawberries.


This card was lots of fun to make!  I stamped on a piece of acetate using Imagine's new StazOn Pigment Ink!  It really is amazing stuff. It makes a super fun shaker card.


I stamped the planter on a piece of white cardstock then placed the acetate over top. I stamped the strawberries, flowers and leaves on to the acetate then stamped the planter on the revers with Piano Black.  I then colored in the open spaces with a few different colors, blending while the ink was still wet.


I cut all the pieces, stamped the back part of the shaker with my sentiment...


And filled it with some lovely sprinkles from Sparkle Blends Sequins mix.


Now I also have a coupon code for you from Rubber Stamp Tapestry...

If you type in the code - RONI - you will get 15% off of orders of $10.00 or more!!
Please feel free to use it as many times as you'd like because there is no expiration date :)

Also if you'd like to sign up for the Rubber Stamp Tapestry news letter you will also get a heads up on other sales, discounts and all sorts of other news first.

You can sign up here: RST News