Friday, February 27, 2015

Club Scrap Book Stack - My Version & GiveAway!

As you know I am a member of the newly minted Club Scrap Design Team.  Each month we will be challenged in some way - it could be a technique, a specific project or creation.  This month we were asked to create something using all or part of the Stacked Book Box Components set.  Well today is the big reveal over on the Club Scrap Blog.  Everyone gets to see what we all made!


You know I'm not much for following directions but in this case I did...sort of - LOL!!  Instead of making all three I decided to show how each sized box could be made into their own individual project.  This week I am sharing the medium sized box which finishes off at approximately 6.5" x 8.5" x 2.5".

Here is mine.... I turned it into a stationary box.  


Here's a peek at the inside....complete with a set of cards....


and the bottom half is actually a handy dandy lidded box that can store pens, pencils, stamps, etc.


And here are the cards I made as well... The box, cards and all of the components were made using paper, stamps and embellishments from London Calling collection.


Be sure to check out the post on the Club Scrap Blog to see how others took this stacked book kit and made it their own!  Have fun and be inspired!

Would you like to win this stationary box and 8 cards?  
If so simply leave a comment 
(and be sure I have a way to contact you) for your chance to win!  
I will draw one lucky winner on March 6th.

Good Luck everyone!!

Thursday, February 26, 2015

2015 Mixed Media Technique Calendar - June

Whew - it's been a busy week ~ it's already Thursday, can you believe it?  I don't know where the week has gone.

Today I've got June's Mixed Media Technique Calendar page to share...this time I'm using up lots and lots of pattern paper scraps.  I swear once I stick a single scrap of paper in my pieces box they multiply 10 fold.  I always have a huge box of scraps and this is a super way to use some of them up.

So I started off by pulling out some scraps of pattern paper and cutting them in to small squares and rectangles.


I traced my gothic arch onto a piece of chipboard then began gluing down the various pieces of paper.


Here's how it looks so far...  You need to let this layer dry completely.


Now water down a bit of white acrylic paint to make a wash.  This is just to tone down some of the brighter pieces and give it a more uniformed look.


You can see how the paint has muted some of the brighter colors...


Next I watered down a few bright colors - blue, lime and lemon yellow and painted it over various parts of the arch.  This layer isn't intended to cover the cardstock - just add a thin layer of color which is why it was watered down.  This would be similar to mixing the paint with a glaze medium.  Since most people don't have the glaze, water is a great substitute.


For the next layer I applied modeling paste over a couple different stencils.  I used the DecoArt modeling paste because it dries to a translucent finish which allows the layers below it show through.  If you don't have modeling paste gesso is a great substitute (but it won't dry translucent).


After the modeling paste had dried I applied Radiant Neon inks using sponge daubers.  These are really vibrant colors - just what I wanted for June.


And here's how it looks at this point.  To finish it off I added some word stickers but stamped words will work great too.  I am just trying to use up some of my stash and I just happened to find these words the other day while looking for something else.  I also added some fine pen work to the edges of the blocks of paper and the edge of the arch.


And here's how it turned out....


Of course you could have added more layers of stamping and color but I wanted to keep the integrity of the papers I started off with.  That's totally up to you.  Below are a few more close up photos of various areas of the calendar....


Hope you have fun making your own!!

Wednesday, February 25, 2015

Club Scrap Blog Hop - London Calling!


Welcome to my creation for the Club Scrap - London Calling Blog Hop!  You may have arrived by way of Janet's blog - Dishing with Janet.  If not be sure to check it and all of the other artists participating in the hop.

I have to say I'm in love with all things British.  It started with my instant love of Downton Abbey five years ago when it first premiered.  If you've never seen it you MUST - it's wonderful. It's a super story line that follows a British family and their servants from the early 1900's forward.  I've been a faithful viewer ever since.   So, when I found out the theme for this months kit I was thrilled!

0215_blog hop photo 0215_blog hop_zpsrabbbjdv.jpg 


The color palette for this kit is lovely, soft and muted like bringing to mind a forgotten memory...


My project started off with a piece I've had in my stash for about 2 years now.  I have a thing for clocks and I found this at a garage sale...I didn't know if it worked or not but I figured for 2.00 I'd give it a shot.  It didn't work so it's been waiting for that perfect occasion ever since.  This is it!

So this is what my clock started out looking like....  There were originally "weights" hanging in the bottom section along with a swinging pendulum.  They were all fake, just hanging on a couple little hooks so they were easily removed.  I then popped the clock face out and was left with a shell - perfect for altering.


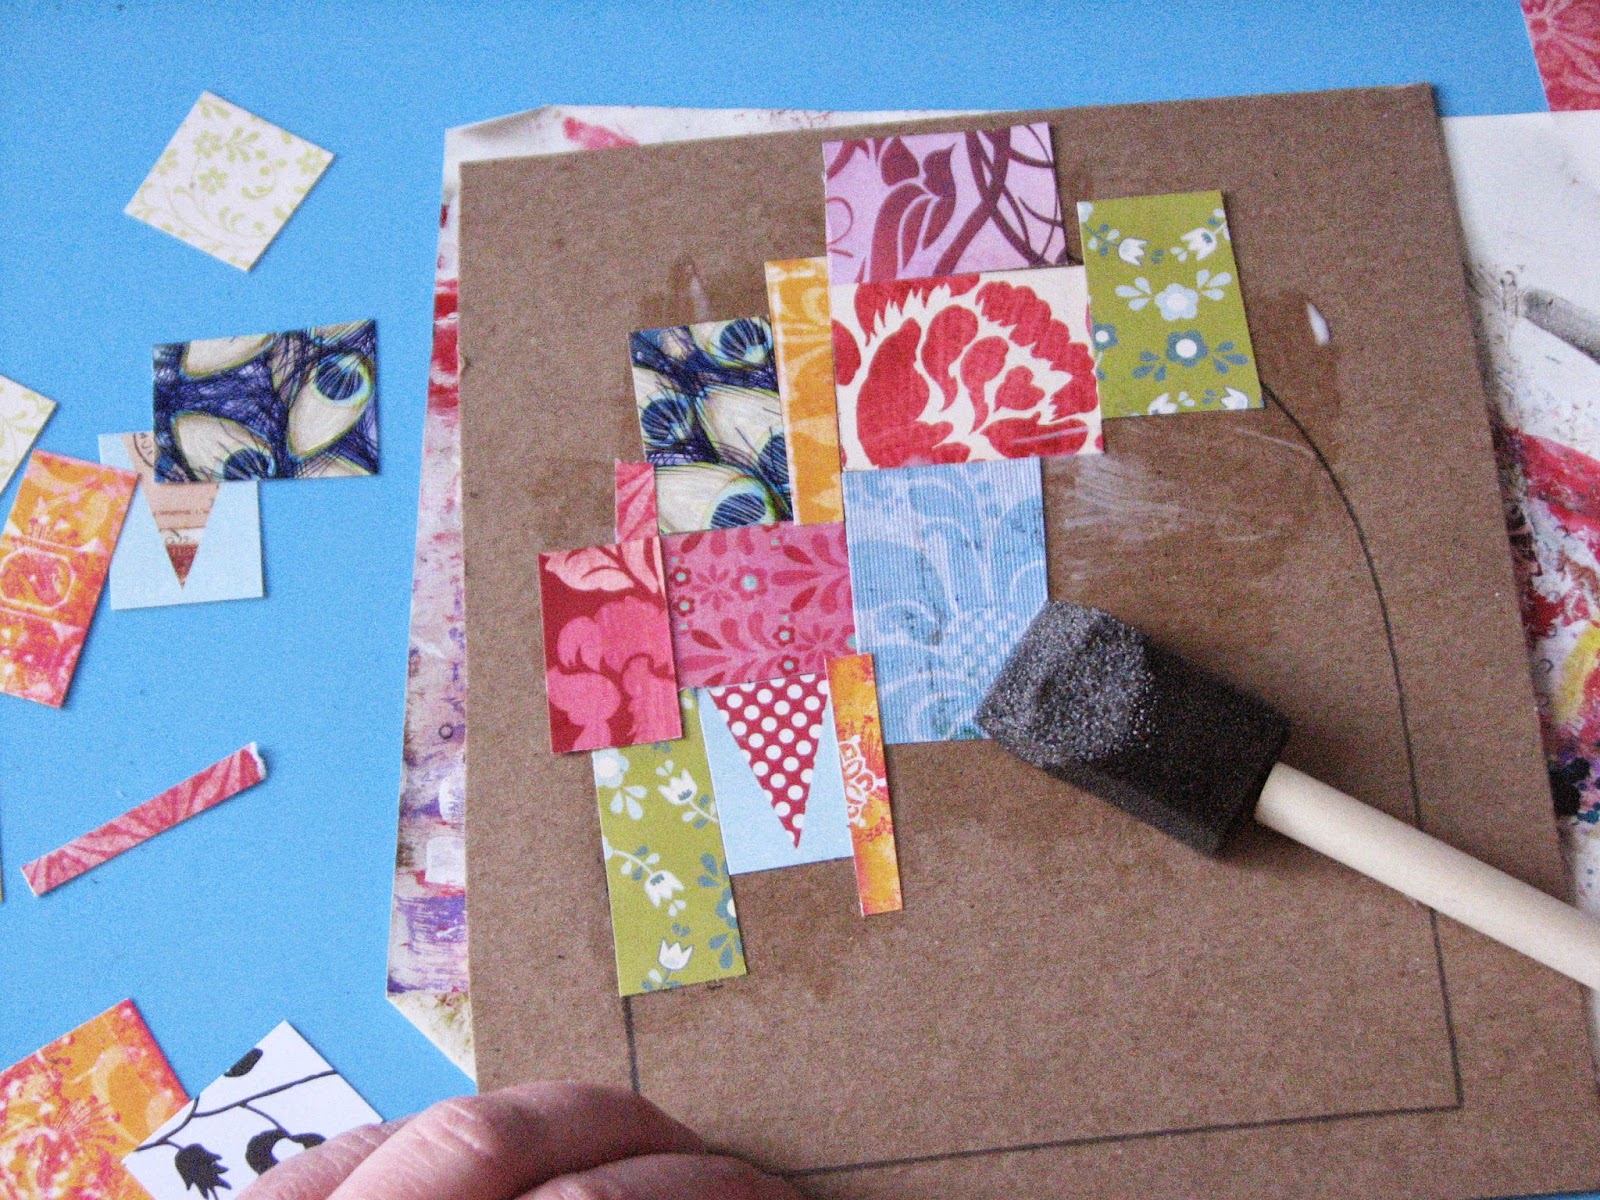
I started off by painting the inside and back cover with white acrylic paint.  I then covered the raised side rails with the Underground Washi Tape.  (LOVE this stuff!!)


And did the same for the front of the case.


I then cut apart a couple of the prints and inserted them into the long recessed side panels.  I used the large collage stamp from the UM Stamp Collection to stamp two panels.  I was able to cut them to fit so it looked like two different views.  I inserted these in the small upper recessed panels.

I used pieces from the green map pattern paper to make strips covering the remaining exposed areas of the clock.


Next I went to work on the back panel.  I decided to put Big Ben in the upper portion of the clock.  To make it stand out a bit I cut Big Ben from the second piece of cardstock and mounted it with double stick foam tape to pop it off the background.

I used the green print on the bottom portion.  I cut the angel & oval out from the second piece of cardstock and used a triple layer of foam core board to pop it off the background.  I used several layers of foam core board so I could pop the other elements (post card, phone booth and hat) off the background as well giving the all a variety of layers for lots of depth.


I then set about working on the inside.  Most everything was from the kit...the only items I added were a bit of lace, a few flowers and the hands from the clock.


The upper portion of the clock didn't have a platform so I made one from a piece of chipboard.  I then mounted several elements on pieces of chipboard to prop them up for perfect placement.


I added 3 British Flag charms from my own collection to finish it off.

and here's how it turned out....


The green and flag ribbons are from the London Calling Kit, the white ribbon is from a previous kit. 
Both sides of the clock case are a bit different....


The top portion of the clock.... Everything is from the kit except for the white flowers which are prima.


I wanted to show a close picture of the crown... it's actually one of the metal pieces from the Embellishment pack.  I simply bent the two sides around and added a bit of Stickles glitter glue on select areas to make it look like a crown! 


And here is the bottom portion... again, most everything from the kit except the lace, flowers, clock hands and flag charms which are hanging from the hooks that originally held the fake clock weights.


I hope you've enjoyed my contribution for this months hop and that you might have drawn a bit of inspiration for making your own altered piece.

Wait a minute...did you think I forgot our little Gnome friend...nope here you go....


He's quite a character isn't he?

Your next stop on the hop is...


If you get lost along the way the entire list can be found on the Club Scrap blog - London Calling.
Have a great day!!
and
Be sure to stop back on Friday to see my take on the first CS Designer challenge!

Tuesday, February 24, 2015

SCACD BRAVE HEARTS and ECLECTIC 2 Blog Hop

SCACD is celebrating the 2 recently released NEW exclusiverubber stamp sets with help from a few friends.. The stamp collections are the Brave Hearts (a group of 4 empowered gals) as well as Eclectic Collection 2 (a combo of 6 Steampunk and ethereal stamps). With the Eclectic 2 collection if you buy the entire set you get 4 FREE date stamp words. SCACD Artist Carmen Medlin and Susana collaborated on the images and we are so happy to be showcasing them to you now :D

These stamps are now available for purchase in the USA HERE 

Our International Friends can purchase SCACD rubber stamps at Quixotic Paperie HERE

SCACD Digital images for USA and International can always be found HERE


Susana knows how much I love Steampunk so I was lucky enough to get to play with the Steampunk Turtles from the Eclectic Collection 2!

and here's my creation....


The background was created by using the Crafters' Workshop Kelp Forest stencil and a variety of Memento Inks.  I then spritzed on a bit of Summer Sky and Bahama Blue Fireworks! shimmer spritz.  Below is a close up of the turtles.  They were made by stamping them several times, coloring each layer with Inktense colored pencils then affixing them together using double stick foam tape.  Really makes them pop off the card.


If you like Steampunk goodness you'll love this fun new Eclectic collection 2!

Your next stop on the hop is Susan's Blog. 
If you get lost along the way you can always find the complete list 

Monday, February 23, 2015

Amplify Flower Garden

Happy Monday!  I hope you've all had a wonderful weekend.  I wanted to share a card/technique with you that was posted on the IMAGINE Crafts/Tsukineko blog over the weekend....Get AMPed.  All of the projects were created by myself and other team members using the Radiant Neon Amplify! medium which puffs once heated.  

My contribution to the post is my Flower tutorial along with this card I made using the flower techniques shared in the tutorial. If you've visited here much you know how much I love both experimenting and flowers.  Well recently I combined the two and came up with some fun "Flower Recipes" that will help you create an amazing Amplify! flower garden of your own.

You can find the flower tutorial on the IC/T web-site here: Amplify Flower Tutorial


This photo will give you some idea of the AMAZING texture created by the Amplify! medium...


So much fun in a small bottle!

Friday, February 20, 2015

Happy St. Patty's Day & Antique Mall Find!

 Happy Friday!  I hope you have had a wonderful week!  Today I have a fun St. Patty's Day card to share with you all.  

It is very clean and simple for me but I don't know if it really qualifies.  I started off by stamping three shamrocks along the left edge of a card panel which I then colored with my Chameleon Markers.  They are so much fun - as you can see I did a bit of experimenting with directions that I colored in.


I then flicked Pear Tart irRESISTible Texture spray on the card and added dots of color here and there with my Pico Embellishers (Bronze & Gold).  The sentiment was stamped, die-cut and mounted on the card.  


And on to my Antique Mall find!!!  I road with dh on a call yesterday - it's one of the only times I've been out since I fell.  On our way we noticed a new Antique Mall and we stopped on the way home.  It was so much fun - first because I haven't been anywhere for so long but also because most of the antique stores around our area have closed in the last several years I'm sure due to the poor economy. I had so much fun, there were so many cool goodies BUT this was my score for the trip.....

It's a printers drawer WITH the printing blocks!!!!!  It looks small in the photo but the drawer is actually about 30-36" long - each of the letters is approx. 2" tall (I haven't measured them yet).  I am going to keep some and sell the rest on my Etsy store.  


So, that's what I've been up to...
how about you?
hope you all have a super weekend!