Showing posts with label domino. Show all posts

Sunday, August 18, 2024

Beauties of the Far East Challenge

Hello Friends -

Long time...things have been crazy busy and not much time for crafting but I finally had a chance to make a few things so I'm going to be sharing them with you now.

As you may or may not know Gecko Galz is a collage store on Etsy. They have been around for many years and I've been enjoying their monthly challenges hosted both on the blog and facebook page. The blog has a main themed challenge each month which you can use any of their images to create a project as long as it follows the theme. This month it is Beauties of the Far East and this is my creation...


I used a couple images from the Beautiful Geishas Tin Toppers sheet for this candy tin - one for the front and one on the inside of the lid... 


The text is part of an element from the Asian Waters Junk Journal kit to line the bottom of the tin.


And of course you have to have something to put inside the tin so I made 3 domino magnets using images from the Asian Beauties image kit.


They fit inside very nicely don't you think?


Monday, October 27, 2014

Wicked Gnome Couple...

Every year a group of bloggers celebrates Halloween by having a month long blog hop each and every day of October featuring a new stamped project each day.  I participated in it last year but knew I wouldn't have enough time this year with the changes in our business.

Luckily I was able to make several Halloween projects for Altered Pages (some I've shared here) and I was tickled to be able to make an altered game piece for today's post over on the DominoART blog!  

Til Death Do Us Part....

Stamps: Viva Las Vegas Stamps

Aren't these gnomes so much fun?  I fell in love with them when I saw the plate and had to have them.  Just too much creepy fun.    I temporarily adhered the blogs to my craft mat then stamped the images using Black StazOn ink.  Once dry I covered it with a layer of GlazeOn (StazOn sealant) and began coloring the dominoes with a combination of StazOn Inks and Sharpie Markers adding additional layers of the GlazeOn between each new color.

I'm thinkin' it's going to be either a cover for a mini album or a pendant but I can't decide which.  What do you think?  

Thursday, June 5, 2014

More Fun with GlazOn Layer Protectant

I wanted to share a couple more examples on how to use the GlazOn from IMAGINE Crafts / Tsukineko.   The first example was made using the Clear GlazOn.

I started off by stamping these cherries using Cactus Green and St. Valentine StazOn Midi.  And just as yesterday I let the inks dry and applied a layer of the Clear GlazOn over the top.


Once it was dry I began layering colors.  First I colored the cherries using a few different colors of Spectrum Noir Marker, applied a layer of GlazOn then colored the background and another layer of GlazOn.


Next I added some shadow using a grey marker, a layer of GlazOn then finally I added some detail lines in black just for a bit more definition and the last layer of GlazOn.  Here's how it turned out...  It's really amazing the depth you can achieve when using the GlazOn.  


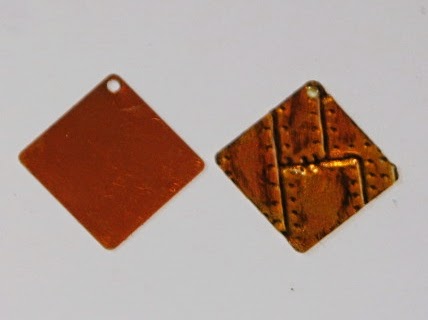
The second example I'd like to share is one I'm very excited about.  You can take aluminum and turn it into a pretty convincing copper color!

To help show the depth I decided to emboss this Sheet Metal charm.


I covered it with a layer of the Orange Zest StazOn Midi.


Then I covered it with 2 layers of Vintage GlazOn.  The slight tan tint of the Vintage GlazOn really helps tone down the bright orange on the aluminum.


After the initial two layers were dry, I added some highlights using Cloudy Sky StazOn and a final layer of Vintage GlazOn.  You can see how it changes the color from bright orange to a warmer copper.  I just love it!


I know there is also a Matte GlazOn but I don't have any of that (yet) to share with you but maybe in the near future ;)

Friday, October 25, 2013

31 Days of Halloween - #25 - Hoot!

Smeared & Smudged
31 Days of Halloween
Day #25
Hoot Hoot!

Today I wanted to share a triomino charm I made....
Triominoes are three sided dominoes and they are perfect for making charms but they are so hard to find.  I was tickled when I found a box...I instantly knew I wanted to put two together to make a nifty diamond shaped charm and it worked perfectly!


I slid the triominoes together, stamped the image then colored him.  Once it was dry I glued three bead spacers onto one of the pieces then glued the second game piece to the spacers. 
I finally added a bail to the back.

Be sure to check out all the other inspiring Halloween goodness by hopping around the various blogs listed in the right hand column on the blog.

TTFN!

Thursday, October 17, 2013

31 Days of Halloween - #17 - Who says bats hang upside down?

Smeared & Smudged
31 Days of Halloween
Day #17
 
I ask you again, who says bats hang upside down?
Not my bat...
with the help of a vintage wood coat hanger he's hanging right side up
AND
he's bringing you a little Halloween greeting to boot!
 
Today's project is my contribution to Leigh's Domino Art blog which is also participating in the 31 Days of Halloween hop this month.


This critter is about 21" across and from the tip of the hanger to the bottom of the dominoes is about 18".    The bat is a digi stamp from Smeared Ink's A Little Bit Batty - Bat 3 supersized.  I actually printed both wings on an 8.5x11 sheet of paper then printed the body twice on a second sheet of cardstock.
 
The bat was colored with Distress Inks and has Sakura black gel pen work here and there.  I cut out each wing and fit it to a vintage wood coat hanger (you know the one that's just a single curved piece of wood...no braces or anything).  I then cut out both bodies, the first body was test fit to the back of the hanger and I cut the lower portion of the 2nd body off and test fit him on top of the hanger.  My goal was to make it look like there are many layers to the bat.
 
Next I went to work on the dominoes and wood letters.  The wood game pieces already had the letters embossed on them so I just dyed them with Distress Stain.  The dominos were colored with Alcohol Inks then stamped with letters (MSE), spiders and bats (Graphic 45).  I affixed a length of bullion wire (it's wicked cool crinkly wire) which was then wired to the hanger. (NOTE: I had previously figured out spacing and notched the wood hanger for each game piece.)
 
Once the letters were all in place I glued the lower portion of the body to the back of the hanger.  I then affixed the wings to each side of the hanger - this covered up all the wires and finally I used double stick foam tape to pop the upper portion of the body over the wings.  He's very dimensional in person.
 
Here's a closer look at the dominoes....


I hope you've enjoyed this piece...
I sure enjoyed making it ~
it was a middle of the night, strike of lightening type of thing.
I KNEW exactly how I wanted it to look and it actually turned out that way.
I love it when that happens don't you?
 
Have a Batty Day Friends!

Tuesday, October 8, 2013

31 Days of Halloween - Day 8 - Hey Frank!

Smeared & Smudged
31 Days of Halloween
Day #8


Hey Frank!
Havin' some fun with a domino, stamps and some Bic Markers.
Rubber Stamps make great additions to domino charms.

I'm still not the best at stamping on dominoes and coloring them....I haven't found the right combination of ink to work with the markers.  Although it could be I'm just too impatient ~ I think I may be trying to color the image before the stamping ink has dried...

Stamp Credit: Third Coast Rubber Stamps

Hope you're enjoying Autumn!!
I know I sure am...
We went to an auction this past weekend and bought lots of "box lots"... it's so much fun sorting through those :)

Charm Swappers...
hope you're sending your charms soon or have already done so.
We're getting some great ones in...
can't wait to share them all with you :)

Friday, April 19, 2013

GlazOn n StazOn Domino Charms

After I got done with the Dream ATC yesterday it got me to thinking about other projects I've worked on where the GlazOn might come in handy.  One thing popped instantly in my mind that I just had to try today to see if it would work or not.


I LOVE to stamp dominoes to use as charms but one of the problems I always seem to have is my Bic markers smearing or rubbing off the ink I use to stamp the design with.  You have to be soooooo careful you don't mess up the image before you're done coloring it.  WELL, I decided to give it a try!

"Marie" Domino Charm

Supplies:

White Domino
StazOn Opaque Inks - Pink Blush - Tsukineko
StazOn Ink - Saddle Brown, Blazing Red - Tsukineko
GlazOn - Tsukineko
Fashion Ticket Stamp - StampersBest
Alcohol Markers - Bic
Gelly Roll White Gel Pen
Stickles Glitter Glue

Instructions:

The first thing I did was to cover the entire domino with Blush Pink Opaque StazOn ink.


After it is dry I added a thin layer of the GlazOn.  Someone asked about how much to put on ~ one small dot on this Mini Squeegee is all I used.  I spread it across the face of the domino and let it dry completely...  It seemed to dry much quicker today - only about 10 seconds.  Maybe it's because it's a domino instead of metal.


After that layer of GlazOn was dry I pounced a bit of Saddle Brown around the edges.

I then stamped the Marie Antoinette ticket on the domino using StazOn.  After it was dry I applied another thin layer of the GlazOn.


Next was the big test...
would the GlazOn work
and let me color the image without smearing?!?!?!?
Woo Hooo....
YES IT DID!!!!


I used Bic Markers, Sharpie Markers, White Gel Pen and Stickles Glitter Glue - NONE of it smudged or smeared the ink!  I topped this all off with a final layer of the GlazOn to protect the finish. 

All I have to do to finish off this charm is to glue on the bail to the back!

I can't tell you how happy that makes me. 
It will make creating flawless stamped domino charms a breeze now!
What Fun!!!


Monday, October 15, 2012

Creepy Halloween Choker Necklace

Happy Monday!!!!

I hope you've all had a good start to your week.
Today I wanted to kick the week off with a fun wearable project with this....
Creepy Halloween Choker Necklace!


Supplies:

Wood Domino (with 2 holes)
Angry Eyes CO-223-A - Third Coast Rubber Stamps
Archival Ink  - Black
Sharpie Markers - Various Shades of Green
Sakura White Gelly Roll Pen
3D Crystal Lacquer
Leather Beading Cord
Metal Bead Spacers (2)
Cord Tips (2)
Bar & Ring Toggle Clasp

Instructions:

1. Stamp image on the domino using Archival Ink.
2. Carefully color the image with various shades of green Sharpie Markers.  You'll have to be careful because the alcohol in the markers will smear or completely remove the ink. 
3. Color the whites of the eye & dots with the White Gelly Roll Ink. 
4. After the inks have dried cover with a coat of Crystal Lacquer and let it dry completely.
 
Here is what it looks like at this point....


5. Measure and cut two strands of leather cord to the necessary length.
6. String the cord through the domino tile. 
7. Thread a metal bead spacer on each side of the domino and tie a knot in the cord behind each spacer.


8. Pinch a cord tip on each end of the necklace.  This is a handy little finding for working with cords, ribbon, hemp, suede, etc.  You lay your cords in the center of the finding then fold over each flap which has tiny little grooves that hold the cords in place.  Really quick, easy to use and inexpensive.
 
 
Click for more details
 
 
9. Attach the bar & loop closures to the ends of the cord.


 And you're done!
 

Makes for such a fun and creepy look!

Thursday, August 16, 2012

New Third Coast Challenge - Sneak Peek!!

Hi All!

There is a new challenge coming up over at the Third Coast Challenge Blog.....

Altered Game Pieces!!

Well, today I wanted to share just one example of what you might create just to get your juices flowing.....

Merryn Mermaid Charm


Third Coast Rubber Stamp: Merryn Mermaid - SM (ES-203-F)

I just love this stamp image and I use it quite often.  She is so idyllic on her perch by the sea.  I stamped her on my domino using Archival Ink which I then heated to really set the ink.  She was colored using alcohol based markers which I again heated to quickly dry the inks.  I then used a dab of Stickles Glitter Glue for the water, inked the edges, glued a bail on the back then covered the image with a layer of Crystal Lacquer.

Now, it's your turn!
Are you up for the challenge???


Thursday, May 13, 2010

Scrolls Work Rubber Stamps & Give-A-Way!

Happy Thursday!

Well, we've got almost all of our business moved! We've got 4 days left on this months rent and I think we're going to make it!! WHEW ~ I was really sweating it... I hate cutting things so close to deadlines like that but when you're waiting on other people to do their thing you can only go so fast. It's storming today but they "say" no rain Fri/Sun so hopefully we'll be able to finish it all up in time!

Today I have another great rubber stamping designer/retailer to tell you about ~ Scrolls Work Stamps ~ a relatively new company that got it's beginnings from another designer. I had the pleasure to talk with Jacque ~ about her about it's origins and more....


IS ~ How long have you been stamping?
Jacque ~ About 18 years. My aunt was really in to stamping and it turned out to be wonderful bonding time for us.
IS ~ How did you get started designing rubber stamps?
Jacque ~ My mother in law started Inka Stamps about 10 years ago. I helped her design quite a few stamps and found it to be very fun. I have always loved any form of art. Last year she ran into some health problems, decided to retire and gifted my husband and I the business.
IS ~ Where do you get your inspiration from for your stamp designs?
Jacque ~ All over the place! Vintage images, postcards, blogs, my husband. He is a major mechanic and so he is the main one who inspired my steampunk styled stamps. Nature is a big one as well, I love to take pictures and so you will be seeing more photo’s to stamps coming soon. I am also working on a vintage rodeo set with some old family photos. My Great Grand Parents were very much into rodeo and trick riding so I have some awesome picture of them that will soon be a part of our stamp line.
IS ~ What is your favorite stamp?
Jacque ~ At the moment my favorite stamp is one called Doll Face, it is a little girl holding 3 dolls and she has this great look on her face that just tells you “Don’t even mess with my dolls!”

ScrollsWorks 005

IS ~ Anything special you’d like the readers to know about your stamps/designs/company?
Jacque ~ Yes. Anyone who knows me knows that I love games, board games, cards, dice, contests. I don’t care if I win I just love to play. I think it is also that I love a good challenge. So between our web site and our blog we have a lot of great contests and challenges, with our stamps as the prizes. I would love for anyone who would to play along as well.
IS ~ Are you an Angel Company?
Jacque ~ Yes we are. We encourage the usage of our designs for hand-crafted projects. As long as the items are hand-stamped designs and are not mechanically or electronically reproduced. Your art is yours to do with what you wish weather it be sold, displayed or gifted.
If you are published with our stamps we do ask that you give us the credit for the stamps used. We do offer $25 to any one who is published with our stamps and gives do give us credit for the stamps.
IS ~ What forms of payments do you take?
Jacque ~ Our web site check out is through PayPal. We do also except US Checks and Postal Money Orders.
IS ~ Do you ship internationally?

Jacque ~ Yes we do. All of our ordering info can be found at: http://www.scrollswork.com/info.html. Just make sure you scroll all the way down to the bottom to see all the info needed.

Now, I have to tell you I just LOVE these stamps! I fell in love with Scrolls Work when I first visited because they offer such a wide variety of images ~ many vintage in nature, that work so well together. I love to mix and match and that's what makes it so much fun. Their images work great for cards, ATC's (like the doll one I made above), scrapbooking, and they even offer smaller stamps that work well for jewelry, altered dominoes and Inchies too!

ScrollsWorks 001


Some of my favorite stamps are the Photo Realistic stamps....I just can't get enough of these types of stamps!

Erica is one of my fav's! I paired her with a set of cool looking wings and a nifty little saying for this tag.

ScrollsWorks 006


Another area of Scrolls Work stamps that I really enjoy is the Floral Section....they have such a nice variety of realistic flowers but also offer Deco, Asian and other styles as well.

ScrollsWorks 007


In addition to these stamps they offer LOADS of cool sayings, quirky Steampunk stamps and so much more!

There are just so many fun stamps at Scrolls Work it's hard to pick a favorite

BUT

I'm going to ask you to try...

Explore the site, check out the various areas and tell me what you like the best.

BECAUSE...

I'm going to be giving away lots of goodies and stamps!

You have 7 chances to win!!!!

I am giving away the following....

1. #4076 Doll Face & #1479 What a Doll stamps

2. #4536 Poppy stamp

3. #4066 Small Shaylee & #1424 Muse stamps

4. #4067 Small Tianna & #1441 Take Wing stamps

5. Spread Your Wings Bird Necklace

ScrollsWorks 002

6. Muse Necklace

ScrollsWorks 004

AND
7. a $10.00 Gift Certificate to Scrolls Work Stamps!

All you have to do is post your favorite(s) stamp(s) to be entered to win!

You have until 5-19 to enter to win!!

Good Luck Everyone

and

Have fun exploring Scrolls Work Stamps!

Monday, November 23, 2009

Southern Blackberry Design - Trans Maxx - Transfer "Skin"

Here is a great new product from Southern Blackberry Designs ~ Trans Maxx! It's a super transfer medium and glue to help you create a perfect image transfer every time!!

Now you can use Trans Maxx using the traditional method for image transfers but I find that I like to use this transfer medium to make image transfer "skins". An image transfer skin is basically just the transfer medium and the image.

You can then apply these "skins" wherever you like without the buckling and wrinkles normally associated with the extra layers of transfer medium from traditional image transfer methods. This works especially well for cards, scrapbooks, ATC's, clear glass items and more These skins of course can still be applied to the more traditional items.

If you have the opportunity you might look into SBD's Tissue Decoupage Collage Sheets. They make image transfers much easier because the images are printed on a very thin special paper which can be removed quickly and easily with far less "fuzzies" you normally get with most image transfer techniques.

And you know me ~ ever experimenting ~ I tried it with ink jet images and IT WORKED!!!

Trans Maxx Image Transfer Skins

SBD Transfer Skin 001

Supplies:

Trans Maxx Image Transfer Medium

Collage Image

Brush or Finger (to apply the medium)

Water

Something to apply your Transfer to

Instructions:

1. Trim the desired image you wish to transfer and apply a coat of Trans Maxx image transfer medium. You can use a brush but I like to use my finger (as you know - lol!). Let the image dry. It usually takes about 45 minutes - 1 hour to dry completely depending on temperature and humidity variations.

SBD Transfer Skin 005

2. Once the first layer has dried, apply a second coat of Trans Maxx & let dry.

3. Apply a third and final layer of the Trans Maxx and once again, let it dry completely.

SBD Transfer Skin 003

4. After the third layer has dried completely ~ flip the image over and wet the image thoroughly and let it set for 5-10 minutes.

SBD Transfer Skin 006

5. Rub the paper off the image as with a normal image transfer. If you are using the tissue decoupage images you will notice the paper almost slides off the image it's so easy to remove. Continue rubbing until the image is revealed.

SBD Transfer Skin 008

6. You'll be left with the image transfer "skin". Blot the excess water off the image and it's ready to be applied to your project. Remember this image will be delicate so handle it accordingly.

I usually just add a dab of transfer medium to the back side of the image to attach it to my project.

If as shown in the example I'm going to be using it for a glass slide (Memory Glass) pendant I don't even add extra transfer medium. The "sandwich" of glass will hold the image in place.

SBD Transfer Skin 009

7. Finish the Memory Glass Pendant by trimming text, cardstock or pattern paper to back the image.

SBD Transfer Skin 007

8. Don't forget to add extra "bits" to the back of the pendant because you may see that side too from time to time.

SBD Transfer Skin 010

9. Slip the glass slide "sandwich" into the Memory Glass Frame and close the little tab...and you're done!

Isn't it amazing how cool the image looks with the text behind it? The best part of using the Image Transfer Skin is there is no glue or adhesive to alter the color, look or feel of the vintage text paper.

SBD Transfer Skin 014

SBD Transfer Skin 013

Here are two additional examples using the Image Transfer Skins...

The eggs on this ATC are ITSkins made from ink jet printer images.

SBD Transfer Skin 020

The domino was colored using Alcohol Inks, after it was dry the ITSkin was applied to the domino. You can see how nicely the wet image transfer skin folds around for nice clean edges.

SBD Transfer Skin 016

Pretty cool huh??

So, do you think you'd like to give either traditional image transfers or the "skins" a try?

Well you're in luck!

Just post a comment here and you'll be entered for a chance to win a trio of Southern Blackberry Designs decoupage/collage sheets AND your own bottle of Trans Maxx!!

If you'd like an extra entry in the drawing, post your favorite decoupage/collage sheet(s)!!

You'll have until December 1st to post your comments and favorite(s) at which time I'll draw one lucky winner from all the entries (using Random.org).

Good Luck Everyone!!!

Monday, December 29, 2008

Bamboo Place mat Tiles

Several people have been asking about the bamboo tile place mats I posted about last week...instead of e-mailing everyone I thought I'd go ahead and make a few things up and post them in the next couple days.

In the mean time...Yes, these can be used just like dominoes.

I have beige/tan color and a lighter brown (you could still see stamped images on them).

They have two holes going through them length ways so you can thread them for a necklace, key chain, bracelet, earrings, etc. Way cool...no drilling - YEAH!!

Alcohol inks WILL work on them. They are sealed to resist foods and drink spills since they are place mats so the glossy surface works well with AI's. They can also be painted, decoupaged, stamped (with Archival or Staz-On) and more!

These little puppies are just way cool!

Thursday, August 21, 2008

Domino Accordion Book

Oh I'm so excited about the little book I have to share today. Not necessarily the book it's self but for the possibilities on where it can take you! It's a fairly easy design that can be adapted to virtually any need by simply changing the theme, images and colors. This could be used for a mini birthday book, a thank you gift, graduation, wedding, etc. I used collage images from Queen's Dresser Drawers but by simply reducing your own images and adding them to the book it can be personalized for anyone!

Bathing Beauties....

Domino Book013

Supplies:

Jumbo Dominoes - 2

Queen's Dresser Drawer Collage Sheet - Hannah Grey

Adirondack Dimensional Pearls - Ranger

Distress Inks - Ranger

Ink Blending Tool & Foam - Ranger

Glue Film - Streuter

Flourish Stamps - Autumn Leaves

Mod Podge - Glossy

Colored Hemp

Dremel/Drill

Instructions:

1. Paint all sides of the dominoes using Adirondack Dimensional Pearls. I used the Ink Blending Tool & Foam but you can use a brush, foam brush, etc. Whatever works for you. Set aside & let dry.

I love this paint because it's more of a glaze than paint. It has a transparent quality which allows the background images/colors to come through. You will need to top-coat it with Mod Podge when it's used on a non-porous surface.

Domino Book001

2. While your dominoes are drying you can cut the paper for the inside pages. Measure the domino you are using and cut your paper approximately 1/8" smaller.

3. Score fold lines in whatever way you are comfortable. I use my trimmer as a guide for both measuring and scoring. It is quicker for me and much easier to keep all of my score lines straight.

Domino Book002

You should end up with something like this....

Domino Book003

4. Your domino should be dry by now - add your cover image and apply a layer of Mod Podge. Add book title and add another layer of Mod Podge. At this time cover all sides of 2nd domino with Mod Podge & let both dry.

Domino Book004

5. Time to work on the insides of your book...add photos, words, stamped images, etc. to the pages.

Domino Book005

6. After your dominoes have dried, drill a hole in the sides of each domino using the method I shared here - Drilling a Hole in a Domino. This is how you will later "close" your book.

Domino Book006

7. Time to assemble the book! Using a small piece of Glue Film and embossing gun, attach the cover of your book to one end of your pages. You can use other adhesives but this is quick and there is no dry time associated with this type of adhesive - I LOVE it!! Do the same with the back cover domino.

Domino Book008

8. Thread a 20" piece of hemp through the back cover of the domino and tie a knot on each side of the domino. The knots just ensure that the hemp won't become lost when the book is opened.

Domino Book009

9. Tie a bow and you're finished!

Domino Book010

Back side of the book....

Domino Book011

Inside of the book....

Domino Book014

Just a note... I ended up having to let the Mod Podge sit quite a while to dry because of the high humidity here. It was also somewhat sticky when it was finally dry. I ended up applying a light coat of clear acrylic spray. Depending on your area/climate you may or may not have to do this as well.

I hope you've enjoyed this little project and give it a whirl yourself.
I promise whomever the lucky recipient is they will be pleased with their own little piece of art!
Hope you've had a wonderful week...tomorrow is FRIDAY!!!
YEAH :)
I'll have the Ink Stained Sketch examples to share with you so be sure and check back then!!