Wednesday, January 29, 2020

Cascading Hearts Valentine's Day Mobile

Hello Friends!

Today I have a fun Valentine's Day project for you that could be turned into an every day home decor project....


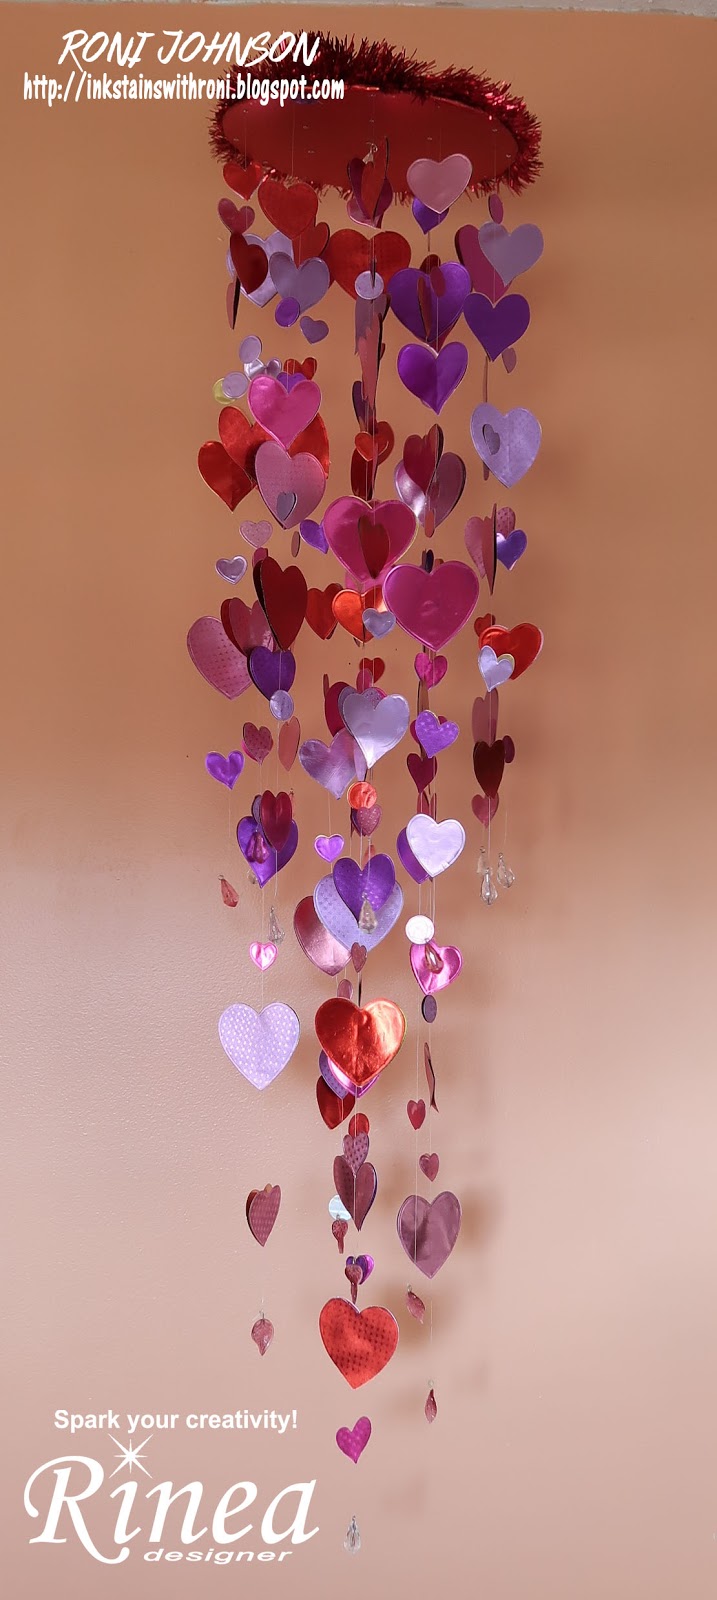
My cascading hearts mobile! While it is a bit time consuming it is so very easy to make and the results are spectacular!  All you need is fishing line, a round of cardboard, glue dots, a few dies and Rinea Foiled Paper!


It's really very easy to make - simply decide how you'd like your string of hearts laid out on the cardboard foundation so you know how many strings you need, die-cut your chosen design (in this case hearts and mini circles), and die-cut the desired shapes. The number of die-cut pieces will vary depending on the size of the die-cuts, number of strings and how far apart you space them.

You will sandwich the fishing line with the same size heart on each size - the same color or different it's up to you. I used 6 different size hearts and a small 1" circle and rotated sizes and colors along each string. I tied a small drop bead on the end of each string to give them a bit of weight.

Once I had all of my strings made I threaded them through the cardboard and affixed them to the top side of the cardboard. The hanger is made from the same fishing line just doubled. I used flat washers to help balance the mobile (glued in place on top of the cardboard circle) which was then covered with another piece of matching foiled paper as well as a scrap of tinsel garland left over from Christmas.

If you'd like to see the full instructions as well as the supply list you can go here - Sweet Heart Valentine's Day Mobile.

Have a wonderful day my friends!


Sunday, January 26, 2020

More Valentine's Love

I've got a couple more love*ly cards for you today. This time I wanted to play with white space (blank areas of the card). I don't know about you but I have a really hard time NOT filling all of the card up with stuff - be it embossing, background techniques, pattern papers, stamping, color, etc. Well, I wanted to practice not filling it up...


First card I made I stamped just a 1 1/2" strip along the side. I used purple tape to mask off the area I wanted to stamp on. I went to town stamping the peg stamps from Follow Your Heart and To My Valentine paired with various colors of VersaFine Clair and Memento inks.  I carefully peeled away the tape - I say carefully because I have smudge the ink off the tape onto the freshly stamped card before mussing it up in the process.


I then stamped the sentiment from Because of You stamp set. Now this was going to be just the sentiment (you know cause of all the blank space thing) but I just couldn't leave it plain. I had to stamp a few flowers, leaves and tiny hearts.  I know, not going with the spirit of the whole CAS/white space thing but I really did try.  It was then die-cut, matted and added to the card.


Now my second card has LOTS of white space and is very CAS for me. I love using this shade of blue for Valentine's Day when paired with red. I started off by stamping the flowers then added some leaves. I stamped the 3 hearts (because I like things in 3's) on a scrap of white cardstock, fussy cut and mounted them on the card with a bit of foam tape.  Finally I added the sentiment from the Because of You set.  Popped it on a card base in a similar shade of blue and I left it alone!  I was sorely tempted to add some sequins and glitter but I refrained (at least for the time being - LOL!!).


So, what do you think?
Up for a bit of white space/CAS stamping?


Friday, January 24, 2020

A Little Love...

Have you all seen the new release from Rubber Stamp Tapestry?  Oh my...you need to check it out! There are 10 new sets plus several new individual peg stamps as well. I have been playing with two of these sets - To My Valentine and Follow Your Heart and this is what I came up with...


My first card I wanted to experiment with a different type of wreath. I drew a small circle in pencil on a square of cardstock. I then stamped the larger hearts in the To My Valentine set with a combination of Memento and Versa Fine Clair inks. I made sure the bottom tip of the heart was touching the pencil line to achieve the wreath feel of it.  I then stamped the flower peg stamp inside the wreath of hearts in shades of purple. I used the sentiment from the Handmade with Love set in the center and colored the heart with a variety of colored pencils.

The pink background was created with the flowers from To My Valentine set as well as the leaf from the Follow Your Heart set. I added a scallop mat, accent strip and background mat using Violet/Gold Glossy Foiled Paper from Rinea.


LOVE...


I had SOOO much fun with this card!!


Inspired by the wreath on the first card I wanted to try to make a half wreath or a swish on this card. I knew I wanted to start off with the "LOVE" from the O So Fancy sentiment stamp set from last month's release. It's so bold and beautiful, I knew it would make the perfect centerpiece for this card.  It was stamped with VersaFine Clair Nocturne ink.

To start the half wreath I started out by stamping the Full of Hearts peg stamp from the Follow Your Heart set since it was the largest stamp, from there I stamped the little flowers, leaves and finally the Double Hearts.

I wanted to highlight the pink and greens I used for the flowers and leaves so I flicked pearly green and pink watercolor paints from my Kuretake Gansai Tambi watercolor paints over the entire panel.  This panel was mounted on a grey card base and finished it off with a few Sparkle Blends sequins from Doodles Paper Playground


 I'll be back tomorrow with more Valentine fun.
Till then friends, stay inky!

Friday, January 17, 2020

Steampunk New Years Shaker Card

To help ring in the new year I wanted to make something really special for my first post of 2020 on the Rinea Foiled Paper blog and here's what I made....


This was SUCH a fun card to make...all of the gears, the clear parts, the shakie bits in the shaker portion. I'm definitely going to be making cards in this style.


Front is a shaker - you can see the shakie bits, and small gears gathered down at the bottom. In the first photo the card is laying down and the shaker pieces are distributed in the frame. Cool thing is it's see through! You can see the second flap of the card (large silver and copper gears) if you look closely!


Card front open to expose the second folded flap. This one is covered with gears on the front of the acetate panel. You can now begin to see the sentiment inside.


And this is the card opened all the way up!

You can see more about how I made the card here:


Supplies:

Rinea - Silver/Glossy Gold, Gold/Glossy Gold, Marigold/Glossy Gold, Copper/Glossy Gold, Mocha/Glossy Gold , Silver Starstruck, Copper Starstruck, Gold Starstruck, Turquoise Starstruck

Memory Box - Gear Assembly, Deluxe Gear Set, Mini Gears, Antique Gears, Gearworks Border

MFT - Stitched Frames

Imagine - StazOn Ink - Jet Black, Jumbo Sponge Dauber

Cardstock, Transparency, Foam Tape, Glue

Wednesday, January 15, 2020

Happy New Year 2020

Yes I know we're 2 weeks in but been busy busy busy. I have been alternating between organizing my craft room and making New Years cards and getting them sent out. My aunt passed away in December which took the creativity out of me. Instead of trying to make myself finish up Christmas cards I decided to forgo them and make New Year's cards instead.  Here's what I came up with...


Both sets of cards were made using the same basic design, I just switched up the snowflakes on some of the cards. I love snowflake dies so I wanted to switch it up.  I started off by embossing the white cardstock for all of the cards which I mounted on each card base (all in some shade of blue). Then I added the sparklie grey washi tape over the seam.

I then die-cut all of the sentiments (Kat Scrappiness.com) and all of the snowflakes (above - Sizzix; below - MFT retired) from Rinea Foiled Papers.  I filcked the bottoms of all of the cards with pearl watercolor paints then added both the snowflake and sentiment.


Most have gone out but a few are still sitting on my desk. I figure if I send them any time during January it's still good. The year will still be shiny and new - at least that's what I'm telling myself.  I have a very special New Years card to share with you tomorrow :) Hope to see you then!

Happy New Year Friends...
Stay Inky :)

Monday, January 6, 2020

Changes Update

Thank you all so much who posted and emailed about my questions I posted. I'm glad to hear that many of you out there still read blogs. I was letting posts I've seen on FB about how outdated and antiquated blogging is get into my mind and make me doubt if I should carry on.  Since it seems that many of you out there still enjoy it I will continue to post. I will still post on FB and Pinterest when I have time as well.

Thanks for your continued support :)

Thursday, January 2, 2020

Woven Foil Plaid Birthday Card


I needed a masculine birthday card so I decided to try my hand at making my own plaid paper from strips of foiled paper from Rinea. As it turned out it was far easier than I had dreamed.

I cut 3 coordinating colors into strips of 3 widths...jade - 1/8", Gold in 1/4" and Mocha Starstruck 1/2". Initially I glued the mocha strips down on a piece of emerald foiled paper. Next I added the Jade strips over the mocha and finally I glued down the gold strips. It made a very appealing plaid don't you think?


Next I die-cut the pine boughs and cones using dies from Gina Marie (love these dies!!). The sentiment was die cut with dies from Queen & Co.


I combined it all on a black card base and it's all set to go!


Supplies:

Queen & Co - Sentiment Dies (limited edition no longer available)