Monday, December 30, 2019

Winter Luminaries

Is it snowing where you live? We had a green Christmas last week but it is supposed to snow this evening for the first time this December. It's been unseasonably warm here...actually it looked more like winter in November than it has all this month and more like Spring now that it did in April and May!  Wild weather...anyway, I thought it might be fun to create these lovely Snowflake Luminaries for the long winter months ahead...


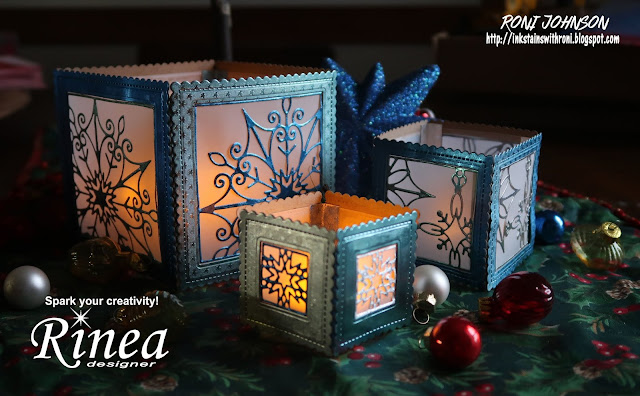
I was inspired to make these when I bought the snowflake dies from Spellbinders. They fit nicely inside my scallop square dies from MFT which sparked this idea.


I mounted Rinea foiled papers onto a piece of chipboard then arranged the snowflake dies inside the scallop squares and cut them both at once. This yielded a nice frame as well as perfectly fitting snowflake inserts.


I glued vellum "windows" to the backs of the frames, then glued the snowflake inserts to the vellum.


Repeated this for all 4 sides and then glued the sides together to create the luminary. There are 3 sizes of the snowflake frames which in turn allowed me to create the trio of luminaries. 


Don't they looks so pretty with the battery operated flicker lights?


Supplies:

Rinea - Frosted Foiled Paper Variety Pack
Spellbinders - Snowflake Frames
MFT - Scallop Squares
Vellum, Chipboard, Flicker Lights

Thursday, December 26, 2019

Snowman Spool Art


I wanted to share a link to the info on my Snowman Spool Art piece.

This is so very easy to make yet it packs a real punch in the WOW department.
A rosette which is mounted to a dowel rod, chopstick or skewer gives this piece it's backbone and when paired with a collage image of your choosing this little charmer really comes together.

Check it out...


I used Rinea Foiled Paper Pack - Frosted  with a collage image from Gecko Galz. 
I think they paired up nicely don't you?

Hope you're enjoying whatever season it is in your neck of the woods. "Winter" currently in Indiana is a balmy 60 degrees!!! About 30 degrees above normal. No white Christmas here but a very beautiful time none the less.

Changes...

Hello Friends

I hope you all had a lovely Christmas with your family and friends.

It's almost the start of a new year and I've been thinking a lot about crafting, the blog and how much things have changed in the past few years on how people are viewing art.

(Just a warning this may get a bit long and boring.)

As you may or may not know Imagine has changed their Design Team from a mix of written tutorials and videos to an all video team in 2020. So my time with them has come to an end and it has given me time to think about art and where more and more teams/companies are headed. 

Video...
 While I made videos many years ago (before it was popular) I decided at the time it wasn't for me. I am very shy so I don't do well with the talking portion nor do I enjoy all of the computer work of splicing, editing, adding photos, music, etc.  It is also a very expensive endeavor to make good videos what with the equipment, lighting, music, etc.  

Instagram....
I'm sorry to Instagram lovers out there but I just don't get the concept of endlessly scrolling through hundreds and hundreds of photos... Honestly to me it's a huge time waster and after a bit I feel like a zombie just gazing at a tiny screen. Yep, you can see some pretty stuff but there are no instructions, no links, usually no supply lists, just pictures. It's a popularity contest that I have no interest in participating in.

It's disheartening that most design teams require you to participate in these SM platforms in addition to any number of other SM outlets. I want to create art, not become a slave to posts, hits, clicks, hearts and viewers. I am so not into the whole high school popularity contest that it has become.

I'm an inky, glitter and glue covered girl and I'm feeling like a dinosaur.  
Like I'm outdated and no longer needed, like quality and substance doesn't matter anymore. 

Could you do me a favor and let me know the answer to these questions....

Do you still read blogs?

Do you still like written tutorials with photos?
(which is what I do)

Do you prefer Instagram?

Videos?

Pinterest ?
(which I do like because it actually links to more information.)

Facebook?

Something Else?

I'd appreciate any input you might offer.

Wednesday, December 25, 2019

Merry Christmas Friends!!


Wishing you all peace, happiness and joy this holiday season.
Be safe and enjoy!

((((HUGS))))

Ink Stained Roni
(more about this project tomorrow)

Sunday, December 15, 2019

Whatever You Are...

Be a Good One!


The current month long challenge at Lost Coast Designs is

I decided that my friend the Abominable Snowman - a.k.a. Yeti, Bigfoot, Sasquatch, or whatever you want to call him would be a perfect addition!

I stamped the Monkey Face stamp using VersaFine Clair Paradise then stamped it a second time with Blue Belle over select areas (eyes, hair, nose holes) and a third time with just a touch of black along the tips of his hear and eyes.

The background Small Snowflakes were stamped using my favorite ink pad...Kaleidacolor - Blue Breeze...a combination of 5 different shades of blue in one pad. They are so pretty don't you think?

I finished it off with the very appropriate sentiment and Sparkle Blends sequins mix.

Hope you are all enjoying the holiday season so far...

Take care and stay inky my friends!
Ink Stained Roni

Friday, December 13, 2019

Home for the Holidays Blog Hop

Welcome to the Home for the Holidays Blog Hop!

Just some friends sharing holiday creations for your viewing pleasure :)
Enjoy!!

If you recall I recently won a box full of mixed media goodness from Cathy Frailey. Well this frame was included in that box. I knew when I saw it I had to do something fun with it and this is what I did...


It is a gold plastic frame that had a few broken bits. I trimmed the broken bits off and evened it up - some of the broken pieces were missing from one side so I cut it off the other side to make it look like that's how it should be.  To tone down the gold and give it a holiday touch I applied 2 coats of Nuvo mica mist in Fresh Pear. It really gave it a lovely color and shimmer. 


Next I filled each frame with a lovely nature themed vintage image from Gecko Galz using the collage sheets - The Frosty Garden and Nature's Christmas.  I just love the variety of images to choose from.


I wrapped each frame with antiqued silver mini garland which added to the lovely vintage feel of the frame.


I added several layered flower and bird pieces


As well as some tiny real pinecones scattered here and there.


Then topped the whole thing off with a large red bow!


Now it's time to check out the other lovely creations...


Ink Stained Roni (You are here)


Merry Christmas Everyone!!!

I'd like to enter this creation into the Gecko Galz - In Dreams challenge...
My dream - a White Christmas but alas it's not looking good this year. So far they are saying we have more a chance for ice rather than snow :(  Keeping my fingers crossed!)


Thursday, December 12, 2019

Winter Wonderland....Humbug!

The current month long challenge at Lost Coast Designs is In the Deep Midwinter.

I made this darling gumpy little pixie card using Lost Coast Designs Lucy HLP, Large Snowflake Set, Small Snowflake Set and Carmen's Veranda Grunge Black Swirl


Isn't she great....I feel like this some days. Don't get me wrong - I love snow...just not driving in it - LOL!! If all I had to do was look out the window and enjoy it would be wonderful but it seems like people always forget how they are supposed to drive in it each year. Drives me crazy.

If you create a wintery themed card be sure to enter into this challenge for your chance to win :)

Monday, December 9, 2019

Scatter Kindness

Hello All...

Just wanted to share this card I made recently...


I loved the ice skate die from Gina Marie Designs and I knew I wanted to use it somehow for a Christmas card or two. I came up with this idea when I saw a commercial with dangles in a doorway.

  I die-cut the shoe using white cardstock, Ebony and Silver Rinea Foiled Papers....I even threaded some twine for the laces.  The new snowflake stamp sets from Rubber Stamp Tapestry (Snowstorm & Snow Much Fun) were the perfect "dangles" for this card. They also have a new sentiment set - Winter Wishes - that contained the sentiment...couldn't get much better huh?  All of the inks used are VersaFine Clair by Imagine. Of course I had to add a bit of glitter for that extra little bit of something special.

Hope you're all enjoying this fine holiday season.
Cheers my friends!

Friday, December 6, 2019

Catchin' Up...A little of this, a little of that

Things have been crazy here what with our business, the holidays and everything else going on.
I have fallen behind on sharing some cards I have made in the last few weeks so I'm going to try to get caught up here.


My first card is one I made for the Day of the Dead challenge.
I love this skull image...it's very festive don't you think - LOL!!

The background is a watercolor bit with a bit of glitter and Rinea Foiled Papers thrown in for a pop of color.


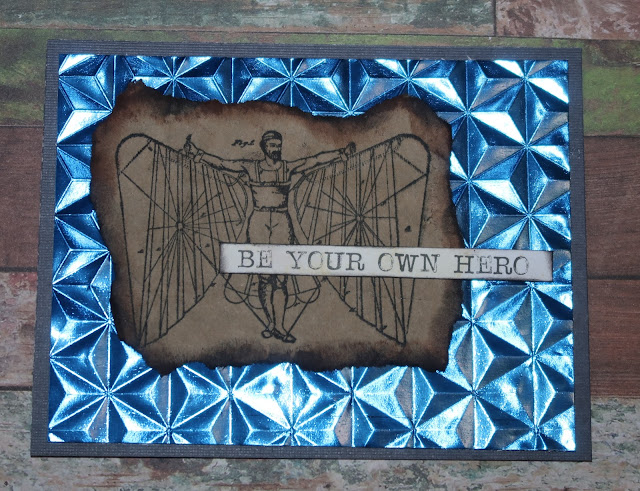
I REALLY like this card - it's a bit of Rinea Foiled Paper that I sent through one of WRMK's 3-D embossing folders. It looks and FEELS amazing IRL. I think it's such a fun contrast to the steampunkish image of the flying guy don't you think?


My final card for today is a very special one....
I call it Man's Best Friend. It's made using one of the newest stamps from Lost Coast Designs. I love all the doggies. It was colored using Marabu Art Crayons, a bit of Rinea Foiled Paper and some Sparkle Blends sequins.


Thursday, December 5, 2019

Tiny Stamp Christmas Tree

Good Morning

Wow, December is flying by - we just got back from a whirlwind trip to Pennsylvania to pick up a machine for our business and it's already the 5th!

Today I wanted to share a couple fun cards using tiny Peg Stamps by Rubber Stamp Tapestry to create something other than what they are.  Confused...check it out....

All Stamps - Rubber Stamp Tapestry

See, not too confusing after all. I used different images all in greens (VersaFine Clair) to make up the Christmas tree...a deer silhouette, poinsettia, gingerbread man, candy cane, bells and more. 

I decorated the tree with candle lanterns, blue Christmas ornaments, a little squiggle and a star on top!

I added bits of glitter here and there to give it that extra something for Christmas and finally added the sentiment and edged it with more green.

It was so much fun choosing the stamps to "build" the tree. it's a bit unexpected and unconventional but that's what makes it special.

You should give it a try...
I'm sure you'll enjoy the process.

Have a lovely day.


Saturday, November 30, 2019

Baby Things....

Happy Day Friends 

I hope you all survived Thanksgiving and Black Friday.
We had a nice Thanksgiving with family and didn't even attempt any Black Friday shopping. I can't stand crowds on a good day much less on a day where everyone is crazy with the day after Thanksgiving sales. I do about 98% of Christmas shopping on line - it's quite, calm and best of all - no people pulling things out of my hands :)  LOL!!!

It's not often I get to make things for/related to babies so recently it was a nice challenge. The lady that heads up the Craft Therapy program at our local library adopted a sweet little guy recently, her first class back Mom and I gave her a few gifts.

I wanted to make something that they could hang in his room now and that he could enjoy later on in the future so I made this...


I used Creative Medium to adhere bits from a map of Indiana.


As it turns out she loves Scrabble so spelling his name out in the tiles was perfect.


I added some keys...as he holds the keys to his parents hearts!
These are a die from Gina Marie Designs. Love how intricate they are and since they were cut from Rinea Foiled Papers they really look like they are metal.

I made this card to go along with. I used Rinea Foiled Papers for the background, pin and sentiment. The dies are all from a set by MFT.

It's fun to step out of the norm and create something a bit different.
Have you had the opportunity to create for a little one recently?

Supplies:

Rinea Foiled Papers - Sapphire/Gold Glossy, Sapphire/Sapphire Starstruck; Silver/Gold Glossy; Turquoise/Turquoise Starstruck, Ruby/Gold Glossy
Imagine - Creative Medium, VersaFine Clair - Blue Belle, Sponge Daubers
Gina Marie Designs - Key, Heart
MFT - Baby sentiment, Pin, Diaper dies
MDF Letter
Scrabble Tiles, Twine, Indiana Map
Cardstock

Thursday, November 28, 2019

Tuesday, November 26, 2019

"Gift" Gift Card Holders

Welcome my friends, I hope you are all having a wonderful Thanksgiving week so far.
Don't know how many of you are taking advantage of the avalanche of Pre-Black Friday sales but in case you're still planning on giving gift cards have I got an idea for you....

Gift Card "Gifts"....


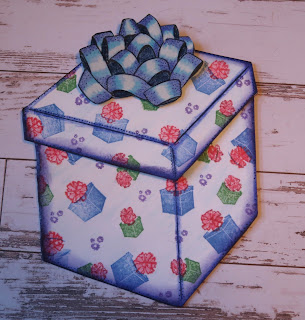
We recently went to a rubber stamp convention in Fort Wayne and while we were there we picked up the Gift Stamp. This "gift" can be stamped as a single flat gift box image and affixed to a card front. It would make a neat looking card BUT....


If you stamp it along the fold of a piece of cardstock you can turn it into a gift card holder!!


How cool is that!!!

 The nifty thing about this image is it's just a plain box. By switching up the stamps you use to create the "wrapping paper" the sky is the limit! This past Saturday Mom and I put this stamp to work to create several "gifts" and we paired them with the oh so versatile Peg Stamps!!


They have just released 8 brand new Winter/Christmas themed sets plus 3 sets of Unmounted Sentiments and several individual peg stamps as well. These new peg stamp sets have been sprinkled over these gift card holders along with some old favorites creating these spectacular"Gifts".


Stamps used:
Pine Bough from Christmas Baubles
Pine Cone and Pine Branch from Poinsettias in the Pines


Stamps:


Stamps used:
Flakes from Snowstorm & Country Christmas sets


Stamps used:
Gingerbread Man from Gingerbread Heaven
Snowflake from Snow Much Fun
Poinsettias from Poinsettias in the Pines


Stamps used:
Ornament from Christmas Baubles

Additional Supplies:

Imagine - VersaFine Clair, Memento Ink, Sponge Daubers, Tear It! Tape
Colored Pencils (various brands)
Cardstock

Wednesday, November 20, 2019

Woodland Magnetic Candy Tin

Hello Friends!

Can you believe it's only 1 more week until Thanksgiving!!!
I just don't know where the year has gone, it's flown by.

One of my favorite childhood memories with regards to Christmas is getting into our stockings! It didn't matter how early we got up we were only allowed to dig into our stockings until everyone was ready to open gifts (when Mom and Dad said). It was like a pre-game special - LOL!! Shoot Mom still makes us all stockings which is just fine with me :)

So today's project is something that will fit into any stocking with easy and I think it's a pretty fun idea... a magnetic woodland themed play set all tucked inside an Altoids/candy tin.


So Imagine teamed up with Joy Clair Rubber Stamps this month and I was able to choose the stamp sets I wanted to work with. Once I saw this set of stamps I KNEW I had to make this magnetic play set with them.

I have been saving magnetic sheets that come with some metal dies to use for something and this was the perfect time to pull them out and create. My magnetic sheets had a white back so I was all set to go but if you have a sheet that is just the black magnetic sheet you can simply adhere a sheet of white paper to the magnetic sheet. works perfectly fine and what I've had to do in the past.

I stamped the images onto the magnet using StazOn inks and then colored each image with alcohol markers.


I stamped the images onto the magnet using StazOn inks and then colored each image with alcohol markers.


I think these would be so much fun to play with and make up stories for the little ones - boys and girls alike.


If you'd like the complete instructions and supply list please see:


Have a lovely day my friends!!
Stay Inky :)