Saturday, January 23, 2021

Snowflake Wreath using Rinea Foiled Papers

Hello Friends! Today I wanted to share a wreath I created using Rinea Foiled Paper set called Frozen. I love snowflakes so I thought this would be a really fun wreath for winter...with a bit of added bling!

Rinea Foiled Paper Frozen Snowflake Wreath by Roni Johnson

Winter is upon us in the northern hemisphere and snowflakes are in the air. You can bring the beauty of winter into your home with this lovely snowflake wreath using the Frosted Variety Pack by Rinea. 

Directions:

Rinea Foiled Paper Frozen Snowflake Wreath by Roni Johnson

Step 1 - Paint a wreath form using white acrylic paint.

Rinea Foiled Paper Frozen Snowflake Wreath by Roni Johnson

Step 2 - Die-cut several snowflakes in assorted sizes using foiled paper from the Frosted Variety Pack.  You can cut several layers of Rinea foiled paper at one time.
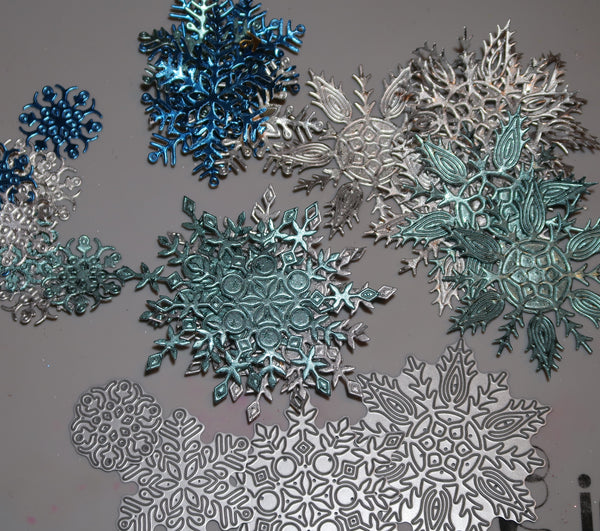
Rinea Foiled Paper Frozen Snowflake Wreath by Roni Johnson

Step 3 - Once you have all the snowflakes cut clean away the excess bits.  The number of die-cuts needed will vary depending on the size of your wreath and the amount of layers you choose to add.

Rinea Foiled Paper Frozen Snowflake Wreath by Roni Johnson

Step 4 - Affix hanger and if desired add a piece of vintage rhinestone jewelry as a dangle for an extra bit of sparkle. A broken rhinestone bracelet was used to embellish my wreath.

Rinea Foiled Paper Frozen Snowflake Wreath by Roni Johnson

Step 5 - Glue the snowflakes to the wreath using your favorite adhesive. 

Rinea Foiled Paper Frozen Snowflake Wreath by Roni Johnson

Step 6 - Continue to add additional layers of snowflakes until the desired look is achieved. 4 layers of snowflakes were added to this wreath.

Rinea Foiled Paper Frozen Snowflake Wreath by Roni Johnson

A close up look at the snowflake layers.

Rinea Foiled Paper Frozen Snowflake Wreath by Roni Johnson

Add a bow and enjoy!!

Supplies:

Rinea - Frosted Variety Pack

Simon Says Stamp - Snowflake Dies

Beacon 3in1 Adhesive

Wreath, Ribbon

(optional) Junk Rhinestone Jewelry

Tuesday, January 12, 2021

Woodland Fairy

Today I wanted to share my latest Fairy Hugs creation...


I thought it would be fun if the Kissing Fairy would commune with her woodland friends. To create this card I stamped the Kissing Fairy on a piece of white cardstock using Fairy Hugs Raven ink pad. I then stamped the Stardust with Green Oasis VersaFine Clair Ink.  The background was then inked with a variety of Memento inks.

I decided that the Kissing Fairy was going to have monarch wings so I colored them using Raven and Shiny Penny Fairy Hugs Powder glitter.  This panel was set aside to dry.

I stamped several bulrushes using Memento Markers which were then fussy cut. I stamped two Moon Trees using both Acorn and Pinecone VFC inks and those were fussy cut as well.

To assemble the card I matted the fairy panel with a piece of wood grain embossed paper that was inked with Nocturne ink. It was then mounted onto a piece of burlap, blue and a black card base.

The bulrushes and trees were then mounted on top of the wood grain mat.

Fairy Hugs Supplies:


Fairy Hugs Premium Pigment Ink Pad


Fairy Hugs Powder - Shiny PennyRaven

Be sure to stop by our Fairy Hugs Facebook Group 


Tuesday, January 5, 2021

Wobble Action Fairy Condo

 Today I wanted to share my latest Fairy Hugs creation...


This card has a little bit of everything...it's even got a bit of Wobble to it!

I started off by inking the background with blues and greens...masked off a few hills in the background then stamped the Leafy Scrolls along the top and upper portions of the sides. I then stamped the Fairy Condo direction onto the panel and a second stamping on a piece of white cardstock. A few of the Condo Dwellers were stamped here and there. I colored the Condo stem and underside of the mushroom (in case it showed up later on).

Next I stamped the Stone Wall, Forest Steps and Wild Leaves on various pieces of cardstock and fussy cut them all out.  Back to the 2nd stamping of the Fairy Condo. I colored the top of the Fairy Condo and houses with Clean Brush Markers and fussy cut. I then covered the top of the mushroom with Shiny Penny Fairy Hugs Powder glitter.

After the glue had dried, I attached a Wobble mechanism on the back of the mushroom top and affixed it to the panel and tested the wobble...several times - LOL!!  They are just so much fun to play with!

I then added the additional scenery and mounted this panel onto a green card base.

Fairy Hugs Supplies:


Be sure to stop by our Fairy Hugs Facebook Group 


Monday, January 4, 2021

Doodles Paper Playground/Sparkle Blends & Pear Blossom Press and Sassy & Crafty Collab!!

Hello Friends! I've been asked to participate in a fun collaboration between Doodles Paper Playground/Sparkle Blends, Pear Blossom Press and Sassy & Crafty Stamps. This has been so much fun as we are showcasing the amazing light up products from Pear Blossom Press on our shaker cards.  This is actually an Instagram hop but I know many of you don't Instagram (I don't much either) but I wanted to be sure to share it with you as well.

My first creation....Shake It Up Baby


To create this shaker I used the stamp set Shake it Up Baby from Sassy & Crafty Stamps, the Pear Blossom Press's brand new EZR-Light which is a circle of lights with a little button power pack all in one.  It is filled with the lovely sequins mix called With a Bang.  I used one of the stars in the mix as the "button" to press to light the lights.  Isn't it such fun!!


I was so surprised how bright it was and how the lights bounced off the sequins. Really kicks up the WOW factor don't you think? I am so excited about these. They will really make for some amazing cards.

My second card....


I love how this turned out. It was a bit more complicated but oh so worth it. I started out by making a night sky with a piece of black cardstock and metallic watercolor paints. I then cut a hole in the card panel and adhering a stamped piece of vellum behind the hole. I then installed the 3 light strand of EZ-Lights around the vellum moon.

Next I cut a large piece of acetate and enveloped the entire panel filling it with the shaker mix called Extraterrestrial. Some of the bits glow in the dark so it's an extra special mix.  I again used a large white star (from the previously used mix) as the "button" to activate the lights.


I am just in love with how much fun these lights are. They are easy to install and all you have to do is press the button to light it up. 

(NOTE - I put a little note inside each card to press the white star for a bit of fun.)

As I mentioned before, this is an instagram hop so if you'd like to enter the giveaway you can head on over there and follow the directions to be entered to win the amazing prizes being offered.  I have included the blurb from the hop below....

We have a fun, interactive collaboration for you today, plus an amazing #CraftyGiveaway  Search for the hashtag: #ShakeLightAndSparkle to see all the amazing inspiration projects created by our talented designers!

Join @Doodles_Paper_Playground @SassyAndCrafty.co @PearblossomPress and as we highlight a brand new #EZlights product AND have a lot of fun doing so.  

You could win a:     
- $15 gift card from Pear Blossom Press     
- Shake it Up Baby stamp set from Sassy and Crafty     
- 5 assorted Sparkle Blends from Doodles Paper Playground 

To Enter:     
- Follow @doodles_paper_playground @sassyandcrafty.co @pearblossompress      
- Follow our all the Designing Divas:
@FawntasticCreations  
@EKGormanDesigns  
@AnnieC09  
@JudyMarkowitz
@InkstainedRoni     

- Like this post and comment below

For extra entries:     
- Share this post to your stories or repost     
- Tag a friend below. One per comment, please.  

This giveaway will close on 1/11/21 and is not sponsored by Instagram or Facebook. This giveaway is open internationally. Winner will be contacted via Instagram.
#ShakeLightAndSparkle #SassyAndCrafty #PearblossomPress #DoodlesPaperPlayground #SparkleBlends #EZlights #handmade #SassyAndCraftyStamps #Cardmaking #Papercrafting #Scrapbooking #Stamping #InteractiveCards #ShakerCards #LightUpCards #SupportSmallBusiness #cardsofinstagram #WomenSupportingWomen 

Thursday, December 31, 2020

Happy New Year 2021!!!

 Hello and welcome to the Winter Blues Challenge...still lots of time to play!


Time to say good bye 2020 and
Hello to 2021!!


Here's to a better year to come!

I created this card by applying assorted shades of blue Brusho Colour Crystals to a piece of cardstock. I then stamped and embossed both Large and Small Snowflakes over the card.  Next I stamped Pieces of Calligraphy over the snowflakes and wiping away the text from the embossed areas. The Heart from the ATC Doodles set of stamps was stamped on a piece of handmade paper and the excess paper torn away to create the feathered edges. This heart was then covered with glitter.  The sentiment from Party Words was stamped on a piece of scrap paper and affixed to the heart.

Today is my final post for Lost Coast Designs/Carmens Veranda. I wanted to thank you all for my wonderful stay here. Wishing you all the best in the remainder of 2020, in 2021 and for years to come!

Hope you join in this month long challenge!!


Wednesday, December 30, 2020

Cozy Little Winter Scene

 Hello Friends - the year is almost done...I hope you're safe, well and sound wherever you are. Today I wanted to share a cozy little winter scene with you that I recently made...


The main image is from Nellie Snellen - Nellie's Choice called Wintery House. It's just such a lovely image I couldn't resist it.  It has been stamped on watercolor paper with VersaFine Clair Nocturne then embossed with black MBossing powder. I colored it using Prima Confections watercolor and a bit of shimmery white watercolor from Yasutomo.  I then stamped the Large Fairy Fir Tree (Lavinia) and the Snow Falls (Lavinia) images on the panel. I added a few detail colors using Kuretake Zig Clean Color Real Brush Markers and finished it off with a bit of Twilight VFC ink around the edges.


I wish you could see the shimmer of the mica watercolors. They are amazing.  Hope you have an amazing end to 2020. Blessings for you all...stay inky my friends!

Supplies:

All of the stamps can be found at Fairy Stamper

Nellie's Choice - Wintery House 
Prima - Confections Watercolors
Yasutomo - Mica Watercolors
Imagine - VersaFine Clair - Nocturne, Twilight; MBossing Powder - Black
Kuretake Zig Clean Color Real Brush Markers
Watercolor paper, Cardstock

Tuesday, December 29, 2020

Fairy Hugs Make A Wish Upcycled Stamping Block

 Today I wanted to share my latest Fairy Hugs creation...

My wish for you in 2021 is health, happiness and peace.


I un-mount all of my rubber stamps to save room and I have all of these wonderful wood blocks left over. I like to save the larger blocks for art and that's what I've got for you today. A former rubber stamp block upcycled into art!

To create this piece I started off by cutting out various definitions from multiple dictionaries (I collect them), for example - fairy, wish, faith, hope, etc. These were decoupaged onto the block and left to dry.  I sponged Warm Breeze VF Clair ink around the edges of the block.

Once the block was completely dry the Leafy Scrolls, Kissing Fairy and Stardust images were stamped directly onto the block using VersaFine Clair inks. I also stamped an extra set of wings onto a piece of vellum cardstock.

I stamped and fussy cut several Wild Leaves images onto scraps of white cardstock. These leaves were glued to the block as seen. I also affixed the die-cut sentiment to the block at this time.

I colored the vellum wings using alcohol markers and they were then glued in place. A white acrylic paint pen was used to add details and glitter was added to the Star Dust image and the visible edge of the block.


Fairy Hugs Powder - LapisOrchid

Be sure to stop by our Fairy Hugs Facebook Group 


Thursday, December 24, 2020

12 Days of Christmas Shakers - #12 - Merry Christmas!!


Merry Christmas friends!!!


For my final shaker of the 12 days of Christmas Shakers I have a slimeline card filled with sparklie goodness! The papers and stickers are from Echo Park's Farmhouse Christmas. I just love this kit - it is so very me.   The string of lights is a die from Gina Marie Designs @ Scrapbook Outlet. It was cut using Rinea foiled papers hence the shimmer.  The shaker bits are left overs from several different Sparkle Blend mixes. 

The window is quite a story...it was made for a card that I intended to use for a project for another design team several (4-5 years ago). It was going to be a window in a card but at that time slimlines weren't popular and it was just too big so I just stuck it in my pile of "for future use".  And that my friends is why I never throw anything away - LOL!!!

Hope you all have a very safe, happy and MERRY CHRISTMAS!!!!

Lots of love my friends!!

Wednesday, December 23, 2020

Look to the Heavens

 Today I wanted to share my latest Fairy Hugs creation...


I love the versatility of the Full Moons and Moon Tree in the most recent release. There are just so many options for using these great images. Today I wanted to share a a card I made pairing these stamps with my favorite color blue!

To create this card I started off by cutting a 6x6 piece of cardstock. I stamped and embossed (with black ep) the larger moon in the center of this panel. 

Next I sponged the panel with Twilight, Medieval Blue and Blue Belle VersaFine Clair Inks working from dark to light.

The Moon Tree was stamped around the edge of the panel on all sides. These too were embossed with black embossing powder.

White Shimmer Delicata ink was pounced over the moon and surrounding area to create the glow, the excess ink was wiped off the embossed moon. 

Diluted white acrylic paint was flicked over the panel to create a starry sky. 

This panel was matted on white cardstock and affixed to an 8x8 panel covered with Cobalt/Gold Glossy Foiled Paper from Rinea.


Fairy Hugs Store - Full Moons,  Moon Tree


Be sure to stop by our Fairy Hugs Facebook Group