
As promised, here are more ideas for using the Faux Mosaic Kit from Ranger!
You don't have to just use pattern paper as your tiles, you can use whatever your heart desires as you will see in the following examples!
This first project is a wooded serving tray from Walnut Hollow. They can be found at most craft stores and discount chains. I painted the tray both inside and out using Ranger Adirondack Acrylic Dabbers. (Espresso & Lettuce) I then stamped the outside of the tray with Autumn Leaves flourish stamps & Lettuce Acrylic Dabber.

As you can see, instead of pattern paper I used vintage postage stamps for tiles!
In addition to the postage stamps I embedded dried flowers in the grout as well.

 Here is a fun project that is totally different from the other examples! This is one of those wooden tic-tac-toe boards you can find in the dollar stores. Very inexpensive game jazzed up with a twist!
I call this game...
The Birds & The Bees
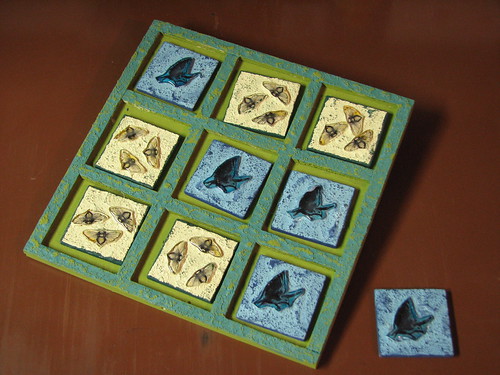 To make this game I painted the entire game board using Lettuce Acrylic Dabber. Stamped birds & bees onto shrink plastic using archival ink and shrunk according to mfg. directions. Alcohol ink was applied to the backs of each piece of shrink plastic after it was shrunk.
I placed a small amount of grout into 2 disposable cups, added a bit of Acrylic Dabber Paints (Lemonade & Sail Boat Blue) and mixed. You can continue to add paint a little at a time until you get the color you're looking for.
I applied the tinted grout to each wood piece and embedded each piece of shrink plastic right into the grout. Set aside & let dry.
Once the grout is dry, check to make sure that each piece is secure in the grout. If one comes loose attach it using Glossy Accents or other clear drying liquid adhesive.
After all pieces are secure, apply the Faux Mosaic Glaze ~ skipping the step 2 Faux Mosaic Glue.
I mixed the left-over yellow & blue grout to get the green grout I applied to the grid lines on the board!
The final example is one I just LOVE!!! This is another inexpensive dollar store find ~ it was on clearance for only .49!!! It is a wooden frame mirror that had a really awful paint job...I wasn't sure if my idea would work or not but for .49 what did it matter, it was worth a shot - LOL!!
I again mixed the grout with Acrylic Dabber Paints and applied it over the entire surface of the mirror frame. Then using buttons from the Autumn Leaves Collection I pushed various sizes & shapes of buttons into the grout.
I found that some of the buttons were shallow and the grout would push right up through the holes. If that happens, you can just take a Q-tip and wipe away the excess while it is still wet.
Once the grout is dry check for loose buttons & attach using Glossy Accents or another clear adhesive.
Skip the Part 2 Faux Mosaic Glue and go right to the Faux Mosaic Glaze. Apply a layer to each button. If you would like you can add a 2nd layer on the smaller buttons.
Skip the Part 2 Faux Mosaic Glue and go right to the Faux Mosaic Glaze. Apply a layer to each button. If you would like you can add a 2nd layer on the smaller buttons.
For a finishing touch I attached velvet ribbon to the edge of the mirror :)

I hope these ideas and the ones I posted yesterday spark your creativity!
Have a wonderful day
and
Happy Crafting!!
Whoa! I like the mirror project the most...........and even more when I hear that you turned a disgrace into a sweet work of art! Love the way you used buttons !!
ReplyDeleteI have a lot of ugly duckling items that would benefit from a faux mosaic treatment!
So cool!! You do the best stuff girl! I love it all but I think that mirror is my fave too.
ReplyDelete