
As promised...one of my favorite techniques using the Ink Blending Tool . The Burnt Edge Technique!
This technique is so very easy to accomplish with very few common tools you may already have in your stash. What I really love about the Burnt Edge technique is that with the very same tools by simply using various color combinations you can create such a wide variety of looks! You'll see what I mean when you take a look at the 2 examples below using this technique.
Supplies Needed to Begin:
Cardstock
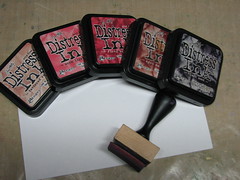
Ink Blending Tool & Foams - Ranger
Distress Inks - Ranger (other inks will work but these are my fav's.)
Distress Tool - Tonic Studios
(*Note: I am using Tattered Rose, Worn Lipstick, Fired Brick, Aged Mahogany and Black Soot for the example. More information on stamps used following each example.)
Instructions:
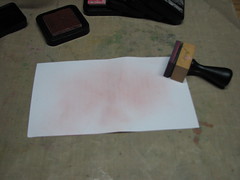
1. Always work on a protected work surface. You need to start off the paper to keep from getting a large rectangle of ink in any given area. I like to work on the Non Stick Craft Sheet by Ranger as it does not absorb the inks so you can go back and pick up the inks left when you start off the paper.
2. Begin by pouncing the Ink Blending Tool & Foam onto your lightest color several times. I know it doesn't look like much ink but trust me, the foam/tool helps the ink go a long way. Start off the edge of the paper and working in circular, swirl motions, move the blending tool on to the paper and begin applying the ink.
 to the paper and begin applying the ink.
3. Concentrate the lightest color of ink where you would like your focal point image to be. I want the image to be slightly off center to the right in the example.
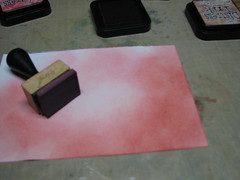
4. Continue by layering additional colors of ink. Here I have added Worn Lipstick and am working on Fired Brick.
5. Finish up adding Aged Mahogany to the outer edges. I like to apply a heavy coat of my finish colors to the corners as shown in the example. This adds alot of character to the finished Burnt Edge look.
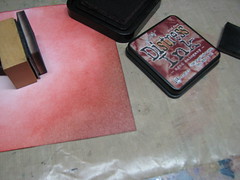
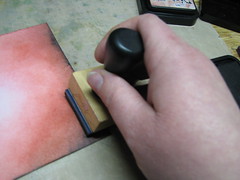 6. Now it is time to switch gears and pull out the Black Soot Ink. Working one edge at a time, you will apply the ink "direct to paper" by running an edge across the ink pad. Place the piece of paper down on the Craft Sheet. Swipe the inked edge inward pulling the ink along with the Ink Blending Tool. You will do this in one swift motion. This produces the feathered look to the edge. Continue until all edges have been inked.
7. Using your favorite paper distress tool, you will distress all edges. I like to work the distress tool in both directions. By going back and forth you will get a more random distressed look to the finished product. I have found that if you pull the distress tool in one direction it looks artificial as all of the tearing is in the same direction.
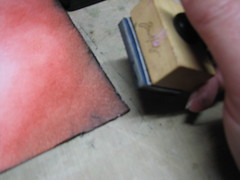
8. This step is totally optional for the finished look you are trying to achieve. You will notice that after you distress the paper you will have alot of white showing where the paper has been torn. I like to go back over each edge with the Ink Blending Tool and Black Soot ink to cover this up. Again, this is totally optional.
You're finished! Your "Burnt" paper is now ready to be stamped and used on cards, scrapbooks, or on an altered project!
Love Conquers All
by Roni Johnson
Supplies: Ranger Distress Ink - Tattered Rose, Worn Lipstick, Fired Brick, Aged Mahogany, Black Soot & Brushed Corduroy; Ink Blending Tool & Foams - Ranger; Heart Flourish Stamp - Fancy Pants; Love Conquers All - Autumn Leaves; Wings - Stampers Anonymous; Script - Inkadinkado; Glossy Accents & Micro Beads - Ranger; Couple Rub-On - Royal & Langnickel; Cardstock - Bazzill; Free-hand Jeans Heart

Create Yourself Altered Journal
by Roni Johnson
by Roni Johnson
Supplies: Distress Inks, Ink Blending Tool & Foams - Ranger; Large Fashion Pattern & Sentiment - Stampers Anonymous; Dress Pattern & Acme - B-Line Designs; Vintage Buttons & Sewing Ephemera - my personal collection.

So, now that you see how easy it is why don't you give the Burnt Edge Technique a try :) I'm sure you'll enjoy the results immensely!
Happy Stamping!!
WOW! I think I love this technique the most so far. your results are incredible.........and I especially like the hand cut jeans heart! Gorgeous and funky! I don't have the ink blending tool...but the more I see you use it, the more I want it! Maybe my LSS will carry it soon.
ReplyDeleteI'm pretty sure I have all the supplies I need to do this technique!! I am so thrilled!! I've had a sheet of the foam for quite awhile just waiting for the right technique to come along. I think I found it!! Thanks, Roni!
ReplyDeleteso cool! so gorgeous!!! I LOVE LOVE LOVE the blue on red. Great technique!
ReplyDeleteLove, Love, Love this!! Now if I can just find one of those ink blending tools......
ReplyDeleteBeautiful! I love the blue heart on red.
ReplyDelete