
It's that time of the year ~ time for Christmas Cards :) I'm sure alot of you already have your cards ready to go but for those of us who are a bit behind and short on time here are a few suggestions for some quick and easy card solutions!
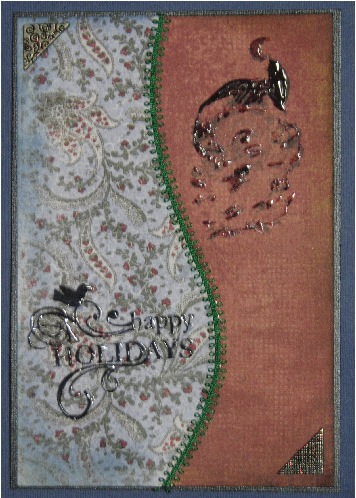
This first card is really quick! Just a few minutes, 2 pieces of pattern paper and 2 stamps is all it takes. Extra embellishments and embossing are optional. To make simply layer the 2 sheets of pattern paper cut to card size. Cut a curve into both layers at the same time. This will give you paper for 2 cards with one cut! Stamp 1 image on each piece of pattern paper and emboss if desired (I used clear for the example.) Adhere each side to a card base. Add ribbon, trim or fiber over the seam if desired. It is not necessary since both sides should match up perfectly. Add extra embellishments if desired. For the example I added metal photo corners topped with Christmas Red Stickles. I also went around the edges of each piece of pattern paper with Distress Inks (walnut stain & faded jeans) and the Blending Tool.

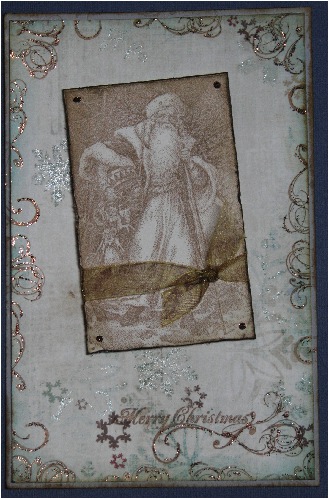
This example takes a bit more time as all of the edges are distressed with a distressing tool and Distress Inks. Love the look of stitches but don't have the time? Try stamping stitches onto your card as shown. These stitches were embossed with clear embossing powders for a raised effect. If you don't already have stitch stamps, use an embossing pen and draw stitches onto your card and emboss with black or colored embossing powders!
Vintage Bling....This card while still easy takes a bit more time as all of the stamped swirls were covered with Cinnamon Stickles and the snowflakes in the pattern paper were covered with Baby Blue Stikles. The "faux brads" on the main image were made again with the Cinnamon Stickles!

I love collage stamps. By applying various colors of ink to each aspect of the stamp it adds so much more to the finished image as opposed to using just one color. To apply the inks I start from the center of the stamp and work my way out. Pick up the ink pad and dab the corner of the ink pad on the desired section. Continue inking up each portion of the stamp until it is completely covered. Don't worry if your color crosses over into a neighboring element, it happens. We're not going for perfect here ;) Just as with any new technique you will improve with practice. All of the inks on this stamp are from Ranger's Adirondack Dye Ink line. From left to right - lettuce, eggplant, stonewashed, cranberry & denim. The edge of the central image, stamped snowflakes & card edges were all inked using Walnut Stain Distress Ink (if you haven't figured it out that's my favorite color of Distress Ink!).
I didn't like the silver of the label holder I had so I dabbed on Espresso, Denim & White Adirondack Acrylic Dabber paints then sanded when dry.
Supplies used:
Card#1 - Black Embossing Ink, Clear Embossing Powder, Christmas Red Stickles - Ranger Industries; Sentiment Stamp - Autumn Leaves; Santa Stamp - Paper Inspirations; Pattern Papers - Daisy D's & Basic Grey; Photo Corners - Making Memories; Trim - unknown.
Card #2 - Adirondack Dye Ink - Cranberry, Pesto, Black Embossing Ink, Clear Embossing Powder, Walnut Stain Distress Ink - Ranger Industries; Pine Stamp - Hero Arts; Sleigh - All Night Media; Sentiment - Wordsworth; Brown Cardstock - Club Scrap; Green Cardstock - Bazzill; Pattern Paper - Basic Grey; Gems, Eyelet, Hemp - Unknown.
Card #3 - Coffee Archival Ink, Broken China Distress Ink, Cinnamon & Baby Blue Stickles - Ranger Industries; Santa Image - Paper Inspirations; Sentiment (flourishes stamped with edge of sentiment) - Autumn Leaves; Pattern Paper - Kelly Pancie; Cardstock - Bazzill.
Card #4 - Adirondack Dye Inks; Distress Inks; Acrylic Dabbers - Ranger Industries; Christmas Collage Image - Stampers Anonymous; Snowflakes - Stampabilities; Sentiment - Fontwerks; Pattern Paper - Kelly Pancie; Cardstock - Club Scrap; label holder - Making Memories; Brad & Photo Turn - Unknown.
How dimensional do the stickles stay? I need a substitute for red brads, since they seem unavailable locally these days, lol! I've got some rain dots that I'm going to try, but thought the stickles might work well, too. Love the cards!!
ReplyDeleteOnce dry the stickles are about 1/2 as high as when applied. If you put a thicker coat they will be fairly dimensional. If it's not enough dimension for you, you can add a top coat of glossy accents. That holds it's form perfectly!
ReplyDeleteVery cool--but how did you ink different parts of the collage stamp? I have a feeling that this is a duh question, but I'm not getting it tonight. LOL
ReplyDeleteLOOOOVE the swirl card!!!
To ink the collage stamp I start from the center and pick up the ink pad and dab color onto the sections I want. I use the regular full sized pads but it would make it easier with the smaller cubes or Cat's Eye pads. I just work my way around the stamp until everything is covered. It doesn't have to be perfect and it will be easier after a few tries. There is another method if you needed several of the same card. It involves makeing a custom ink pad of using Ranger's Cut & Dry Felt.
ReplyDeleteI love them all but I really like the suggestion for the quick and easy one. I need that. I will have to give it a try. Will link it if I do. Great idea. Loving your blog!
ReplyDeleteoh those are beautifu, I will have to try these for sure , in fact after I post on the soot card I will I like the first one a lot!! I can so scraplift that one
ReplyDeleteOh - thanks so much for the ideas! I think I'm gonna give that first one a try.
ReplyDeleteHey! I made yet another card which was inspired by your blog! I don't know about anyone else, but I am loving your Ink Stains!!
ReplyDeleteI'll email the card so you can see it, but I used your idea of a curved cut on the cardstock. Instead of adhering ribbon etc. over the joined edge, I inked and embossed the edge with gold.
Thanks for another great idea!
Karen
Beatiful as usual, Miss Roni! You are so talented!
ReplyDeleteThe card designs are beautiful. I got inspired by my Christmas Journal prompt to get started on my cards for this year. I'm going with the custom inkpad idea.
ReplyDeletehttp://lisadixon.typepad.com/photos/uncategorized/2007/12/03/day_3_page.jpg