
 Here are a couple inexpensive alternatives to Reverse Image Stamps. Fun Foam!
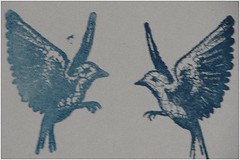
The blue set to the left was made by inking the rubber stamp then stamping it onto the fun foam. Immediately place your cardstock over the image and run a brayer over the back side of the paper. It gives a slightly fainter image but still very clear. I found it works best if you use pigment inks as dye inks dry far too quickly to give a good impression. It also a good idea to huff on the image for added moisture.
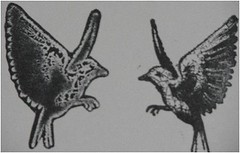
This image is another type of reverse image ~ it is both reversed as well as the negative to the rubber stamp positive! Makes for a cool look and could be used for a number of projects. To make a negative stamp image you will need to heat up a portion of fun foam using an embossing gun/heat tool. The area will need to be large enough for the stamp you will be working with. Once heated, immediately press the un-inked rubber stamp onto the heated portion. After about 30 seconds or so remove the rubber stamp and you will have the negative image. Cut the image out leaving a very small edge as shown in the example. Follow the image closely as this will be the outline for the stamp. Ink up and stamp as you would any other image.
LOVE the negative reverse image stamaping. I have lots of fun foam sheets....and some stamps that I think will make interesting negatives...can't wait to try it!
ReplyDeleteKaren
Well, who would have thunk it?? Fun foam? I'll have to try this sometime. Thanks for the tips =)
ReplyDelete