

This is my button container...yes, it's a bread box and yes, it's almost full. Told you it was an addiction with me ~ I wasn't kidding! Now I didn't buy them all, my grandma gave me several tins full of buttons (you know those old round cookie type tins) collected by various members of the family over the years.
These ornaments are a great way to spiff up plain colored ornaments and give them a little zip! It's also a super way to use up odds and ends buttons you might have in your stash.
25 Days of Hand Made Ornaments
#8 - Button Decorated Ornaments
Idea #1 - Button Belted Ornament
Supplies:
Buttons
Ornament
Glue Dots
Side Cutters

Instructions:
1. Snip off any shanks your buttons might have. This will allow you to attach the buttons to the ornament and have them sit properly.

2. Place a Glue Dot on the back of each button and work your way around the center point of the ornament...you can see I've already got several buttons on the ornament in the background.
And you'll end up with an ornament something like this...

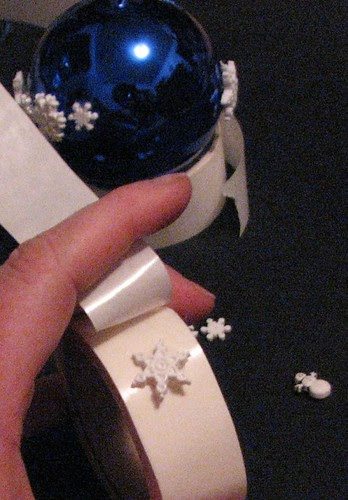
Idea #2 - Ribbon & Buttons
Supplies:
Buttons
Ribbon
Ornament
Glue Dots
Double Stick Tape
Side Cutters

Instructions:
1. Snip off any shanks the buttons may have.
2. Beginning at the top, wrap the double stick tape around the bulb from cap to cap as shown. You can see that I have added ribbon to the first strip of adhesive and have placed the second strip (white) ready for more ribbon.

3. Add as many strips of ribbon as desired. I usually add 3 or 4 - this spaces the ribbon nicely.
4. Add buttons where desired. I have added one at each strip of ribbon as well as around the cap.
And here is what your ornament may look like....

So there you go...
another quick and easy ornament!
I know they aren't all inky but I do hope you're all enjoying these ornaments.
I am having fun making and sharing them with you!
There are just so many fun ways to create hand-made ornaments it's hard to decide which ones to post each day!
Roni -
ReplyDeleteThank you for another wonderful ornament posting. I used to have lots of old buttons (only have a few left) that belonged to my grandmother (she's 102 and was a seamstress). I've used them through the years on works of art, I've included in beading, in jewelry, on a collage I made on velvet, things like that. I never thought about using them on ornaments, see that's why I need your brain - to pick it - LOL! Thanks for sharing.
Elaine Allen
Neat ornaments Roni! I too have lots of buttons my family has collected over the years. An ornament would be a great way to showcase some of them!
ReplyDeleteWow, that is some huge buttonbox!!
ReplyDeleteI, too, have a bunch of buttons - both old and new. I wasn't planning to have a tree this year, but if I start making all your cool ornaments, I might have to! LOL
ReplyDeleteVery cool idea. I too have a ton of buttons from my grandma! My mom has even been reading along because she has a ton of the bulbs and I sent her your link. Thanks for inspiring us.
ReplyDelete