Friday, December 8, 2017

Carve December Day 8 - Challenge Accepted!

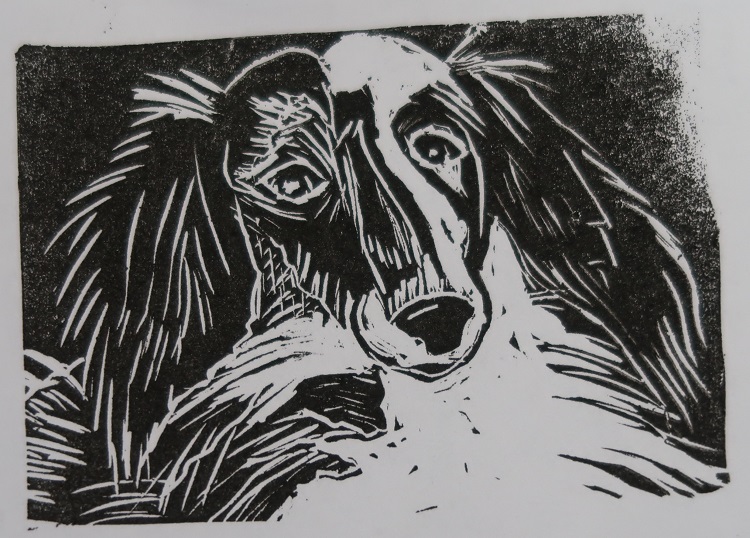
Today I have a special stamp to share...it was a special request for a friend. She liked my dog stamp so much she asked if I'd make one of her dog.  Never backing away from a challenge I gave it a shot and here it is...


It's her long hair weiner dog Buddy.


My first attempt was rather tragic...In my defense it was a small photo with half his face in shadow. I tried to enlarge it but the left side of his face just wouldn't show up well enough. Needless to say he's a scary looking dog - I think it's going in the trash.


So she sent me a better photo and I played with the contrast and such the started carving...


This is a much better likeness - at least you can tell how it is this time - LOL!!

Thursday, December 7, 2017

Carve December #7

Today I have a trio of stamps that I made to go with a couple new stamps I bought recently.  The stamps I bought were some woodsy type stamps from Joy Clair that were so cute but I needed something to go with so I carved these...


I am so excited to use these...they are going to come in so handy with my other new stamps. I think they will make some really cool "woodland" type cards and I'm thinking some masculine cards are in my near future as well. 

Supplies: 

Speedball Carving Tool
Various Rubber Blanks
Imagine  - Memento Dye Ink

Wednesday, December 6, 2017

Carve December 2017 - Day 6

This is only day 6 on my stamp carving journey and I'm still learning.  I have always wanted a feather tree stamp but I've never found one that I really like. There aren't many out there and the ones that are just don't look like what I picture a feather tree so I decided to carve one of my own.


This is my finished "decorated" feather tree.  I used several peg stamps from Rubber Stamp Tapestry for the decorations and to add to the bottom of my spool stand.  Looks cute huh?  Best thing - I can vary the peg stamps to change up my tree for the various seasons and holidays!!!  How cool is that?


But it wasn't all peaches and cream!  It was really hard trying to figure out how to make the branches of the tree and I had an epic fail.   My first attempt actually went into my circular file so I started over.


This time I did things a bit different and carved out all of the little bits. It was VERY time consuming but I liked how it turned out...almost.


I say almost because I started the spool stand too far down on the rubber and ended up not having enough room to carve the bottom portion of the spool....CRAP!


But I had a thought, I went digging through my circular file and pulled out my first attempt.  I liked the spool from that tree so I hacked it off, did a bit of surgery on my second stamp and ta-da! I now had a feather tree that actually had a decent stand.


And here's my funky little feather tree!
The star was carved from some scrap rubber that I cut away making the tree.

So tickled I figured out how to make it after all.

Are you carving???

Supplies:

Speedball Carving Tool

Stamped Imagines:

Imagine - Delicata Golden Glitz; Memento Dye Inks
Rubber Stamp Tapestry - Various Christmas Stamps

Tuesday, December 5, 2017

Winter Wonderland ...

No, we didn't get any snow last night but I did make a fun winter wonderland scene on a card for Imagine!  One of the challenges for December was "winter window" so I decided to make a winter shadow box card.  It's not the normal small cards you see around.  This one measures 4x7x2.5" and fits into a #10 size envelope. Since it's 2.5" wide it allows for 4 layers plus the scene on the back of the card. Lots of room to decorate!


You can find the directions on how I completed this card here...


Don't ya just love how the White Amplify! really looks like snow on the hills and trees?  It really adds such depth and dimension to an already fun card.

So, are you ready for winter????


CarveDecember2017 - Day 5 Graber

I am so excited to share the stamp I carved today...I saw somewhere that someone was carving stamps of people from photographs.  Well I'm so not ready for that but I did want to give it a shot so I found a photo of my dog Graber (pronounced Grey-burr, not grabber - LOL) I liked and tried my hand at it.


This is my stamp that I made from this photo...

(He's a Jack Russell, Rat Terrier mix)

I forgot to print it out in reverse so he would be facing the right direction but it's pretty close.  As you can see he's brown with black shot through. I didn't know how to carve that into the stamp so it doesn't look exact but I'm pretty happy with how he turned out.  He's at least recognizable.  

Monday, December 4, 2017

CarveDecember2017 Day 4

Continuing to carve stamps - this one is for my DIL for Christmas...she's already seen it, I couldn't wait to show her - LOL!!  I'm terrible at surprises.


So she loves owls so I thought I'd give one a shot. I googled owls and WOW - do you know how many different types of owls there are?  I sure didn't. My owl is kind of a mish-mash of a couple pics I saw. I liked the ears on one, feet on another, etc.  I think he turned out pretty cool though - except one of his eyes is wonky but hey, maybe he's giving someone the evil eye - LOL!!

Sunday, December 3, 2017

CarveDecember2017 - #3 - Flowers

I am having so much fun carving these stamps. I made 2 different flowers today.

(Inks - Memento - Cottage Ivy; Kaleidacolor Berry Blaze)

My first flower was meant to be a tulip but I think it looks more like a crocus but I guess it's close enough.  

(Inks - Memento - Bahama Blue & Cottage Ivy)

This is supposed to be a flower but I think it looks a bit like cotton?!?!  I don't know what to do to fix it but I may try to make some leaves for it to make it look more like a flower.

Happy Carve December Friends :)

Saturday, December 2, 2017

Carve December 2017 #2

Hello Friends -  
Back with another new stamp I carved!


I wanted to make a stamp that looked cool on it's own but also worked in groupings... I'm pretty happy with hot it turned out!


I used Kaleidacolor - Autumn Leaves for this example :)
I forgot to rock the stamp on a couple of these images but you get the general idea.

Friday, December 1, 2017

December CS Card Sketch Challenge

Hello my inky friends!  It's time for a new card sketch challenge on the Club Scrap Forum and I've got another fun sketch for you.


We're pushing the main image up into the corner!


And here are my cards...


This sketch leaves it pretty open for interpretation. I hope you give it a go.

Supplies:
ClubScrap.com - Scandinavian Holiday Kit & Stamps; Misc. CS embellishments
Imagine - VersaMagic (chalk) ink; VersaFine

Carve December 2017 - Day 1

Welcome to Carve December 2017!  This is the first year I'm participating in so I'm really excited. I would label myself as a beginner as far as carving goes.  I gave it a try many years ago when a friend got me a carving blade and a piece of the pink Speedball rubber.  Let's just say it was less than successful and I haven't attempted it since.

Recently Marcie at Imagine posted a link to this challenge and I thought it sounded like lots of fun so I am going to give it a shot.  I can't promise that I'll carve every day but I'm going to play as much as possible time wise.

I wanted to start out easy so I went with a geometric design.  This is a stamp I've wanted for several years, I just haven't gotten around to purchasing one so I decided to make one for myself!


It's wicked easy, I just made some marks on the square of rubber, drew lines with my pencil and carved.  I did dig them a bit deeper than I needed but that was in part due to the rubber...it kept wanting to pull the blade deeper as I pushed it along the line. I tried to straighten them up as best I could but you can see there are some pretty wiggly lines.  Not bad for a first try though.

This stamp was carved using some pretty yellow rubber blanks that I bought on amazon.  Actually it was a set of 5 of these squares - about 2" square.  I must say I'm not real impressed with these pieces of rubber. They are a bit difficult to cut (as opposed to the Speedball pink rubber) and they are not flat. I found that little bit out when I went to stamp the image above. It's higher in the center than it is the edges so to get the images above I had to rock the stamp back and forth to get a full impression.

All in all, this was a fun start to Carve December 2017.  Are you carving?