Friday, May 31, 2013

"Create" Mini Mint Tin - Necklace

Well, I was finally able to get my necklace finished...
(I had an unexpected pick-up for our business today)
I started off by alcohol inking the back of the box with Espresso AI. 


Then I set about turning it into a necklace.  I used an eye pin threaded through the hold I poked in the top, I twisted a loop into the top and used it to hang from my necklace....  This is the second design I made and ended up using.  I wanted to have a string of little gears on each side but it just wouldn't lay right.  I had one side that kept wanting to twist and twist.  It would have been o.k. if both sides did it but it just ended up driving me crazy. 

Sooooo, I took it all off and started off fresh.  I used the two larger gears that I attached to the chain.


I need to come up with something else to put on the front...
a word, phrase, embellishment?!?!?

Any ideas???

I just think it looks so unfinished.
I'd love your suggestions!

Next week be sure to stop in, I'm going to be trying my hand at a new (to me) technique that I've been seeing quite a bit ~ it's where you create a collage, paint it black then shimmer it up.  I don't know that it has a name but I saw it first from Mark Perry - The Male Crafter.
Like I said, I don't think this particular style has a name but I think it should be Aurora or Northern Lights.  It reminds me of the Northern Lights dancing in the sky.

Anyway, I'll take you along as I try my hand at one of these gems!
Hope to see you then!!

Thursday, May 30, 2013

*Create* Altered Mini Mint Tin

Hi All ~

I was cleaning off my desk yesterday ~ I have the piles disease....I am constantly battling piles everywhere ~ anyway, I found a nifty little mint tin I got at Hobby Lobby....  (These things are so good!).  So I decided that after my desk was clean that was going to be the first thing I played with.

 
Well, I started off with an idea that had been rolling around in my brain for a while and I pulled out some of my Graphic 45 8" paper from the Curiosity Shoppe (yes, I'm hoarding it) and went to work.
 
I wanted the other side of this print for the front and inside of the tin so I placed the tin over the paper face down and traced around it.  For the inside of the tin I traced the bottom of the tin since it was a bit smaller.  It fit in the inside of the lid perfectly but I had to do some trimming for the inside bottom of the tin.
 
 
(this is what the other side looks like...)
 
 
And that's where things sort of went blank...
I guess I really got in the zone because from there out I didn't even think about taking another picture until I set it down to dry.
 
(slap my forehead!!!)
 
DOH!
 
Anyway,
here is how it looks so far....
 
I glued the paper to the front of the tin, inked the edges and added some ribbon around the edge of the lid.  The star is a little rusty metal star I had in my stash ~ I thought it went perfectly.

 
Then I went to work on the inside...
 
You can see the background paper but I also cut out the eye chart, mini butterflies and nifty lady!  I also added a few mini feathers and some tiny eggs I had in my box of goodness.

 
Tomorrow I'll be back to show you how I finished it off...

Till then ~
have a wonderfully inky evening!

Wednesday, May 29, 2013

Club Scrap - Cape Cod May Blog Hop!

Welcome to May's Club Scrap Blog Hop
 
This month the kit theme is Cape Cod!
 
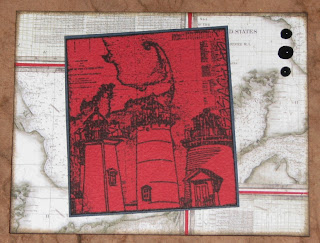
The first card I created was a Tri-Fold Shutter Card....


I also decided that it would be fun to add a few cards to the 2013 goal of making 2,013 cards to donate to Operation Write Home!  
 Right now the counter is sitting at 685 but with my 10 cards it will go up to 695!
 
2013 in 2013
 
Here are just a few of my cards....
(some of them still need a sentiment which I will add before I send them in)


Hope you've enjoyed your stop here at Ink Stains!
 
The next stop on your journey will be:

Tuesday, May 28, 2013

Le Ballon

 
I thought I'd share a fun Steampunk-ish card I made recently for Deep Red Stamps ~
Stampers Best new name for their stamp line!
Same great stamps ~ but Deep Red Stamps is the retail name since they will now be available in stores too!
 
They are already at
and I'm sure there will be many more in the near future as the word gets out!
 
This card was created using the following stamps:
 
Remember if you would like to place an order at Stampers Best -
Be sure to use the 10% off your order discount code:
"inkstains"
when you check out!
 
You can use this code more than once and it's good indefinitely!!
 
Have a wonderful day everyone!!


Monday, May 27, 2013

Happy Memorial Day!

To all of the men and women who have served in our armed forces...
in the past, present and future....


SB - OWH 5-19 001

Thanks for all you do!!!


SB - OWH 5-19 003
Happy Memorial Day!!!

Friday, May 24, 2013

White Pens - My Favorite

 
One question I get over and over is what white pen do I like the best.
 
Well, I keep meaning to post this but it wasn't until I was using it that I actually got around to showing the differences to post.
 
So, here goes....
 
Now in the past I did a demo of various inks and how they came out on top.  At that time I like Ranger's White Pigment Pen the best. So I decided to include it and my new favorites in this little demo.  Priced at around $3.00.
 
The second pen I'm using is the Sakura Gelly Roll white pen.  It's relatively inexpensive at $1.40 - 1.60 each. (roughly half of Ranger's pen)
 
You're going to think I'm nuts but the third pen I'm adding to the mix is Liquid Papers All Purpose Correction Pen.  It's a bit pricy at a little over $3.50 per pen but it lasts quite a while.


Now I don't like to do a lot of talking (o.k.... typing) for demos like this ~
I like to let you make up your own mind so here are examples showing all 3 pens side by side so you can compare how the white pens show up on black and lighter colored papers.
 
NOTE: all three pens have been used but still had over 1/2 the ink left so it's a level playing field.


You can make the choice for yourself but I have to tell you the Sakura White Gelly Roll is THE BEST white pen I have ever used!!!!  Not to mention the cheapest!!!
I rarely if ever have a problem with it.  It's always ready to go no matter if I've used it daily or left it sit in my pen jar for weeks at a time.  It has never failed me.  Below is part of a card that I used it on ~ you can draw, color in images, write, etc.  It ALWAYS works!
 
I simply can't speak highly enough about this pen, I would recommend it to anyone.


Now, I have to say that when Ranger's White Pigment Pen is brand new it works great (check out the old demo I did - link posted below). It has a nice opaque color that has a very consistent flow.  BUT as you can tell from the two examples above after Ranger's pen has been used a few times is very difficult to make it work nice.  I actually had to go through 3 pens to find one that would even work.  I don't know if the ink dried up in the barrel or if it was something to do with the tip but any way you cut it they are far too expensive to be having that much trouble.
 

Now the wild card - The Liquid Paper correction pen.  I know it's crazy but this thing really works very well.  I actually unearthed it when I was cleaning out our office desk.  I sort of forgot I had it because I bought it so long ago but man this thing is cool.  As you can see it creates a bold line which can be very handy for some applications.  It's in the same dollar range as Ranger's white pen so it's about double the Sakura pen but it's nice to have on hand when you've got a project that calls for lots of white coloring.

I hope this helps you a bit in your search for a super white pens. 
To see the previous results of the white pen test check it out here....

Ahoy Matey!

Do you realize that Father's Day is just 3 short weeks away?!?!?

Eeek!

Here is a card idea you might enjoy :)


Just For Fun Rubber Stamps: 
The ship was colored using Spectrum Noir Markers; the background was stamped using black & coffee Archival Inks and shaded with Distress Inks.

Thursday, May 23, 2013

Cutting and Punching Holes in Mica

Several people have posted or e-mailed about how to punch holes in the mica.  Several were worried it would crack or break like glass.
 
Even though it's fairly brittle and is see through like glass it's VERY tough stuff.  Yes, you can break it if you try really hard but I've never had any trouble with punching holes in mica or even cutting it for that matter.
 

mica 004
 
Now many times you'll want to separate the pieces because for most projects you only need a few sheets instead of a really thick piece.  This is super for making charms because you can make two exact halves to sandwich your images between!
 
You can use your fingernail or like here a pick or paper piercing tool.
 
mica 007
 
You can punch the mica with a hole punch - I'm using a Crop-o-Dile because it's what I have.  As long as your punch is sharp it will cut like butter.  As far as cutting mica thinner sheets can be cut with regular shears while thicker pieces can be cut with heavier duty scissors like Tim Holtz type.  I say this only because lighter weight scissors may dull after cutting much mica.  I have a pair of heavier duty Mundial scissors that I use all the time and they cut the mica just fine.
 
mica 008
 
As you can see here the mica doesn't crack, break or peel where I made the hole...
 
(Note, this is a thicker piece of mica)
 
mica 009
 
And to show you that you can punch a hole on thinner mica this piece has only 2-3 layers (which is pretty thin as you can tell since it's very transparent). 
 
mica 010
 
Now on thinner pieces the piece of mica that you punched out may not come away clean as you can sort of see in this photo.  All you do to remove it is run your finger nail across it and the excess flakes right off.  No damage what so ever done to the mica.
 
mica 011
 
Now, no matter if you're cutting thick or thin sheets of mica you'll end up with waste from the holes...don't throw it away!!!  You can use this just as you would glitter...  it's beautiful and so very pretty as an embellishment.
 
mica 012
 
Now, where can you get it??? 
 
Well, I've been referring people to Altered Pages - Mica or USArtQuest - the two places I've been getting my mica.  BUT, I've been thinking about adding mica to my Etsy shop. 
 
Lots of people shy away from mica because of the price but I would offer it at lower prices than I've seen elsewhere.   I just need to figure out if there would be enough interest in it.  The initial investment would be substantial and I need to make sure I would be able to at least make enough to cover the costs.
 
Anyway, I hope this helps answer at least some of the questions you've had about mica.  If you have any more, please feel free to post...I'm always happy to help when I can.

Fishin' Photo...

This past weekend I was lucky enough to go fishin' with my son and his girlfriend over at her grandparents pond.  It was the first time I've been fishing in years even though I love it.  Summer has been so busy the last few years cause dh has been makin' so much hay he just never took the time to do so.

We were having an unofficial fishin contest to see who could catch the most and we were also pretending to be Jeremy Wade (from River Monsters). 

Well, ds only caught 2 but he wasn't really trying and he decided it was more fun to troll the boat around instead of fish.  Morgan (dsgf) caught 9  and I caught 7 - but I caught the largest fish that day....this devil.  I know it doesn't look like much compared to lots of different fish but being so early in the year and the largest fish I've caught in years I was pretty tickled with it.
 
(fuzzy photos = son's camera phone)

Fishin 5-18-13
 
Fishin 5-18-13 (2)
 
What fun!
Do you all fish?
What kinds of fish do you catch where you live?
We have mostly blue gill, crappies & bass here.  A few perch if you go to the right lakes but I don't think there were any in this pond.

Wednesday, May 22, 2013

Lovely Mica Charms - Pt 2

O.k...when I left you yesterday I was letting the mica sheets that I glued together dry.

And today we're ready to spice it up a bit.

So, the first thing I'm going to do is add some holes and eyelets...

Lovely Mica Charm 1
Once I have the eyelets set I took a piece of 10g. aluminum wire and bent it so it loosely resembled the piece of mica.... 
NOTE: Aluminum wire is REALLY easy to work with.  It's very pliable unlike other types of wire.
Lovely Mica Charm 003
Once I got it to roughly the shape I wanted I made a loop at the top and wrapped the excess wire around that loop.
Lovely Mica Charm 004
Next I cut 5 - 12-16" pieces of 32g. wire.  I folded each wire in half.   To secure the mica piece to the wire frame I threaded the wire around the wire through the eyelet several times.  I tried to make sure the wire was wrapped around two edges if possible to add a bit more stability to the mica piece.  This will just ensure it's being held in one spot once finished.
Lovely Mica Charm 005
After each corner was wrapped with wire you're basically done!
Lovely mica charm 007
When I was going through my dictionary trying to find a word to use on the "Lovely" charm I found this wicked octopus image and decided to use it on a charm as well.  I finished this one off by wrapping the wire through each eyelet and making a loop at the top.  This was much quicker and gives the charm a whole different feel don't you think?
Lovely mica charm 009
Ahhhh, gotta love that mica!!

Blog Changes

TEXT -
 
I've had lots of requests to change the color of the font because it was hard to read. 
 
I can't change the background color but I did darken the text.  In addition I changed the font and made it bold so it's a bit larger and I think easier to read. 
 
I hope this helps those folks with vision issues :)
 
COMMENTS -
 
I also had to switch up the comments area again.  Every time I allow anonymous comments I get TONS of spam.  Blogger is really good at screening out most of it but there are still several that get through.  Last week I had over 400 spam comments and about 20% got through so it showed up on the blog. 
 
I did go back through and deleted them all but I just don't have time to sift through the fakes for the few anonymous real comments.
 
I was able to finally turn off the word verification so that shouldn't be a problem anymore.  That option only recently became available for this template so hopefully that will make lots of folks happy as well.
 
If you have any other concerns, please let me know....
I'm happy to tweak things to make it easier and more enjoyable for you.
 
Have a wonderful day!

Tuesday, May 21, 2013

"Lovely" Mica Charm - Pt. 1

I've been working on lots of cards and books and things for a while so I decided it was time for a change of pace. 

I think it's time for a charm....a mica charm to be exact!
Mmmmmm, if you've never worked with mica I highly recommend it. 
It's one of my favorite things to work with. 
It comes in many forms...the piece below is a mica tile. 

mica charm pt1 001
The great thing about the tiles is you can peel them apart and get many sheets from one chunk.  You'll notice that the thicker or more layers a mica tile has the deeper the sepia color is - single sheets have a transparent, vintage quality to them. 
mica charm pt1 003
Here are a variety of thicknesses so you get the idea.
mica charm pt1 002
I took two fairly thick sheets of mica which I wanted to use for my charm.  I gathered up the goodies I wanted to sandwich between the tiles and my Crystal Lacquer.
mica charm pt1 006
I applied bit of the CL to the tile then began layering on the flowers & sentiment.
mica charm pt1 007
Once I had everything where I wanted it, I added more CL and then added the 2nd sheet.  Now comes the hard part....  Dry Time!  Yuck - LOL!!   I'm not very good when it comes to waiting but this will take a while to dry because it's very humid here today and of course it is sandwiched between two non-porous surfaces.
mica charm pt1 009
So, this is where I'll leave the charm today and we'll pick it up again tomorrow once the tile has dried.
Hope to see you then!