
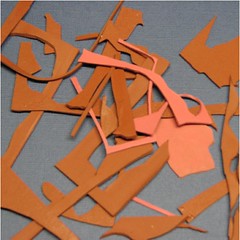
First, you will want to cut various shapes and sizes from the scraps of rubber you have left. You can do this a couple ways. You can make them all straight angles and cuts for a very
 linear design.
I chose to cut my scraps in a very random fashion. This means a bit extra cutting because you will need to trim all sides of the piece of rubber and give it a jagged, rough edge. If you leave one straight edge and the rest rough it would look very odd.
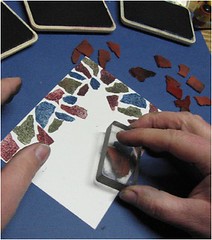
Instead of mounting each and every little bit I ran a line of adhesive on one of my acrylic blocks and just switched out piece by piece as I stamped. When the adhesive doesn't hold the rubber bits any longer just apply another line.
 I decided to use 3 rich colors from the original Adirondack line ~ Cranberry, Denim & Pesto! Very bold jewel tones ~ just perfect for the holiday card I was making. To start, simply stick one of the pieces of rubber to the block, ink up and stamp. Change inks and stamps for the next piece of your mosaic. Continue to fill up the entire piece.
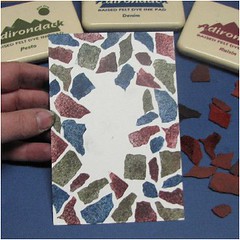
I left the center of this piece un-stamped because I knew I was going to be using another image in the center. You can fill up the entire panel if desired. To add more interest, I inked the edges with Walnut Distress Ink and the Ink Blending Tool from Ranger. I also covered each "tile" with Glossy Accents to add dimension and shine. I then stamped & colored the center piece and mounted on cardstock finishing the look with a bit of Gold Posh Ink Pen & Stickles Glitter Glue. Here is the finished card.....

**as a side note, don't toss the remainder of your scraps away...you can use them for a raised effect instead of foam tape. I mounted the Santa image to the green cardstock using several pieces of the rubber scraps and my ATG adhesive. Worked like a charm and it feels great to use up something that otherwise would have been pitched out :)
Sooooo, go to your garbage can and pull out all those scraps!! Put em to good use making your own mosaic rubber stamps :)
Supplies: Rubber scraps - um rubber die sheets; Distress Inks (for coloring image), Adirondack Dye Ink - Pesto, Denim, Cranberry, Glossy Accents, Archival Black Ink, Posh Metallic Pen, Stickles - Ranger; Santa Image - Fancy Pants; Cardstock - Bazzill
Happy Stamping!!
Oh man - and to think of all the excess rubber I've tossed away =( This is such a great idea for recycling - something we all need to be aware of. Thanks for the ideas!
ReplyDeleteOh no, too late for me to save those scraps....I threw them all away! And that's a BIG step for me, because I keep everything! But I love the effect....and there are always new unmounted sheets in my future!
ReplyDeleteKaren
This is such a great technique! I love using things that would otherwide be tossed. In fact, I have some rubber scraps that I couldn't quite bring myself to throw away months ago because it seemed like they would be good for SOMETHING! I'll have to dig them out and see what I create. :-)
ReplyDeleteOH, I forgot to ask what kind of adhesive did you use?
ReplyDelete...and to think- i just trimmed all my stamps down and tossed it in the trash. i may have a couple of tiny-ish ones that need trimming yet--- well doesnt that just figure.... However I love the way there card came out
ReplyDeleteFor adhesive I used my ATG but any type of adhesive like Tombow or even double sided tape will work.
ReplyDeleteAwesome! I still have all the scraps from my stamps!! This is such a neat idea. I really like the ink that you used too. I'm going to have to start saving up for some of those. Very pretty colors!
ReplyDeleteyou never cease to amaze me! what a stunning background~ 2 thumbs WAY up! ;)
ReplyDeleteWhat a great idea! I love the card!
ReplyDeleteAwesome Roni!! I've always looked at my scraps and wondered, but always end up tossing them. :~\
ReplyDeleteI posted a comment on the flocking post too. It looks like it didn't stick. :~(
I've been using flock a lot lately it was cool to see your post about it. I used it on the ATC's I sent you and on a Christmas card I made last month while at the beach. I love that stuff. My only issue was it looking thin or trasparent, so I do two layers.
love your new blog...the Tim Holtz goodies, and most of all your great use of refugee rubber..love the mosiac look.
ReplyDeleteConnie Paxman
Amazing idea! I love how you created the mosaic and used such vibrant colors.
ReplyDeleteHey Roni,
ReplyDeleteThis isn't exactly the same thing, but I just saw video where they suggest using small unmounted stamps as little "feet" when you have to use a large acrylic block and a small unmounted stamp. The unmounted stamp feet keep the large block from rocking. It occurred to me that using unmounted sheet leftover scraps could serve the same purpose!
Karen
Thanks so much Connie & Heather :)
ReplyDeleteKaren, Yes I have heard of using stamps as feet as well. You're idea is a good one but the rubber die left overs wouldn't work. The image is raised off of the rubber sheet so there is a gap between the image height vs. the die height. I'm not sure if doubling the rubber scraps would work or not. I think it would depend on the mfg. Some images are deeply etched while others are not. It's worth a try doubling it up though :)