Thursday, May 6, 2021

Doria's Gift

 Today I wanted to share my latest Fairy Hugs creation...


Making underwater scenes are so much fun with the newest Fairy Hugs stamp release. Today Doria is sharing one of the sea's treasures carrying it from the ocean depths to the light of day.

I started off by blending several colors of Distress Oxide ink together then flicking with water to create the lovely pattern.  I then went to work stamping with a variety of colors of VersaFine Clair inks. The Rock Formation was first to be stamped then masked off. I then stamped the Shower Mushroom off to the right, Fan Plant on the left and Fan Coral between them.  A few more masks and I then added the Ivy Seaweed and Frilly Seaweed.

Doria was stamped so it looked like she was swimming towards the light carrying her lovely coral colored shell. Finally I stamped the beautiful sentiment with Nocturne ink.

Fairy Hugs Supplies:


Be sure to stop by our Fairy Hugs Facebook Group 


Tuesday, May 4, 2021

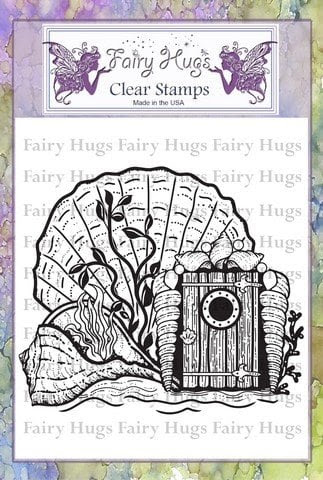
Under The Sea Shell Door Puzzle Piece

 Today I wanted to share my latest Fairy Hugs creation...


I love the brand new Fairy Hugs release filled with all sorts of fun under the sea images. These are two of my favorite in one project. The Shell Door and Tentacles create such a fun combination.  Here I have used the Tentacles so they almost look like a new form of sea plant life....swaying in the currents. 

I created this piece by painting the giant puzzle piece with black acrylic paint. I then watercolor painted it with multiple colors of Cosmic Pixie Sparkles.  After the paint had dried I stamped the Tentacles along the bottom of the puzzle piece with VersaMark ink. I then embossed them using Lucky Stars Mboss embossing powder from Imagine (it's got glitter in it!). 

The Shell Door was stamped on a piece of white cardstock using VersaFine Clair Nocturne ink then colored with colored pencils. I added a few faux pearls and lots of beautiful Fairy Hugs Powder glitter.  The door was then fussy cut and affixed to the puzzle piece.

I hope you have enjoyed this piece and check out all of the amazing new stamps in this enchanted oceanic release!

Fairy Hugs Products Used:


Be sure to stop by our Fairy Hugs Facebook Group 

Thursday, April 29, 2021

Estrella's Moonlight Stroll

 Today I wanted to share my latest Fairy Hugs creation...


Estrella is one of the newest fairies to join the Fairy Hugs family but soon to become one of your favorites. She is so dainty and pretty with her lovely pose.

Today I stared off by inking up the Gelli Plate with various colors of ink then flicked on diluted Brusho Colour Crystals over the top. I placed a shipping tag over the ink creating the resulting tag you see.  Next I used a die cut piece of acetate for the moon and inked around the edges. I then stamped the Pine Branches across the top of the panel with brown ink which I went back in with a green marker to enhance the pine needles. The flying owl was stamped along side the Pine Branches.

Estrella was then stamped on the bottom third of the card with black ink. I colored her wings with a pink marker then added a bit of glitter. I used a torn piece of paper to sponge in the ground with green ink, stamped the grass and popped it onto the pink mat on the blue card base.


Be sure to stop by our Fairy Hugs Facebook Group 


Tuesday, April 27, 2021

Singin' in the Rain

Today I wanted to share my latest Fairy Hugs creation...


One of the advantages of being a Fairy....no stomping through the puddles....just fly through the sky singin' in the rain! This was such a fun card to create even though it did take a while.

To create this card I started off by stamping and embossing April in the center of a card panel made using Lavender Distress Oxide and various colors of Brushos colour crystals.    Next I stamped the  tops of the Short Skinny Bare Tree along the bottom with brown ink. I then began stamping the "rain" using the new Raindrops stamp. After all of my raindrops had been stamped I embossed them using sparkle embossing powder.  I finished off the card by adding a pink umbrella for April and a bit of glitter to her wings.


Be sure to stop by our Fairy Hugs Facebook Group 


Thursday, April 22, 2021

Dropping In To Say Hi!!

Today I wanted to share my latest Fairy Hugs creation...


I made this card in 2 layers, lets start with the background panel. To create this piece I started off with a piece of cardstock that I had used the monoprint technique and a Gelli Plate. Once dried and trimmed I stamped the Dotted Mushrooms along the edge with the stamp pointing towards the center.  I then stamped the Whimsical Flower Cluster between the Dotted Mushrooms so they were facing outward towards the edge of the panel.

I moved on to the feature panel which was inked with the Spritz and Flick Technique. I applied various shades of blued Distress Oxide then spritzed the water in my hand and flicked it onto the inked surface. After about 20 seconds or so I dabbed the surface with a dry paper towel creating the lovely pattern you see.  After it was dry I stamped and embossed Dandelia with black embossing powder. This panel was die-cut along with an accompanying mat which were layered and adhered to the stamped card panel. A few sparklie enamel dots were added to finish it off.


Be sure to stop by our Fairy Hugs Facebook Group 


Wednesday, April 21, 2021

Cinco de Mayo Donkey Pinata with Rinea Foiled Papers!

 Hello Friends!! I hope you're having a lovely day. It's beautiful here if you look at the sky...all bright and sunny - just don't look at the ground because it's covered in SNOW!!! BRRRRRR I am so over winter!


Despite the 4 letter white stuff on the ground Cinco de Mayo is quickly approaching!! Can you believe it - May already...  So I thought it would be fun to create a fun Pinata - for table decor or for real use.  Here's how I made it...

Directions:

Rinea Foiled Paper Donkey Pinata by Roni Johnson

Step 1 - Free hand draw or download a donkey pinata template on a piece of chipboard x 2. Mine is approximately 9" tall and 12" long from tip to tail.

Rinea Foiled Paper Donkey Pinata by Roni Johnson

Step 2 - Cut strips of chipboard to the desired width of your pinata. I went with 2.5" wide.  Tape these strips of chipboard end to end with masking tape so you have one long continuous piece of chipboard. It's always better to have more but you can add to this strip later on if necessary.

Rinea Foiled Paper Donkey Pinata by Roni Johnson

Step 3 - Begin taping the chipboard strip to the two sides of your pinata. I like to start on the back of the donkey above the back legs. Use the masking tape to secure the strip to each chipboard donkey.

Rinea Foiled Paper Donkey Pinata by Roni Johnson

Continue taping the chipboard strip around the outline of the donkey.

Rinea Foiled Paper Donkey Pinata by Roni Johnson

It's o.k. if the chipboard strip doesn't line up perfectly with both sides of the pinata as they will be completely covered in the foiled paper.

Rinea Foiled Paper Donkey Pinata by Roni Johnson

Step 4 - (Optional) - If you'd like to fill the pinata with treats, when you get back to where you started taping the chipboard strip to the sides leave a 1 1/2 - 2 1/2" gap. This will allow you to add candy and small gifts to the pinata once it has been decorated.

Rinea Foiled Paper Donkey Pinata by Roni Johnson

Step 5 - Use the flower die from the 3D Hyacinth die set to cut desired colors of Rinea Foiled Paper. This will be the fringe used to cover the entire pinata. 

NOTE - Don't throw away those scraps from cutting the fringe. They will be used later in the process.

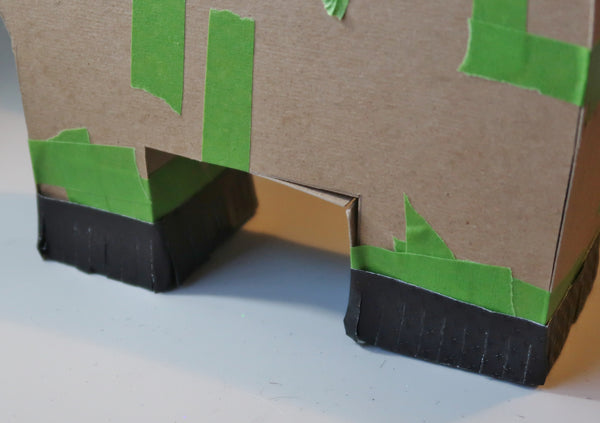
Step 6 - Cut a piece of Ebony/Ebony Starstruck foiled paper to cover the bottoms of the feet.

Step 7 - Wrap a piece of red line tape around the base of the feet, remove the liner and adhere an Ebony/Ebony Starstruck piece of fringe to create the donkey hooves. Repeat on the second set of legs.
Rinea Foiled Paper Donkey Pinata by Roni Johnson

Step 9 - Trim off the excess fringe from the feet.

Rinea Foiled Paper Donkey Pinata by Roni Johnson

Step 10 - You will need to cover the back and face first since this fringe needs to be wrapped over the back and around the face. 

To cover the back I started by the tail section and wrapped the fringe approximately 1/2" - 1" over the sides and continued to layer in this manor until I reached the neck. You can cover cover the fill hole and simply lift the fringe up to fill when desired.

To cover the face, cover the nose with a piece of Gold/Gold Starstruck foiled paper in the same fashion as you did the bottom of the feet. The wrap the fringe around the muzzle until you reach the neck area. 

Rinea Foiled Paper Donkey Pinata by Roni Johnson

Step 11 - Once the muzzle of the donkey has been covered in fringe, cover the rest of the face as you did the back wrapping a bit of extra fringe over the side until you reach the ears.

Step 12 - (Optional) - Ears - you can leave the ear area as one solid piece (like the legs) or you can do a bit of cutting to create two desperate ears. If you want to ears, cut down the center of the ear area until you reach the head. Make 1/4" cuts from the center towards the outside of the ear at the head, top two points of the ears and at the back of the head. These relief cuts will allow you to fold that 1/4" flap towards the center of each ear. Secure these folded pieces with tape.

Step 13 - Cover the top of the ear(s) with desired color of foiled paper.

Rinea Foiled Paper Donkey Pinata by Roni Johnson

Step 14 - Now it's time to start covering the body of the pinata with fringe. Work from the bottom of the feet up. Simply wrap a piece of red line tape around the area to be covered, remove the liner and cover with fringe. 

This is where the magic happens. You can choose any color combination you like, have fun, mix it up a bit. I went with the Floral and Peacock variety pack colors.

Rinea Foiled Paper Donkey Pinata by Roni Johnson

After the legs are covered continue working your way up the pinata right up to the tips of the ears. 

Rinea Foiled Paper Donkey Pinata by Roni Johnson

Step 15 - Remember all those scraps from cutting the fringe out? It's time to put them to use. Cut the short ends off and make a pile of the long scrap pieces. These will become the tail.

Rinea Foiled Paper Donkey Pinata by Roni Johnson

Step 16 - Gather all of the long scrap pieces together and secure them together with a twist tie. Make sure it is really bound tightly together. Apply your favorite glue to the end of the bundle to make sure all of the little pieces are secure and let dry.

Step 17 - Lift the fringe at the back of the donkey and poke a hole in the chipboard large enough to slip the tail in. Glue the tail in place and let dry.  Once the glue has dried smooth the fringe back down around the tail.

Rinea Foiled Paper Donkey Pinata by Roni Johnson

Step 18 - To give your pinata a bit of personality, cut eyes and nose holes from Ebony/Ebony Starstruck and Arctic/Gold Glossy foiled paper and glue in place.

Step 19 - Fluff the fringe to give it a bit of depth and dimension.

Rinea Foiled Paper Donkey Pinata by Roni Johnson

Rinea Foiled Paper Donkey Pinata by Roni Johnson

Rinea Foiled Paper Donkey Pinata by Roni Johnson

Supplies:

Rinea: Ebony/Ebony Starstruck, Arctic/Gold Glossy, Gold/Gold Glossy, Peacock Variety Pack, Floral Variety Pack, 3D Hyacinth Die

Other Supplies:

Chipboard, Masking Tape, Red Line Tape, Twist Tie, Liquid Glue, Die Cutting Machine