Wednesday, July 22, 2020

Growing in Unity - Day 3 - Pretty as a Peacock

Welcome back friends to day 3 of my Growing in Unity week! Today I wanted to share a card I made using the Pretty as a Peacock set of stamps. I love this elegant stamp - the peacock is such a regal bird and it's so much fun to color!


I started off by stamping the peacock onto a piece of watercolor paper using VersaMark ink which was then embossed with white embossing powder.   I then set about playing with my Kuretake Gansai Tambi Watercolor Paints. Adding a bit, letting it dry then adding some more. The key to the whole process is layers.
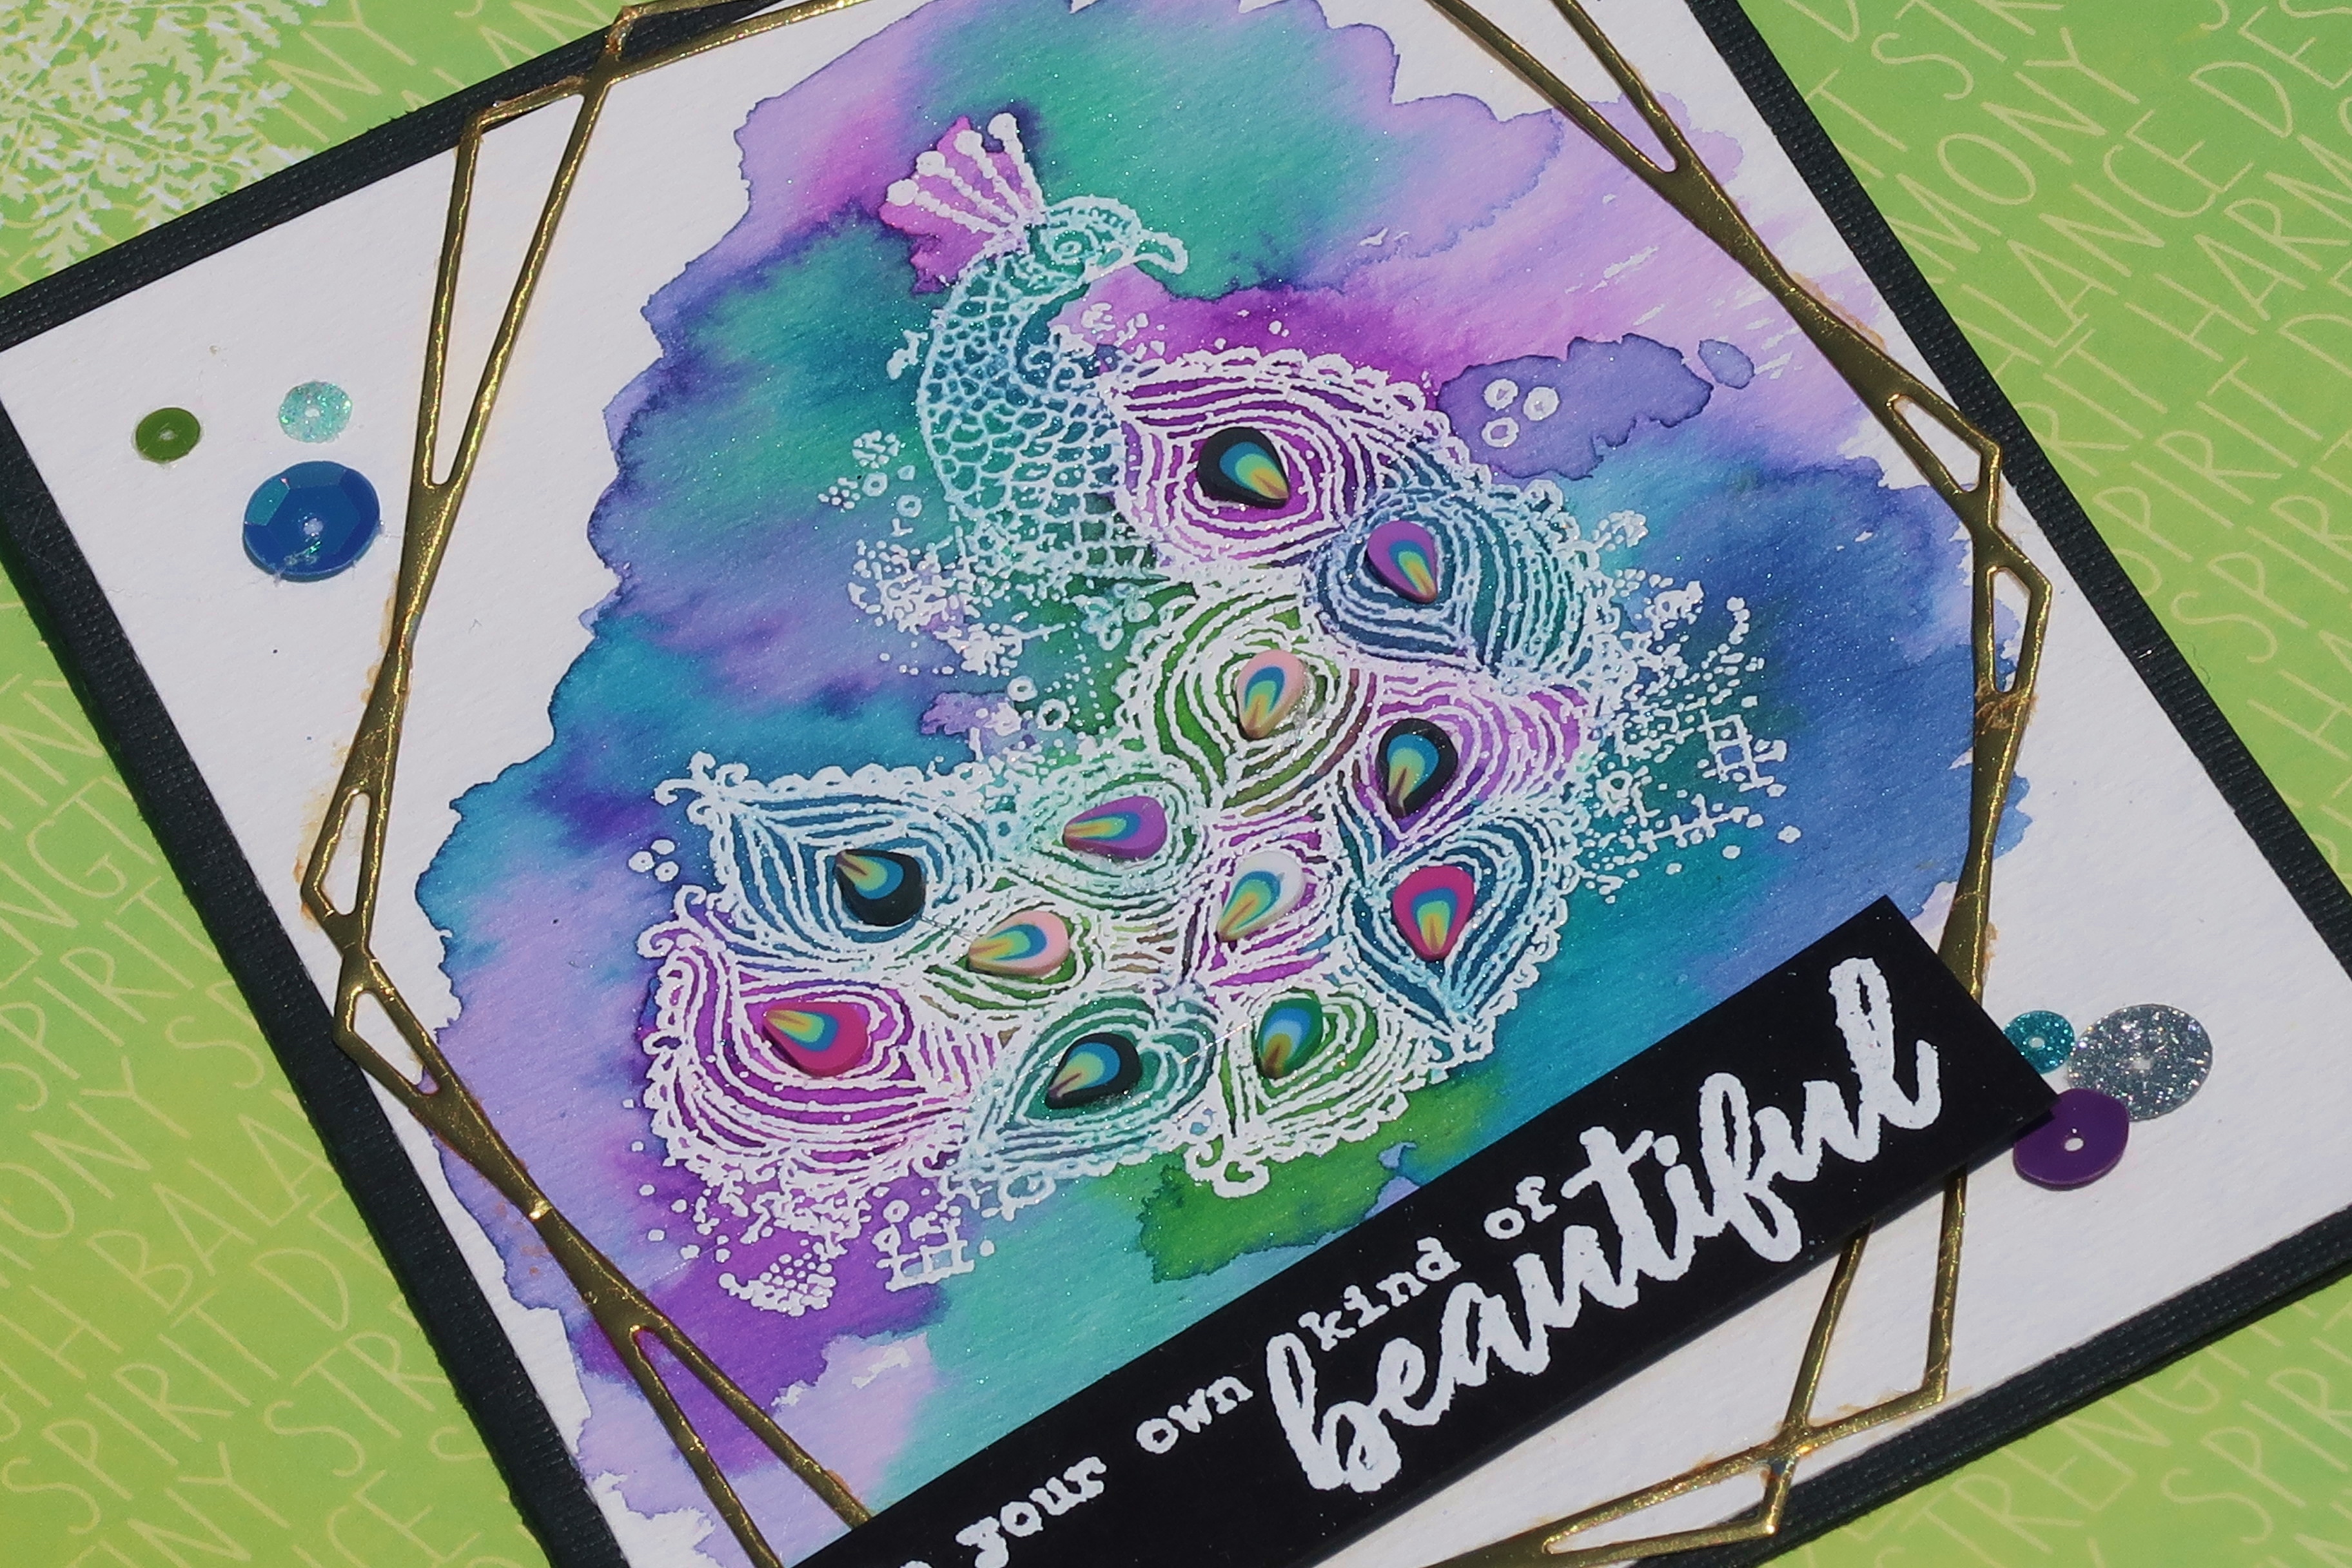

After the paints had dried I trimmed and mounted the panel on a black card blank. I stamped the sentiment (from Naturally Beautiful) on a piece of black cardstock with VersaMark ink and embossed with white ep.  A frame was diecut from Gold/Gold Glossy foiled paper from Rinea using the Geometric Oval Frame from Gina Marie.


I finished the card off by adding lovely Fimo peacock feathers and sequins from Doodles Paper Playground Limited Edition Sparkle Blends sequins mixes. They are the perfect compliment to the lovely peacock don't you think?

I hope you're enjoying the week so far...be sure to leave a comment on this or any or every post this week for your chance to win one of two surprise packages from Unity Stamp Co!  See you tomorrow friends...ink on!

Supplies:

Unity Stamp Co - Pretty as a Peacock, Naturally Beautiful (sentiment)

Imagine - VersaMark, White Embossing Powder

Kuretake Gansai Tambi Watercolor Paints


Cardstock, Watercolor Paper

Tuesday, July 21, 2020

Growing in Unity - Day 2 - Orange...Orange Who?

Hello and welcome to day 2 of my Growing in Unity Week!  Today is Twofer Tuesday and the title might have given you a hint at what stamp set I'm playing with today...Naturally Beautiful. I have a thing for citrus so I instantly fell in love with this set when it came out and wanted to showcase it's beauty!


My first card was made by stamping the background - Barn Wall - onto white cardstock using VersaMark ink which was sprinkled with white embossing powder and heated to set.  I applied both sky blue and brown inks to the panel and affixed it to a blue slimline card base.


Next I stamped and embossed the oranges on watercolor paper and used my Prima Confections watercolor paints to color them.  They were fussy cut and added to the card using double stick foam tape to pop them off the background.  I then diecut the geometric double frame from Gold/Gold Glossy Rinea Foiled Paper and glued it to the card framing the oranges.


I stamped the sentiment on a piece of scrap cardstock and diecut, added brown ink to the edges and popped it on the card. I added a few holographic circle stickers to finish it off.


My second card came about quite by accident. I originally stamped the Barn Wall image on white cardstock using Paradise VeraFine Clair ink and embossed it using Clear Matte embossing powder. I realized that it was not the look I was going for (on the first card) so I sat this one aside and stamped/embossed the background again.  I was cleaning up and was going to pitch this background but I decided to try and salvage it and this is the card I created.


I decided to use the citrus slices from the stamp set so I set about stamping and embossing several of each design. I then had loads of fun with my paints and water colored each of them.  These slices were then fussy cut.  The resulting slices were mounted on the panel either glued down directly on the panel or attached with foam tape.  


Next I stamped the sentiment from the Shimmer & Shine (07/19 Sentiment) kit onto a piece of white cardstock and diecut it. It was mounted on the panel on the diagonal.  I finished off the card with some really fun leaf ribbon from May Arts Ribbon.

Thanks for stopping by and remember to leave a comment here to be entered for a chance to win one of two surprise stamp packages from Unity Stamp Co! 

Supplies - Card 1:

Unity Stamp Co - Naturally Beautiful, Barn Wall

Prima - Watercolor Paints

Gina Marie - Geometric Double Frame 


Imagine - VersaMark, Embossing Powders - Black, White; Jumbo Dauber, VersaFine Clair - Paradise, Acorn, Nocturne

Cardstock, Holographic Stickers, Double Stick Foam Tape, Adhesive

Supplies - Card 2:


Prima - Watercolor Paints

Imagine - VersaFine Clair - Paradise, Nocturne; VersaMark; Embossing Powder - White, Clear Matte, Sponge Daubers

May Art Ribbon - Leaf

MFT - Stitched Label

Cardstock, Adhesive, Double Stock Foam Tape


Monday, July 20, 2020

Growing In Unity Girl - Day 1 - Very Me

Hello and welcome to my first time at being a Growing In Unity girl. I am so excited about this opportunity to share my art with you, so excited in fact that I've had my cards done for almost a month now!  It's been killing me to wait till now. LOL!!

I must confess, I had a very difficult time choosing which stamps to use because I love them all. I would have my list set then remember another set I just had to include. I finally narrowed it down to some of my absolute favorites.  I hope that you enjoy what I have in store for you this week.  On to the fun....

My first card as you can tell from the title is very me...


Let me explain a bit about my choice...I live in rural Indiana and I'm very much a simple country girl.  We own our own business and operate a small farm where my husband grows corn, soybeans and with the help of our boys they make hay and straw.  The Farm Fresh stamp set is a great starting point  because it has a lovely rustic mid-west vibe.


You might have noticed that I also have a passion for vintage ephemera. I love scouring flea markets, antique malls, resale shops, garage & estate sales to find and collect bits and pieces from the past. I have used vintage grocery store savings stamps from all over the mid-west along with a few milk caps and a nifty cream tag that was tied to the milk cans for collection! I love incorporating real vintage ephemera into my art whenever I can. I think it adds a fun touch of nostalgia to my work.


I hope you've enjoyed this initial glimpse of me and my work. Stay tuned...tomorrow is Two-fer Tuesday!

Remember to leave a comment each day to be entered to win a goodie bag of stamps from Unity!! At the end of the week I'll choose 2 lucky folks from all comments left here and on these Facebook pages - Ink Stained Roni, Growing in Unity and Unity {show & tell}.  The more you comment the better your chance at winning!  Good Luck Friends and see you tomorrow!


Supplies:

Unity - Farm Fresh

Imagine - VersaFine Clair Nocturne, Summertime (orange), Cheerful (bright yellow) and Golden Meadow (darker yellow), Jumbo Sponge Dauber

Kuretake Zig Clean Brush Markers

MFT - Rounded Corner Dies

My collection - Vintage Ephemera

Sunday, July 19, 2020

Christmas in July Day 7 - Merry Christmas Pixie Style

Welcome to the final day of Christmas in July 2020!  Today I have this darling Pixie card that has a little bit of everything...stamping, embossing, glitter and more!


Step 1 - Stamp the sentiment repeatedly over a red cardstock panel using Acorn VersaFine Clair ink.

Step 2 - Stamp the Daisy Flourish in the corners using Nocturne VersaFine Clair ink.

Step 3 - Cut a 2.25 x 3.25" red card panel. 

Step 4 - Stamp Candy Cane background on the panel with VersaMark ink.

Step 5 - Sprinkle white embossing powder over the stamped candy canes, shake off excess powder, heat to melt the powder.

Step 6 - Mat the candy cane panel with dark chocolate cardstock.

Step 7 - Stamp the pixie onto a piece of white cardstock and color as desired. Fussy cut the image.

Step 8 - Apply glue and a fine glitter to the pixie wings.

Step 9 - Stamp sentiment on white cardstock, trim and mat with red cardstock.

Step 10 - Mount the red background panel on a dark chocolate card base; affix the candy cane panel and then add the pixie.  Glue the sentiment so it looks like the pixie is holding the sentiment.


You're now ready to send the little pixie on her way!

I hope you've enjoyed this week full of Christmas inspiration. Maybe I'll do it again next year.

Entering this into this challenge:


Supplies:


Imagine - VersaFine Clair - Nocturne, Acorn; VersaMark, White Embossing Powder

Glitter, Cardstock, Heat Tool

Saturday, July 18, 2020

Christmas in July Day 6 - Happy Pawlidays Gift Tags

We're almost through the whole week of Christmas in July 2020 and today I have a fun set of gift tags made using the darling Pawlidays stamp set from The Rabbit Hole Desings and Sparkle Blends Old St Nick Limited Edition Sequins Mix.


These tags are so quick and easy to make and the darling little dog/deer will bring a smile to everyone's face!  Using a stamp positioner is a quick way to create multiple tags in a short amount of time. Once you have your mask created it's as easy as opening the lid, positioning the tag and mask then stamp and repeat.

Step 1 - Create a mask by stamping the image onto a piece of scrap paper, cut away the reindeer dog (the image you are going to be stamping) but leave the rest of the image intact.

Step 2 - Place the mask over the tag in the stamp positioner and stamp the image. Repeat as many times as needed.

Step 3 - Color the images using desired medium.

Step 4 - Stamp To, From and Sentiment.

Step 5 - Embellish with Old St Nick Limited Edition sequins mix from Sparkle Blends.

Step 6 - Add a ribbon or fiber to the hole.


You can really have fun with the sequins mix - mix, match, and embellish the dog/deer with a little or a lot. It's totally up to you how blinged out you wish him to be.


Now it's time to put a smile on all of your packages!

Supplies:

Sparkle Blends - Old St. Nick

The Rabbit Hole Designs - Pawlidays

Tags, Markers, Adhesive, Stamp Positioner

Friday, July 17, 2020

Christmas In July Day 5 - Merry Mint Shaker

Day 5 of my Christmas in July 2020 celebration. Today I wanted to share a really fun shaker card I made using the Candy Twist die from The Rabbit Hole Designs, Rinea Foiled Paper and Sparkle Blends Limited Edition Merry Mint sequins mix.


I am so tickled with this shaker. It took a bit of doing to figure it all out but the result is spectacular!

Here's what I did....

Step 1 - Cover a 4.5 x 6" piece of cardstock with Arctic/Gold Glossy foiled paper.

Step 2 - Die cut the Candy Twist design on a diagonal pattern leaving at least 1/4" space on all sides of each cut.  This is to ensure that your cardstock stays in a single piece.

Step 3 - Glue the Arctic diecut piece of cardstock to a piece of acetate. This will give the cardstock some support and be the window for the shaker.

Step 4 - Cut several Candy Twist diecuts from Ruby/Gold Glossy foiled paper.

Step 5 - Glue the Ruby Candy Twist diecuts in the Arctic card panel.

Step 6 - Cut a double stitched frame from Ruby/Gold Glossy foiled paper.

Step 7 - Cover the Arctic panel with the Ruby stitched frame, trim away any excess from the Arctic Panel.

Step 8 - Create a well on the back side of the Arctic panel using double stick foam tape.

Step 9 - Fill the shaker cavity with Sparkle Blends Merry Mint sequins mix.

Step 10 - Cover the shaker with a piece of white cardstock.

Step 11 - Cover a card blank with Emerald/Emerald Starstruck foiled paper. Crop the corners with a corner rounder.

Step 12 - Mount the shaker card to the card base.

Step 13 - Diecut sentiment from Cobalt/Gold Glossy foiled paper.  Adhere the sentiment to the card.


Isn't this such a fun design. I just love all of the different elements in the shaker mix, it really creates such a festive feel to the shaker!

Entering it into this challenge...


Supplies:


Sparkle Blends - Limited Edition Merry Mint

The Rabbit Hole Designs - Candy Twist Diecut

Acetate, Cardstock, Adhesive, Double Stick Foam Tape

Thursday, July 16, 2020

Christmas in July Day 4 - Holly Jolly Christmas

Another day at my Christmas in July 2020 party.  Today I wanted to show you how to take a single diecut and give it a boost.


Isn't this a fun die-cut!!  I love it but it looked a bit drab in one color so I decided to kick it up a notch and bring a little life into it.  Here's what I did....

Step 1 - Trim a piece of Gold/Gold Glossy, Emerald/Gold Glossy and Ruby/Gold Glossy foiled paper to fit the diecut.

Step 2 - Diecut the tree from the foiled paper. 

NOTE: You can cut all three in one single pass.

Step 3 - Selectively cut the words from the red and green foiled trees and glue them down to the  gold tree.

Step 4 - Diecut scallop rectangle from Cobalt/Gold Glossy and stitched rectangle Arctic/Gold Glossy foiled paper. 

Step 5 - Cover a card base using Cobalt/Cobalt Starstruck foiled paper. 

Step 6 - Cut and adhere an Silver/Silver Starstruck foiled mat to the card base.

Step 7 - Affix the small mat frame to the card.

Step 8 - Glue the multi color tree diecut to the frame.


Just look at how pretty it is all assembled.  That foiled paper really adds such a pop of color doesn't it?

Supplies:


Spellbinders - Christmas Tree

MFT - Scallop Stitched Rectangle, Stitched Rectangle


Wednesday, July 15, 2020

Christmas in July - Day 3 Christmas Gnomes

Day three of my Christmas in July 2020 event. Today I wanted to share with you not only my card but extend an invitation to join in the fun over on the Lost Coast Designs blog as they are celebrating Christmas in July as well!!  Starting today through the end of the month enter your stamped Christmas creations in the challenge for your chance to win a gift certificate to Lost Coast Designs/Carmens Veranda!


Oh my aren't these two quite the pair. I just love their striped hats, they are perfect for Christmas cards.  

Step 1 - Stamp large and small snowflakes over the kraft panel using Tulip Red VersaFine Clair Ink.

Step 2 - Stamp the gnomes onto white cardstock using Nocturne VersaFine Clair ink.

Step 3 - Color the Gnomes using Kuretake Zig Clean Brush Markers.

Step 4 - Fussy cut the gnomes.

Step 5 - Adhere the gnomes to the snowflake panel.

Step 6 - Stamp sentiment on a scrap of kraft cardstock. 

Step 7 - Die cut the sentiment as well as a red and dark chocolate cardstock using a fishtail banner diecut.

Step 8 - Layer sentiment and the extra fishtail diecuts to the panel.

Step 9 - Affix the panel to a dark chocolate card base.

Step 10 - Embellish with a few sequins and fimo pieces.


Aren't these little guys so cute?  I'd like to enter this card into the following challenges....


Supplies:


Imagine - VersaFine Clair Tulip Red, Nocturne

Kuretake Zig Clean Brush Markers


Tuesday, July 14, 2020

Christmas in July - Day 2 Yappy Howl-Idays!

Welcome back to my Christmas in July 2020 celebration. Today I wanted to share a fun shaker card made using a fun stamp from The Rabbit Hole Designs called Pawlidays and a brand new limited edition Sparkle Blends sequins mix called Oh Christmas Tree!


I love this new set of stamps from The Rabbit Hole Designs. Those fellas are just too dog-gone cute (sorry, couldn't resist!).  I love that the terrier is wearing a Christmas Tree costume...I thought it would make a perfect base for a shaker card.  

Step 1 - I stamped the image onto white cardstock and colored it using a variety of colored pencils.

Step 2 - I fussy cut the interior of the tree away.

Step 3 - Affix a piece of clear acetate to the back of the card. 

Step 4 - Use double stick foam tape to create a well for the shaker bits.

Step 5 - Fill the shaker with Oh Christmas Tree sequin embellishment mix.

Step 6 - Cover the bits with a piece of cardstock which had been covered with Jade/Gold Glossy foiled paper.

Step 7 - Affix this panel to a red card base.

Step 8 - Add a few sequins to the tree from the Sparkle Blend called Old St. Nick.  

Step 9 - Add a fimo Candy Cane (Sparkle Blend - Merry Mint) to the antlers.


Have a howlin' good day my friends!!


Supplies:

Sparkle Blends Limited Edition Sequin Mixes - Oh Christmas Tree, Old St. Nick, Merry Mint

The Rabbit Hole Designs - Pawlidays

Imagine - VersaFine Clair Nocturne Ink

Cardstock, Acetate, Double Stick Foam Tape, 

Monday, July 13, 2020

Christmas In July - Day 1 Merriest Wishes

Hello and welcome to my Christmas in July 2020 week long event.  I decided that it would be fun to forget all that is going on around us for a bit and ring in a bit of cheer.  I'll be sharing a new design or two each day this week.  I hope it inspires you to get into the holiday spirit too!


I thought I'd start with a fun card using my favorite colors...blue and green. 

Step 1 - I started off by cutting a white card base that I added a Turquoise/Turquoise Starstruck foiled paper mat.  

Step 2 - I die-cut several pine trees from Emerald/Gold Glossy, Emerald/Emerald Starstruck, Jade/Jade Starstruck and Jade/Gold Glossy foiled paper.  

Step 3 - Glue the trees down in groups of three. 

Step 4 - Diecut the FaLaLaLa image from both Arctic/Gold Glossy and Cobalt/Gold Glossy foiled paper. 

Step 5 - Glue the Cobalt diecut slightly off center of the Arctic diecut. Adhere this to the card.

Step 6 - Stamp the sentiment (MFT - Snow Globe Sentiments) on a scrap of white cardstock, trim and affix it to the card.


And that's it! Quick and easy... Be sure to stop back tomorrow for another fun bit of Christmas in July!


Supplies


Spellbinders - Fa La La La Diecut

Gina Marie - Pine Trees Diecut

My Favorite Things - Snow Globe Sentiments

White Cardstock, Adhesive