Wednesday, December 23, 2015

Last Minute Gifts - Part 2

Seems like we all need some help with last minute gifts and it just so happens that was one of my challenges for the IMAGINE Crafts blog!


Today's last minute gift could actually turn into several minutes because you might just get carried away like I did with these - Dog Tag Charms!  StazOn inks - both regular and opaques make these charms quick and easy not to mention FUN!


All you need are the dog tag blanks, StazOn Inks, Glaze On (to seal the inks), a few stamps and bit's and bobs to add to the charms.  Originally I started out intending to make 3 tags but ended up with a dozen!!  I don't know how I did it but they just went so quickly and I had so many ideas, I couldn't help myself.

To find the complete directions for these fun charms please see:


Now I would like to share these tags with a few readers.  To enter to win one of these charms, post an answer to this question:   Have you ever made dog tag charms or any altered charms for that matter.

You have until 12-31-15 to enter to win.

Good Luck Everyone!!

Tuesday, December 22, 2015

Last Minute Gift Ideas - Part I

Hey there everyone!  Only a few days left until Christmas!!  Are you ready?  I am - I think?!?!  But you know there are always last minute gifts that pop up here and there.  Luckily that is what the Club Scrap Design Team Challenge is all about this month - Last Minute Gift Ideas.

Here are a few to get you started....

I saw this one on Pinterest a couple months ago and knew I wanted to make a few for my kids.  Since it's just Eric and I at home now I have decided to forgo making Christmas cookies anymore - at least until we have some grandchildren.  We don't eat many cookies ourselves (and end up throwing most of them out) and the kids get sent home with a bag/box of cookies every place they visit - ya know you can only eat so many.  So I've decided to give them "holiday dough" instead!


I left it pretty simple since these are quick last minute gift ideas. All of the papers, stamps and fibers are from the Homemade Holiday kit.   To make the topper I folded a piece of 8.5 x 5.5" maroon cardstock in half; adhered a piece of the "recipe" pattern paper on top.  I mounted my printed poem (below) onto a piece of dark blue cardstock and adhered that to the topper.  I then stamped 3 cookie cutter images, trimmed and added them to the topper as well.  I rolled up the $'s; placed them in a bag and affixed the topper with double stick tape!  I added a spritz of Shimmer Mist just for that extra bit of sparkle.

Easy peasy - rolling and adding the little bows to the money will take you longer than anything else. If you're really sort on time you could just turn the topper into a card and insert the $'s into it.

I have changed the wording on the little poem.  It originally was about gingerbread men which I've never made...unless you count the pre-made rolls of gingerbread (Thank you Pillsbury Man!).  

My little poem goes as follows:

Holiday Dough

Christmas Cookies covered in icing.
Are oh so good and extremely enticing.
I set out to make a dozen or two
but ran out of time - oh what to do?

Instead of the cookies tied up with a bow
I whipped up a batch of your own Holiday Dough.

Now that you have a nifty little gift you're going to need a bag to put it in....


That's where this fun little one sheet of 12x12 paper bag comes into play. I used a sheet from Gnome for the Holidays kit. 


Fold over the top 1 - 2" of cardstock.


Now fold both side edges towards the center.
Secure with clear packing tape.


Fold the bottom edge up 3" - fold & crease.


Open the bottom fold and fold the corners in towards the center making a diamond shape.


Fold the two points into the center and adhere with a piece of clear packing tape.


Punch holes on each side of the bag opening.


Tie on handles and fill!
After the first bag (to figure it all out) the second bag 
took less than 2 minutes to complete.

Really quick and easy
AND
best part is...you can use it anytime!


Monday, December 21, 2015

Blue Christmas Pocket Letter & Brown Paper Wrapping

This past weekend we had the first of our Christmases at Mom's.  I found this lovely Blue Christmas pocket letter in my stocking!


As many of you know Mom loves to make ATC's so she decided to give a Pocket Letter a try.  I think she did an amazing job.  She knows blue is my favorite color so she just went with it.


She filled it with some of my favorite things and tucked in a special hand written note.  This was the best thing I rec'd....well that and she also put a couple of rocks I really wanted in my stocking too - LOL!!  Everyone thought I was nuts to be excited about rocks but you'll see why in the near future ;)


Also, I wanted to share how I did some wrapping this past weekend too.  I have TONS of this "packing" paper from recent gift orders and I just hate to throw it away.  I thought about stamping on it or spritzing with color but I pulled out my shiny green ribbon and wow - it looked so good there laying together I just couldn't do any more to it.  Now I know to most people might find this boring but I thought the simplicity of green and natural kraft color was pretty.  What do you think?  Pretty or boring?  

Saturday, December 19, 2015

Watercolor Christmas Blog Hop

Welcome welcome friends!  Today a few of us are sharing our creations made using the new holiday kit from Club Scrap - Watercolor Christmas - designed by Swarup Murthy.  If you've never seen her art you should really check it out.  Her watercolor creations are beautiful.


I chose to make a holiday planner!  So many planners are made so that they are only usable for a single years details.  I thought it would be nice to have a forever type thing that you could switch pages around and use it for many years to come.  I started off with a lovely set of covers featuring the cardinal and holly print.  Both the front and back covers are made using book board then covered with the green cardstock.


I added several tabbed pages for things like the calendar, card list, baking list, etc.  I free-hand cut the tabs but there are several dies and/or punches out there that would do the trick as well.   Those were affixed to blue page dividers.


Each of those tabbed page dividers are either decorated with a stamped image or sentiment from the kit.


For the pages themselves I did a search for holiday planner pages and OH MY, there are so many out there to choose from.  I decided to use the ones offered at ScatteredSquirrel.com.  Some pages such as the Greeting Card List, Master Gift List and Family Favorites (for baking) will be used over and over again so I only printed a single copy of each.  Other pages such as baking plan, entertaining, wish lists, etc. I printed copies for this year plus several copies for coming years.


Since I used book binder rings I can switch out the yearly pages - which I plan to put at the very back of the book under a tab called Christmas Past.  I have extra copies of other pages under a tab called Christmas Future to be used in years to come.  


There are several fun cut-a-parts included in the kit which are perfect for adding here and there in the book as you can see.  In addition to the printed pages I also included several 6x9 envelopes to help store ideas for hand made gifts, recipes I am going to use and receipts/coupons in the gifts section.   I must say I'm very excited to use this planner next year - I'm hoping it will help cut down on some of the "holiday anxiety" of forgetting things. 

Merry Christmas Everyone!
I hope you all have a lovely holiday season
and 
I wish you all the best in the coming year!

Your next stop on the hop is Kay's blog -


If you get lost along the way the complete list can be found here -

Friday, December 18, 2015

Bokeh Technique w/ Brusho, Nuance & Acrylic Paint

Today I wanted to share a couple of fun cards using the Bokeh Technique which was inspired by this months Technique Challenge on the Club Scrap Blog.

Lisa created her background by using PanPastels but I wanted to see what I could do by using Nuance powders and Brusho Colour Crystals.


Here is my first card...


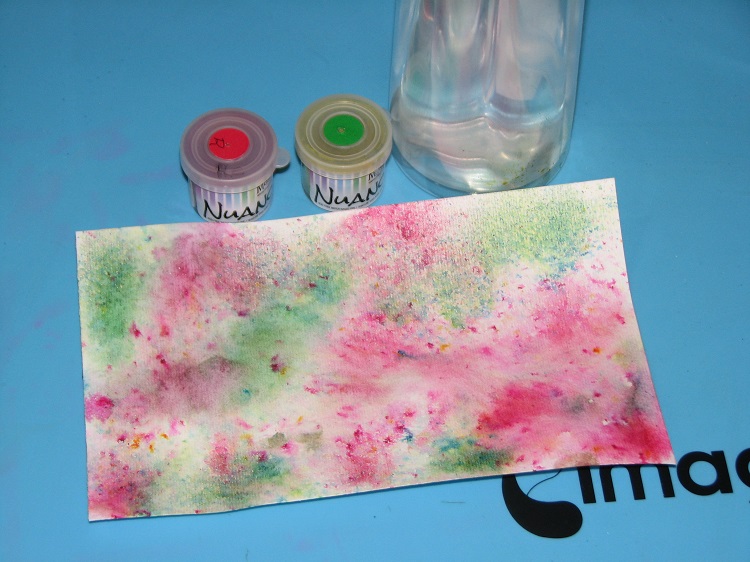
I started off by sprinkling Red and Green Nuance powders onto watercolor paper then spritzing with water.  

TIP: After the paper had dried (I cheated and used a heat tool), I sprayed it with a couple light coats of hair spray.  This seals in the colors so they don't bleed through in later steps.


Next I tried to add circles with a few different types of white ink to no avail.  I just wasn't getting the variety of opacity I was going for.


So I switched to white acrylic paint!  And it worked like a charm.


Next I stamped on a few bits of holly.  I used Memento markers to ink up the image.


I then went to add the sentiment but wouldn't you know it...I dropped the stamp!  So that's why I added the sentiment stamped on the die-cut ;)  LOL!!  I left both of today's cards pretty simple so the bokeh technique could shine.


My second card was made in a similar fashion but the image was stamped first; colored with a nice selection of Brusho Colour Crystals then the Bokeh Technique was applied over the top.  I didn't spray the BCC with hair spray because I wanted to show you how the colors would come through in the circles for a totally different look.  

Pretty fun how the colors amplify where the acrylic paint was applied - huh?  IRL the individual cyrstals of color really come through the white.  It's amazing how many colors make up a single "color" of Brushos.

So there you go...if you have time, give it a try.
The Brushos/Nuance powders paired with Acrylic paint 
adds a whole new dimension to this technique.

Thursday, December 17, 2015

Ho Ho Ho - Merry Christmas!

Just a couple cards for you today....


The first card is made using my favorite color - BLUE!  I love this card - it's so simple but so very pretty and shiny which doesn't really show up in the photo.  The image its self was stamped then embossed with clear embossing powder.  I then applied metallic gold washi tape around the outside edge - I even mitered the corners!  I left the bottom open so I could hand write a little note there - something like with love or from me to you, etc.


For my second card I did something a bit different.  I masked off an area of the watercolor card panel I wanted to stamp; I stamped the image using a pigment ink (so it would be slow drying).  I then colored in the leaves and applied Red Pico Embellisher on the berries - this adds dimension and shine.  I die-cut my sentiment and glued it to the panel.  Next I glued this card onto the red card blank and spritzed it with Shimmer Spritz.  The combination of the Shimmer Spritz & still wet pigment ink reacted and the ink started to spread a tiny bit giving the impression of a watercolor stamped image!   Fun and easy way to get a watercolor look.

Supplies:

Just For Fun Rubber Stamps - All Stamps
IMAGINE Crafts - VersaFine Blue, Clear Embossing Powder, Green Kalidecolor Ink Pad, Red Pico Embellisher, Shimmer Spritz
Spellbinders Die Cut Sentiment
Washi Tape
Club Scrap - Red & Blue Cardstock
Watercolor Paper


Are you all ready for Christmas - only 8 days!!
We actually have our first Christmas on Saturday a.m. 
so only 2 days for me :)

Wednesday, December 16, 2015

DIY Stockings for Him and Her

Hanging up stockings on Christmas Eve is a very big deal in our house.  My parents did it when we were kids (still do!) and we carried on the tradition for our boys.  I still fill a stocking for each of the kids every year.  They each have special stockings that we used for most of their childhood but from time to time I like to mix it up and make one for each of them.  

Today I wanted to share a couple easy ways to make your own personalized stockings.  For fair play I made a masculine one out of burlap and an unbleached muslin one for the gals.


I found a very basic stocking shape pattern on the net - don't even recall where it was from but just look around and find a shape you like.  I honestly didn't realize there were so many different styles - these are what the stockings in our family have traditionally looked like.


For the guys it's a very quick and easy design...cut out the burlap, apply Gold Creative Medium over a stencil, let dry and the stitch it all together.  I lined both of the stockings with felt but you could use cotton or any other fabric you have on hand.   I added a length of feather boa to each of the finished stockings - darker for the guys and white with sparklie bits for the girls.


The one for the gals was a bit more time consuming but just as much fun.  I stamped the poinsettia image onto the muslin with Memento Luxe ink which is designed to be used on fabrics and ironed to set the image.  I then painted the poinsettias using a variety of All Purpose Inks.  It was so much fun to blend the colors to create a very striking image on the white background...


If you'd like to see step by step instructions with photos check out -

Supplies:


Imagine Crafts featuring Tsukineko:
  • Metallic Creative Medium – Gold
  • Memento LUXE ink – Tuxedo Black
  • All Purpose Ink – Rose Pink, Poppy Red, Red Delicious, Green Apple, Spring Green, Emerald, Lemon Yellow
  • Fabrico Marker – Burgundy
Other
  • Miscellaneous: Burlap; Unbleached Muslin; Felt; Feather Boa; Hot Glue Gun, Sewing Machine
  • The Crafters Workshop – Stencil
  • JustForFun Rubber Stamps – Poinsettia Stamp

Tuesday, December 15, 2015

Baby it's Cold Outside!

Well, after last weekend it feels cold anyway!  Man - it was almost 70 last weekend and today it's in the low 40's.  I can do warm and I can do cold but preferably not in a 3 day time span!

Today I have a fun polar bear card to share with you...


This was such a fun card to make.  The background was created by a single blizzard snowflake stamp that I inked up with the Blue Breeze Kaliedacolor stamp pad.  What's a Kaliedacolor?  It's an ink pad that has 5 individual colored pads in one box - you slide the colors together to ink up your stamp and slide them apart again for storage.  It keeps the inks fresh and they don't bleed together like some pads do.  You can also purchase re-inkers for each individual color which is nice because most multi-colored ink pads you just have to toss once the inks are used up.


I also added a bit of texture here and there - the snowflakes were partially embossed with clear EP.  Since it's a dye ink the EP only stuck here and there for a fun texture.  Then I applied Radiant Neon Amplify! medium to the Santa hat and Pico Embellishers to his nose, eyes, holly berries and the ribbon on his gift.   These little details really help bring the image to life.  Remember, sometimes it's the subtle details that make a big impact on the finished image/project.

You can find all of the instructions here -


8 Year Celebration Winner!

A bit behind here what with the holidays and business being busy.  Anyway, today I pulled the winner for the goodies helping me celebrate 8 years of blogging...

and that winner is... 
(chosen at random by Random.O

Janet L.!!!


I love seeing all the techniques you post, Roni. I've been following your blog for years and have learned so much! Since they come in my inbox, I don't always go directly to your blog and comment as I should. Shame on me as you deserve to know what a great job you're doing keeping us informed and inspired! Congratulations on your 8 year anniversary!


Congratulations Janet L.!!
Please send me your snail mail addy so I can get your Brushos & other goodies in the mail!


I also wanted to take a moment and thank each and everyone of you for sticking around and becoming friends!  It means so much and I love you all!!

Ink Stained (((((HUGS)))))

Monday, December 14, 2015

Funky Owl Girls Night Out - Paint & Sip

Today I wanted to share our most recent Paint & Sip project...our Funky Owl.


It's funny, you can see our personalities in the finished paintings...Mine is toned down a bit, Morgans (far right) is a little bit more wild and Mom's - well, what can you say - it's Mom.  She just went for it...That's Mom :)


This one is mine in the process...


The guys (Dh & Ds's) were making fun of my owl - 
they said he was short and fat.


Mom is funny...she was taking notes!


She's holding it out so far because she didn't want to be in the photo.  Ha!  Fixed her - lol!


Morgan and her finished painting...
Such fun!