OH MY GOSH, I have found the coolest web-site! It's called the German Corner Store and I tell you they have THE BEST prices on some favorite crafting goodies....
Dresden Trim - you know, the gold pressed foils. They are so expensive normally but this place has them for a fraction of the cost. Here are a few of my fav's.... Angel Wings, Borders, Butterflies, Good Luck Ornaments, and many many more!!! Prices range from $2.40 - 6.00 for various sets. An excellent price when you see how much you get for that price.
German Glass Glitter in loads of colors - this is my fav color - Light Blue (of course) but they also have Copper, Clear, Silver, Red, Black, on and on!!! They come in 3 sizes - 1.2 oz - $3.25 (normally you only get about 1/2 an oz. for 3.50 or more!!!), 6oz - $12.25 and a one pound container for 30.00. AMAZING PRICES!!!!!!!!
They also have something called German Scraps - they are the sheets with multiple vintage images already die-cut (you just trim the connecting strips). They have reproductions from companies that are using the same dies they had 100 years ago!! Here are just a few of the ones I LOVE.... Assorted Angels , Easter Assortment 3, Vintage Roses. They have loads more so you'll just have to check them out. The best thing is most of them are only $1.55 a sheet!!! They have some from England as well that are a bit more - $1.75 a sheet and then some newer versions with Smurfs and other German/European cartoon characters.
This place is just chock full of awesome goodies...they have tons of flocking supplies, mica snowflakes, way cool paper mache hearts, eggs, and christmas boxes, and more. Can you tell how excited I am about this place - LOL!!! It is just way way cool. They have other German goodies too - flags, t-shirts, ornaments, well, you'll just have to see it to believe it.
I am so in love with this place I'm going to keep a link to the right just in case you ever need anything :) I placed a huge order tonite and can't wait to get my hands on it!!

Thursday, February 28, 2008
More Bi-Fold Triangle Cards
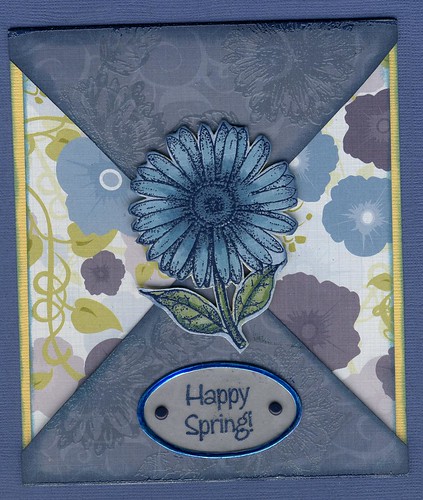
Here are some additional examples of the card template featured on Stampingtons web-site that I shared yesterday.
"The Look"
Supplies:
Black Embossing Powder, Big & Bossy Embossing Ink, Adirondack Acrylic Dabber, Distress Inks, Posh Accent Pen - Ranger
Flourish - Fancy Pants
Face - Hero Arts
Stamp Bord
Specialty Gold Cardstock - California Paper Company
Cardstock - Bazzill

"Happy Spring"
Supplies:
Clear Embossing Ink, Clear Embossing Powder, Black Embossing Powder, Distress Inks, Alcohol Inks, Glossy Accents (covering flower) - Ranger Industries
Pattern Paper - Chatterbox
Cardstock - Bazzill
Rubber Stamps - TAC

"Beloved"
Supplies:
Adirondack Dye Inks, Distress Ink - Ranger
Pattern Paper - Basic Grey
Cardstock - Bazzill
Stitch Stamp - Fontwerks
Flower Stamp - TAC
Sentiment Stamp - Creative Imaginations
Dress Form - Unknown
Flowers - Prima
Trim - Unknown

So there you have a few more ideas to get you on your way.
"The Look"
Supplies:
Black Embossing Powder, Big & Bossy Embossing Ink, Adirondack Acrylic Dabber, Distress Inks, Posh Accent Pen - Ranger
Flourish - Fancy Pants
Face - Hero Arts
Stamp Bord
Specialty Gold Cardstock - California Paper Company
Cardstock - Bazzill

"Happy Spring"
Supplies:
Clear Embossing Ink, Clear Embossing Powder, Black Embossing Powder, Distress Inks, Alcohol Inks, Glossy Accents (covering flower) - Ranger Industries
Pattern Paper - Chatterbox
Cardstock - Bazzill
Rubber Stamps - TAC
"Beloved"
Supplies:
Adirondack Dye Inks, Distress Ink - Ranger
Pattern Paper - Basic Grey
Cardstock - Bazzill
Stitch Stamp - Fontwerks
Flower Stamp - TAC
Sentiment Stamp - Creative Imaginations
Dress Form - Unknown
Flowers - Prima
Trim - Unknown

So there you have a few more ideas to get you on your way.
Hope they have sparked your creative muse :)
Have a great stamping day!!!
Wednesday, February 27, 2008
Challenge Cards - Bi-Fold Triangles
I am going to start a series of cards using a Challenge Card Sketch from Stampington & Co. You will find an example and template on their site under We Challenge You. This sketch was originally from the fall of 06 and cards were published in the Spring 07 issue of their publication - Take Ten. Of the 3 cards I submitted two were published in that issue.
The first card I want to share was one of the two that was published in that issue....
"Congrats!"
Supplies:
Gold UTEE - Ranger
Big & Bossy Embossing Ink - Ranger
Perfect Pearls - Heirloom Gold & Forever Red - Ranger
Perfect Medium - Ranger
Archival Ink - Jet Black - Ranger
Posh Accent Pen - Gold - Ranger
Heat It Craft Tool - Ranger
Oriental Image - Hero Arts
Sentiment & Symbol - TAC
Specialty Gold & Red Cardstock - California Paper Goods
Cardstock - Bazzill
Chipboard circle, ribbon - unknown

2. Stamp symbol onto all three pieces of red cardstock using Perfect Medium. Dust with Heirloom Gold & Forever Red Perfect Pearls.
3. Remove excess Perfect Pearls with large brush included in kit. Mist with water to set. Set aside.
4. Press chipboard circle into Big & Bossy Embossing Ink. Sprinkle Gold UTEE over embossing ink and heat with Craft Tool. Continue to layer additional UTEE granules and heating until a fairly thick coat has been applied to the entire piece of chipboard. (Usually 3-4 coats.)
5. After the last coat of UTEE immediately ink stamp with black embossing ink and press into molten UTEE. Let cool. (NOTE - This will not harm your stamp!)
6. Once cooled, carefully remove the rubber stamp from the cooled UTEE. If it is an unmounted rubber stamp you will probably have to peel it out as it make come off of the acrylic block.
7. Edge all red cardstock pieces using Gold Accent Pen.
8. Mount red cardstock onto gold panels then attach to the card base.
9. Using double stick tape apply the ribbon to the top triangle near the point.
10. Attach the UTEE Chipboard piece over the ribbon using Glue Dots or other strong adhesive.
11. Stamp sentiment in lower right hand corner.
There you have it!
By using this template you have a quick and easy card that can be made in minutes!
I will be sharing additional examples of this card template over the coming days and hope you will give it a try yourself. If you do, please be sure to post a link the in comments section so we can all admire your work. Or if you'd rather, send a photo of your card to me and I will post it on the blog for you!
Happy Stamping Friends!!
The first card I want to share was one of the two that was published in that issue....
"Congrats!"
Supplies:
Gold UTEE - Ranger
Big & Bossy Embossing Ink - Ranger
Perfect Pearls - Heirloom Gold & Forever Red - Ranger
Perfect Medium - Ranger
Archival Ink - Jet Black - Ranger
Posh Accent Pen - Gold - Ranger
Heat It Craft Tool - Ranger
Oriental Image - Hero Arts
Sentiment & Symbol - TAC
Specialty Gold & Red Cardstock - California Paper Goods
Cardstock - Bazzill
Chipboard circle, ribbon - unknown

Instructions:
1. Cut black cardstock base according to template. Cut 2 triangles from specialty gold cardstock & 2 from red cardstock. Cut one large red piece of cardstock for center.
2. Stamp symbol onto all three pieces of red cardstock using Perfect Medium. Dust with Heirloom Gold & Forever Red Perfect Pearls.
3. Remove excess Perfect Pearls with large brush included in kit. Mist with water to set. Set aside.
4. Press chipboard circle into Big & Bossy Embossing Ink. Sprinkle Gold UTEE over embossing ink and heat with Craft Tool. Continue to layer additional UTEE granules and heating until a fairly thick coat has been applied to the entire piece of chipboard. (Usually 3-4 coats.)
5. After the last coat of UTEE immediately ink stamp with black embossing ink and press into molten UTEE. Let cool. (NOTE - This will not harm your stamp!)
6. Once cooled, carefully remove the rubber stamp from the cooled UTEE. If it is an unmounted rubber stamp you will probably have to peel it out as it make come off of the acrylic block.
7. Edge all red cardstock pieces using Gold Accent Pen.
8. Mount red cardstock onto gold panels then attach to the card base.
9. Using double stick tape apply the ribbon to the top triangle near the point.
10. Attach the UTEE Chipboard piece over the ribbon using Glue Dots or other strong adhesive.
11. Stamp sentiment in lower right hand corner.
There you have it!
By using this template you have a quick and easy card that can be made in minutes!
I will be sharing additional examples of this card template over the coming days and hope you will give it a try yourself. If you do, please be sure to post a link the in comments section so we can all admire your work. Or if you'd rather, send a photo of your card to me and I will post it on the blog for you!
Happy Stamping Friends!!
Tuesday, February 26, 2008
Cowboy's Have Birthdays Too!
Yes, even rough & tumble cowboys have birthdays too....and here is a winning combination for your cowboy! A cool cowboy themed birthday card and frame for your favorite buckaroo's!
Happy Birthday - Cowboy Style
Happy Birthday - Cowboy Style
Supplies: (these supplies are used for both the card & frame.)
Distress Ink - Ranger
Distress Embossing Powder - Ranger
Metallic Mixative - Alcohol Ink - Ranger
Birthday Sentiment - Inkadinkadoo
Star Stamp - SU!
Specialty Paper - FiberMark
Charms, feathers, leather cording, - Hobby Lobby - www.craftsetc.com
 Instructions:
1. Tear a piece of leather specialty paper approx. 4x6". Crumble paper into a tight ball (this is some tough paper....you really need to get physical for the winkles to show up.)
2. Uncrumble paper and smooth out. Using Walnut Stain Distress Ink, apply direct to paper in sweeping motions hitting only the highest points of the winkles. Let dry. Repeat using Brushed Corduroy Distress Ink.
3. Tear edges of inked leather paper and ink using Black Soot Distress Ink.
4. Stamp sentiment & star image onto inked leather paper with Distress Embossing Ink (or Distress Ink).
5. **Important** Shake Walnut Stain Distress Embossing Powder to mix embossing powder & release crystals. This will help ensure that you will get a good combo of ep & crystals...
6. Sprinkle Distress EP over stamped images making sure to coat the entire area. Shake off excess.
7. Heat the Distress Embossing Powder. NOTE - This embossing powder does not change to a glossy finish as regular embossing powders do. There are some colors of Distress EP where you will notice a very slight color change but for the most part, you won't actually see much change at all! How do you know when it's done? Well, I like to heat the image for approximately the same time it takes for a regular image then go back over it and heat it again. Have no fear....you can't over heat or burn Distress EP like regular EP's. So heat it as much as you like.
8. LET THE DISTRESS EP's COOL!!!! This is VERY important when using Distress EP's. If you don't let it cool a couple things will happen when you go to rub the release crystals off. 1.) You will burn the heck out of your fingers (yes, this is the voice of experience speaking!) and 2.) You will rub off all the EP!
9. Once the Distress EP has cooled, rub off the release crystals and dispose of them.
10. Mount the embossed leather paper onto copper specialty paper using star nail heads.
11. Attach to card and add desired charms, feathers, ect. (Note - the large star was inked using Copper Metal Mixative).
Cowboy Frame
Supplies:Same as above with the addition of the following:
Wooden Frame - Hobby Lobby
Ribbon - Michaels Crafts
Sand Paper - unknown
Stipple Brush - TAC
E-6000 Adhesive

Instructions:
1. Prepare leather paper by crumbling and distressing with Distress Inks as you did for the card.
2. Remove the backing & glass from wood frame and set aside. Slather front of frame with Mod Podge.
3. Place distressed leather paper over frame. Don't smooth out the winkles too much...you want a worn, rough look. Let dry.
4. When the frame/paper has dried, turn the frame over and using an exacto knife, cut away the excess paper. Don't worry about cutting the edges precisely...we're going to take care of that in the next step.
5. Sand all of the edges.
6. Using Black Soot Distress Ink apply the ink to all edges. Stipple additional ink in the corners.
7. Shake the Distress EP as you did with the card and apply around the edges of the frame. Heat and let cool. Once cool rub off the release crystals & dispose of them.
8. Apply desired ribbon, charms, feathers, etc. to the frame using E-6000 adhesive. Let cure.
9. Re-assemble the frame components.
So there you have it....
a quick & easy Distressed frame & card for all the cowboys in your life :)
Happy Trails Partners!!
Monday, February 25, 2008
Painting with Perfect Pearls!
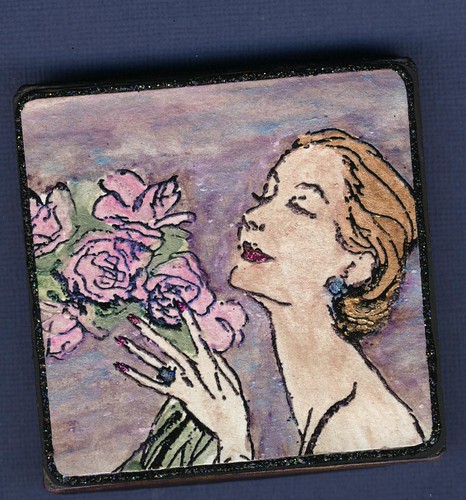
As promised, here is my Perfect Pearls project using my favorite B-Line Designs Stamp - Pleasure. If you've never painted with Perfect Pearls, you're definately going to want to give it a try. It is so very easy and results are simply stunning! The shimmer of the finished product is unmatched by other colorizing techniques!

Supplies:
Perfect Pearls - Forever Violet; Forever Green, Forever Blue, Forever Red, Interference Violet, Interference Green, Perfect Bronze, Turquoise, Berry Twist, Blush, Ranger Industries
Perfect Pearls Brushes included in the Perfect Pearls Kits, Ranger Industries
Perfect Medium Clear Pad, Ranger Industries
Embossing Powder, Ranger Industries
Stickles Glitter Glue - Black Diamond, Magenta, Ranger Industries
Ice Stickles Glitter Glue - Arctic Ice, Ranger Industries
Inkssentials Gloss Paper - White, Ranger Industries
Inkssentials Heat It Craft Tool, Ranger Industries
Inkssentials Non-Stick Craft Mat, Ranger Industries
Mini Mister - Ranger Industries
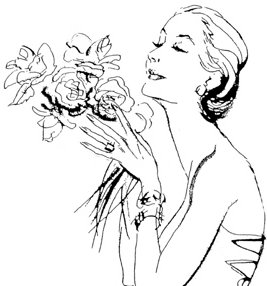
Pleasure stamp - B Line Designs, http://www.blinedesigns.com/
Embossed Paper Mache Box - Hobby Lobby, http://www.craftsetc.com/
Yasutomo Niji Watercolor Brush,. http://www.yasutomo.com/
 Instructions:
Box Base & Box Lid
1. Starting with box base, pounce Perfect Medium Ink Pad directly from pad onto one side of the box.
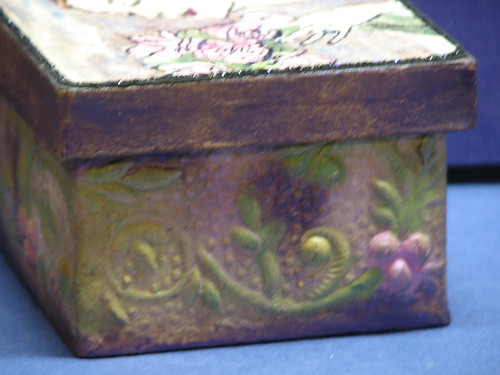
2. Using the small brush provided with in the Perfect Medium kit, pick up a small amount of desired Perfect Pearls pigment powder onto the brush. (For this box I used Forever Violet & Interference Violet for the background colors, Forever Green for the vines and leaves, Berry Twist for the flower buds.)
3. Lightly dust areas you wish to color. Note: If you would like to mix more than one color in an area only partially dust the area. Come back with your next color to fill in the empty spaces.
4. Continue dusting with desired colors until the entire side is covered.
5. Once the entire side is covered, take the large brush included in the Perfect Pearls kit and dust off any extra Perfect Pearl pigment powder remaining on the side.
6. Repeat steps 1-4 on the remaining sides of the box.
7. Once the entire box has been colored and dusted off, using your Mini Mister filled with water, spritz all sides lightly. Set aside to dry.
8. Next, take the box lid and using the Perfect Medium Ink Pad and pounce ink directly from pad to box lid edges. (Note, you will not need to decorate the top of the lid because you will be covering this area with the stamped image later.)
9. Using the small brush pick up the desired color and dust each side of the box lid.
10. Repeat until the remaining 3 edges of the box lid are colored.
11. Dust off any extra Perfect Pearls pigment powder using the large brush included in the kit.
12. Mist with water using your Mini Mister and set aside.
 Stamped & Painted Image -
13. Ink the rubber stamp using Perfect Medium pad.
14. Stamp the image onto white glossy cardstock.
15. Sprinkle entire image with black embossing powder, shaking off excess and replacing in the jar.
16. Heat emboss the image using the Heat-It Craft Tool and let cool.
17. Using the water brush, pick up a small amount of Perfect Pearls pigment powder and paint the desired area(s) with that color. (Note - for darker paint use less water, for lighter more translucent paint use additional water.)
18. Clean brush after each color by simply squeezing brush and wiping on a clean towel until water runs clear.
19. To add depth, you can layer colors as shown in the background, flowers and leaves, simply paint area with initial lighter colored pigment powder, let dry. Next come back with additional colors as desired. For example on the background I stared out with Interference Violet, layered on Forever Violet, Turquoise, and Forever Blue blending with each additional color.
20. Set aside to dry or use your Heat-It tool to speed drying.
21. Once dry, trim the painted image and adhere to the top of the box lid.
22. Embellish image using Stickles Glitter Glue and Ice Stickles Glitter Glue for the finger nails, lips and ring.
So there you have it....amazing results with such little effort. I must say that using a water brush really is the best when it comes to painting with Perfect Pearls. You can control the flow of water far easier than with a traditional paint brush & cup of water. In my opinion it makes all the difference in the finished results.
Pleasure Paper Mache Treasure Box
Supplies:
Perfect Pearls - Forever Violet; Forever Green, Forever Blue, Forever Red, Interference Violet, Interference Green, Perfect Bronze, Turquoise, Berry Twist, Blush, Ranger Industries
Perfect Pearls Brushes included in the Perfect Pearls Kits, Ranger Industries
Perfect Medium Clear Pad, Ranger Industries
Embossing Powder, Ranger Industries
Stickles Glitter Glue - Black Diamond, Magenta, Ranger Industries
Ice Stickles Glitter Glue - Arctic Ice, Ranger Industries
Inkssentials Gloss Paper - White, Ranger Industries
Inkssentials Heat It Craft Tool, Ranger Industries
Inkssentials Non-Stick Craft Mat, Ranger Industries
Mini Mister - Ranger Industries
Pleasure stamp - B Line Designs, http://www.blinedesigns.com/
Embossed Paper Mache Box - Hobby Lobby, http://www.craftsetc.com/
Yasutomo Niji Watercolor Brush,. http://www.yasutomo.com/
 Instructions:
Box Base & Box Lid
1. Starting with box base, pounce Perfect Medium Ink Pad directly from pad onto one side of the box.
2. Using the small brush provided with in the Perfect Medium kit, pick up a small amount of desired Perfect Pearls pigment powder onto the brush. (For this box I used Forever Violet & Interference Violet for the background colors, Forever Green for the vines and leaves, Berry Twist for the flower buds.)
3. Lightly dust areas you wish to color. Note: If you would like to mix more than one color in an area only partially dust the area. Come back with your next color to fill in the empty spaces.
4. Continue dusting with desired colors until the entire side is covered.
5. Once the entire side is covered, take the large brush included in the Perfect Pearls kit and dust off any extra Perfect Pearl pigment powder remaining on the side.
6. Repeat steps 1-4 on the remaining sides of the box.
7. Once the entire box has been colored and dusted off, using your Mini Mister filled with water, spritz all sides lightly. Set aside to dry.
8. Next, take the box lid and using the Perfect Medium Ink Pad and pounce ink directly from pad to box lid edges. (Note, you will not need to decorate the top of the lid because you will be covering this area with the stamped image later.)
9. Using the small brush pick up the desired color and dust each side of the box lid.
10. Repeat until the remaining 3 edges of the box lid are colored.
11. Dust off any extra Perfect Pearls pigment powder using the large brush included in the kit.
12. Mist with water using your Mini Mister and set aside.
 Stamped & Painted Image -
13. Ink the rubber stamp using Perfect Medium pad.
14. Stamp the image onto white glossy cardstock.
15. Sprinkle entire image with black embossing powder, shaking off excess and replacing in the jar.
16. Heat emboss the image using the Heat-It Craft Tool and let cool.
17. Using the water brush, pick up a small amount of Perfect Pearls pigment powder and paint the desired area(s) with that color. (Note - for darker paint use less water, for lighter more translucent paint use additional water.)
18. Clean brush after each color by simply squeezing brush and wiping on a clean towel until water runs clear.
19. To add depth, you can layer colors as shown in the background, flowers and leaves, simply paint area with initial lighter colored pigment powder, let dry. Next come back with additional colors as desired. For example on the background I stared out with Interference Violet, layered on Forever Violet, Turquoise, and Forever Blue blending with each additional color.
20. Set aside to dry or use your Heat-It tool to speed drying.
21. Once dry, trim the painted image and adhere to the top of the box lid.
22. Embellish image using Stickles Glitter Glue and Ice Stickles Glitter Glue for the finger nails, lips and ring.
So there you have it....amazing results with such little effort. I must say that using a water brush really is the best when it comes to painting with Perfect Pearls. You can control the flow of water far easier than with a traditional paint brush & cup of water. In my opinion it makes all the difference in the finished results.
Hope you enjoy this project and give it a try yourself :)
Be sure to share your results if you do!!
Sunday, February 24, 2008
B-Line Designs
Time to share another great stamp company with you :) (sorry to all those out there on a spending freeze - tee hee hee!!!) Anyway, the company I want to share with you today is one of my absolute FAVORITES!!!

B-Line Designs! They offer an amazing assortment of vintage images from fashion diva's from the 20's & 30's, retro women of the 40's & 50's to sewing themed stamps, travel & nautical stamps. Just about anything you can think of.
I HIGHLY suggest you take a look at each of their catalogs - Original cataloge, Passport to Europe & Beyond and Nautical Exploration! I'm sure you'll be very pleased with what you find there.
The stamped image to the right is one of my favorite B-Line Design stamps I have in my collection. It's called - Pleasure - BA314F! She is just beautiful. I have a Perfect Pearls project I will share with you tomorrow where she is the focal point.
Till then friends....INK ON!!!
Saturday, February 23, 2008
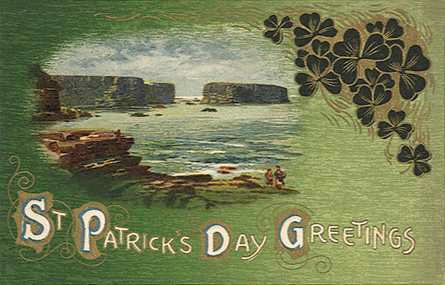
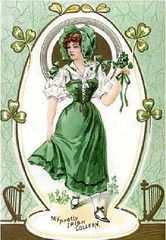
St. Patrick's Day Quotes, Proverbs, Sentiments & Greetings!
St. Patty's day is quickly approaching so I thought I'd post an assortment of Irish quotes, proverbs, card sentiments and greetings. Hope you find something here that you can use for all of your GREEN projects :)
A merry heart lives long.
An Irishman is never drunk as long he can hold onto one blade of grass and not fall off the face of the earth.
As you slide down the banister of life, may the splinters never point in the wrong direction!
 Beautiful young people are acts of nature,
But beautiful old people are works of art.
Cheerfulness is a sign of wisdom.
Dance as if no one were watching,
Sing as if no one were listening,
And live every day as if it were your last.
Erin Go Bragh
Erin Go Bragh
Bring my pipe and fill its bowl,
Tthat I may puff to sooth my soul.
For it is sure to clear my brain,
And bring old memories back again!
For each petal on the shamrock This brings a wish your way
Good health, good luck, and happiness
For today and every day.
Here’s to a long life and a merry one.
A quick death and an easy one.
A pretty girl and an honest one.
A cold beer—and another one!
Here’s to fine wine, women, and song.
And here’s to workdays that aren’t too long.
Here’s to shoes that always fit.
And here’s to you, you silly shit!
Here’s wishing you the top o’ life without a single tumble.
Here’s wishing you the smiles o’ life and not a single grumble.
Here’s wishing you the best o’ life and not a claw about it.
Here’s wishing you the joy in life and not a day without it.
Life is like a cup of tea, it's all in how you make it.
May God bless and keep in good health your enemies' enemies.
May God grant you always...
A sunbeam to warm you,
A moonbeam to charm you,
A sheltering angel,
so nothing can harm you.
May misfortune follow you the rest of your life, but never catch up.
May the Irish hills caress you.
May her lakes and rivers bless you.
May the luck of the Irish enfold you.
May the blessings of Saint Patrick behold you.
May the leprechauns be near you to spread luck along your way!
May the leprechauns dance over your bed and bring you sweet dreams.
May the road rise to meet you.
May the wind be always at your back.
May the sun shine warm upon your face.
And rains fall soft upon your fields.
And until we meet again,
May God hold you in the hollow of His hand.
May the saddest day of your future be no worse
Than the happiest day of your past.
May the sun shine all day long,
Everything go right and nothing go wrong.
May those you love bring love back to you
And may all the wishes you wish come true!
May those that love us, love us.
And those that don't love us,
May God turn their hearts.
And if He doesn't turn their hearts,
May He turn their ankles
So we will know them by their limping.
May you always walk in sunshine.
May you never want for more.
May Irish angels rest their wings right beside your door.
May you get all your wishes but one so you always have something to strive for!
May you have warm words on a cold evening,
A full moon on a dark night,
And the road downhill all the way to your door.
May you live as long as you want,
And never want as long as you live.
May you live long,
Die happy,
And rate a mansion in heaven.
May your blessings outnumber the shamrocks that grow,
And may trouble avoid you wherever you go.
May your day be filled with blessings
Like the sun that lights the sky,
And may you always have the courage
To spread your wings and fly.
May your glass be ever full.
May the roof over your head be always strong.
And may you be in heaven half an hour before the devil knows you’re dead.
May your home always be too small to hold all your friends.
May your pockets be heavy and your heart be light
May good luck pursue you each morning and night.
May your right hand always
Be stretched out in friendship
And never in want.
May your thoughts be as glad as the shamrocks.
May your heart be as light as a song.
May each day bring you bright happy hours,
That stay with you all year long.
May your troubles be less
And your blessings be more.
And nothing but happiness
Come through your door.
"Mora na maidine dhuit." - Top of the morning to you.

St. Patrick’s Day is an enchanted time - a day to begin transforming winter’s dreams into summer’s magic.- Adrienne Cook
The light heart lives long.
The mills of God grind slowly but they grind finely.
There are many good reasons for drinking,
One has just entered my head.
If a man doesn’t drink when he’s living,
How in the hell can he drink when he’s dead?
Time is a great story teller.
Tis better by far at the rainbows end to find not a pot of gold but the heart of a friend.
Two shorten the road.
Wherever you go and whatever you do,
May the luck of the Irish be there with you.
Your My Pot of Gold!
Be sure to check out my new post -
MORE St. Patrick's Day Toasts, Quotes, Proverbs, Sentiments & Sayings!
A merry heart lives long.
An Irishman is never drunk as long he can hold onto one blade of grass and not fall off the face of the earth.
As you slide down the banister of life, may the splinters never point in the wrong direction!
 Beautiful young people are acts of nature,
But beautiful old people are works of art.
Cheerfulness is a sign of wisdom.
Dance as if no one were watching,
Sing as if no one were listening,
And live every day as if it were your last.
Erin Go Bragh
Erin Go Bragh
Bring my pipe and fill its bowl,
Tthat I may puff to sooth my soul.
For it is sure to clear my brain,
And bring old memories back again!
For each petal on the shamrock This brings a wish your way
Good health, good luck, and happiness
For today and every day.
Here’s to a long life and a merry one.
A quick death and an easy one.
A pretty girl and an honest one.
A cold beer—and another one!
Here’s to fine wine, women, and song.
And here’s to workdays that aren’t too long.
Here’s to shoes that always fit.
And here’s to you, you silly shit!
Here’s wishing you the top o’ life without a single tumble.
Here’s wishing you the smiles o’ life and not a single grumble.
Here’s wishing you the best o’ life and not a claw about it.
Here’s wishing you the joy in life and not a day without it.
Life is like a cup of tea, it's all in how you make it.
May God bless and keep in good health your enemies' enemies.
May God grant you always...
A sunbeam to warm you,
A moonbeam to charm you,
A sheltering angel,
so nothing can harm you.
May misfortune follow you the rest of your life, but never catch up.
May the Irish hills caress you.
May her lakes and rivers bless you.
May the luck of the Irish enfold you.
May the blessings of Saint Patrick behold you.
May the leprechauns be near you to spread luck along your way!
May the leprechauns dance over your bed and bring you sweet dreams.
May the road rise to meet you.
May the wind be always at your back.
May the sun shine warm upon your face.
And rains fall soft upon your fields.
And until we meet again,
May God hold you in the hollow of His hand.
May the saddest day of your future be no worse
Than the happiest day of your past.
May the sun shine all day long,
Everything go right and nothing go wrong.
May those you love bring love back to you
And may all the wishes you wish come true!
May those that love us, love us.
And those that don't love us,
May God turn their hearts.
And if He doesn't turn their hearts,
May He turn their ankles
So we will know them by their limping.
May you always walk in sunshine.
May you never want for more.
May Irish angels rest their wings right beside your door.
May you get all your wishes but one so you always have something to strive for!
May you have warm words on a cold evening,
A full moon on a dark night,
And the road downhill all the way to your door.
May you live as long as you want,
And never want as long as you live.
May you live long,
Die happy,
And rate a mansion in heaven.
May your blessings outnumber the shamrocks that grow,
And may trouble avoid you wherever you go.
May your day be filled with blessings
Like the sun that lights the sky,
And may you always have the courage
To spread your wings and fly.
May your glass be ever full.
May the roof over your head be always strong.
And may you be in heaven half an hour before the devil knows you’re dead.
May your home always be too small to hold all your friends.
May your pockets be heavy and your heart be light
May good luck pursue you each morning and night.
May your right hand always
Be stretched out in friendship
And never in want.
May your thoughts be as glad as the shamrocks.
May your heart be as light as a song.
May each day bring you bright happy hours,
That stay with you all year long.
May your troubles be less
And your blessings be more.
And nothing but happiness
Come through your door.
"Mora na maidine dhuit." - Top of the morning to you.
St. Patrick’s Day is an enchanted time - a day to begin transforming winter’s dreams into summer’s magic.- Adrienne Cook
The light heart lives long.
The mills of God grind slowly but they grind finely.
There are many good reasons for drinking,
One has just entered my head.
If a man doesn’t drink when he’s living,
How in the hell can he drink when he’s dead?
Time is a great story teller.
Tis better by far at the rainbows end to find not a pot of gold but the heart of a friend.
Two shorten the road.
Wherever you go and whatever you do,
May the luck of the Irish be there with you.
Your My Pot of Gold!
Friday, February 22, 2008
Altered Microscope Slide Mailers Cont.
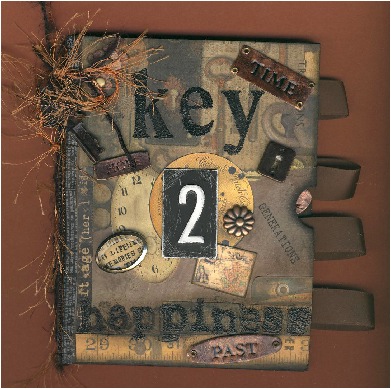
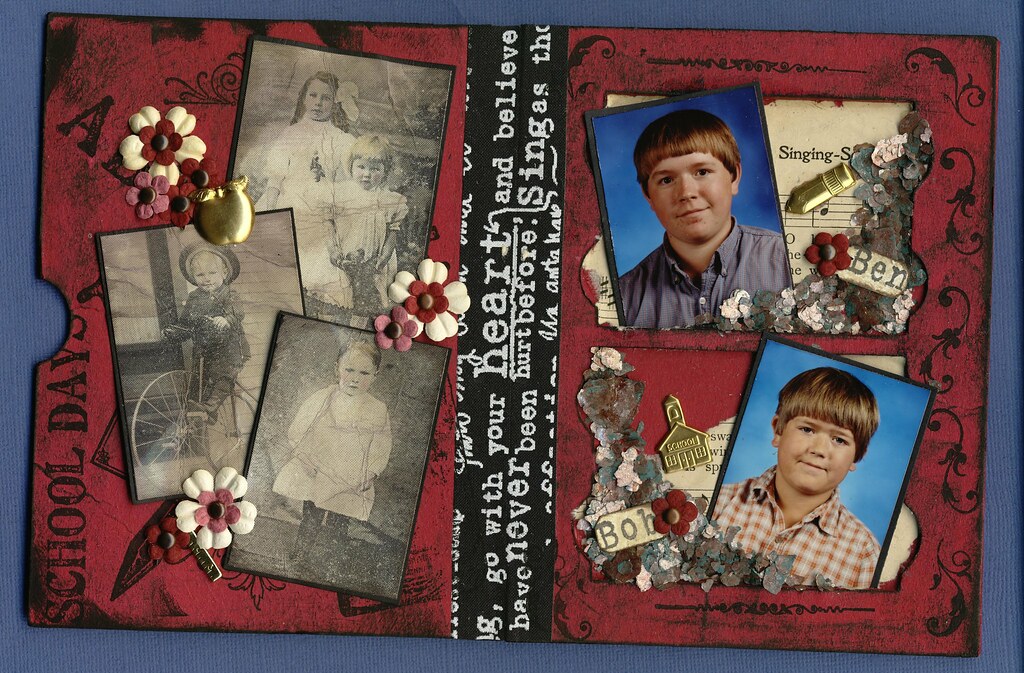
Here are a couple more examples but this time the slide mailers are the larger 4 slot types. I enjoy working with these mailers as their larger size lets you get a bit more creative. On the first example - Key 2 Happiness, I actually used glass slides as part of the design leaving all 4 slots intact. On the second example - School Days, I trimmed away 2 of the divider to enlarge the top and bottom sections. Instead of glass slides, I filled them with photos of my boys along with mica chips, charms and other goodies.
"Key 2 Happiness"
Supplies: Distress Inks, Big & Bossy Embossing Ink, Black Embossing Powder, Alcohol Inks, Archival Jet Black Ink, Copper Tape, Memory Glass, Glossy Accents - Ranger; Pattern Paper - Design Originals; Rubber Stamps - MSE; Various charms, ribbons & fiber.
 The inside of the cover is left blank for a family photo.
 Close up of the glass slides.
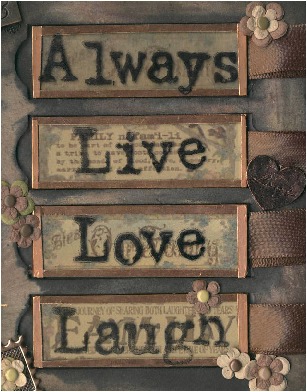
"School Days"
Supplies - Color Wash, Distress Embossing Powder, Distress Embossing Ink, Big & Bossy Embossing Ink, Black Embossing Powder, Distress Inks, Glossy Cardstock - Ranger; Rubber stamps - (Front) Stampers Anonymous; Inside - Oxford Impressions; Gaffers Tape - 7 Gypsies; Flowers - Prima; Mica Chips - USArt Quest; Misc. charms - unknown.
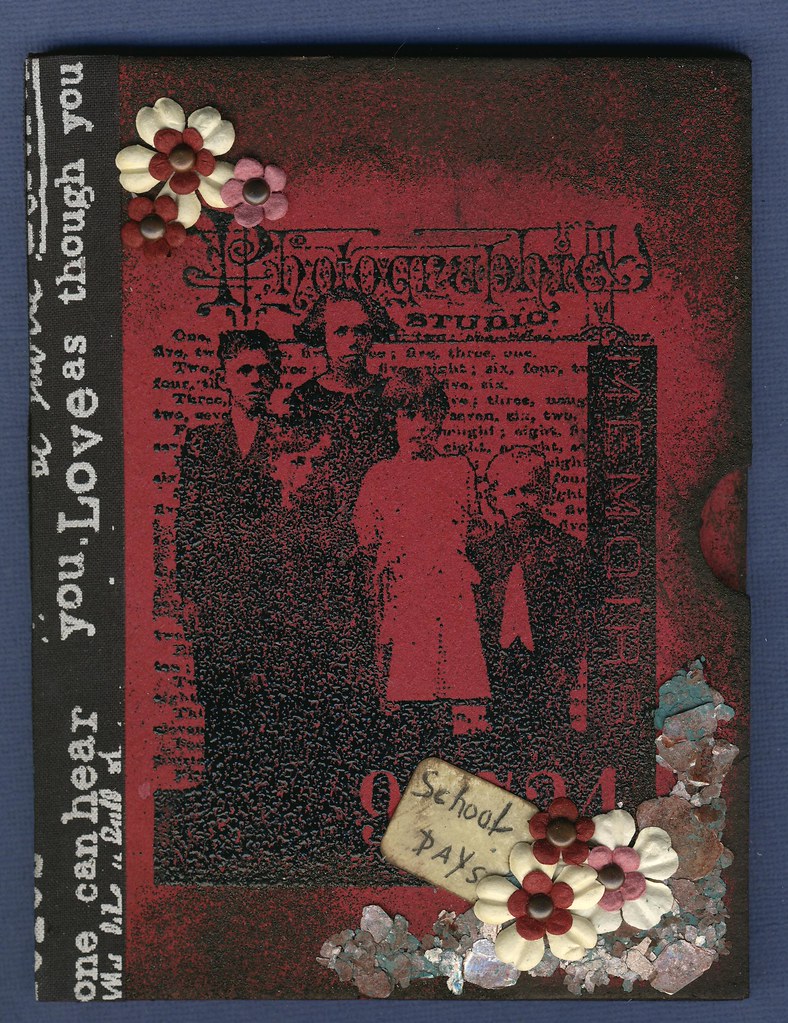
Don't be afraid to trim out the dividers. It can really open up new possibilities to create!
Well, I hope you all have enjoyed seeing a few examples of what you can do with microscope slide mailers. They really are loads of fun just waiting to be explored!
I know I shared alot of examples with you at one time ~
I hope you're not tired of them before you get to play with them - LOL!!
Anyway....Happy Friday!!
I want to leave you with one of my favorite quotes.....
....
Creativity is allowing yourself to make mistakes.
Art is knowing which ones to keep.
::: Scott Adams
Thursday, February 21, 2008
More Fun with Altered Microscope Slide Mailers!
Here are a few more ideas to alter Microscope Slide Mailers....I am still working with single & double mailers again today. I've got a couple 4 slot mailers to share with you but those are more involved so I will be sharing those in the coming days.
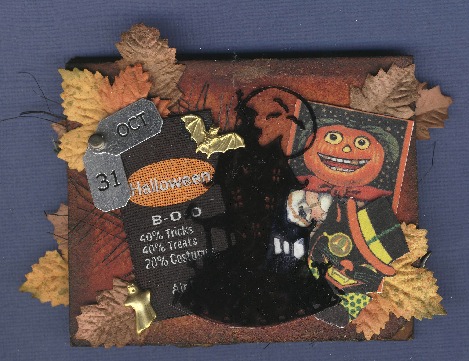
"Oct 31 - Halloween"
Supplies:
Double Slide Mailer
Color Wash - Ranger
Distress Inks - Ranger
Archival Jet Black Ink - Ranger
Ink Blending Tool - Ranger
Mini Mister - filled with water
Transparencies - Office Depot
Computer Generated Halloween Images
Leaves - Prima
Fabric Labels - Junkitz
Charms - Making Memories, Karen Foster, Fancifuls, Wal-Mart
Rubber Stamps - TAC
 Instructions:
1. Mist the entire mailer with a light coat of water using Mini Mister. (this step will help spread the color wash dye inks evenly.)
2. Working in a protected area - spray the entire mailer (both inside & out) with Terra Cotta Color Wash Dye Ink. I like to work over my Non-Stick Craft Mat when I use Color Wash as the mat can easily be wiped clean and it protects my work surface from stains. Let Dry.
3. Stamp Halloween images onto transparencies using Archival Jet Black Ink. This ink works great on slick surfaces. I like using this type of ink because it doesn't produce the unpleasant odors that go along with the solvent inks. Let Dry.
4. While your slide mailer & Halloween images are drying, you can print several vintage Halloween images onto cardstock or if you have smaller pre-printed collage images available trim them out at this time.
5. Once the slide mailer has dried, take your Ink Blending Tool & Walnut Distress Inks and soften all edges (and the crease) of the mailer both inside and out.
6. Layer leaves, stamped images, mesh & collage images onto mailer. Add charms & enjoy!

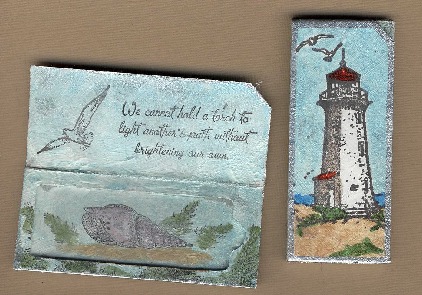
"Light the Path"
Supplies:
Single Slide Mailer
Archival Jet Black Ink - Ranger
Posh Silver Accent Pen - Ranger
Snow Cap Adirondack Acrylic Dabber - Ranger
Twinkling H2O's - Lumin Arte
Waterbrush - Hobby Lobby
Stamps - TAC
 Instructions:
1. Paint the entire mailer both inside and out using the white acrylic dabber. Let Dry.
2. Stamp all images using Jet Black Archival Ink (note - this ink is water-proof!).
3. Color images using Twinkling H2O's & waterbrush.
4. Edge front cover & inside using Silver Posh Accents Pen.
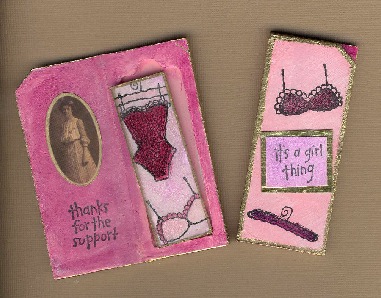
"It's A Girl Thing"
Unlike the other slide mailers I have shared this one actually has an altered glass microscope slide included.
Supplies:
Single Slide Mailer
Glass Microscope Slide or Memory Glass 1x3"
Archival Jet Black Ink - Ranger
Snow Cap Adirondack Acrylic Dabber - Ranger
Gold Posh Accent Pen - Ranger
Glossy Accents - Ranger
Twinkling H2O's - Lumin Arte
Water Brush - Hobby Lobby
Specialty Gold Paper - California Paper Goods
Computer Generated Vintage Woman Image
Stamps - TAC
White Cardstock - Bazzill
 Instructions:
1. Paint the entire slide mailer with white acrylic dabber. Let Dry.
2. Stamp images & sentiments using Archival Jet Black Ink. Let Dry.
3. Color entire slide mailer & stamped images using Twinkling H2O's & waterbrush.
4. Stamp sentiment (using Archival Jet Black Ink) onto scrap of white cardstock & color using Twinkling H2O's & waterbrush.
5. Mount sentiment & vintage image onto specialty gold cardstock & Attach to mailer.
6. Stamp under garments onto white cardstock again using Archival Jet Black Ink. Color using Twinkling H2O's & waterbrush & let dry.
7. Trim image & adhere to glass slide using Glossy Accents. Let Dry.
8. When slide/image is dry, edge using Posh Accent Pen. Insert into slide mailer and enjoy!
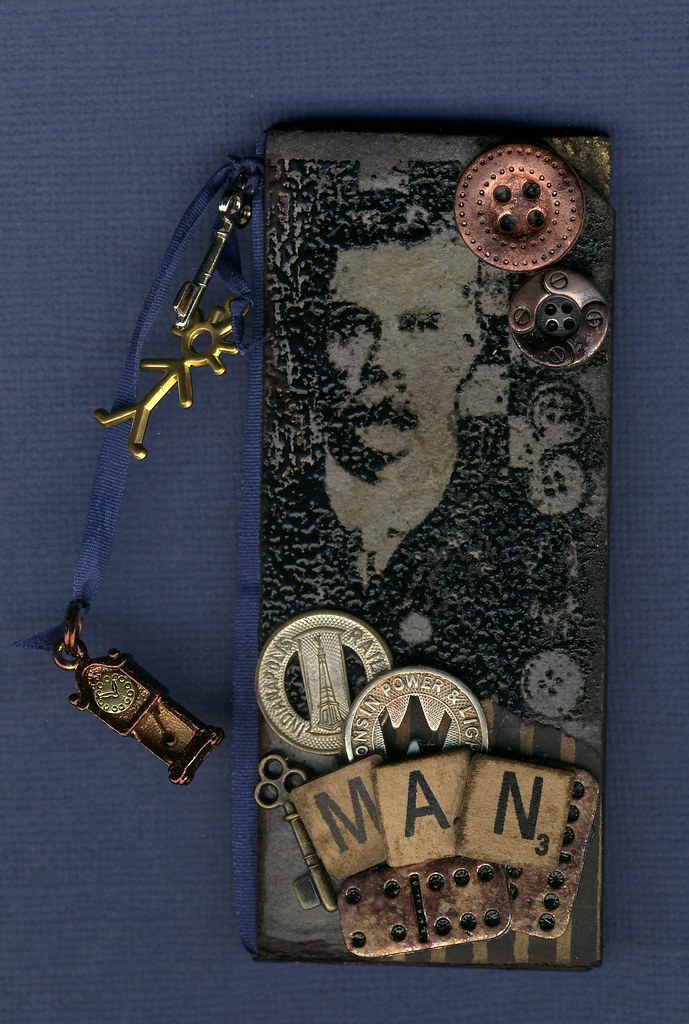
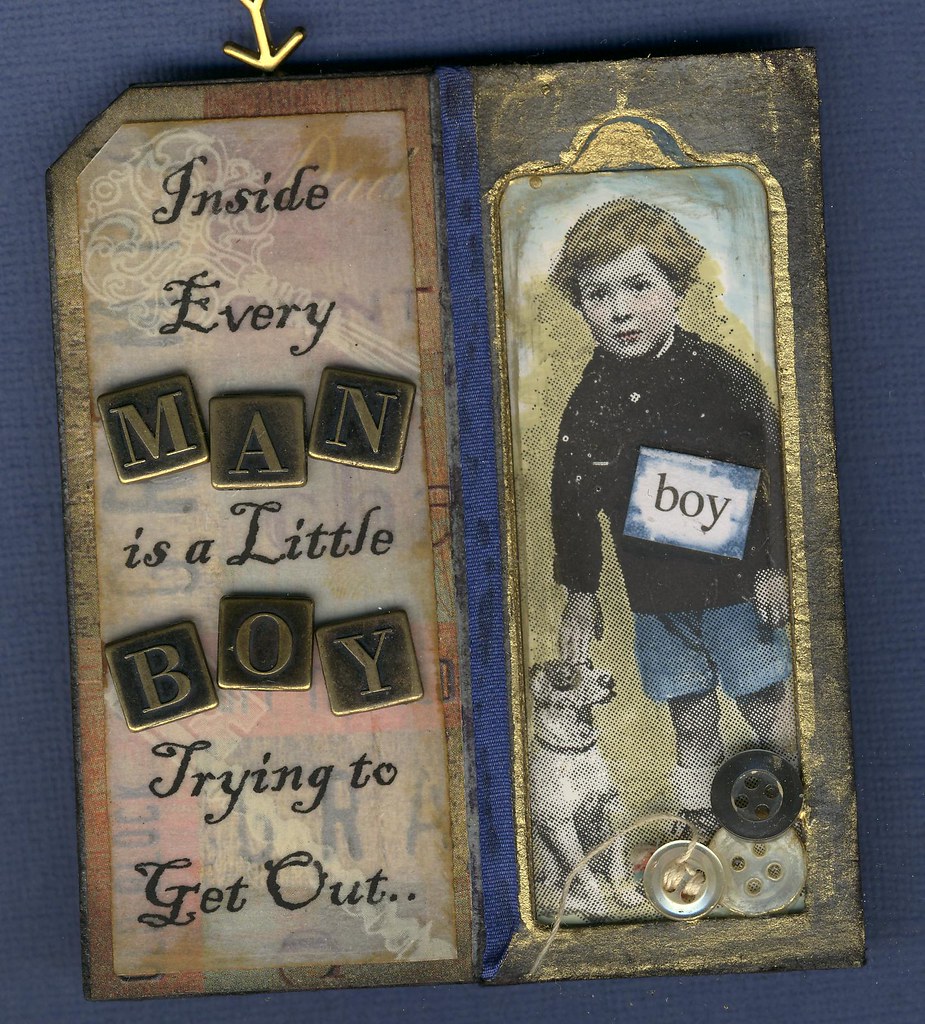
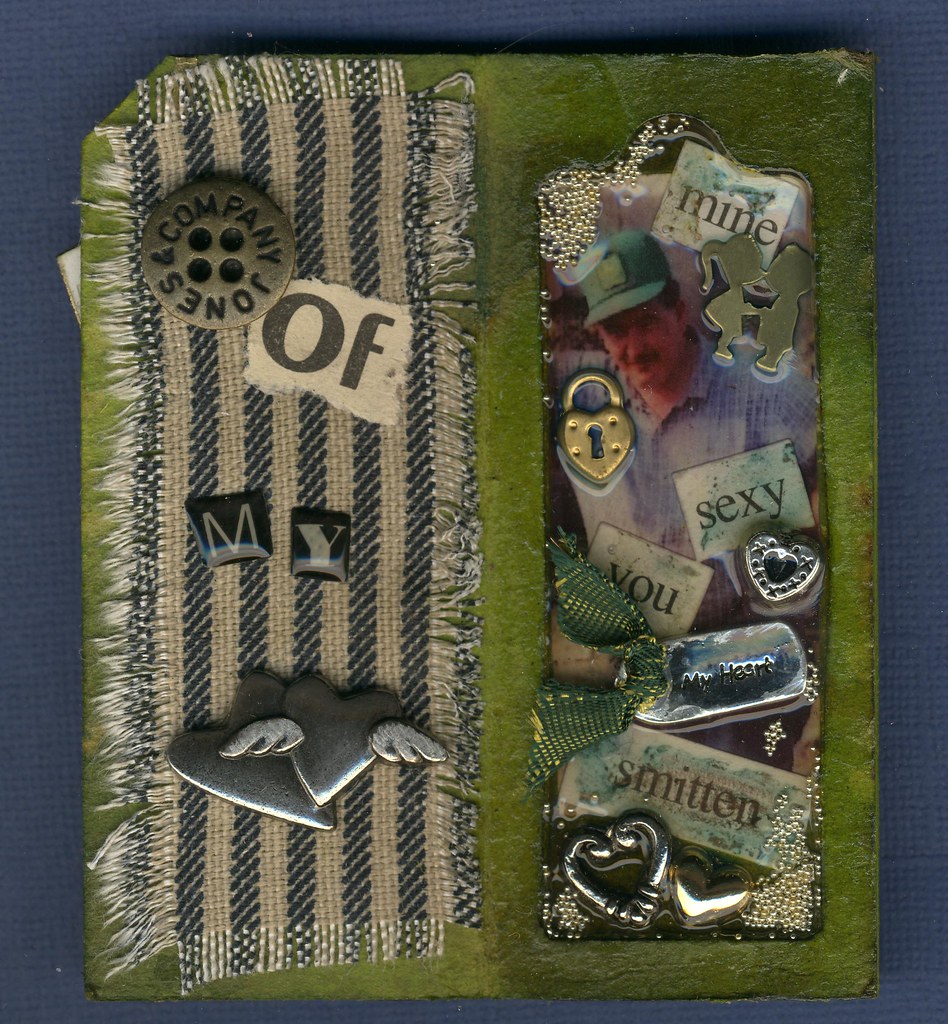
"Man"
Supplies:
Single Slide Mailer
Distress Inks - Ranger
Black Embossing Powder - Ranger
Big & Bossy Embossing Ink - Ranger
Adirondack Alcohol Inks - Ranger
Posh Accent Pen - Ranger
Glossy Cardstock - Ranger
Cut & Dry Nibs - Ranger
Enos (cover image) - River City Rubber Works
Boy (inside image) - Oxford Impressions
Computer generated quote
Man Words Pattern Paper - K&Co
Various charms, buttons, tokens, ribbon - various mfg.
 Instructions:
1. Stamp image onto cover and heat emboss. Let cool.
2. Cover entire slide mailer both inside & out using Weathered Wood Distress Inks.
3. Edge cover & inside edges with Walnut Stain Distress Inks.
4. Adhere pattern paper to inside cover of slide mailer.
5. Attach computer generated quote over pattern paper.
6. Stamp boy image onto glossy cardstock & colorize using Distress Inks & Cut & Dry Nibs. Mount image in slide mailer slot.
7. Edge slide slot with Gold Posh Accent pen.
8. Embellish cover & inside with charms, buttons, letter tiles.
9. Attach ribbon and charms.

I hope you're enjoying these altered slide mailers as much as I have enjoyed making them. Maybe these will spark a few ideas of your own to give these inexpensive little mailers a try!!
"Oct 31 - Halloween"
Supplies:
Double Slide Mailer
Color Wash - Ranger
Distress Inks - Ranger
Archival Jet Black Ink - Ranger
Ink Blending Tool - Ranger
Mini Mister - filled with water
Transparencies - Office Depot
Computer Generated Halloween Images
Leaves - Prima
Fabric Labels - Junkitz
Charms - Making Memories, Karen Foster, Fancifuls, Wal-Mart
Rubber Stamps - TAC
 Instructions:
 1. Mist the entire mailer with a light coat of water using Mini Mister. (this step will help spread the color wash dye inks evenly.)
2. Working in a protected area - spray the entire mailer (both inside & out) with Terra Cotta Color Wash Dye Ink. I like to work over my Non-Stick Craft Mat when I use Color Wash as the mat can easily be wiped clean and it protects my work surface from stains. Let Dry.
3. Stamp Halloween images onto transparencies using Archival Jet Black Ink. This ink works great on slick surfaces. I like using this type of ink because it doesn't produce the unpleasant odors that go along with the solvent inks. Let Dry.
4. While your slide mailer & Halloween images are drying, you can print several vintage Halloween images onto cardstock or if you have smaller pre-printed collage images available trim them out at this time.
5. Once the slide mailer has dried, take your Ink Blending Tool & Walnut Distress Inks and soften all edges (and the crease) of the mailer both inside and out.
6. Layer leaves, stamped images, mesh & collage images onto mailer. Add charms & enjoy!
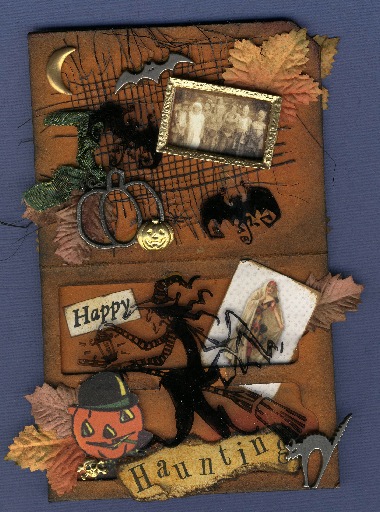
"Light the Path"
Supplies:
Single Slide Mailer
Archival Jet Black Ink - Ranger
Posh Silver Accent Pen - Ranger
Snow Cap Adirondack Acrylic Dabber - Ranger
Twinkling H2O's - Lumin Arte
Waterbrush - Hobby Lobby
Stamps - TAC
 Instructions:
 1. Paint the entire mailer both inside and out using the white acrylic dabber. Let Dry.
2. Stamp all images using Jet Black Archival Ink (note - this ink is water-proof!).
3. Color images using Twinkling H2O's & waterbrush.
4. Edge front cover & inside using Silver Posh Accents Pen.
"It's A Girl Thing"
Unlike the other slide mailers I have shared this one actually has an altered glass microscope slide included.
Supplies:
Single Slide Mailer
Glass Microscope Slide or Memory Glass 1x3"
Archival Jet Black Ink - Ranger
Snow Cap Adirondack Acrylic Dabber - Ranger
Gold Posh Accent Pen - Ranger
Glossy Accents - Ranger
Twinkling H2O's - Lumin Arte
Water Brush - Hobby Lobby
Specialty Gold Paper - California Paper Goods
Computer Generated Vintage Woman Image
Stamps - TAC
White Cardstock - Bazzill
 Instructions:
1. Paint the entire slide mailer with white acrylic dabber. Let Dry.
2. Stamp images & sentiments using Archival Jet Black Ink. Let Dry.
3. Color entire slide mailer & stamped images using Twinkling H2O's & waterbrush.
4. Stamp sentiment (using Archival Jet Black Ink) onto scrap of white cardstock & color using Twinkling H2O's & waterbrush.
5. Mount sentiment & vintage image onto specialty gold cardstock & Attach to mailer.
6. Stamp under garments onto white cardstock again using Archival Jet Black Ink. Color using Twinkling H2O's & waterbrush & let dry.
7. Trim image & adhere to glass slide using Glossy Accents. Let Dry.
8. When slide/image is dry, edge using Posh Accent Pen. Insert into slide mailer and enjoy!
"Man"
Supplies:
Single Slide Mailer
Distress Inks - Ranger
Black Embossing Powder - Ranger
Big & Bossy Embossing Ink - Ranger
Adirondack Alcohol Inks - Ranger
Posh Accent Pen - Ranger
Glossy Cardstock - Ranger
Cut & Dry Nibs - Ranger
Enos (cover image) - River City Rubber Works
Boy (inside image) - Oxford Impressions
Computer generated quote
Man Words Pattern Paper - K&Co
Various charms, buttons, tokens, ribbon - various mfg.
 Instructions:
1. Stamp image onto cover and heat emboss. Let cool.
2. Cover entire slide mailer both inside & out using Weathered Wood Distress Inks.
3. Edge cover & inside edges with Walnut Stain Distress Inks.
4. Adhere pattern paper to inside cover of slide mailer.
5. Attach computer generated quote over pattern paper.
6. Stamp boy image onto glossy cardstock & colorize using Distress Inks & Cut & Dry Nibs. Mount image in slide mailer slot.
7. Edge slide slot with Gold Posh Accent pen.
8. Embellish cover & inside with charms, buttons, letter tiles.
9. Attach ribbon and charms.
I hope you're enjoying these altered slide mailers as much as I have enjoyed making them. Maybe these will spark a few ideas of your own to give these inexpensive little mailers a try!!
Now....
Go alter something today!
Wednesday, February 20, 2008
Altered Microscope Slide Mailers
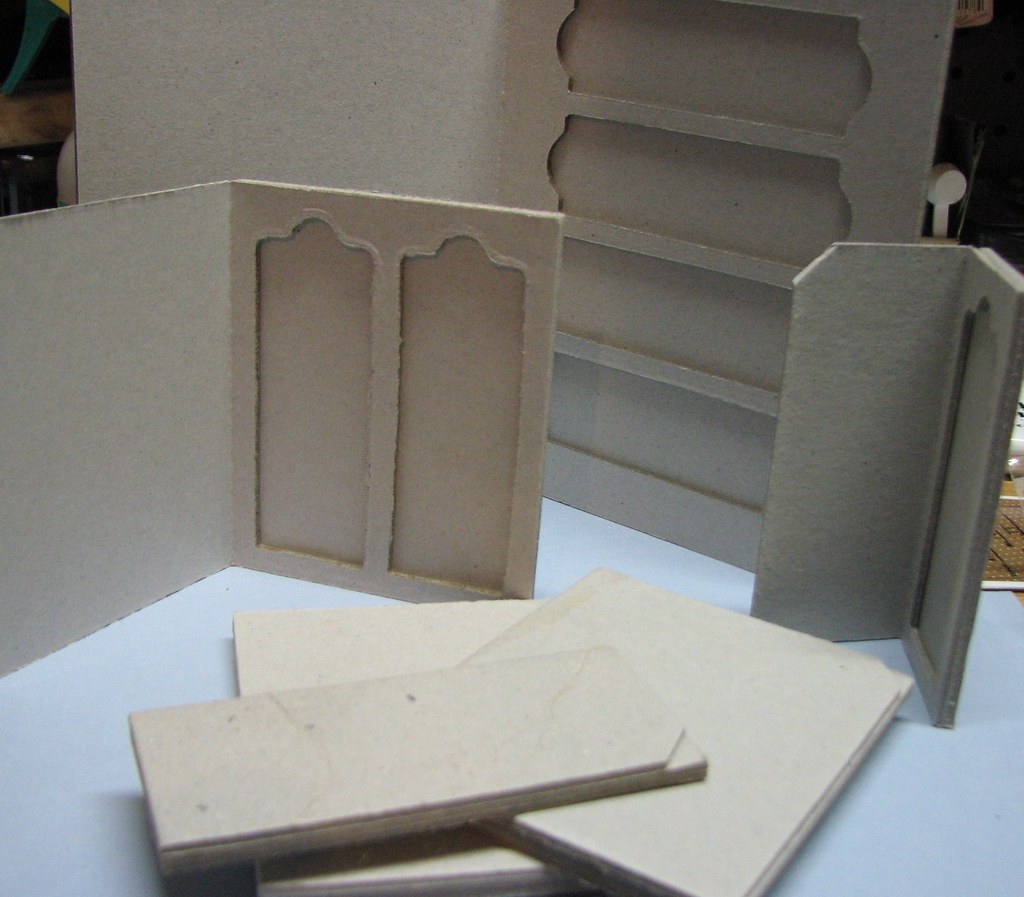 Microscope Slide Mailers...a rather boring little piece of mail ephemera upon first glance. Usually made from a sturdy grayish-brown chipboard type material with 1, 2 and 4 slots to encase glass microscope slides. You would never think they could be turned into a piece of art but they can! With a bit of ink, rubber stamps and some embellishments these little diamonds in the rough can be turned into a cherished keepsake!
Today I want to share a couple examples I made using of course Ranger inks, a few rubber stamps and fun embellishments. I will share more in the coming days :)
 "King"
Supplies -
Distress Inks - Ranger
Adirondack Alcohol Inks - Ranger
Archival Ink - Ranger
Accent Pen - Ranger
Adirondack Dye Ink - Ranger
Glossy Accents - Ranger
Mod Podge
Tissue Paper, Photo Turns - 7 Gypsies
Sea Glass, Vintage Brads, various charms, ticking fabric - unknown
Instructions:
1. Ink the front of the slide mailer using Walnut and Peeled Paint Distress Inks. At this time you should also ink the inside of the mailer with the Peeled Paint Distress Inks.
2. Adhere a crumbled piece of tissue paper to the bottom third of the front cover using Mod Podge. Let Dry.
3. Sea Glass Embellishment -
- First you need to clean any dust that may be left from the mfg. process. I like to clean it with windex.
- On the back side of your piece apply desired colors of Alcohol Ink. For the example I used Pesto, Meadow and a bit of Butterscotch.
- Stamp desired image on the front of the piece using Archival Jet Black Ink.
- Paint the edges using Gold Accent Paint Pen.
4. Attach Sea Glass Embellishment to the cover using photo turns & large brads.
5. Once the tissue paper has dried add epoxy letters.
Inside -
6. Attach the fabric piece to the inside front cover using Mod Podge. This will be the "canvas" for your saying as well as help cover the brad prongs which you used to attach the Sea Glass Piece. Let Dry.
7. Cut & insert a photo to the inside of the slot.
8. Once the fabric is dry, add words, buttons & charms.
9. Add desired embellishments to the photo and fill with Glossy Accents. Let Dry.
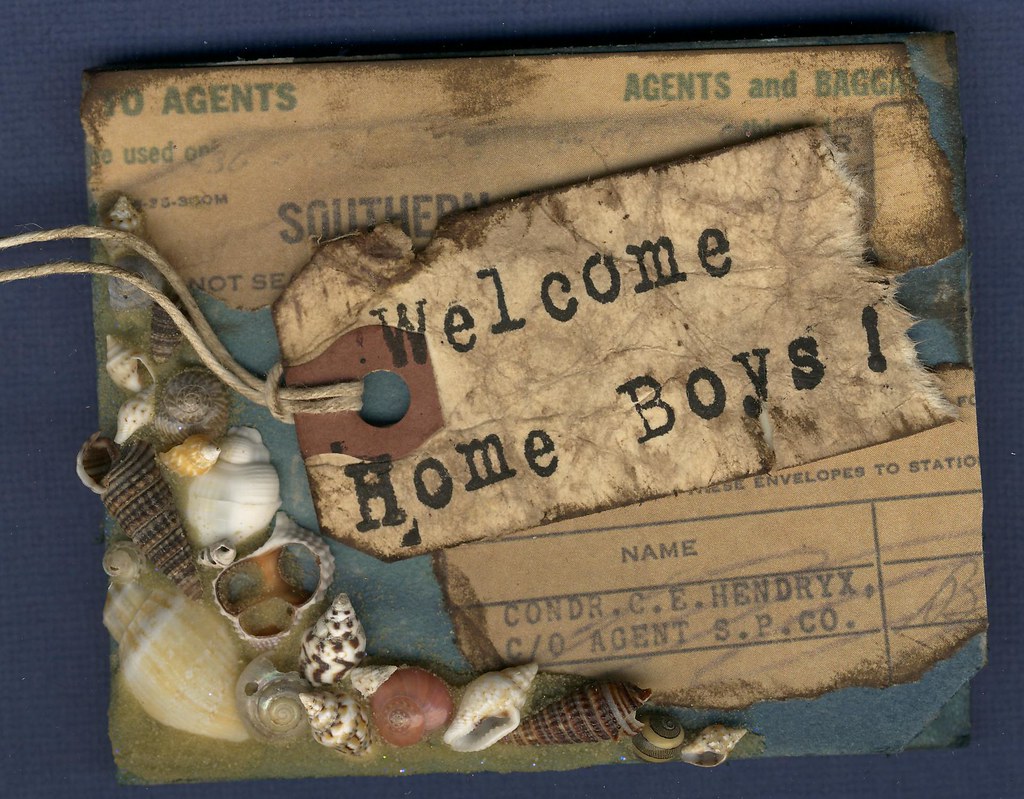
"Welcome Home Boys!"
This is one of my favorite slide mailers I've ever made....it was inspired by the vintage photo of my Grandpa and Grandma and some of their friends. It was taken during WWII while the "boys" were home on leave.
Supplies:
Distress Inks - Ranger
Archival Ink - Ranger
Glossy Accents - Ranger
Slide Mailer
Mod Podge
Tag - Office Depot
Pattern Paper - Design Originals - Tim Holtz Distressables
Shells & Sand - Magic Scraps
Charms & Cord - unknown

Instructions:
1. Ink entire mailer using Broken China Distress Ink. Note: the slide mailer doesn't have to be completely covered by the ink. Leave some of the raw chipboard peek through for a more worn distressed look.
2. Distress tag using Walnut Stain Distress Ink & stamp sentiment. Set aside to dry.
3. Attach pieces of the pattern paper to the front and inside using mod podge.
4. Drizzle Glossy Accents along two sides of the cover. Immediately place shells in the GA. Sprinkle remaining exposed GA with sand. Let Dry.
5. Once the cover is dry, time to work on the inside. Remove the center divider between the 2 slide slots.
6. Stamp image onto glossy cardstock using Archival Jet Black Ink. Distress using Broken China & Weathered Wood Distress Inks.
7. Adhere stamped image inside the enlarged slot.
8. Attach Photo to the inside of the front cover.
9. Attach Cord using Glossy Accents to both the photo and stamped image.
10. Apply Glossy Accents to two sides of the slot, immediately place shells in the wet GA and sprinkle sand over the remaining exposed GA. Let Dry.
11. Attach anchor charms to the cord around the photo.
That's all for today.
Hope you enjoy these projects!
Check back tomorrow for more examples of Altered Slide Mailers :)
Have an Inky Day!!
Posting Winners
Sorry it's taken me so long to get the results of the Posting Contest up but this darn illness has kept me down for a while.
Without further delay....
The winner of the posting contest
with a whopping
98 points!!!
is
Karen!!!!
Wooo Hooo....congrats Karen!!!
Thanks for all your wonderful comments :) I'll be e-mailing you with regards to your cd choice :)
Since there were SOOOOOOO many cool comments, I've got some rubber stamps and other goodies for the 2nd & 3rd place points posters as well...
They are.....
with 29 points....
Nanette!!!
and
with 18 points.....
Shannon!!!!
Congrats ladies :)
Thanks to everyone who posted! I appreciate your comments, please keep them coming!
Tuesday, February 19, 2008
Robin Beam demo's the NEW Pigment Inks & White Pen!!
Here is a great video of Robin Beam (Ranger's Education Guru) demos the new Adirondack Pigment Inks & Inkssentials White Pen!
http://thepinkdonut.com/index.php?option=com_content&task=view&id=102&Itemid=122
Oh my, I can't wait to get my hands on this stuff!!! Looks like such fun :)
http://thepinkdonut.com/index.php?option=com_content&task=view&id=102&Itemid=122
Oh my, I can't wait to get my hands on this stuff!!! Looks like such fun :)
Monday, February 18, 2008
Color Sticks Cont.
As promised, here are some additional examples using the Color Sticks technique I showed you last week!! You will see they just don't have to be cut into strips....try cutting other geometric shapes out of the paper or you may even want to die cut your color stick paper!!! Makes for a stunning end result anyone would enjoy!
Together - Adirondack Alcohol Inks - Ranger; Adirondack Dye Inks - Ranger; Stickles - Ranger; Glossy Cardsock - Ranger; Stamps - Fiskars; Cardstock - Bazzill
 Happy Valentines Day - Adirondack Alcohol Ink - Ranger; Adirondack Dye Inks - Ranger; Glossy Cardstock - Ranger; Sentiment - TAC; Flower Stamp - Fiskars; Gems- unknown; Cardstock - Bazzill

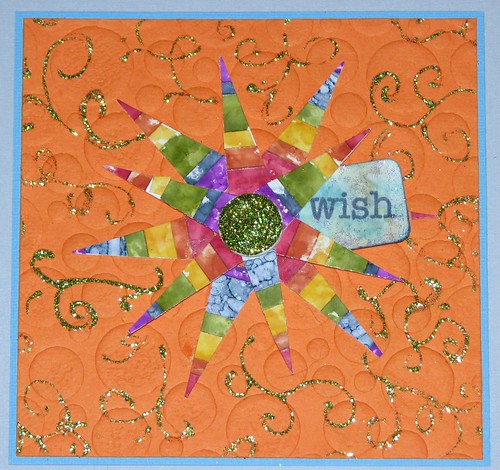
Wish - Adirondack Alcohol Ink - Ranger; Glossy Cardstock - Ranger; Stickles - Ranger; sentiment stamp - Fiskars; Specialty paper - Hobby Lobby; Cardstock - Bazzill
 Hearts & Flowers - Adirondack Alcohol Ink - Ranger; Glossy Cardstock - Ranger; Color Rubs; Cardstock - DCWV; Specialty paper - Hobby Lobby

Together - Adirondack Alcohol Inks - Ranger; Adirondack Dye Inks - Ranger; Stickles - Ranger; Glossy Cardsock - Ranger; Stamps - Fiskars; Cardstock - Bazzill
 Happy Valentines Day - Adirondack Alcohol Ink - Ranger; Adirondack Dye Inks - Ranger; Glossy Cardstock - Ranger; Sentiment - TAC; Flower Stamp - Fiskars; Gems- unknown; Cardstock - Bazzill
Wish - Adirondack Alcohol Ink - Ranger; Glossy Cardstock - Ranger; Stickles - Ranger; sentiment stamp - Fiskars; Specialty paper - Hobby Lobby; Cardstock - Bazzill
 Hearts & Flowers - Adirondack Alcohol Ink - Ranger; Glossy Cardstock - Ranger; Color Rubs; Cardstock - DCWV; Specialty paper - Hobby Lobby
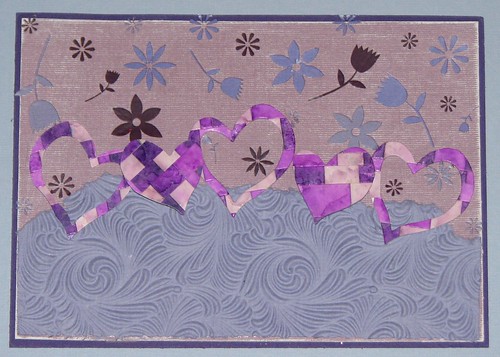
So you see there are loads of cool ways to use this altered bargello technique!
Have a great day
Have a great day
and
Don't forget to Create Something!!
Sunday, February 17, 2008
Stamping Ground
It's that time of the week...time to share another great stamp source!
The Stamping Ground - Rubber Stamp Factory - The World's Largest Inventory of Unmounted Rubber Stamps!!! I have to tell you I am sooooooo impressed with this place! They sell all SORTS of images on 8 1/2 x 11 sheets for $15.00!!! Yes, that's right just $15.00! I could hardly believe it. The cool thing is ~ they are having some specials right now where you can get the same size sheets for 25-50% off!!!
Their images are mostly true to life types, there are a few "cute" images in the animals and children sections but for the most part they are very realistic. LOADS of cool ephemera type items such as a page full of various nails, vintage office equipment, architectural columns, bottles of potions, etc. It is just a really cool assortment of stamps! There are images of the classic authors, books, people, animals, and more!
I just can't get over all of the way cool images for such a very small price! Definitely a neat place to check out :)
Thursday, February 14, 2008
Feb ATC's
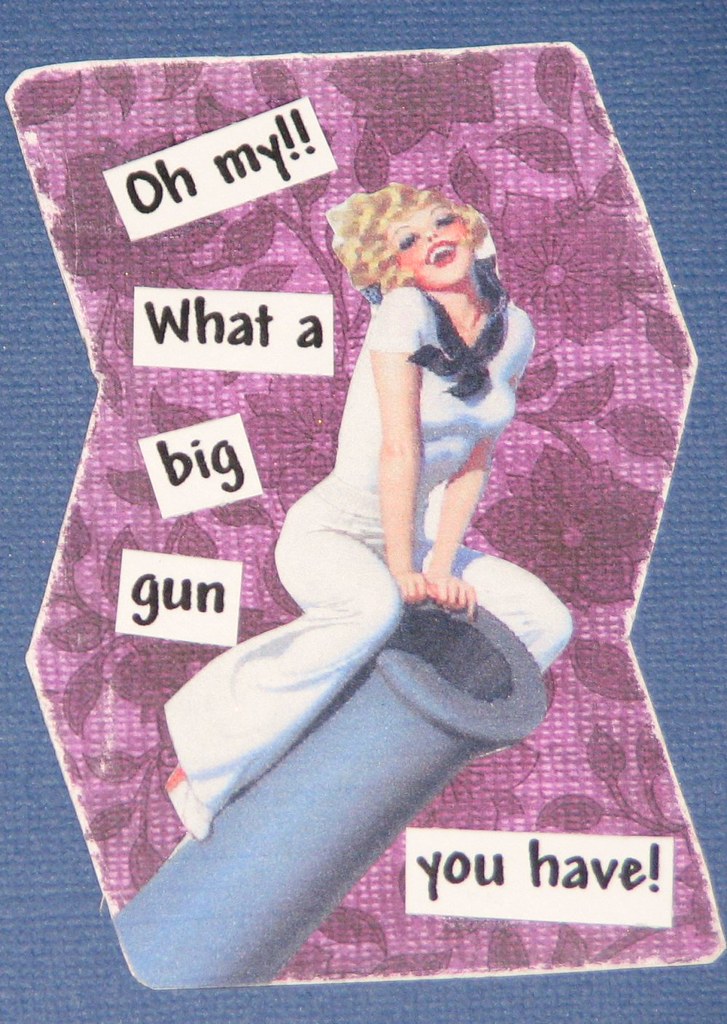
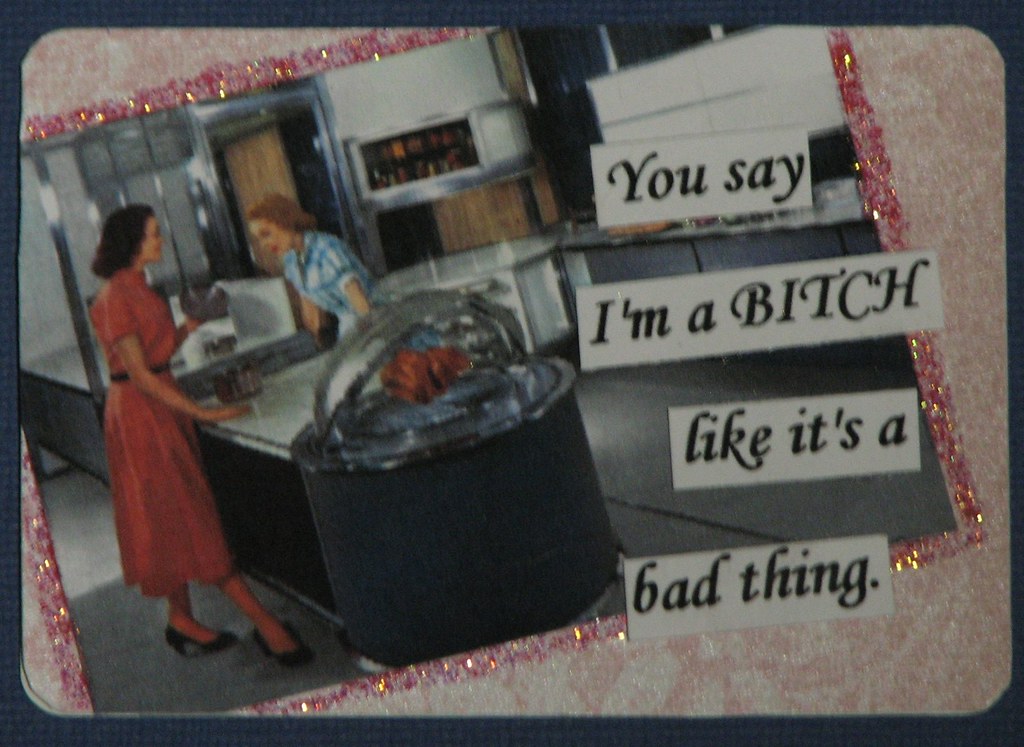
I wanted to share the ATC's I made for this months swap on About.com....
Oh My - vintage pin up girl & computer generated saying.
 Party Animal - Color Wash - Ranger; Dog - Rusty Pickle; Stickles - Ranger; Twinkling H2O's; Letter Stickers
 Make a Wish - Adirondack Dye Inks - Ranger; Stickles - Ranger; stamps - Fiskars

You say..... - Vintage ad image; computer generated saying; Stickles - Ranger; Paper - DCWV

Childhood Memories - Distress Inks - Ranger; Archival Ink - Ranger; Cut & Dry Nibs - Ranger; Image - Queens Dresser Drawers

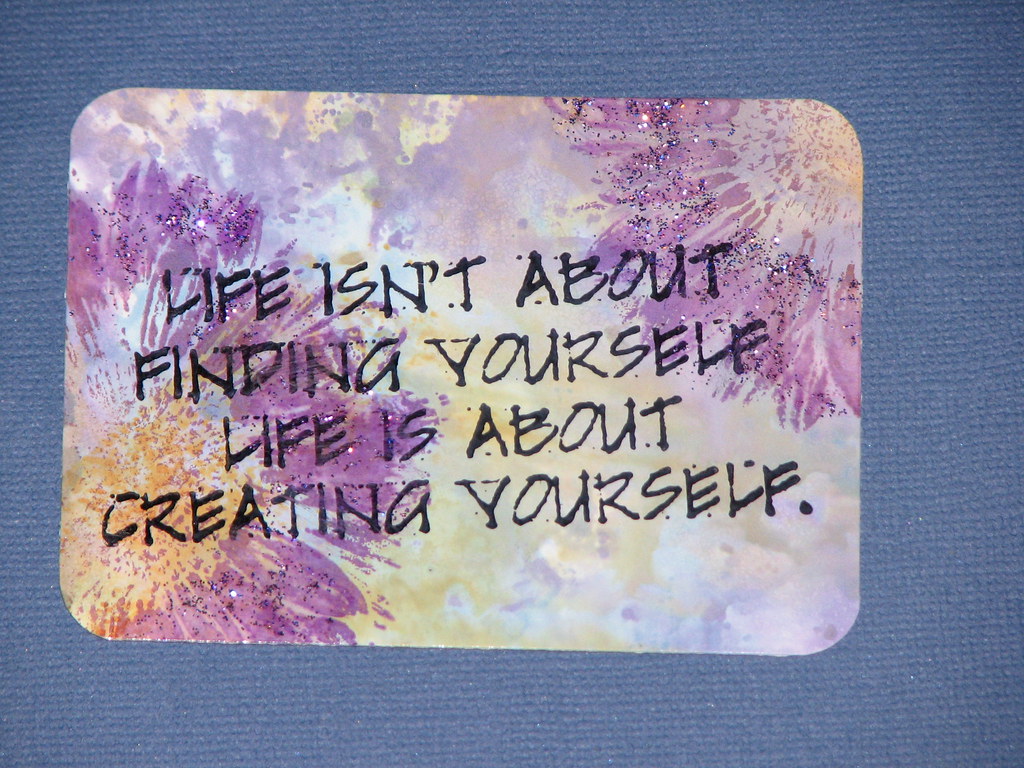
Life.... - Adirondack Dye Ink - Ranger; Archival Jet Black Ink - Ranger - Stickles - Ranger; sentiment - Stampers Anonymous; Flower stamp - Rubber Stampede
 These next 2 sets are made from stickers! Yes, stickers....I can hardly believe it myself but I was sorting through my stash and found this awesome sheet of faries & sayings from PSX that were just too cute to leave hidden in my folder so I decided to put them to use! I am thinking that I am going to trade these as sets. I hate to break them up as they are just so cute together....well, I think so at least :) I hope to find someone to trade with...but if I don't I get to keep them for my own collection - not a bad thing ;) LOL!!!!
Fairy Series I - Adirondack Alcohol Inks - Ranger; Stickers - PSX
 Fairy Series II - Specialty Paper - mfg unknown; Stickers - PSX

Oh My - vintage pin up girl & computer generated saying.
 Party Animal - Color Wash - Ranger; Dog - Rusty Pickle; Stickles - Ranger; Twinkling H2O's; Letter Stickers
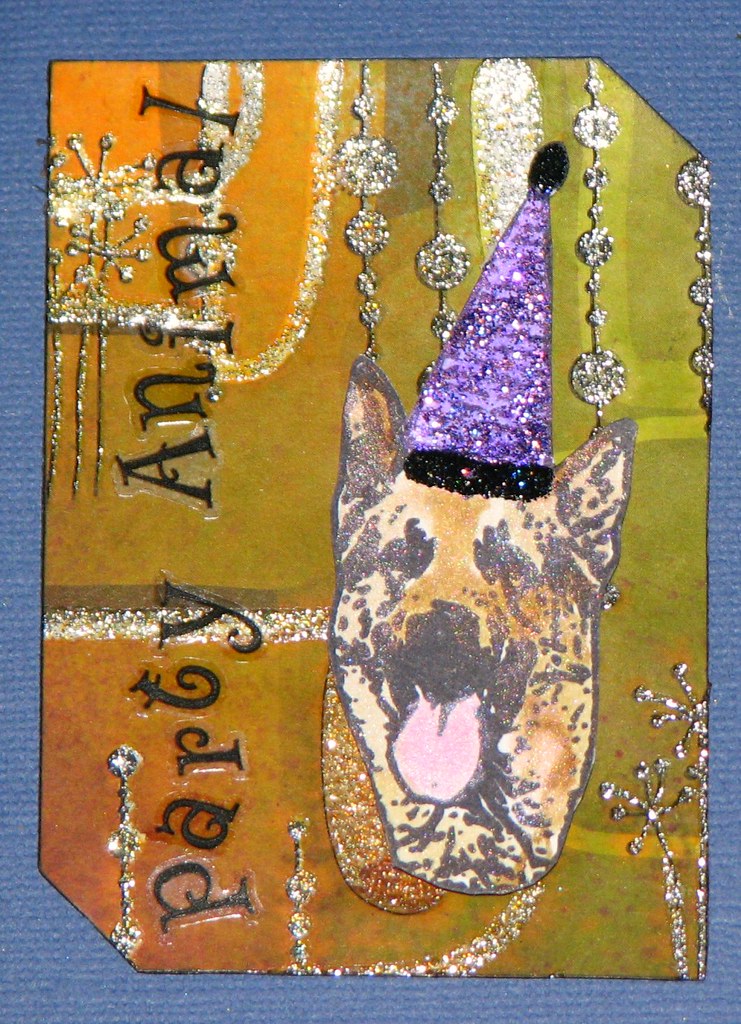 Make a Wish - Adirondack Dye Inks - Ranger; Stickles - Ranger; stamps - Fiskars
You say..... - Vintage ad image; computer generated saying; Stickles - Ranger; Paper - DCWV
Childhood Memories - Distress Inks - Ranger; Archival Ink - Ranger; Cut & Dry Nibs - Ranger; Image - Queens Dresser Drawers

Life.... - Adirondack Dye Ink - Ranger; Archival Jet Black Ink - Ranger - Stickles - Ranger; sentiment - Stampers Anonymous; Flower stamp - Rubber Stampede
 These next 2 sets are made from stickers! Yes, stickers....I can hardly believe it myself but I was sorting through my stash and found this awesome sheet of faries & sayings from PSX that were just too cute to leave hidden in my folder so I decided to put them to use! I am thinking that I am going to trade these as sets. I hate to break them up as they are just so cute together....well, I think so at least :) I hope to find someone to trade with...but if I don't I get to keep them for my own collection - not a bad thing ;) LOL!!!!
 Fairy Series I - Adirondack Alcohol Inks - Ranger; Stickers - PSX
 Fairy Series II - Specialty Paper - mfg unknown; Stickers - PSX
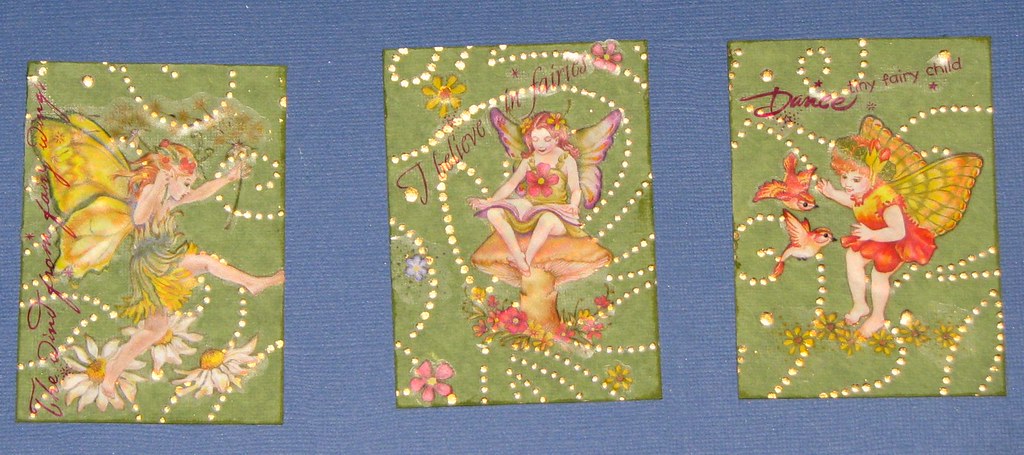
Well, hope you enjoy them :) I'm going to be gone for a few days...dh has to go south to check out some machines for a company we work for and I'm going with. I've got a few more projects made using the "Color Stick" technique I shared yesterday so I'll post them as soon as I get back :)
Have a wonderful weekend everyone!!
Remember to take some time for yourself!

Wednesday, February 13, 2008
CHA update...
I found this blog while searching for pics of new goodies at CHA. She's got lots of neat pics of various mfg's!
Also lots of great pics here....
This is the list of product previews & exhibitors (along with web-sites) on the CHA site.
Some pics on Split Coast Stampers
Lots of neat Rubber Stamp previews here
Also lots of great pics here....
This is the list of product previews & exhibitors (along with web-sites) on the CHA site.
Some pics on Split Coast Stampers
Lots of neat Rubber Stamp previews here
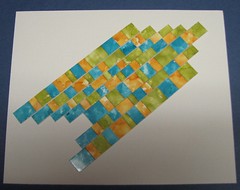
Color Sticks Technique
Today I wanted to share with you a technique I call "Color Sticks". It's my own twist on the technique known as "bargello". Basically, bargello is slicing a piece of pattern paper or a stamped image into several pieces then layering these individual pieces in a stair-step fashion.
Color Sticks takes it a step further with the magic of Alcohol Inks! One of my absolute favorite color mediums, you will see what a striking effect the inks have on the finished cards :)
Supplies:
Adirondack Alcohol Inks - Ranger
Adirondack Alcohol Ink Blending Tool & Felts - Ranger
Non-Stick Craft Mat - Ranger
Glossy Cardstock - Ranger
Glue Stick
Cardstock
Trimmer

Instructions:
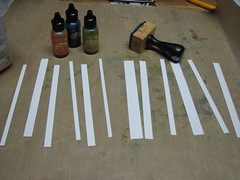
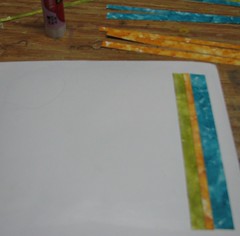
1. Trim several pieces of glossy cardstock in various widths. Why cut first? Well I do it this way so there is no waste. If you ink a solid section of glossy cardstock you may end up with excess for your particular project. This way, there is no waste! You ink only what is needed and don't end up with a pile of already inked cardstock you have to find a use for.

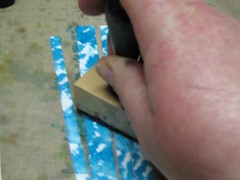
2. Apply alcohol inks to the strips of glossy cardstock. For this example I used Butterscotch, Lettuce and Stream.
3. On a plain piece of carstock, apply a generous amount of glue stick adhesive. I know I know, glue stick? Yes...I like to use a glue stick for this particular step rather than other adhesives because you will need to be sure that the entire length of each strip is secured to the backing cardstock. If the entire strip is not adhered to the backing paper it will cause problems when it comes time to cut.
4. Once you have applied the glue stick to the backing paper, start laying the individual strips down. You need to make sure that they are butted snugly next to each other leaving no spaces.

Once you have attached all of your strips to the backing paper you will be left with something that looks like this. It needs to be set aside to dry completely.
NOTE: I like to place a few books on top of the piece while it's drying to ensure there is no curling or warping of the finished piece.
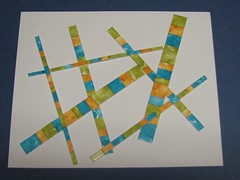
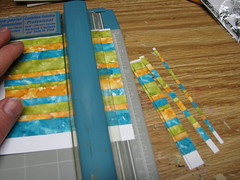 5. Now you are ready to make your "Color Sticks"! Simply slice your creation in various widths ~ everything from very thin to wider pieces will work. You just want to make sure you have lots of sizes to choose from.
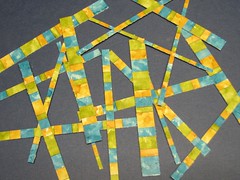 You will be left with a pile of Color Sticks like this! You may be asking ... now what?
 Well, now it's time to put those Color Stick to use! They can be arranged in various patterns on your cards.
Maybe you want to use a couple of color sticks to frame a saying or stamped image. How about cutting a few color sticks up to make mini sticks! Here are just a few examples of various patterns to use the color sticks.....


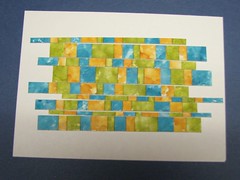
Alternating layers in a stepped fashion.
Another stepped pattern going in one direction or the other.
Maybe you like a more random
pattern to work with....

or
Maybe you're more the linear type....
No matter what your preference, there are always fun ways to use the Color Sticks!
The following cards were all made using the colors sticks produced from the example. Some of the sticks were used whole while others were trimmed to smaller sizes.
Life
Supplies - Scroll stamp - Fiskars; Senitment - Stampers Anonymouus; Vellum, Ink Blending Tool - Ranger; Adirondack Dye Inks - Ranger; Lime Green Stickles - Ranger

Make A Wish
Two Peas in a Pod

Supplies - Girls - Queens Dresser Drawers; Adirondack Dye Ink - Ranger; Cardstock - Club Scrap

Happy Birthday
Supplies: Cake - TAC; Sentiment - Unknown; Adrondack Dye Inks - Ranger; Stickles - Ranger Cardstock - Bazzill

Subscribe to:
Comments (Atom)