Friday, March 13, 2020

Wandering Gnome

Happy Friday the 13th!

Nothing scary here...just a new little gnome friend from Lost Coast Designs!


The current challenge is Artist Trading Cards/Coins/Chunky

I love making ATC's and couldn't resist making a card using one of the brand new gnome stamps from Lost Coast Designs. There are 8 NEW Gnome Stamps in the store now.  You've got to check them out...they are just too much fun!

There is still time to join us for this challenge.
Just make an ATC - card, coin or chunky, post it and you're in!

Good Luck Friends


Thursday, March 12, 2020

Shamrock Shake-r


Today I have a triple whammy for you...Rinea Foiled Papers, Creative Embellishments Shamrock Shaker and Sparkle Blends Gold Rush sequins mix!!  This month the Rinea team is collaborating with the folks over at Creative Embellishments. As luck would have it I choose to use their Shamrock shaker kit AND I'm also guest designing for Doodles Paper Playground using their Sparkle Blend sequins mixes which was the perfect additive for the shaker.

I had SOOOO much fun making this card - check it out...


Here is the Shamrock Shaker kit - all of their shakers come with a shaker back, three outline frames and a window. These kits are so much fun to work with. It makes creating shakers so easy!


To begin, I covered the shaker back with Jade/Gold Glossy foiled paper.


I used a bone folder to smooth out all of the edges when I cut away the excess paper.


Next, glue on 2 of the outline frames - let dry.


Then I filled the shaker with paper punched shamrocks (EK Success Punch)


And the limited edition Gold Rush sequins mix.
I glued on the window and the upper most frame.


While the shaker was drying I embossed a piece of Emerald/Gold Glossy foiled paper.


I then rubbed the Ghost Ink 2.0 over the embossed areas.
When the ink had dried I wiped away the ink and color - just like magic!

I mounted this panel on a card that was matted with Gold/Gold Starstruck foiled paper.

Die-cut an oval from the same paper and mounted it in the center of the card. I then affixed the shamrock shaker to the card as well.


A few more views of the lovely shaker goodness!


Hope you've enjoyed this card and it inspires you to get to shakin'!

Supplies:

Creative Embellishments - Shamrock Shaker Kit
Doodles Paper Playground Sparkle Blend - Gold Rush
Sizzix - Embossing Folder
MFT - Stitched Oval
EK Success - Shamrock Paper Punch
Cardstock, Green Metallic Marker

Wednesday, March 11, 2020

Beer Garden


Today I wanted to share a couple cards I made using Rubber Stamp Tapestries new set of stamps called Beer Garden. It's a fun new set of Peg Stamps that includes hops vine, hops bud, beer stein and pretzels. I was very excited about this as there is someone not far from where I live that grows hops! It's always fun to see the vines climb up the wires during the summer and then see the flowers once they ripen hanging up high. They are really beautiful in their own way.

Today I wanted to share a fun way to create an interesting look by using layered dies as a stamping guide...check it out.


For this technique I am going to use alternating size circle dies to trace stamping lines on both a card and tag. The die set I'm using has 5 layered circles in the set so I'll be using #1 (largest), # 3 and #5 (smallest). You simply trace on a very light pencil line onto your substrate to follow while you stamp. Once the inks have dried you can erase the line where visible but much of the time they will fade beneath the stamped images so you don't even have to erase if you don't want to.

Here you can see that I stamped the hops vines over the lines.


And then I added the flowers to the vines.


I skipped the next size circle and went with the #3 circle die. I stamped the pretzels and beer steins on that line. Note I did have to erase the line where the beer steins are due to the lighter ink color I used.


I used the smallest circle die in the very corners and stamped the hops vine and flower. I then went back and colored each of the hops flowers with colored pencils.


Finally I stamped the sentiments using stamps from the sets Happy and Mom and Dad.  I flicked on a bit of green and gold watercolor paints and after they had dried I added a bit of green ink around the edges to finish them off.


Such a fun and easy technique to create really fun projects.


Supplies:

Rubber Stamp Tapestry - Beer Garden, Happy, Mom & Dad
Imagine - VersaFine Clair Inks
Prima - Watercolor Confections
Cardstock, Tag, Fibers

Tuesday, March 10, 2020

Hey Chick!


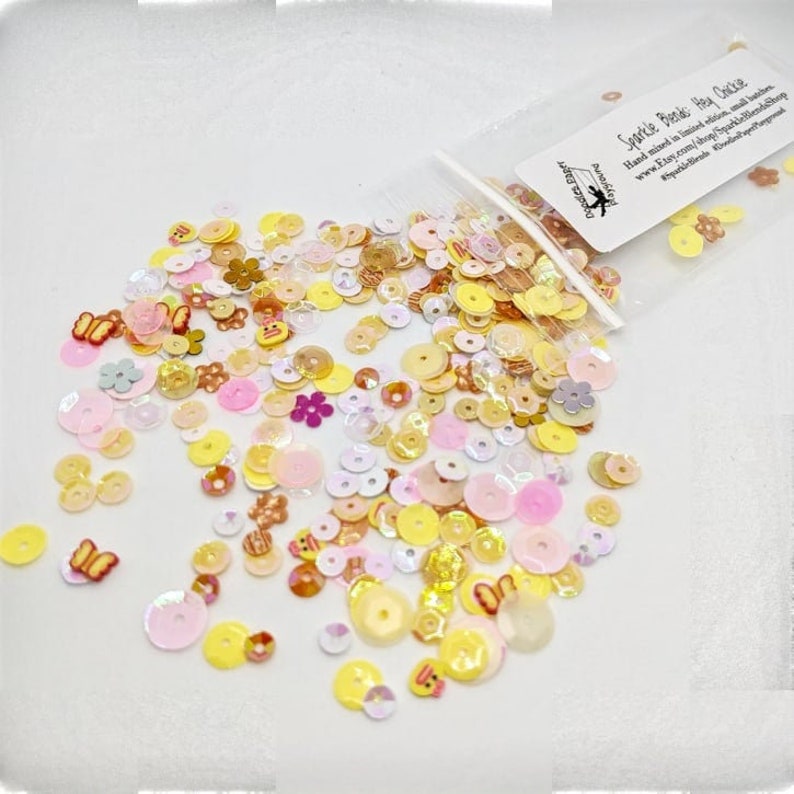
Today I have a fun shaker card creation for you...Hey Chick! I'm continuing with my guest position at Doodles Paper Playground featuring Sparkle Blend sequins mixes. As it happens Hey Chickie is the name of the mix used in this card!

Hey Chickie  Doodles Paper Playground: Sparkle Blends image 0

This mix is filled with a lovely combination of pinks, orange, yellows and even a bit of iridescence sequins. All shapes and sizes of cup sequins, flowers and even some Fimo butterflies and chick faces! Such a fun spring mix.


To make the card I created a shadowbox window from a Spellbinders Die of the Month club kit which I filled with this lovely mix and backed with some pretty rose pattern paper. It was mounted on a card base matted with some pretty plaid paper. (Both pattern papers from Jubilee by Authentique.)


The darling little chicks, sentiment and flowers are from the Sunny Studio stamp set called Chickie Baby. Too cute aren't they? I just love their stamps.  They were each stamped on a piece of scrap paper, colored then fussy cut and mounted on the shaker.

Supplies:

Doodles Paper Playground Sparkle Blends - Hey Chickie
Sunny Studio - Chickie Baby
Authentique - Jubilee
Spellbinders - Lattice Frame
Imagine - VersaFine Clair Ink
Prismacolor Colored Pencils
Cardstock, Foam Tape


Monday, March 9, 2020

Shamrock Time!


I love St. Patrick's Day and as luck would have it Rubber Stamp Tapestry just released a few new stamp sets perfect for this time of year.  


I'm using Shamrocks & Clover and Luck of the Irish to create a Saint Patrick's Day shaker card.


I decided to pull out my Yasutomo mica watercolor paints to create a really pretty background paper to start with. I laid down a couple colors of green then went back and applied some gold over top. It really is so beautifully shimmery in person. These paints give you such a luxe look.

I then stamped the clover & shamrocks in all sorts of shades of green around the edges. I stamped the sentiment in the center twice a bit offset.


I created a shaker window using cream and green cardstock and filled it with Doodles Paper Playground Sparkle Blends limited edition sequins mix called Champagne Bubbles. I LOVE this mix...it's got some really cool ring confetti sequins included in the mix that are so fun and different. Gives the shaker a really fun feel.


Once I had assembled the shaker I flicked a bit of the gold metallic paint on the front of the shaker for good measure. The shaker element was then mounted on a black card base to make the gold really pop.  Finally I stamped a few extra shamrocks and clover on scraps of paper, fussy cut and mounted them in the corners. Such a fun way to celebrate a forgotten holiday.


Sunday, March 8, 2020

Sail Steampunk Canvas


Good Morning all...

Today I have a canvas for you that I had loads of fun making. Ya know sometimes there are projects that you have to create for a specific reason and then there are times there are projects you want to make just for fun. Well this is one of those just for fun projects all for me.


This month the team at Rinea had to opportunity to play with chipboard pieces from Creative Embellishments and let me tell you it was instant love for me. They have so many cool pieces and the ones I fell in love with (besides the shaker kits) were all of their Steampunk goodies!! I abosolute LOVE this Airship!  

So I already created my projects for the Rinea blog (those will come along later in the month) but I still had some chipboard pieces left over. I was very inspired by the current March Challenge on the Creative Embellishments blog and decided I wanted to play.  This is their inspiration board....


with the optional twist to incorporate GLITTER!!

I love all of the colors and well, you all know how much I love glitter so I decided to give it a go. Here's what I did...


I started off by covering a canvas board with Silver/Silver Starstruck foiled paper.


Used DecoArt Modeling Paste and this pretty stencil to add some fun designs.


Then I spritzed it with Fireworks! ink spray colors similar to the ones on the inspiration board.


While the canvas was drying I colored several gears with a paint pen.


Then glued them into cloud formations.


While the glue was drying on the clouds I colored the airship with some Memento Markers, the white paint pen and some metallic markers.


When the clouds had dried I covered them with glitter....a very pretty irridescent mica micro glitter over most with a bit of silver glass glitter along the bottom edges - you know for a silver lining.


And this is what I came up with!


So I'd like to enter this project into the March 2020 Creative Embellishments challenge!


Thanks to all for looking...
hope it inspires you!

Supplies

Creative Embellishments - Airship, Large Gears, 1" Gears
DecoArt - Modeling Paste
Myers Imports - Silver Glass Glitter
Posca Paint Marker - White 
Canvas, Stencil, Micro Mica Glitter, Metallic Markers, Metal Letters


Friday, March 6, 2020

New Challenge - ATC's - Cards or Coins!

Welcome my friends...it's been a while since I've played with ATC's and I don't know why I was waiting but I'm so glad that the current challenge at Lost Coast Designs prompted me to play with them again!

The challenge is #94 - Artist Trading Cards or Coins and this is what I have created to kick off the challenge.


The men are two of the most recent stamps released from Carmen's Veranda, aren't they dashing? You can find Sherlock and Einstein here along with his pal the Joker.


I made the Sherlock ATC by adhering a piece of a vintage ledger page onto an ATC blank. I flicked on red watercolor paint for fake blood then stamped Sherlock. I grunged it up a bit with some smudged fingerprints (my own) then stamped the measuring tape and grunge black swirl here and there on the card. I added the word Curiosity just because I can't seem to not add some sort of text to my ATC's - LOL!!


Einstein was made by affixing an old Latin book page onto a crooked playing card I had in my stash. I then stamped him in Paradise Blue VersaFine Clair ink.  I used a fun circle stencil to add the little green dots and stamped the word wisdom in red.  I added a little white gel pen to the green dots to make them stand out a bit more.

This challenge runs until the 14th so you've got plenty of time to join in on the fun!  Simply make an ATCard or ATCoin and enter it for your chance to win!


Supplies:

Lost Coast Designs - Misc Words, Measuring Tape Border
Imagine - VersaFine Clair Inks, Sponge Dauber
Vintage Book Pages
Circle Stencil
Watercolor Paint