Tuesday, August 7, 2018

Lavender - Imagine's Color of the Month!

Have you heard that Lavender is the color of the month for Imagine?  It is and I created these fun and smelly sachets!  Smelly in a good way though - filled with lavender collected from my garden.


These little gems were made with the help of Fabrico Dual Tip Fabric Markers.
For complete details be sure to check out the Imagine blog - 


Have a lovely day friends!

Monday, August 6, 2018

More Gnome Fun!

Last week I shared one of my gnome cards using a new set of stamps from Rubber Stamp Tapestry called Fairy Garden.  Well today I have a couple more cards using this set...


This card was stamped on a bit of watercolor paper that I had taped off the edges.  After it was stamped n colored I removed the tape and splattered a bit more of the sky blue over the entire panel.


I had fun with color on this card. I stamped the circles all over the card using various colors of VersaMagic (chalk) ink.  After I had them all stamped I went back and stamped the images inside each circle with VersaFine Clair ink. Finally I stamped little sentiment and added the die-cut "hello".

Hope you all have a lovely week!

Thursday, August 2, 2018

Steampunk Magic

Happy Day Friends!

Today I have a bit of Steampunk Magic for you...
the magic of flight!


I just love detailed schematics of various steampunk designs and this is one of my favorites. An airship in the shape of a bird.  If it flew I'm sure it truly was magical to watch. The background is made using Bronze Creative Medium which was applied to the cardstock using a faux wood grain tool. It's amazing how realistic it looks IRL.


Lost Coast Designs is sponsoring the current challenge at Allsorts of Challenges blog - Tags! where you will also find a nifty little coupon if you would like to order.

Image may contain: 3 people, people smiling, text

Doesn't get much easier than that huh?  Just stamp any card and you're set to go!!

Be sure to enter both challenges for your chance to win :)
Good Luck Friends!

Supplies:
Lost Coast Designs - Steampunk Plane, Words
Imagine - Creative Medium, VersaFine Clair
Tag
Cardstock
Faux Wood Grain Tool
Raffia
Brads

Wednesday, August 1, 2018

A Little Gnome Told Me....

August 1st, 2018!!!

Can you believe it?
I don't know where the year has gone...

It sure doesn't feel like  it should be August already.

Well I thought I'd share the first of a little series of Gnome cards I've made for you all...


A little gnome told me that
Gnome is where the Heart is.

And here are 3 little guys to prove it! 
I had so much fun making this card using stamps from the Fairy Garden set. I started off by stamping the stump from the Budding Spring UM set, from there I stamped the 3 little Gnomes and went on from there. Everything was watercolored after I was satisfied with all of the little mushrooms, critters and such.  This is such a fun stamp set I don't know if I'll be able to wait to show you the other cards I made.


Supplies:

Rubber Stamp Tapestry - Fairy Garden, Whispers from the Garden, Budding Spring 
Imagine - VersaFine Clair
Kuretake Watercolors
Watercolor Paper
Cardstock
MFT - Stitched edge rectangle die


Monday, July 30, 2018

Marabu Easy Marble

Happy Monday!

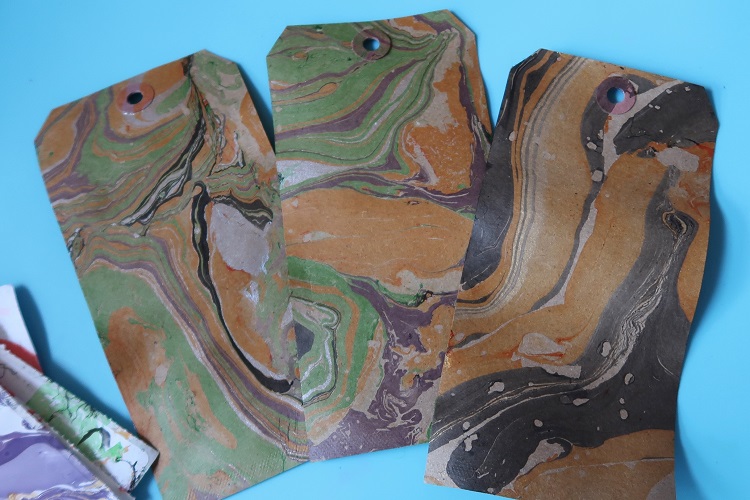
Today I wanted to share a fun and new to me art medium... Marabu's Easy Marble. I have to say I love this stuff.  I have always had an affinity for the marble papers found in vintage books and I've always wanted to try to make it but it was a complicated technique requiring various ingredients to make it just right.   Well, thanks to Marabu we can all make those pretty marbled papers easily!


To get started all you need are a few bottles of Easy Marble, a pan of water and something to marble.  I started out by experimenting with cardstock, bristol cardstock, tags, labels, glossy cardstock, vintage book pages, ledger sheets, sheet music, foam core board, shrink film, MDF shapes and even rocks!  They all worked great! It also works on metal, glass, plastic, and even fabric as long as it won't be washed.


Directions....

NOTE: Wear gloves or be very careful picking your items off of the water - the Easy Marble will stick to your fingers and it can be difficult to remove.  I found that an Orange Oil based cleaner works best to remove the film once it has adhered to your skin/nails.


Fill a pan with water - I used about 1 1/2" - 2"  of water in my pan - just enough to dunk whatever I wanted to marble.  If you are going to be marbling larger items you will want a deeper pan and more water.

Shake all of the colors you want to use vigorously and remove the caps.


NOTE: You must work fairly quickly from here on out.

Sprinkle your base color until it covers the water in the pan.

Note: You need to do this for more open time to work with the medium.  If you don't do this the EM will begin to form a "skin" and adding/swirling the colors after it has made the skin becomes almost impossible.


Sprinkled additional colors as desired.

You may either print as is for large splotches of color or you can swirl the colors around with a tooth pick, skewer or something similar.  I used a wood stir stick.

NOTE: you will pick up some of the medium on whatever you use to swirl the colors. It will look like a gloppy mess but a little is normal. If you pick up more than a small amount then you've taken too long and the skin has formed.  Stop when this happens otherwise you can pull all of the medium off the water with your stirrer.


Place your cardstock or other item on top of the water and give it a gentle press down until it is dunked under the water. Carefully remove it from the water.  Some people use tweezers, I just use my fingers.


Set it aside to dry.

That's it...it is so easy and with 22 colors the combinations are endless!  After just a couple hours of play I ended up with a whole pile of fun pieces to use in my art plus a couple nifty stones, a couple pieces of MDF to decorate my room and a piece of really cool shrink film.

This is just a small sampling of the amazing pieces I made....


This is shrink film!!  It works amazingly well.


MDF Indiana piece - I'm seein' a Cubs state of mind here ;)


White, Silver and Gold...really pretty IRL.


I worked on several Halloween color combos...


This was made with Autumn in mind but it almost looks Christmasy too.


Blues & purples


Turquoise, green, pink and purple.


The next 3 are Rinea Silver foiled paper!  
This is Silver/Gold Glossy Foiled Paper.


Silver/Silver Starstruck Foiled Paper


And Silver/Gold Glossy Foiled Paper


Christmas colors of red, green and gold.


and a bit of Valentine's Day in pinks, reds, silver.

This stuff is just soooooooo much fun...you could spend hours just coming up with various color combos to try.  I sure did!  I had to stop a couple times in order to let stuff dry.  I kept running out of room to put the wet stuff - LOL!!


Steampunk Inspiration

Time is running short on the "No Body Here" challenge at Lost Coast Designs.  You have just today and tomorrow to enter your creation.


I made this card/tag with the challenge in mind. I love the steampunk stamps available at Lost Coast and this mechanical horse is one of my favorites. I smudged up the tag for a bit of a vintage feel.  The background was created by tearing bits of Rinea foiled paper and layering them onto a piece of cardstock. Once the cardstock was covered I ran it through in a gear embossing folder.

I love how it turned out and can't wait to send it on it's way!

Be sure to stop by and add your creation to the challenge -


Supplies:

Lost Coast Designs - Steampunk Mechanical Horse; Words
Rinea Copper/Gold Glossy; Mocha/Gold Glossy; Silver/Gold Glossy; Ebony/Gold Glossy Foiled Papers
Imagine - VersaFine Clair; Sponge Daubers
Tag
Fibers
Sizzix - Embossing Folder

Friday, July 27, 2018

Art Supply Exchange Announcement!!

Hey friends!  


Don't know if you've heard it or not but recently Etsy made lots of changes to their policies (with more to come) and raised their fees...as if they didn't make enough on you already!  When I opened my store, my original goal was to find and sell vintage ephemera and other goodies that folks (myself included) could use in their art at a reasonable price.  Well with all the new fees a reasonable price is no longer feasible.  So after 9 years of selling I decided to close my shop.


You know when they say one door closes another opens - I decided to start a facebook group where anyone could buy, sell or trade their new or used art supplies and ephemera!  It's called...


Right now it's in it's infancy with just a few members and only a couple items for sale but I'm hoping that you will help me spread the news and join in on the fun.  Please feel free to go on over, answer 2 really easy questions and join!  Also if you could share the link with your artsy minded friends that would be awesome.

I'm going to start photographing all of the goodies I have available 
and start posting more soon :)

Hope to see you there!!

Thursday, July 26, 2018

Ocean Babies

Playin' with some new peg stamps today...Ocean Babies!

These little devils are so cute, they make really fun cards...


Having fun mixing up colors with a blue octopus baby, a green lobster, pink whale and orange seahorses which isn't really a stretch since some of them are on the orange side.  I almost never use orange but I really wanted to do something a bit different.  I think it turned out pretty good.


A fun underwater scene.  All of the foliage & coral are different peg stamps just arranged unexpectedly. 


Pairs of babies...the background is a lovely 

Supplies:
Rubber Stamp Tapestry - Ocean Babies, Whispers from the Garden 
Imagine - VersaFine Clair, Memento Dye Inks, VersaMagic (chalk ink), Sheer Shimmer Spritz - Sparkle
Rinea - Turquoise/Turquoise Starstruck Foiled Paper
Sizzix - Sentiment Dies
Cardstock
Twine

Wednesday, July 25, 2018

Golden Seashell Necklaces....

Happy Day Everyone!

Today I wanted to share my latest creations....
Golden Shell Necklaces!


They were created with this month's color of choice over at Imagine...
Golden Glow.

The inside and out were colored using a mix of All Purpose Inks...gold for the inside of course and a variety of colors out.


They can be worn either with the color showing or the mermaid/octopus out.

For information on how these shells were made, please see ~


Tuesday, July 24, 2018

Faux Ormolu Glass Bottle

You all know how much I love vintage goodies well today I have a fun project I made using Rinea foiled paper paired with a vintage glass bottle and Imagine's StazOn Studio Glaze.  Check it out....


Ormolu is the term used to describe gilt brass on decorative art objects from the 18th and 19th centuries also known as fire gilding. I decided to create a bit of faux ormolu on this very cool vintage glass bottle I found recently at a flea market.


Wash the bottle to remove any foreign dirt, debris and oils from the surface.


Use an Ink Blusher to apply a coat of Blue Hawaii StazOn Studio Glaze to the surface of the bottle.


After the bottle has dried you will have a lovely cloudy semi translucent "glaze".
It brings to mind the look of sea glass.


Die-cut 3-4 sheets of Gold/Gold Glossy Foiled Paper using desired filigree dies.
(These dies are from the Spellbinders monthly die club.)


Remove the die-cut foiled papers from the machine and carefully peel each piece apart.
Depending on the die you may have more or less embossed areas than others.
Keep this in mind for placement. I used the highly embossed pieces (those closest to the front of the die) for prominent areas and the less embossed (3 & 4th die cut layers) in areas that the embossing wouldn't be as noticeable (sides & back).


Run all of the pieces through the Xyron Sticker Maker.


Carefully peel off the foiled filigree pieces and apply them to the bottle as desired.


The results are stunning!
It looks like the bottle is encased in a gilt filigree cage.


I finished off the jar with this very elaborate antique perfume bottle stopper.

Supplies:

Imagine - StazOn Studio Glaze - Blue Hawaii; Ink Blusher
Xyron Sticker Maker
Antique Glass Jar, Bottle Stopper
Faux Gemstones
Wire