I am getting closer to sharing my watercolor paper comparison but I wanted to get your input on a few things...
I have many many different types of paper to compare but I was wanting to know what color mediums you might like to see.
I have planned to test the following:
Inks - Archival, Memento & StazOn
Mediums - Watercolor Paints (Koi); Watercolor Pencils; Watercolor Crayons (if I can find them); Distress Stains; Gelatos; Acrylics; and alcohol markers.
Is there some other medium you'd like to see on the papers? If there is, just leave a comment or e-mail me directly. I'll be happy to test anything I am able.
I needed to know how many things I was going to test so I knew how bit to cut my papers. Once I get that down I'll be able to start all of the comparisons.

Tuesday, June 10, 2014
Monday, June 9, 2014
Quite the Pair... or is that Pear...
Do you like the look of Zentangles?
Then you'll love the look of StampTangles!
If you thought you didn't have the time to achieve the Zentangle style you'll love these rubber stamps because all of the time consuming work is done for you. All you have to do is color and amaze your friends.
The good news is Just For Fun Rubber Stamps already has a selection of fun StampTangle images available. Even better news they are coming out with a whole new selection the end of this month!!! Below are a couple cards showing both the old and new stamps combined. The smaller Pear and Enjoy Life stamps are already available ~ the large Pear, Leaves and Perfect Pair sentiments are coming soon.


Don't forget JFF Rubber Stamps is looking for new members for it's design team!
If you think you'd like to work with these fun StampTangles and other JFF images be sure to send your application soon. The deadline for submissions is June 18th!
For complete details:
Saturday, June 7, 2014
Custom Crops - Going out of Business :(
I thought I'd let you know...Custom Crops is going out of business.
I got an e-mail saying that everything was 25-75% off until June 18th.
After that they won't accept any new orders.

Friday, June 6, 2014
Club Scrap Big Deal Stamped Collage Card
Recently Rubber Stamp Madness had a call for Stamped Collage Cards.... which got me to thinkin' how much I love to make them so today I have one to share with you that I made using Club Scraps Big Deal kit/stamps plus some pages from a vintage Hoyle card game book and a few other bits.

This collage was made on a sheet of mixed media paper that I sprayed with a couple different colors of ink. I then used IMAGINE Crafts/Tsukineko's Vintage Creative Medium (more about that later) to add bits and pieces of a few inside pages of the book plus the title page (up in the lh corner).
After the medium had time to dry I started stamping. I started off by stamping the cards in a light grey ink and the tiny suit symbols in a vintage brown ink over the entire card. I then stamped the large and medium suits in Red Geranium and Jet Black Archival Inks. The joker was stamped using Watering Can (dark grey). I stamped the hand of cards using a light blue ink that I aged by adding a layer of Vintage Photo Distress Ink.
I finished the whole thing off with a bit of pen work to bring it all together. It really is such fun to stamp a collage! If you have a free moment or two you should give it a try!
Have a wonderful weekend friends!!
Thursday, June 5, 2014
More Fun with GlazOn Layer Protectant
I wanted to share a couple more examples on how to use the GlazOn from IMAGINE Crafts / Tsukineko. The first example was made using the Clear GlazOn.
I started off by stamping these cherries using Cactus Green and St. Valentine StazOn Midi. And just as yesterday I let the inks dry and applied a layer of the Clear GlazOn over the top.

Once it was dry I began layering colors. First I colored the cherries using a few different colors of Spectrum Noir Marker, applied a layer of GlazOn then colored the background and another layer of GlazOn.


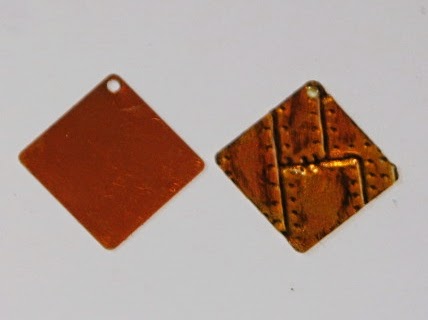
The second example I'd like to share is one I'm very excited about. You can take aluminum and turn it into a pretty convincing copper color!
To help show the depth I decided to emboss this Sheet Metal charm.


I covered it with a layer of the Orange Zest StazOn Midi.

Then I covered it with 2 layers of Vintage GlazOn. The slight tan tint of the Vintage GlazOn really helps tone down the bright orange on the aluminum.

I know there is also a Matte GlazOn but I don't have any of that (yet) to share with you but maybe in the near future ;)
I started off by stamping these cherries using Cactus Green and St. Valentine StazOn Midi. And just as yesterday I let the inks dry and applied a layer of the Clear GlazOn over the top.
Once it was dry I began layering colors. First I colored the cherries using a few different colors of Spectrum Noir Marker, applied a layer of GlazOn then colored the background and another layer of GlazOn.
Next I added some shadow using a grey marker, a layer of GlazOn then finally I added some detail lines in black just for a bit more definition and the last layer of GlazOn. Here's how it turned out... It's really amazing the depth you can achieve when using the GlazOn.
The second example I'd like to share is one I'm very excited about. You can take aluminum and turn it into a pretty convincing copper color!
To help show the depth I decided to emboss this Sheet Metal charm.
I covered it with a layer of the Orange Zest StazOn Midi.
Then I covered it with 2 layers of Vintage GlazOn. The slight tan tint of the Vintage GlazOn really helps tone down the bright orange on the aluminum.
After the initial two layers were dry, I added some highlights using Cloudy Sky StazOn and a final layer of Vintage GlazOn. You can see how it changes the color from bright orange to a warmer copper. I just love it!
I know there is also a Matte GlazOn but I don't have any of that (yet) to share with you but maybe in the near future ;)
Wednesday, June 4, 2014
GlazOn - StazOn Layer Protectant
Monday I shared my Home Sweet Home - Bird House Pendant and I mentioned using GlazOn between the layers of StazOn Midi Inks. Well that sparked much conversation and questions so I thought I'd address them here in case others were wondering about it as well.

You know sometimes when you stamp color a piece of metal, glass or other porous surface with StazOn it would be nice to be able to add more colors or stamp over it with other StazOn inks. As many of you know if you apply an alcohol or solvent based ink over another they will react and 9x's out of 10 make a mess instead of a masterpiece.
Here is an example of just that very thing....St. Valentine's StazOn base layer...

Stamped with Jet Black StazOn and was able to wipe the image right off...taking some of the base color with it. Of course there is a resist method using these steps but sometimes you actually WANT the image to stay put...not wiped away.

I was able to wipe all of the ink off with the wet ink.

So, time to start over this time using both StazOn and GlazOn.... add the base coat of St. Valentine's StazOn.

Once the ink was dry, apply a thin layer of GlazOn and let it dry. I used my fingertip but you don't have to. You can use a soft rubber spatula, paintbrush, etc. but remember to clean your tools because it will dry and may ruin a paint brush if let to dry as most mediums may.
A question that I got several times was about dry times. This medium dries very quickly so no worries about lengthy wait times. I believe all of the layers I applied were dry within 30-40 seconds or so. Not bad at all. If you can't wait that long you can hit it with short blasts of warm air from your heat tool. You don't want to dry it too quickly especially on metals. The heat tool will super heat the metal very quickly and cause the medium to bubble up. I found that short intervals of the warm air does the trick in like 15 seconds or so. Almost instant gratification.

Next you can apply more inks. For this example I stamped over the base coat with Jet Black just as I did in the first example. After the ink was dry, I added another layer of GlazOn and let it dry.

I then added a bit of green and orange inks to various parts of the image, and another layer of GlazOn. I should have used a lighter base color but you can see enough of the other colors to get the drift.

The final layer of GlazOn also helps protect your creation from getting rubbed off with normal wear. Now that's not to say if you really get nasty with it that you couldn't scratch it but it's pretty tough stuff.

I thought about my Spectrum Noir alcohol markers and decided to give the GlazOn a try with those. So I set about testing another Sheet Metal charm... Base coat / GlazOn

Basic drawn image & color.... GlazOn


And it worked! Now I can't say if it will work with other AI markers (because I don't own any) but give it a shot...it could open up a whole new artsy world! I know it has for me :)
Someone also asked about how much it costs... I did some checking and it looks like you can find it anywhere from 3-4.00 a bottle which is .5 fl oz. I know that doesn't sound like much but you only use a very tiny about for each layer...a small dot on the tip of my finger is all I used. I've made the bird house pendant, several charms and experimented with other materials and I haven't even used a quarter of the bottle. It goes a LONG way.
Canvas Hangers ?
Hi All...
I have a question to start your Wednesday...
I have a question to start your Wednesday...
What type of hanger do you use on canvas art boards (if you make them that is)?
I've been having a hard time deciding what type of hanger I actually want to use. I've tried a few different things - right now my favorite is the canvas sticky back pieces that have an eyelet in them for hanging. They look nice and are easy to attach. Problem is they are getting hard to find.
I used my last one and it's time to really figure out how I want to hang these things because I finished another and need something to hang it with. I have in the past used pop can tabs but I don't really like the look...and the glob of hot glue (that I used to stick it on the canvas) stuck out a bit making it not hang properly on the wall.
Can't wait to hear what you use and how you like it!
Tuesday, June 3, 2014
Blending Sectrum Noir Colored Pencils
I am so excited...this past weekend I had my Sectrum Noir Colored Pencils out and played with them. A LONG time ago I heard about a way to blend colored pencils using baby oil but when I tried it at the time I obviously didn't have the correct type of colored pencils because all I did was end up making a mess.
Well I gave it a shot with the new pencils and it worked! I started off by coloring my image with a few colors of green. I didn't really take much time, just scribbled in the general area I wanted the colors to be.
.JPG)
I then wet a pointy q-tip with the baby oil
.JPG)
and began blending. Basically just rubbing the colors together.
.JPG)
and what do you know....it turned out great!
.JPG)
The smaller pear is on Georgia Pacific cardstock and the larger pear is on Cougar cardstock. I've never used the Cougar cs before but WOW, it's great stuff. I'll be able to tell you more about that soon.
.JPG)
So I can now say that I have tried the baby oil trick and it works great :)
Well I gave it a shot with the new pencils and it worked! I started off by coloring my image with a few colors of green. I didn't really take much time, just scribbled in the general area I wanted the colors to be.
I then wet a pointy q-tip with the baby oil
and began blending. Basically just rubbing the colors together.
and what do you know....it turned out great!
The smaller pear is on Georgia Pacific cardstock and the larger pear is on Cougar cardstock. I've never used the Cougar cs before but WOW, it's great stuff. I'll be able to tell you more about that soon.
So I can now say that I have tried the baby oil trick and it works great :)
Dina Wakley Winner!!
The winner of the Dina Wakley Paint, Gel Medium & Spatula is....
Diana Fernandez!!!
diana fernandezMay 17, 2014 at 12:21 AM
I haven't been able to get my hands on any of her paint yet, but it looks like so much fun! I think the turquoise will be my favorite color because well turquoise is usually my favorite color to work with! Thanks so much!
Congratulations Diana!
Please e-mail me your snail mail addy so I can get your goodies out in the mail to you :)
Monday, June 2, 2014
Home Sweet Home Metal Pendant ~ IMAGINE Craft/Tsukineko Sheet Metal
During the month of June Altered Pages Design Team is featuring IMAGINE Crafts/Tsukineko products in all of our projects. They have generously supplied us with a vast array of their new and existing inks, texture sprays, tools and more!

Today I get to share my first project -
Home Sweet Home Metal Pendant...

IMAGINE Crafts/Tsukineko Supplies Used:
Sheet Metal (ATC sized Blank)
Staz-on Midis (Cloudy Sky, Cactus Green, Emerald City, Spiced Chai, Orange Zest, Claret, St. Valentine, Blue Hawaii, Midnight Blue, Jet Black)
Glaz-On (Clear)
irRESISTible Colored Texture Spray (Bronze)
Creative Medium (Vintage)
Ink Blushers
FantaStix
Altered Pages Supplies Used:
Little Spring Birdies Collage Sheet
The BrushStix
Kai Scissors
Aleene's Tacky Glue
Adhesive Dimensionals
Basket Weave Rubber Stamp
Paper Flowers
Lightbulb Safety Pins
Other Supplies:
Rusty Wire, Beads, Moss, Jewelry Findings
Instructions:
1. Start off by making a rough drawing of your dwelling on the Sheet Metal ATC blank. I used a Sharpie* to get my basic pattern, fold and cut lines.
*Please note that once you apply the Staz-On most of these lines will be erased with the addition of the new ink.

2. Make 4 cuts - two along the bottom in towards the floor line and two on the horizontal roof line as shown.
3. I used multiple layers of ink to color both the inside and outside of my house. I used Orange Zest for the inside of the roof (covered with a layer of Clear Glaz-On)...most of this will be hidden in the finished pendant but it's nice for some brightness and contrast.
4. I applied a layer of Cactus Green to the inside portion of the house and after it had dried I covered it with a thin layer of Glaz-On. I then sponged on a bit of Emerald City green using an Ink Blusher for a bit of depth and another layer of Glaz-On.

5. I stamped a flourish using Cloudy Sky Staz-On Midi and added a shadow line in what will be the corners when the walls and floor is bent up (also using Cloudy Sky) and another layer of Glaz-On.

6. Once the inside walls were finished I flipped the Sheet Metal ATC Blank over and proceeded to color the outside of the house. I applied a layer of St. Valentine Staz-On Midi to the roof line and applied a layer of Glaz-On. Next I added shadow using an Ink Blusher and Claret then more Glaz-On.
7. The bottom portion of the house was colored using alternate layers of Blue Hawaii, Glaz-On, sponged Midnight Blue, and Glaz-On.

8. To add a bit of faux texture I stamped the Basket Weave pattern on to the roof using Chai Tea.

9. I then used a BrushStix (you could also use a FantaStix) to create a faux wood texture with both Chai Tea and Cloudy Sky Staz-On Midis.

10. Once the final layer of Glaz-On has dried it's time to turn the ATC blank into a home! Fold up the bottom portion then fold up each side wall bending the extra little tab under the floor section for support. Notice I folded a small triangle at the upper most part of each wall. This is done to better accommodate the folded roof later on.
11. I folded about 1/3rd of the roof over to achieve the desired overhang. You might choose to fold over more or less depending on the look you are going for.
12. To fold the roof you will need to slightly bend the roof forward then into a peak. You can see how the roof "rests" on the previously bent corners of the upper portion of the side walls.

13. I wanted a more rustic look to the finished pendant so I used an Ink Blusher to apply Jet Black Staz-On to all of the bends and edges.

14. Cover the outside of the home with one final layer of Glaz-On to help protect all of the details.
15. Poke a hole in the floor of the house and in the back panel of the roof with a paper piercer or nail.
16. Spritz a bit of the Bronze irRESISTible Texture Spray on the inside of the house and set aside to dry.

17. Trim the desired collage images and ink the edges with Chai Tee. I also inked edges of the computer generated text.
18. Spread a very thin layer of the Vintage Creative Medium over the images and text to give them a rustic, vintage feel. Let dry completely.

19. I had a clear plastic gem in my stash that had a silver wire hanger. I decided to spice it up a bit and color the faux gem with Blue Hawaii and the wire with Orange Zest (which looked like copper once dry!).

20. Once the irRESISTible Texture Spray is dry it's time to turn the house into a home. I used dimensional foam tape to lift the bird next image off the back wall; glued in a bit of green moss and added the mamma bird with 3 pieces of the foam tape.

21. Insert the hanging gemstone at this point.
22. Finish off the inside by adhering the sentiment and add a paper flower for a finishing touch.
23. Add desired findings for attaching the pendant to a chain...in this case I used a bit of rusty wire, a couple beads and a lightbulb safety pin.
And you're ready to enjoy!

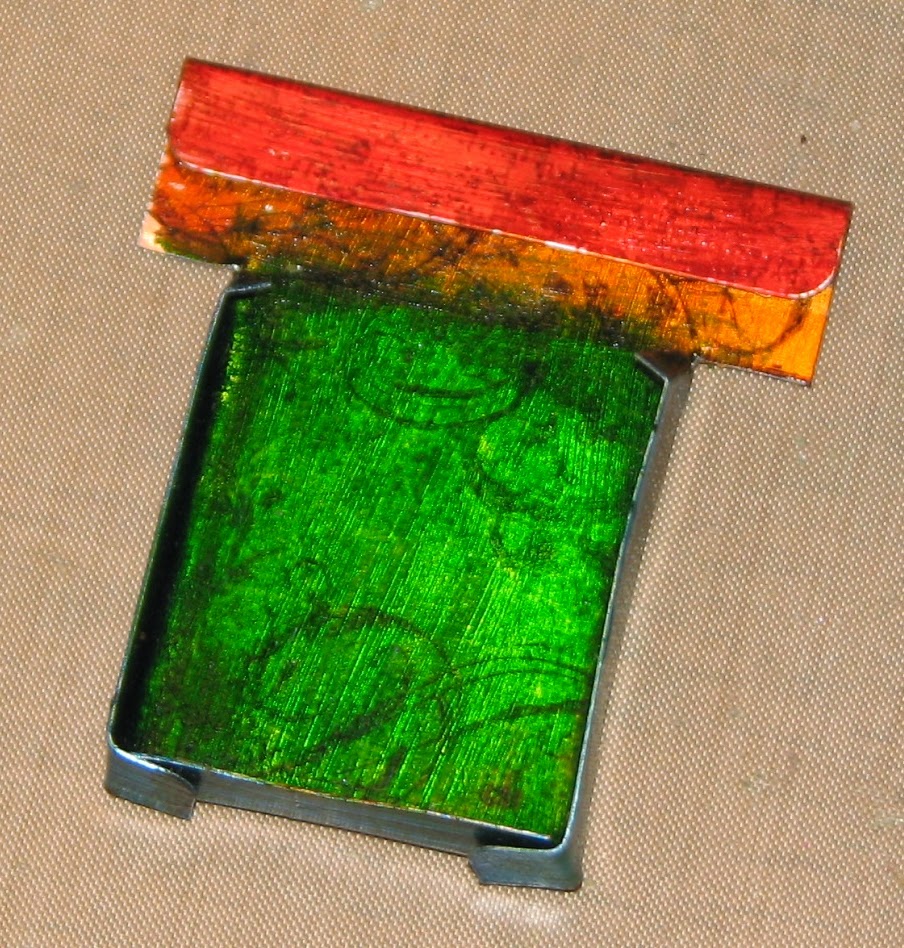
In the following photo you can catch a glimpse of how the two tone background really adds dimension to both the inside and out.


Special thanks go out to IMAGINE Crafts/Tsukineko for generously supplying me with their products.
Subscribe to:
Posts (Atom)