Thursday, May 26, 2016

Rubber Stamp Madness Magazine Winner....

And the winner is....

True Random Number Generator  8Powered by RANDOM.ORG


Congrats on the article, Roni! It is so exciting to see your work in print, isn't it? I have not made any pocket letters yet but I do plan to give it a try! I keep forgetting to search out the baseball card sleeves at the craft store... I hope they carry them! Or, fingers crossed to win your prize then I will have some to start out with! :)
.
CONGRATULATIONS Denise!!!
Please e-mail me your snail mail addy.

Wednesday, May 25, 2016

Creative License Blog Hop & GiveAway!


I am so excited to share the creation I made using the Creative License kit.  It's a very versatile kit that has a masculine feel to it which is nice when you live with a bunch of guys (Dh & 2 sons).  It's packed with some really graphic grungy prints in some great colors.  

The kit comes with a mini album project using some neat chipboard CD folders which I had planned to make until I came up with another idea....  I was inspired to make a small album specifically for the small square photos like you'd see on instagram or similar photo apps.  This album is small enough it can be carried in your purse or back pocket but holds loads of pics.

Best part is - the base is made from a 8 3/4" x 12" sheet of cardstock and it's quick and easy to make.  Of course I used lots more papers decorating the inside and out but it's not necessary...if you want just a simple quick album this is it.  (Cut instructions at the bottom.)

I left the front license plate blank because I am going to give this album away!  I wanted the recipient to be able to personalize it to their own needs/tastes.


The album is about 3" square and has a tie closure.


Untie the bow and the top flips up...


And then the bottom flips down...


and another flap flips down!
(the ruler is there to hold all the little flaps closed for now)


There are 8 pages that open - 4 to the right and 4 to the left...


Till you finally have the album completely open. There are 24 areas that you could add photos if you'd like. Lots of real estate for all sorts of memories!  I went ahead and decorated them with an assortment of papers and cut-aparts from the kit... and it's so easy to make!


Trim a piece of cardstock to 8 3/4" x 12"

Position the paper in a landscape fashion in your Scor-Pal; 
score the cardstock at the following:

2 1/2"
2 3/4"
6"
6 1/4"
9"
9 1/4"

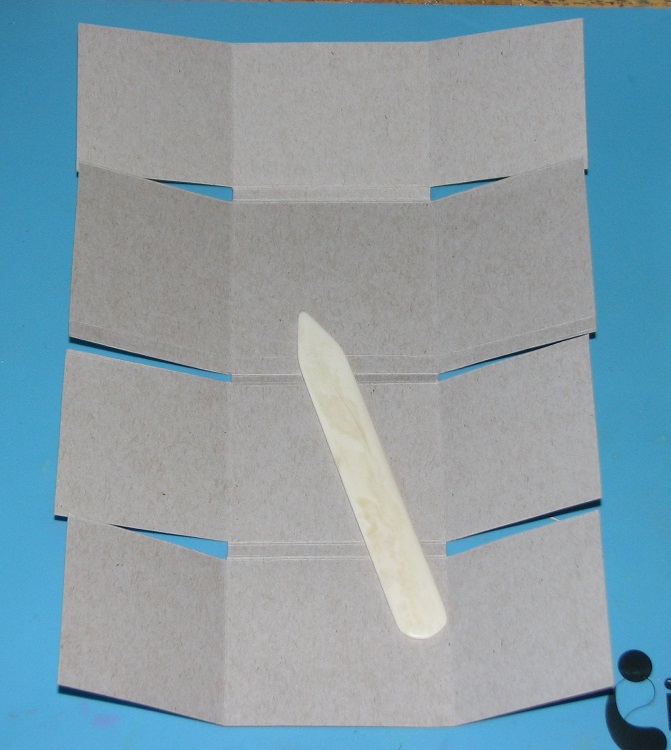
Rotate the paper so it is portrait oriented in the Scor-Pal; 
score the cardstock 2 3/4" from each edge.


Crease all of the folds.
Trim away the tiny 1/4" strips on the two outside edges as shown.
This will create the pages for each segment of the album.

All that's left to do is to decorate it to your hearts content!
(GiveAway info below)

It's time to hop on over to 


to see what she has dreamed up this month!
Remember, if you get lost along the way you can find the entire list here:


NOW for the give away....

Would you like to win my little Creative License Album???
Simple leave a comment telling us about your most memorable moment in a car....
remember - keep it clean out there - lol!!!

You have until June 6th to share your memory!

I'll share mine...it was when Dad was teaching me how to drive.  Dad had me drive over to Eric's (future DH) grandma's house.  First let me say that the car Dad bought me was a boat....well, more like a SHIP - it was a 70's Ford LTD.  It was about 3x long as it was wide.  Anyway, on with the story...  It went fine until we were going to leave...I whipped that puppy around an backed right into Eric's brand new Ford F250!  

OMG - talk about embarrassing...my first thought was damn - Dad's going to kill me - then of course instantly my next thought was oh shit! I hit Eric's new baby!!!  I thought for sure he'd get mad ~ but young love - he didn't say a word which was a relief.  It didn't do much damage other than scuff the bumper on the car so it wasn't a big deal other than scaring the crap out of me. Dad on the other hand....he didn't say a word either but trust me - that was NOT a good thing.  Needless to say it was a few days before I was allowed to get behind the wheel again ;)  LOL!!!

So there you have it, Eric still reminds me of it every so often....and it's been over 30 years.  I'm pretty sure I'm never going to live that one down.

You've heard my most memorable (and embarrassing) moment in a car - now it's your turn!  Come on...you've got one too...let's hear it!


Tuesday, May 24, 2016

Always Playing with Paper Challenge

Last night while I was messing around on the internet I stumbled upon a new challenge blog - Always Playing with Paper.  I was tickled to see what their current challenge photo was...a Farmall tractor with a masculine theme.  The guys have several so I didn't see how I could possibly pass it up!
Here is what I created for the challenge....


This is a stamp from an Unity set called Farm Fresh.  I couldn't resist it when I bought it and I knew it would be perfect for this challenge!  I did a bit of stamped paper piecing and stamped the design directly on the card, on a bit of yellow pattern paper (for the sun) and white pattern paper (for the tractor).  The white background was created with a piece of scrap paper, a sponge dauber and Memento Dandelion ink.  I just marked a center point and rotated the paper around inking off the edge as I went.  Finally, each element was then layered onto the card with a bit of green pattern paper for the ground.  Fun challenge!  I'm going to add something clever to the inside for my son's b-day.


Supplies:

ClubScrap.com - yellow cardstock
Unity Stamp Co - Farm Fresh
Imagine Crafts - Memento Ink - Dandelion, Tuxedo Black; Memento Markers; Sponge Dauber
Pattern Paper - unknown

Monday, May 23, 2016

Faux Sandpaper Patina

Each month at Club Scrap the design team hosts a technique challenge on their blog.  This month Anne Marie has challenged us to make/use a faux metal patina on paper.  Well how could I turn down a challenge like that?

The card by the way was created using Mojo Monday's sketch #449.


The panel on the right side of the card is my faux metal patina...I wish you could see and feel it in person.  The photos just don't do it justice.  The "metal" shines but then you have the grungy look and feel of the sand paper and as an added layer you have the oxidation of the copper.  Really fun stuff!

Let's make some faux sandpaper patina!

Directions:


Start off by gathering your supplies...I used DecoArt's metallic paints, "patina" paint from the Media line and Metallic Luster in a beautiful green color and a bit of sand paper of course.


1. Paint a 12x12 piece of cardstock with the copper metallic paint. - brush it this way and that...it doesn't have to be perfect, this is just our base layer of metal going down.  I also used a bit of Brown Espresso metallic paint for a bit of a dirty look to the copper.


2. Tear up and adhere the sandpaper pieces to the cardstock.  Why do we do this after we lay down our initial coat of paint?  Because sometimes it's difficult to get the metallic paint in around the creases and crevices of the sand paper so it's better to glue it down to a "metal" surface so we know that those crevices are copper and not cardstock.


3.  Dry brush a bit more copper and espresso over the cardstock and sandpaper.  Willy nilly is perfectly fine...

4. Add dabs of the "patina" paint to the metal mixture dry brushing it here and there - just a dab will do for now.  Remember it's all about layers.


5. When you're satisfied with the look of the patina paint, rub on a bit of the green Metallic Luster around the edges of the sandpaper bits until you like how your metal looks.


Here is how mine turned out....LOVE it.  I wish you could feel it.


I cut up the faux copper sheet into pieces I need for my particular project.  For an extra bit of authenticity I stamped splatter marks onto the copper sheet using StazOn Spiced Chai ink.  Really adds to the grunge factor.

And there you have it!  Faux Copper Patina metal to use on any project you have in mind!

Supplies:

ClubScrap.com - Cardstock, Stamps, Ribbon
DecoArt - Dazzling Metallics - Bright Copper, Rich Espresso; Media Antiquing Cream - Patina; Metallic Luster - Lavish Green
Imagine Crafts - StazOn Ink - Spiced Chai; Memento Dual Tip Markers (Amazing); Memento Tuxedo Black
Sandpaper

Sunday, May 22, 2016

Altered Candy Tins & Give Away!

WOO HOOO....

I rec'd the final package yesterday - today I sorted, swapped, repackaged and posted everything!  Your packages will be in the mail first thing tomorrow....o.k...whenever the mail person shows up.  But they should all be winging their way to you tomorrow afternoon!

I can't wait till they start arriving - lots of fun, unique tins!
I will post photos of all of the tins later on this week.

Now for a little fun!!

What do you think the most popular theme was?

2nd Most popular?

Any guesses????

What state(s) do you think most of the swaps went to???

Anyone is welcome to take a guess...

Later this week when I post photos I'll also draw the name of one lucky winner...
I'll send that winner a finished tin plus a couple unfinished tins so you can alter your own!

Good Luck Everyone!

Friday, May 20, 2016

Deep Red Stamps GC Winner -

As promised, the winner of the Deep Red Stamps Gift Certificate (chosen by random.org) is....

Both cards are so cute, but the chickens & the sentiment are definitely my favorite! :)

Nicie

..CONGRATULATIONS NICIE!!!!
Please send me your contact info so I can pass it along to the folks at DRS. 
(You can e-mail me at ronijj @ g mail . com (no spaces of course)

Maker'smart by Spellbinders

Have you all heard of Maker'smart by Spellbinders? I recently got an e-mail about it - I think because I subscribe to Spellbinders newsletters.  It's a newish (new to me anyway) shipment club offering either a card kit or a die-cut kit each month.  The die-cut kit is only $12.50 per month so I figured why not give it a try.  In addition to the discounted price on the dies you receive you're supposed to also get codes to give you additional discounts on past kits and a percentage off if you order directly from the Spellbinders site.  (More about these discounts later).

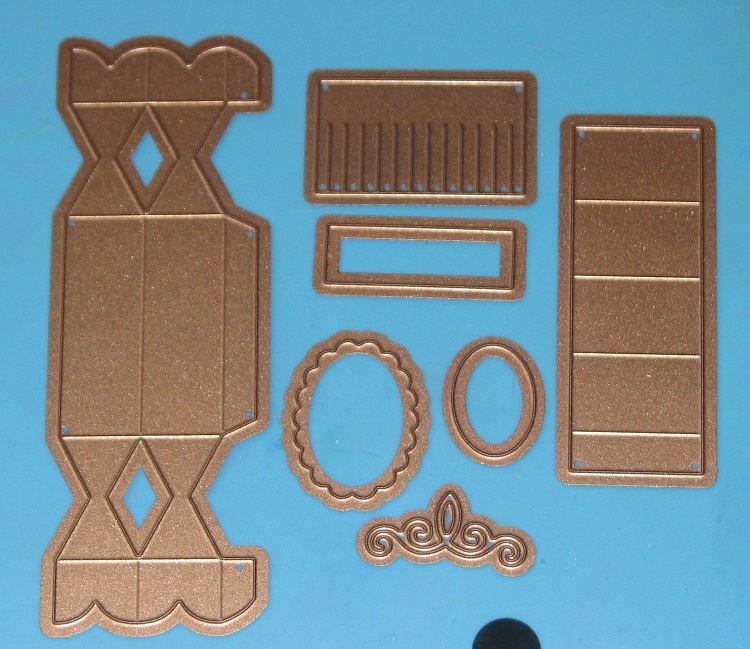
So I just got my first set of dies a few days ago and here it is....


It's a fun little set that makes a "cracker" gift box.
It's got pieces to make the box, 3 labels, a little decorative flourish, a wrap around piece
and a small piece to add fringe to the ends.


and here's what it makes...you cut 2 of the body pieces and glue them together.
It's nice because it also creases everywhere that needs to be manipulated when assembled.


And decorated!
I used the oval labels on this side along with 2 of the flourishes.


This side shows the wrap-around piece.
The diamond in the center is actual a scrap from cutting the body.
There were 2 from each piece...too cute to throw away.


And finally the rectangle label on the back.

It's darling as all get out but I'm stuck on what to put in it...it's about 2" long and 1/2" square.  I though chapstick maybe but then not sure beyond that.  Most of the charms I've made have been about 1" wide so those wouldn't fit, beyond that I'm not sure...  I did happen to think that these would make cute little ornaments for Christmas trees...done up in colorful, sparklie papers. Any other suggestions?

Discounts - 

As far as the discounts go - They give you discount codes which change each month.  I signed up on the 13th and in the intro e-mail it says that it will take a few days for your account to show up in their system.  I also got the discount codes.  So I waited a few days and went to place an order...there are so really cool older kits, put in the codes and what do you think happened?  The codes actually expired on the night I signed up?!?!?  Sooooo, I sent an e-mail to them a couple days ago - haven't heard back yet so we'll see what happens.  I didn't try the spellbinders code yet but it says it's good till the 31st.

So there you have it...I'll be sharing more as I get new kits each month.
Can't wait to see what other fun goodies they have in store.


Thursday, May 19, 2016

A Simple Succulent Birthday & A Fun Chick!

Ha...how's that for a title... made you wonder didn't it???

Well today I'm back with a couple of fun cards made using a combination of Deep Red Stamps and Xyron adhesives and a reminder to post your comments to be entered into the giveaway for the $25.00 Gift Certificate to Deep Red Stamps!


My first card is a pretty little watercolor card made using this fun Potted Plants trio.  I started off by watercoloring a bit of green, yellow and blue on a piece of watercolor paper.  Once dry I flicked a bit more blue and a touch of gold watercolor paint over the panel.  That panel was mounted onto a green card base using the Xyron Tape Runner.  

I then stamped and watercolored the plants; trimmed the image and mounted it onto a green mat the the card using the Tape Runner.  I stamped the sentiment in the corner for the finishing touch.


I made this card with my Mom in mind...which is why I colored the end chicken purple.  The sentiment explains it all.   

I started off by stamping the grey blue card base with the chicken wire stamp.  I then stamped and colored the hen trio on a scrap of cream cardstock.  The hens and frame were both die-cut using a stitched die and adhered to the card base using the Tape Runner.   I finished off the card by stamping the amusing sentiment.

Deep Red Stamps GiveAway!!!

Be sure to post your comments to be entered into the Deep Red Stamps GiveAway!  You just might be the lucky reader to win a  $25.00 Gift Certificate to the Deep Red Stamps site!!  I will draw one lucky winners name from all of the comments on both Tuesday and today's post and announce it on Friday!!

Good Luck Friends!! 

Supplies:

Deep Red Stamps - Potted Plants, Hens, Chicken Wire
Club Scrap -  Cardstock, Sentiment Stamps
Imagine Crafts - Memento Tuxedo Black, Delicata - Black Shimmer
Prima - Watercolor Confections
Misc. Colored Pencils

Wednesday, May 18, 2016

Altered Candy Tin Swap Update

Hello swappers...  I'm still waiting on one package to show up... as soon as it arrives I hope to sort and resend but our help (at our business) is on vacation the rest of this week so I will be working the rest of the week.   Not sure how much free time I will have but I will keep you updated on when everything gets swapped out. 

For now here are a couple photos of a little visitor we had to our yard last evening...


A baby bunny!  So darn cute!


A Little Girly Girl!

Yes, today I am gettin' a little girly girl which I don't often do but this month's challenge over at Just For Fun Stamps blog is just that - Let's Hear it for the Girls!  So I decided to have a bit of dress up fun with a fun design technique I like to use an a bit of doodling fun.


The first two cards are a variation on each other with just a simple color and sentiment change.  This is such a fun way to make loads of cards in a short amount of time.  You can even personalize the dresses/color choices for the person(people) you have in mind.  I often use this design technique to create a box full of cards as gifts to have on hand "just in case".  You never know when you'll need a gift in a hurry.


I had a bit of fun with my doodling on this card. I worked the word "friends" into the doodling on the upper right side of the card.  This is a nifty little idea that can be incorporated on so many different  style cards.  It can be used on a clean and simple design with just a bit of doodling around the edges or you could go all out and doodle words into a mixed media card just about anywhere you please. 

These dresses are so much fun to stamp on pattern paper, I love using them with different lines of paper - the finished cards look beautiful together and there is no guessing involved.  It's also a great way to use up some of the older pieces of pattern paper you have in your stash!  

I hope you've enjoyed these cards and little techniques as much as  I enjoyed making them for you!  

If you have a bit of time please feel free to enter a card over on the 

You don't have to use a JFF stamp to enter your creation...just stick to the theme and you're golden!  You might just be the lucky random winner of the JFF Gift Certificate!