Saturday, April 7, 2018

Pretty as a Picture Challenge

Lost Coast Designs and Carmen's Veranda's second challenge for the month is Pretty as a Picture (see the inspiration photo at the bottom)!  I decided to play along and this is what I created...


I was inspired initially by the birds nest but then as I looked at it again I was also struck by the colors...vintage barn red, the blue from the eggs and the stark white of the freshly painted trim.  How could I resist.

I started off by cutting a piece of cardstock 4.25 x 5.5" and ran it through a wood grain embossing folder.  I colored the panel using 3 different Nuance reds plus a bit of grey/black.  I then swiped a white ink pad over the raised areas and immediately smudged it around just to give it a weathered feel. I sponged Acorn and Fallen Leaves VersaFine Clair ink around the edges.

I stamped one of birds from the Three Birds stamp set on white cardstock using Paradise blue VFC which was then fussy cut.  I twisted twine into a loopy birds next and stapled it onto the panel. Finally I die-cut a few branches which were sponged with brown ink added them to the card and finished it off with a few white flowers.

My rendition of Pretty as a Picture!


Supplies:
Lost Coast Designs - Three Birds
Imagine - VersaFine Clair - Paradise, Acorn, Fallen Leaves; irRESISTible Pico Embellisher - Electric Blue; Memento Luxe - White; Sponge Dauber
Nuance Pigment Powders
Sizzix Die/Embossing Folder


Friday, April 6, 2018

Take It Challenge Rollagraph #1

Happy Friday! 
It's been quite a week here...
hope yours has been great!  

Today I wanted to share a fun new challenge that I thought I'd bring back. Quite a few years ago I held a challenge where I sent out the same materials to several people and they created a card or other project with the materials and shared the image with me.  I then shared all of the projects on one post showing what everyone came up with.  

Well recently I was able to purchase NOS Rollagraph stamps and there were a few wheels that had several duplicates. I am going to sell some of the dups on my Etsy store but I thought I'd share  some with you as well!


NOTE: I have the 7 participants for this round of Take It Challenge! Thanks to all who volunteered, if you haven't already send me your snail mail addy please do so and I'll get your stamps out to you.  If you didn't get in this round, no worries...I will have another soon!

So here's what I'm going to do...I'm going to send out the Flagstone Rollagraph stamp out to 7 people. Once rec'd you will create a project incorporating the stamp into your design, send me a photo of the finished design within 2 weeks then I will post all of your creations along with one of my own all together to reveal the results.  

So who's up for a challenge?  You'll have approx. 2.5 weeks to complete your project (I'll give you the exact date once the stamps have been sent.).  You don't have to pay anything, I'm going to cover the cost of the rubber stamp and postage myself. I'll take the first 7 people who are interested.  Please either post here or e-mail me at ronijj @ gmail . com (no spaces of course).  I will need your snail mail addy as well so I can send out your stamp to you.

If all goes well we will have another Take It Challenge in May and possibly beyond :)

Take It Challenge - Rollagraph #1 Participants:

1. Ionabunny

2. SusanK

3. Erin

4. Tonya

5. Cindy 

6. Theresa

7. SusanP

As you will notice in the photo above the stamp has been removed from the wheel.  If you prefer to have your stamp sent on the wheel, plmk.  IMO it's cheaper to send and easier to store off the wheel.  In fact, I have removed all of my rollagraph stamps from the wheels and store them in a single box...


This is one 8.5 x 11 x 2" box! It has approx. 75 stamps so far and can hold loads more.  
FAR less room than trying to store all of the stamp wheels. 


And here is how I keep track of what I have...they are arranged by theme.  I mark the stamp name and number on the back of the rubber and they are stored in sequential order so I can look for my design in the book and locate it quickly and easily in the box.  If I have a wheel that doesn't have a number on it I assign one randomly.


Thursday, April 5, 2018

Spring Flowers Challenge

Hello Friends!

I hope you're having a good day today. 
I wanted to share the new April challenge over on 

I wanted to share a few...o.k. several flower cards with you...


Hope you stop by and give it a try!

Supplies:

Just For Fun Rubber Stamps - all images n sentiments
Imagine - Memento Dye Inks, Memento Dual Tip Markers, VersaMark, Clear Embossing Powder, On Point Glue, irREISTible Pico Embellisher, Sponge Daubers
Kuretake Watercolor Paints 
Niji Watercolor Brush

Wednesday, April 4, 2018

New Card Sketch

Inky salutations my artsy friends! I hope you're all fairing well today. I had a rude awakening this morning...snow!  I know many of you have been dealing with the resurgence of winter this Spring but up till now we had been spared.  Unfortunately we woke up to the white stuff today....my dog was not happy about it either - he refused to go out ;)  LOL!!  I think he's had enough of winter like the rest of us.

Today I have a new card sketch to share with you that I made for the Club Scrap Card Challenge for April.  


And here it is...


And this is what I created!  It was made using supplies from the Daffodils kit (03/18), paper flowers from Prima and VersaFine Clair inks.  The splatter background is actually a stamp from the kit that I stamped all over with yellow then went back and stamped the orange in a few locations (so it didn't over power the yellow). I didn't notice it at the time but the orange strip (which is a cut-a-part border) is almost a mirror image of the flower I stamped on the tag!  Looks like I planned it that way but it happened purely by accident.

I hope it inspires you to get inky and you go ahead and give it a try!

Tuesday, April 3, 2018

Rainbow Pinwheel Wreath!


Check out my new wreath I made to welcome in Spring/Summer!
It was made from white cardstock, stamps from Rubber Stamp Tapestry and VersaMagic Inks!!

Complete instructions and supply list can be found here:


Saturday, March 31, 2018

Big Hugs

Getting a jump start on a Mother's Day card for Mom today...


This month's color at Imagine was Ultraviolet...I knew it would be a perfect pairing with this marble stamp from MFT. It looks great on this Mother's Day card I made for mom.  She loves purple and I hope she'll like this.


I tried to show the sparkle of the embossing powder in this photo....it looks amazing in person.

For the complete supply list and tutorial please see:


Friday, March 30, 2018

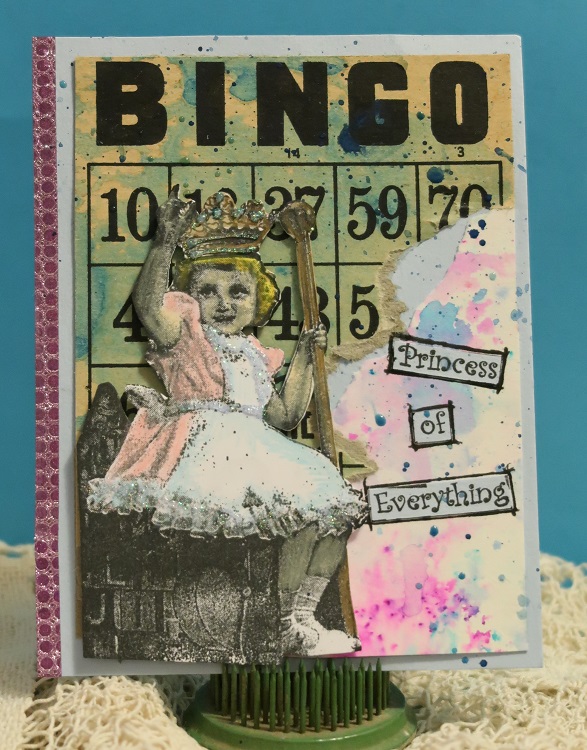
Princess of Everything!

Just playin' around with one of my stamps I haven't used in a while...Princess of Everything!  Isn't she great? 


The card is assembled using an old bingo card that I swished around some watercolor paint, the white piece in the lower right corner was made by sprinkling on a bit of Nuance powdered pigments on watercolor.   After I stuck them down to the card I flicked on a bit of blue watercolor paint.  

The little princess was stamped with VersaFine Clair Nocturne ink and then colored with Prismacolor colored pencils.   I fussy cut her then pop dotted her onto the card.  The sentiment which is actually below the image when stamped was cut, glued then outlined.

I added the sparklie washi tape to the side just for an extra bit of bling.  You can't see it in this photo very well but her pinafore has a bit of micro fine glitter along the edges as well.

This card fits into the challenge over on Lost Coast Portal to Creativity's challenge: Say What??


Supplies:

Lost Coast Designs - Princess of Everything
Imagine - VersaFine Clair - Nocturne; On Point Glue; Tear It Tape
Nuance Pigment Powders
Prima - Watercolor Paints
Prismacolor Colored Pencils
Washi Tape 
Vintage Bingo Card

Tuesday, March 27, 2018

Painting Negative Space

Oh my...recently I saw a really cool video from The Pigeon Letters - Peggy Dean where she painted the negative space instead of an image.  It was very inspiring and despite never having tried it before I wanted to give it a shot.  It's way harder that I thought it would be.  I made 2 so far and I like the first one the best (orange). 


I did far better on my first attempt because I actually drew out what I wanted it to look like on paper before I began.  The pink version was just painting stuff...no real plan to go by.  I often have a war  going on between the left brain/ right brain. One side of my brain is very organized and I like to have structure - a plan - a guide if you will but then the art side wants to be free and just do whatever. It makes it difficult to actually produce what I see in my head.  This is one exercise I need to continue with so I can mesh both into one.


I started off with the yellow...


And added the pink. 


You can see some of my ideas didn't quite work out...the upper R flower was supposed to be spikey but my brush was way too wet, I ran the flower in the upper L a little too close to the edge so I had to smoosh it up a bit.  I do however like how my tulip and a couple of the leaves turned out.

Now see how a pro does it....


Thursday, March 22, 2018

Stampin' Trees

Hello Friends!  I hope you're all doing well today.  I know many of you have been battling a late winter snow storm - I hope you're all safe and snug wherever you are.

Today I wanted to share a couple of cards I made today using the UM stamp set - Trees from Rubber Stamps Tapestry.


The first card was made for my sweetie...  I stamped the bare tree using VersaFine Clair Pinecone.  I then used a peg stamp that is called "Heart Dust" (isn't that darling?) to stamp the VersaFine Clair ink colors Glamorous (deep pink), Tulip Red and Charming Pink (bright pink)  VersaFine Clair.  You won't believe what I used for the grass...a Pineapple Top! It worked like a charm :)


This is a more traditional spring tree filled with lovely flowers and a sprinkling of flowers beneath as well.  A picture I'm sure we're all ready for!  The background for this card was stamped with a tri-flower stamp using VersaMark ink.

Supplies:

Rubber Stamp Tapestry - Trees UM set; Heart Dust, Pineapple Top, Oak Leaf, Flowers Three Ripply, Cherry Blossoms
Imagine - VersaFine Clair - Pinecone, Acorn, Tulip Red, Glamorous, Charming Pink, Verdant, Green Oasis, Golden Meadow, Blue Belle; VersaMark
Club Scrap - cardstock
Altenew - Painted Greetings
MFT - Stitched Dies