Tuesday, June 14, 2016

Faux Calico Fabric Stamping Technique

Hey everyone!  I hope you're all having a super inky week.  If not, maybe you can find a few minutes to stamp an image or two just to tide you over till you can really get inky.

Today I wanted to share a really fun idea I've had rolling around for a while now - Faux Calico Fabric!  If you can't tell I'm a child of the 70's...calico was everywhere back then and I loved it!  I have 2 favorite calico memories...the first is a doll that was popular back then - Holly Hobby.  She had a pretty little calico dress in blues that I just loved.  Had a small doll and a lunch pail with her on it. Still have the doll somewhere...not so sure about the lunch box.

The second memory is about a dress I had.  The town we lived in was having a huge 1976 celebration which I believe coincided with our fair.  Part of the fun was people dressing up in  "old tyme" cloths.  Mom made her and I matching dresses in red calico.  Loved it!  My dad even entered the old tyme moustache contest and had one of those white hats with red/white/blue hat band.  Lots of fun!

So on to the technique....

Faux Calico Fabric Stamping


So, these were what sparked the idea...they are mini stamp sets from Rubber Stamp Tapestry.  They have several stamps in each set that are meant to be stamped repeatedly to make a frame or image.  I thought it would be fun to turn them into faux fabric.


The set I'm using today - Summer Floral -  has 5 images shown above.


I am also going to be using a couple stencils from ClubScrap.com and of course my Memento Inks from Imagine Crafts.


I started off by taping off the design I wanted to use...


and chose my inks.  I am using 3 colors of pink/red for the flowers; a fun purple for the berries and a trio of green for the foliage.


I started off by stamping the largest flower with the darkest red - Rhubarb Stalk.
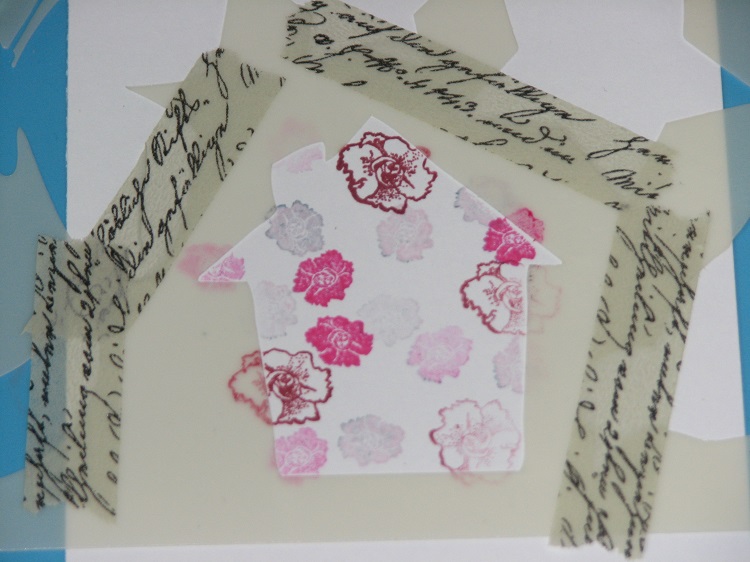

I then stamped the smaller flower using Rose Bud and Angel Pink - which ended up more purple because I hadn't cleaned off the residual black ink from a previous stamping.


Next the leaves - Bamboo Stalk, Pear Tart and Olive Grove.


Finally I added the Berries using Lilac Posies.


I used a sponge dauber and Rich Cocoa around the edges of the stencil to really set the design off.


And here's how it turned out! 


Next I made a bird using the same technique using blues and the same set of green inks.


Added the leaves & berries...


And a touch of Grey Flannel around the edges... 


And there you go!

Supplies:

Imagine Crafts - Memento Dye Inks; Sponge Dauber
Club Scrap.com - Stencils

Monday, June 13, 2016

MISTI - Got mine...

O.k..after much mental debate late last week I decided to order a MISTI Stamping tool by My Sweet Petunia.  Not sure if you've heard of it or not but the original tool has been around for a couple years now.  The original MISTI (6.5 x 8.5" stamping area) had a few problems after it was first released (cracking at the hinges mostly) and had a price tag of around $60-70.00* - Now they are $60.00*.  Too rich for my frugal (read cheap) self.  

NOTE: this may sound like a commercial but it's not...I'm not being paid or compensated in any way to talk about this...  It's just a new toy that I'm excited about ;)  LOL!!

MISTI

So they got their problems taken care of and wow, lots of people started getting them dispite the price.  I think 9 months to a year ago they came out with a Mini MISTI (4.75 x 6" stamping area) - $45.00*  and they now have a Scrapbook MISTI (12.25 x 12.25" stamping area) - $100.00*.   

*NOTE - These prices are the My Sweet Petunia prices - some on-line stores and/or auctions are charging LOTS more so be sure to price around.

Still a bit pricy for me so I held off until last week.  I got an e-mail from Scrapbook.com that they were offering a $10.00 off coupon on their MISTI priced at $47.99.  Of course that's what it took to push my cheap self over the line and I bought it.  Woo Hoo...  

So I rec'd it and love it!  It arrived a couple days into my big card sample stamping week and I can't tell you how much paper it saved me.  Up until then if I got a bad image I had to start over.  It didn't happen that much but when it did it was very frustrating.  WELL....  I didn't waste anymore paper after I started stamping with the MISTI!  I don't have too much trouble on plain white cardstock but stamping on watercolor, mixed media or colored (textured) cardstock is a pain.  The watercolor and mixed media paper has a different texture and is very absorbent - it really sucks up ink and leaves you with a weak image many times no matter how well you inked the stamp.  Of course textured cardstock poses it's own issues depending on the texture in the paper.


So this is what it looks like out of the package....you get the stamping "folder", a few pieces of grid paper, foam pad and a couple of very powerful magnets.  It's designed to be used with cling mounted stamps but with help from the foam pad you can use acrylic stamps and I've found you can also use it with unmounted stamps as well!


So with acrylic and UM you use the foam sheet and I also covered the foam pad with one of the pieces of grid paper just to keep the foam clean.  The foam pad drops right into the MISTI and stays put - nothing else needed to keep it secure and in place.

Since I UM all of my stamps I'm going to just leave the foam in from here on out.


Here it is ready to stamp.


So, let's try stamping a piece of watercolor paper with one of my new stamps from Club Scraps - Boardwalk kit.  It is UM with a coating of Aleene's Tack it Over and Over on the back.  


Position it, let the lid come down and pick it up.


When you raise the lid the stamp is held just where you needed it.


Ink up the stamp, close the lid and stamp the image.  You will notice it's a bit light as the watercolor paper absorbs the ink.


So, you simply open the lid, ink it up and restamp until you get a really great image.  

TIP: You will notice in this photo I have an embossing folder under the clear door.  The door doesn't lay completely flat when it's open so when you go to ink up the stamp is puts a bit of stress on the hinges.  I don't want to break it so I figured out that if you slide an embossing folder under the door it holds the acrylic piece completely flat so you can ink up the stamp without fear of damaging the hinges.  


And here's my lovely dark image on watercolor paper!  It took 3 times to get the entire image deep rich black lines but hey, it's worth it - I didn't have to throw away a piece of costly watercolor paper.

Now I must warn you that depending on how long ago you applied the Aleene's Tack it Over and Over to the back of your stamp some of it may stick to the door.  No worries, it came right off as did the excess ink that I got on the door when inking the stamp up.  My Sweet Petunia does sell special cleaners and such (which I don't have yet) to help keep your MISTI looking new.

I would say that if you have an extra $45.00 laying around (for the MINI) it's well worth it.  It's even better if you get it on sale.  I'm still skeptical about paying the $60.00 or 100.00 for the other two but since I mostly just make cards the mini works for me.

So there you go...my honest unbiased opinion about the MISTI.  Hope that answers some questions that several of you have asked over the past few months.


Friday, June 10, 2016

Turn Any Stamp into a Silhouette Image

As you know this week at Imagine Crafts they are celebrating weddings since the season is in full swing.  Today was my turn to share a fun technique using the VersaMarker to turn my swan stamps into silhouette images!


Here is the "Congratulations" wedding card I made using the technique.

If you'd like to take a peek at how this card was created, please stop by...


I'm sure you've been wondering where I've been the last several days....  Every year Just For Fun Rubber Stamps hosts a large stamping convention down in FL - in addition they usually release all of their new stamps at the same time.   Due to some unforeseen circumstances they didn't get the stamps until Monday...which I rec'd on Tuesday.  The only hitch is that they need the card examples by next Friday which wouldn't be so bad but I'm going out of town on Wednesday so I have exactly one week to make as many samples as possible.    

I've been stamping, coloring and creating cards as fast as I can....  I've got about 60 cards done  (in 3 days) and I've got probably another 20-40 more to go depending on if my steam holds out....it's dwindling quickly though...after about the first 40 fresh card design ideas are becoming harder and harder to come by.  Oh well, at least there is sunshine at the end of the rainbow...just a few more to go and I'll be all set ~ at least that's what I keep telling myself - LOL!!

Wednesday, June 8, 2016

Selective Embossing Technique

This week over on the Imagine Crafts blog is Wedding Week!  Since I recently finished the invitations for my son's wedding in August I thought it would be fun to re-create it with a bit of a different look with the help of the VersaMarker, Delicata Black Shimmer, White Shimmer and Silver inks and the Selective Embossing Technique!

And here's how it turned out.....


To see just how I made this invitation and it's components 
please stop by the Imagine Crafts blog here - 


Inside the first flap


Main invite & pocket holding the rest of the info.


Invitation


Extra bits pocket...


RSVP Postcard


The whole deal....
Can you tell I'm excited and ready for August to get here?

Have a lovely day friends!

Supplies:

Imagine Crafts - Delicata, VersaMark Ink Pad, VersaMarker, Embossing Powder
Club Scrap.com - Rubber Stamps
Cardstock - Bazzill.com
Glitter Cardstock - American Crafts
Vellum - Unknown


Monday, June 6, 2016

Gelli Plate Minis

Today I had some more fun with my mini gelli plates - this time the hexagon.  These should be called fun size just like the mini candy bars.


So I needed some tags for a few gifts I have to send off and I thought it would be fun to decorate them using the gelli plate.  Now, I don't know about you but digging the big plate out can be a drag - you have to clean off your area and make room to get messy in a big way.  These mini's are so much easier to create with...mini plate, mini mess - LOL!!


So I pulled out a few tags and some deli paper (more on this later), stencils, paint, brayer, my hot glue impression plates and the mini gelli which I stuck to one of my stamping blocks.


I wanted these tags to be very bright so I used my Dylusions Paints.   Spread a bit on the plate and smooth out with my brayer.


I started off using one of my hot glue impression plates....this one is a random squiggle which I love.  I think it's going to become one of my fav's.


Stamped it on my tag but you can see there was quite a bit of paint left so I also stamped it off on some deli paper....  


I like to use deli paper to stamp off excess paint because it makes great prints for use on mixed media pieces...it's fairly translucent so it really adds quite an interesting aspect to any project.


I went ahead and covered the tags I needed and more deli paper.


Then it's time to experiment and have fun by adding layers.
You can do so by printing like you do with the large plates
 

Or you can cover your project with the stencil and use the mini GP like a stamp!  Either way works great.


And don't forget about masks....it works as both a positive and a negative as shown above.


And here are a couple of the finished tags for use now....


and some deli paper to play with later!

Thursday, June 2, 2016

Hot Glue Texture Plates for Gelli Plate Printing


So, I've got all these wonderful mini gelli arts plates that I have yet to do anything with.  I've had them since they came out but alas...far too many irons the the fire and so not enough time to do it all.
Well, I decided that I needed to play with them.  But first I wanted to make some new texture plates.


I pulled out my hot glue gun and some heavy duty chipboard....not the good stuff mind you, I keep chipboard from product boxes, game board boxes and other packaging and use it for projects like this.


Now that I have a base for my texture plate, I pull out my hot glue gun and just start doodling.  You don't have to be all neat and tidy...that's what stencils are for.  These are more artsy and random designs.  Draw whatever your heart desires!


These are a few of the texture plates I came up with...as you can see I forgot to take pics before "testing" them out - LOL!!  Some of my test prints are below....I wasn't taking lots of time lining things up or anything, just testing layers and patterns out.  Playing pretty much....


So next, deli tray texture plates!  
On to those tomorrow.

Wednesday, June 1, 2016

Rock On!

Happy June!!  

Can you believe that it's JUNE already???  I sure can't - don't know where the year has gone, it's just flyin' by! Well, since it's the first that means a new challenge over on the Just For Fun Rubber Stamps blog and this month the theme is 1950's Flashback!  Fast cars, diners, music, poodle skirts, sock hops and more....   Here are a couple fun cards to get you going.


My first card was made by stamping the Atom image over the pattern paper as well as "Daddy-O".  I outlined the daddy-o with black marker.  I stamped the Drive In sign on white cardstock and colored it using Memento Dual Tip Markers.  It was fussy cut; the birthday sentiment stamped and finally I added glitter to the arrow.  You can't tell in the photo but the sign was attached to the card using double stick foam tape to give it a bit of dimension.


For this card I used Black Shimmer Delicata ink to stamp the Record Background onto teal paper.  I stamped the Jukebox on white cardstock and colored again with Memento Dual Tip markers.  It was fussy cut and mounted on the card.  Inside the sentiment is "Rock Around the Clock".  

Be sure to check out the JFF Blog to see the other fun creations and to enter your project for your chance to win a Gift Certificate to Just For Fun Rubber Stamps!