Friday, December 11, 2015

Sea Salt Caramel Day!

Each year for the past 5-6 years I've made sea salt caramels around Christmas time.  They are so tasty and everyone loves them.  Usually they don't last long which is why I make 2 batches just in case.  Well today was sea salt caramel day!


I found the basic microwave recipe on-line several years ago but made a few tweaks to it which made it almost fool-proof.

Ingredients -

1 cup butter
1 cup brown sugar
1 cup sugar
1 cup corn syrup
1 can sweetened condensed milk
Sea Salt

Wax Paper (for wrapping up the caramels)

In a large glass bowl melt the butter (approx. a minute or two).  To the butter mix in brown sugar, sugar and corn syrup.  Mix until blended well.  Pour in the can of sweetened condensed milk and again stir until mixed well.  I usually mix until I can't see any streaks of the s. c. milk.  

Place your bowl in the microwave and nuke it for 8 minutes on high.

Carefully take the bowl out of the microwave and thoroughly stir.

Return to the microwave for an additional 5 minutes on high.

Remove the bowl from the microwave and stir well; immediately pour into a pan lined with parchment paper coated with butter.  

OPTIONAL - Sprinkle sea salt over the pan of caramel.  Use as little or as much as you like.

Let cool - I usually place it on a hot pad for 5-10 minutes then put it in the fridge for an additional 15-30 minutes (time really depends on the weather, humidity, fridge temp).  It should be fairly cool - still pliable and definitely not hard.

While the caramels are cooling I usually cut the wax paper into pieces.  Now nobody tells you about HOW to wrap the caramels and let me tell you the first year I did this they looked like a mess....  Caramels were coming unwrapped, sticking to everything - it was just awful but they were tasty - LOL!  

So here's what I do - Pull off 5-6 sheets of waxed paper approx. 24" long.  Now you have a stack of wax paper in front of you in a landscape orientation - starting at the bottom edge (nearest you) cut the stack into 6" strips. You should now have 6 piles of wax paper - turn the wax paper so it is again in a landscape orientation - cut into thirds.  Repeat with each stack of wax paper.  This will give you a good supply of wrappers.  It's a pain in the rump to have to stop mid-way to cut additional wrappers - trust me...been there done that!


Now comes the fun part (not!) - cutting and wrapping up each caramel!


I cut the caramel with a pair of kitchen scissors rubbed with butter.    Slice off a "log" of caramel - I usually try for about 1" wide log (more on that later).  Just start with one log - it's easier to work with smaller quantities at a time.  

When I first started making caramels I used to try to cut them all at once and by the time I had wrapped about 10 caramels the rest of the caramel had oozed back together making one heck of a mess.  Working with one log of caramel at a time solved that issue.


Then cut the log into individual pieces...as you can see - it's not an exact science.   Since the caramel is still pliable you can "fix" the misshapen ones by gently forming.  If they are really messed up - go ahead and eat the mistakes - after all you wouldn't want to serve your guests inferior caramels would you?


How do I wrap them?  Like this... 
Place a caramel in the center of the wax paper wrapper.


Fold up the bottom portion


fold over the top portion


Take hold of the very end of one side, pinch and twist -
this twisting action will naturally draw the paper in towards the candy.


Flip it over and again pinch the ends of the wax paper and twist.
You now have your first lovely piece of Sea Salt Caramel.

Reward yourself with a piece of caramel...just not the one you wrapped - LOL!!

Now you'll want to repeat these steps for each piece of caramel.  Remember up top when you're cutting up the caramels how I said to cut the logs into 1" wide strips - well the more you wrap and the longer you go you begin to feel like you're Lucy working at the chocolate factory (click if you want to see the clip)  By the end of my 2nd batch of caramel the pieces start getting pretty large.

If you like caramels you really should give them a try -
they are wonderful! 

Thursday, December 10, 2015

Watercolor StazOn Studio Glaze

Today I wanted to share a couple of fun watercolor techniques using StazOn Studio Glaze.  A couple of weeks ago I had a bit of free time over the weekend so I decided to play around with watercolor techniques.  Not often I get to do that now so I just wanted to experiment and have fun.   I decided to see what the Studio Glaze would look like on watercolor papers and here's what I did...


This was the first background I made - the colors are much more blended and have a "freer" feel to it.


1. Begin by wetting the entire piece of watercolor paper.


2. Squirt the desired colors of StazOn Studio Glaze onto the craft mat.  

3. I began by picking up the Bahama Blue glaze with my wet brush and coloring the upper two thirds of the piece of cardstock.  (love this color!)


4. Next I added a bit of water to the Gothic Purple Glaze and dabbed it just on the upper edge of the paper - see all the water puddles - more on this in a bit.

5. I then added water to the Silver Glaze and applied it to the bottom third that was left bare.

6. I then tilted and tapped the paper here and there while drying the paper with a heat tool to create the "drip" consistency I wanted.

7. Once it was all dry I added a bit of water to a small puddle of Midnight Blue glaze and "flicked" it over the entire panel.


This technique is more controlled and concentrated color wise as well.  The colors aren't nearly as blended or "watercolor-y" as the previous technique but still pretty in it's own way.


1. Again, wet the entire panel with water.

2. Squirt the glazes directly onto the wet watercolor paper as shown.


3. Gently blend the glazes with the tip of your brush (I like using my 1" wide brush for this) in water on the paper - try not to "mix it up" too much.  You're just going for a wet look - not watercolor.

4. Leave the paper laying on the craft mat, use the heat tool to "push" the color puddles around creating a lovely design.  You'll notice that there are bits of really intense colors.  This is where the glazes didn't completely break up in the water which is great because this helps with the intense colors.


Here is a photo of both techniques side by side -   the one on the left is the blended watercolor look of the first technique while the one on the right is more of a controlled quadrant color experiment.

Both panels were then embossed with snowflakes; adhered to a card base and a sentiment stamped along the bottom.

Which do you prefer?

I like them both for different reasons and waver between which one I like best.  
I suppose it depends on my mood of the day - LOL!!


Supplies:

IMAGINE Crafts - StazOn Studio Glaze; VersaMark Ink, White Embossing Powder, Memento Tuxedo Black Ink
Watercolor Paper
CTMH - Snowflake Stamps
JFF Stamps - Sentiments
Cardstock - Club Scrap

Wednesday, December 9, 2015

Sea Shell Shadow Box

Do you procrastinate on craft/art projects?  I have to admit I do.  If I'm just not feelin' something I just can't seem to get into the mood to do what needs done.  That was the case with some shells my son and future DIL had collected.  Each summer since they have been going together they would go to a local park and walk along the shore of the lake and collect little shells which they kept in a mason jar.

When ds moved out in July he gave me the jar and asked me to do something artsy with them. They have been sitting on my desk ever since mocking me....I just didn't know what to do with them.  Yes, there were some easy routes which would have been quick like simply decorating the jar or gluing them to a frame but I wanted something more - something they could have and continue to add shells to.

Last month when I was organizing my stash I found some cool shadow boxes and decided it was the perfect vehicle for storing and displaying the shells and giving them the opportunity to add to their collection!


1, Start off by removing all of the "guts" of the previous shadow box display.  I was so excited I forgot to take photos of the before but this is what it looked like afterwards.  I also removed the front frame which held in the glass.  This was simply as it was held on with 2 tiny screws.

At this point you could paint the inside of the box and/or the frame but I liked the shabby distressed look which was accidental - it had a rough life prior to my finding it but I liked the look so I went with it.


2. Stamp desired image with VersaMark ink, sprinkle with embossing powder and heat to melt.


3. Since I wanted to create a lake in the foreground I had to add a lake shore area so I just took my VersaMark pen and beefed up the shore line along the bottom of the tree line, sprinkled on some black embossing powder and heated to melt that area.


4. Next time to play with a bit of Brusho Colour Crystals!  I wanted it to be a night time scene so I used a Ost. Blue, Prussian Blue and Purple.  


5. Once it had dried I glued that to the back of the shadow box.


6. I then stamped and embossed a couple kissing in a boat on a piece of acetate.  When it had cooled I cut around the upper portion of the image leaving the base in tact to use that as a stand for the image.  I filled the back half of the shadow box with some of the shells the used them as a prop to hold up the image while the glue dried.


When it was all dry I added the rest of the shells and replaced the glass & frame front!  
To add more shells all they have to do is remove the frame/glass.

It's very satisfying to cross a project like that off my ToDo list.

What projects have you been putting off?


Supplies:

Shadow Box
IMAGINE Crafts featuring Tsukineko: VersaMark Ink Pad, VersaMark Pen, Black Embossing Powder
Brusho Colour Crystals
Just For Fun Rubber Stamps - Tree Line, Kissing Boaters
Acetate
Shells

Tuesday, December 8, 2015

Choosing the tree....

Continuing with holiday traditions one of the big things at our house is the choosing of the tree! I'm sure dh would prefer that we choose a pre-cut tree at a lot somewhere but I like to go the a local tree farm and choose/cut a fresh tree.  I think it's so much fun to walk the farm and choose one of our very own...dh not so much but he's a good sport and follows along after me - then usually back to the first one we saw - LOL!! 

This card was made to honor that tradition!


While we don't have an old car to strap our tree the excitement and love behind it is the same.   This entire card was made in a single layer - how? - lots and lots of masking.  I had so much fun making it, I hope you stop on over to the IMAGINE Crafts site to check it out - Oh Tannenbaum.  You'll find a complete list of stamps, supplies, directions and step by step photos.

Do you decorate a tree each year?
Real or Fake?
When do you put your tree up?

This year we thought we were going to have a real one but we are starting a new venture with our business so we've been so busy buying machines, learning the new process, and trying to keep up with everything we just haven't had time to go and get one.  I think I'll be putting up our little fake tree this coming weekend just so we have something up.

One year at mom's we put up and decorated 8-10 trees - there were large ones, small ones and every size in between.  All of them were decorated with different themes.  It was so much fun but LOTS of work.  I think she had like 5 in her living room alone!  WHAT FUN!  Sometimes they hang their tree upside down - If they did this year I'll be sure to take pics and share.  They've been doing it for years - long before the upside down tree kits were sold in stores.  Everyone thought they were nuts at the time but they were trendsetters - LOL!!

Monday, December 7, 2015

Faux Ceramic Glazed Ornaments

Happy Monday Everyone!  I hope you all had a lovely weekend.  Today I wanted to share a fun project with you - how to get the look of those beautiful glazed ceramic ornaments which can be expensive to buy and even more expensive to make!

Originally this started off as a challenge from Imagine Crafts and our Holiday Family Traditions.  One of the biggest traditions in our family is baking cookies.  Of course I couldn't make a batch of cookies for you all - that would take a while so I decided the next best thing would be to make a batch of Salt Dough Cookie ornaments instead.  As I was messing around with various products I stumbled on a really cool combination that gave my ordinary salt dough ornaments the look of glazed ceramic ornaments!

Here are just a few examples of the cookie ornaments I came up with....


These were made by pressing an embossing folder into the dough while rolling them out.


This cookie ornament was made by stamping into the dough with StazOn ink.  The one on the left has been touched up with White StazOn ink and the right left as plain dough.


These ornaments were stamped...


and these were also stamped.

All of the ornaments were colored using StazOn Studio Glaze with a coat of Goosebumps Texture Spray over top giving that extra glossy shine like the glazed ceramic ornaments.

For complete directions and a supply list check out the tutorial here - Holiday Cookies Galore!


Friday, December 4, 2015

Sad News -

Don't know if you've heard or not but I thought I'd share...

Top Dog Dies is closing.  They are having a clearence sale right now but it looks like the dies are going fast.  Better hurry if you want to take advantage of the sale pricing.


Also, this month is the last month for the blogozine - Unruly Paperarts

"It is with great sadness I announce today that this will actually be the final issue and month of inspiration here on the blog.  I have had to make a difficult decision to end this journey. I am sure you can all appreciate our lives change and with it so do our priorities, our creative desires evolve and our commitments and time constraints vary.  Often we have to let go of the old to allow in the new. And it is for all of these reasons our time here must come to an end."


Be sure to check them both out while you still have a chance.    I do hope that this isn't the start of another round of great places to visit/shop closings.  It's so sad to see great places like these close.  Wishing all the best to both in whatever comes next.

Pantone Color of the Year for 2016!

This coming year Pantone chose not one but 2 colors for 2016 to be their "Color of the Year"....

PANTONE Color Standards
for Creating with Rose Quartz & Serenity

Lee_Eisemann Pantone Color of the Year 2016 ROSE QUARTZ & SERENITY

So I'm taking this as a pastel Ying and Yang color year.  
I love the purple-y blue and paired with it the pink is o.k. too...
What do you think?  Honest opinions...
Does it remind you of nursery colors?  

Do you think you'll be following suit and incorporating these colors into your art in the coming year?  I've already heard several companies are getting ready to share some new lines featuring these colors. Not so sure I'm ready for them..  

Club Scrap Christmas Stamp Winners

Today I have the winners for the Club Scrap Christmas stamps....

and they are....


\\

The winner of the Homemade Holiday set of stamps is...

Kee - 

What a fabulous gift for your daughter in law! Baking is a huge tradition in our house as well, and from the time my children were very small we would bake cookies and decorate mini gingerbread houses. even though my children are still mostly grown up they still love to come and decorate them with their friends. :-) Every year I can't wait to start my Christmas baking.


and the winner of I'll be Gnome for Christmas is...

Patricia Moreland!!

Love the idea of a book. Every year my husband and I turn our kitchen into a cookie factory baking as many different kinds of cookies as we can in a week using many favorite recipes and always trying to add a new one. Then my husband is the cookie elf who delivers them to family and friends for the holidays. Would love to make books for all the nieces and nephews with the recipes for next year. Great job on yours! Patti

Congratulations to the winners!
Please e-mail me your snail mail addy so I can drop these stamps in the mail.


Thursday, December 3, 2015

Spicy Frame

Last week I shared a frame I made using Club Scrap Moroccan Spice kit - Live Live with a Little Spice.  Today I wanted to share the directions for making that frame.


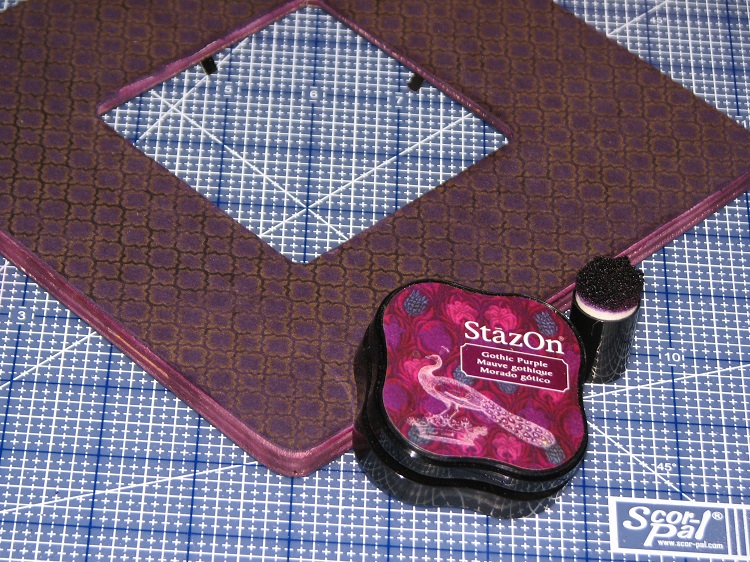
1. Sand all of the edges of the wood frame.


2. Apply an even coat of book binding or other glue to the frame; position the cardstock and let it dry completely.


3. Cut away the excess cardstock from the edges and the center of the frame.

4. Again, sand all of the edges.


5. Apply Gothic Purple StazOn ink to the inside and outside edge.


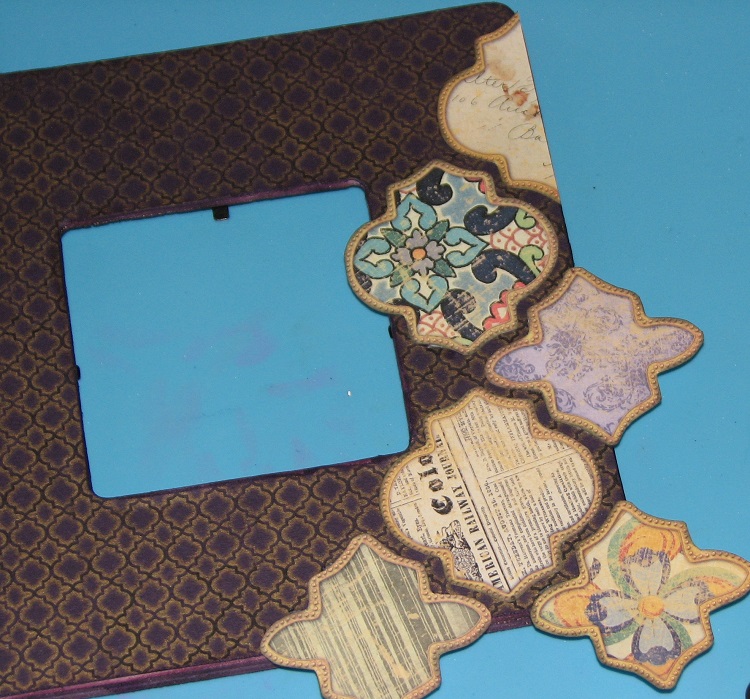
6. Trim then fussy cut the large Moroccan tiles from the pattern cardstock.  Apply Spiced Chai StazOn ink to all of the edges of each tile.


7. Play with the tile placement until you get them just so.    TIP - When you get a layout you like, take a quick photo of it to help recreate it - helps when you go to glue them all down!


8. Glue each of the tiles down.  Once dry, trim off the excess.


9. Now fussy cut all of the small tiles and apply the same ink to the edges of these tiles.


10. Glue the small tiles down to the frame.  Once dry, trim away the excess.

11.  Sand the edges where the tiles were added.


12. Apply a layer of Crystal Lacquer to each of the tiles.  This will give them a lovely gloss and add dimension at the same time.  It's amazing how much this changes the look of the tiles.  Let the lacquer dry completely.


13. Stamp sentiment, mat and adhere it to the frame.  Add additional embellishments as desired.


And your frame is ready to enjoy!

Supplies:
Club Scrap.com - Papers, stampes, embellishments.
IMAGINE Crafts featuring Tsukineko - StazOn Ink, Sponge Dauber
Crystal Lacquer

Wednesday, December 2, 2015

2015 Mixed Media Calendar Page - December

O.k.. so I'm a bit late with this one but it is still December so we'll call it good - LOL!!

I had planned on sharing a technique for creating faux texture BUT yesterday inspiration struck and I just had to give it a try.  First let me say when I'm making up techniques like this to share I try to create pages that could be created using a variety of products and still achieve the same look.  So while I'm using a hot glue gun for the example you can use a variety of glues for this technique - for example, you could use Aleene's Tacky Glue, Crystal Lacquer, even Elmers Glue would work.  If you do use these alternate products please keep in mind you'll need to let your images dry over night before moving onto the painting stage.


Let's begin....  


You'll need your calendar page, a less detailed stamp, ink and a Hot Glue Gun (or alternative heavy body glue)


1. Begin by stamping your image 1 or more times on your calendar page.  I like 3's but you can stamp it more or less.


2. Use the glue and trace over the image - it doesn't have to be perfect, we're going for the "idea" of the image rather than an exact replica.  


3. If you have room you can add random dots, dashes or other shapes in the open areas - or not - depending on the look you're going for.  You will need to let your glue cool or dry depending on the type of  glue used.  Since I'm using a hot glue gun, it will cool and set up so it's really solid in about 20 minutes.  If you're using wet types of glue you'll need to let it set overnight.  

NOTE - don't worry about the hot glue strings.  Once your glue has set up solid you can go back and rub your finger over the strings and gather them up & pluck 'em off.


4. Paint the entire page with a solid background color.  I am using Deco Art Metallic paints because it's for December/Christmas time and I like the shine and shimmer.  


5. After you have coated the entire calendar page, use a tissue to dab at the ink.  This does a couple things - it takes away all of the paint strokes and it gives the paint an interesting texture.


6. Paint the images as desired.  Again, I used Deco Arts Metallic paints for each of the poinsettias, flower centers and accent dots.  This technique creates an amazing depth and dimension!  I so wish you could feel and see it in person.


7. Time to add your calendar and any additional embellishments.  I have some vintage German Scrap Santas that went with this page perfectly.

Now I wanted to tell you what inspired me to do this - yesterday while I was at work I was making clips for some harnesses we sew/assemble.  Making the clips involves a hot glue gun - mind you several of us make clips when we have time.  I try to keep all of the hot glue strings picked up because they drive me nuts but the guys don't care so at times the glue builds up over time.  As I was cleaning it up I noticed what a neat pattern some of the glue droplets had made and the idea was born!

I came right home and gave it a try and then tried painting over it and it worked! I love it when that happens.

So there you go #12!  Hope you enjoyed the calendar this year - I promise next year we'll be a bit more timely.  Off to go painting tonite - this time an owl!  Should be fun!