Wednesday, October 15, 2014

Altered Playing Card - Week 6 - Halloween!!!

WOO Hooo!  You all know how much I love Halloween.  Well Week #6 in the Altered Playing Card Challenge is all about Halloween! 

Claudine's first card was painted then she added washi tape and embossed a Halloween image over top...


I kept to the basic design but I used Trolley Grey Art Anthology paint because it was still sitting on my desk from another project. I love this color...it reminds me of a sparklie stone.  I also used it because it was a nice neutral color to go with my washi tape...


You see, I have lots of colorful Halloween tapes so I needed that neutral background so they wouldn't clash.  I wanted the tape to "speak" as the sentiment so I covered most of the card with the tape.


And finished it off by stamping and embossing my trick or treat image  and then finished it off by embossing the edges as well.


The next card was made with a bit of Color Wash, stenciling and pieces torn from a holiday napkin.  


Well, I thought it would be fun to use real definitions from various old dictionaries as my main focus.  I just happened to have this wicked Raven ace of spades card in my stash...  How perfect is that?!?!  Sooo, I glued down several Halloween related definitions - carefully tearing each one so the center ace/raven still showed through.  Once the Creative Medium (collage glue) dried I added orange, green and purple StazOn inks over top.  I LOVE how it turned out!  I stamped the sentiment using black StazOn.


Here are a couple looks at the definitions....


And here are my cards together....  
What fun!  I love Halloween!!!


Tuesday, October 14, 2014

Candy Corn Acorns!

Fall is in full swing here in Indiana and that means time to collect the bounty of Mother Natures gifts to artists.  We have several large oak trees out at the farm so I always try to collect lots of acorns - both complete and caps.  There are lots of fun things you can do with both so I always pick up what I can before the squirrels snatch them all up.  I've got to be fast though - we've got some smart squirrels...they have to be as big and fat as they are ;)


Here's an Acorn Frame I made a while ago....I've made several over the years and they are always a big hit. 

Oak Frame 012

Today I wanted to share another fun idea...painted acorns!  Dang people are acting like this is something new - I've seen them everywhere this year.  Of course this is nothing new but they are lots of fun to make and use for fall decor around the home.

I paint the acorns a couple different ways depending on if they have caps or not.  For the acorns without their little hats on I apply a bit of adhesive down on a scrap of paper and stick the acorns down so the point is facing up.


Then I just paint away.  Since I'm making "candy corn" acorns I'm going to paint a couple white, some yellow and a few more orange.


Depending on how dry your acorns are and your paint you may need to apply 2 or more coats.


Let them dry completely before moving on...


Here's where the extra caps come in...test fit a cap to find one that fits your acorn and then just add a bit of liquid glue (I'm using Aleene's Tacky Glue)


Then place the acorn into the cap and let the glue dry.


For the acorns that have caps I just hold them and paint away.  Once you're finished, find a pretty box to display them in.  I found this fun vintage jewelry casket at a garage sale this past summer...I thought it would be perfect for something like this....  Of course keeping my son out of the candy corn is going to be another issue ;)  lol!!


Hope you're enjoying Autumn where you are!
Stay Inky my Friends!


Friday, October 10, 2014

Boo! Scrabble Tile Halloween Card


A fun collage card for a spooky holiday!

Hope you all had a super week!  I thought it would be fun to leave you with a fun stamped collage card for Halloween...   

I started off by stamping and embossing the spider web on a white sheet of cardstock.  I then applied a variety of PanPastels over the web and the rest of the card panel.  I then glued a torn section of Halloween pattern paper to the panel and added a bit more PanPastels.   I then sprayed the entire panel with hair spray to set the pastels.

I then went about stamping various images to the card - fence, sentiments, spider, bats - all Just For Fun stamps.  I then added a couple fun treat bag images, a Dresden Trim cat and the scrabble tiles.  For an added punch I applied a bit of red Stickles to the spider & cat and clear (Diamond) Stickles to the web.  

It took a bit of time but I think the finished card was well worth it :)

Hope you all have a wonderfully
inky weekend!!


Wednesday, October 8, 2014

Altered Playing Card - Week 5

Today I finished up my cards for week #5 in the Altered Playing Card Challenge.  Let's get right to it....

Both cards this week had butterflies in the mix as well as an inspiration word for each.  The first card was made using acrylic paint, a circle stencil, a bit of pen work and a little guy as it's focus with the inspiration word - Imagination.  Notice the butterfly in the background...


So, keeping with the general idea I too painted my card with acrylic paint - Turquois Dina Wakley paint.


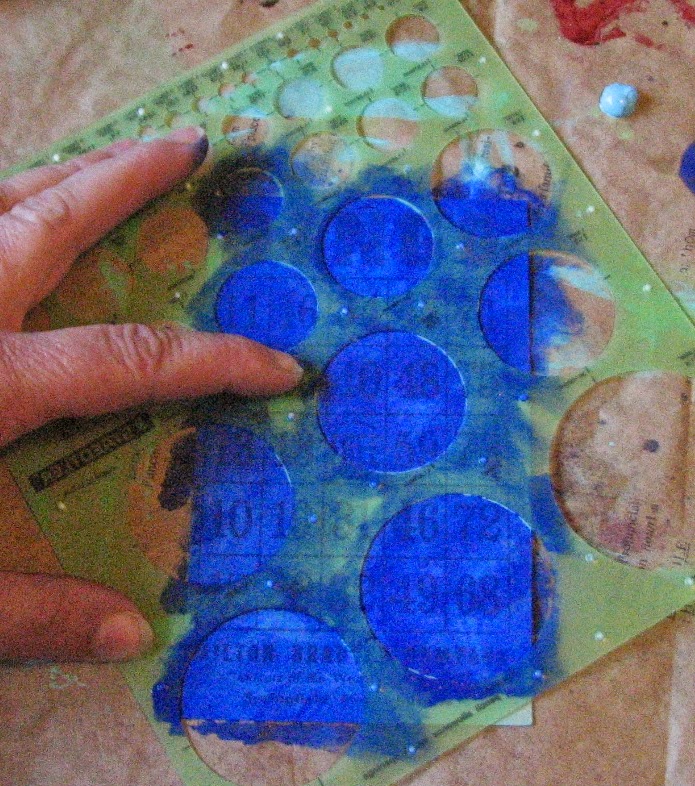
Since I didn't have a circle stencil of any kind I decided to use my circle template instead!  It worked pretty good...


I added two colors of blue to each circle - a dark and light for contrast.  Once the paint dried I outlined each circle with my white pen from Sakura.


I added pen work along the edge and instead of drawing little circles in the corners I used bubble wrap and gesso.


Instead of little paint dots I added a few pearls along the edge.  Also, my reference to the butterfly is the butterfly wings I added to my woman.


And here's how it turned out!


Claudine's second card incorporated a fun collage background that she made with pattern papers and a bit of brown ink.


I set about creating my background but instead of pattern paper I used real vintage ephemera - my fav!  I also used Vintage Creative Medium which has a nice sepia finish to it.


Here it is in the drying stage...


Next I trimmed off all of the excess paper, inked the edges and added a bit of washi tape to the bottom (the numbers) and the upper RH corner (the dots).  My nod to the butterfly theme is the column of butterflies I stamped on the right side using Cloudy Sky StazOn Midi.


And here is how she turned out!


And both of them together....


Tuesday, October 7, 2014

Poe - Alive or Dead...or Both!

Today I wanted to share a fun Halloween card I made for the Altered Pages blog.  We have the pleasure of working with Art Anthology paints this month.  I don't know if you've had the opportunity to see or work with them but I'm having fun.  They offer a range of dimensional paint which comes in 3 different finishes (Sorbet - has glitter in it; Velvet - has a matte finish; and Effects - which comes in a Metal or Stone finish).   I have found that the Sorbet paints are semi translucent with thinner coats which adds a whole new twist to them.    The card I'm going to share with you today takes advantage of that translucent quality.  Check it out....

Supplies: 

PanPastels - Black
Art Anthology - Sorbet Dimensional Paints - Trolley Grey, Imperial, Stencil
Altered Pages - Collage Images
Stamp Sentiment - DeepRedStamps
Spellbinders Dies
Cardstock
Adhesives

I started off by applying black PanPastels over the AA stencil and sprayed it with hair spray to set the pastels.


Once the hair spray had dried I applied a layer of the Art Anthology paint over the entire piece. This is Trolley Grey  - I love it because it's a neat color BUT it's also got glitter in it for just the right amount of sparkle!


Next I started playing with Poe...  I printed out his photo and then I printed a skull roughly the same size of his head ~ which took me a couple tries but I got it.  I then used my exacto knife and cut around the edge of his hair around his face on the right hand side of the picture.

I cut the skull in half and slipped it under his hairline to make sure I could line it up correctly.  I then glued it in place when I had it where it looked best.  After the glue had dried I painted the "dead" side of him.  He was then fussy cut and set aside.

Collage Images - Altered Pages

Next I took a piece of grey cardstock and painted it with Imperial (purple) Sorbet (the kind with glitter in it).  I applied the paint in a thicker layer and added lots of brush stokes in different directions which is really apparent in person because of the dimensional aspect of the paint.


And here's how it turned out....


You can see a bit of the dimensional texture in this photo....


So there you go...
Hope you're all having a spooky fun October!

Monday, October 6, 2014

Auction Winnings...German Scrap

Well, finally got some photos of the goodies I won at the auction I told you about last week.  First, I have to tell you I was SOOOOOO excited when Mom told me about this auction.  Here's why.... this is the auction listing....

ANTIQUE AUCTION
OF
EPHEMRA – ADVERTISING – TEXTILES – BUTTONS -  ANTIQUES
30,000+/- post cards – real photos, buildings, Christmas, holidays and more; 60+ Scrap Books trade cards, old photos, calling cards, people, animals, botanical and much more, a great selection; adverting calendars; stock certificates; sheet music; Buster Brown; calendar prints; 100’s of old valentines including 3D and others; chain framed advertising pictures; Dan Patch pictures and other items; photo albums; Kate Greenway and Palmer Cox books; children’s books; Modern Priscilla magazines; Ladies Home Journal; Prairie Farmer; almanacs; playbills; The Little Corporal; farm equipment paper items; Railroad time tables and more; patches; World’s Fair items; large selection of political buttons and posters; 50+ advertising yard sticks; books; Camel menu sign; advertising signs and tins; DeLaval tin cows; trade cards; tine types; lots of horse pictures and prints; old photographs; The Sun Garter oak advertising display; Duro Decorative Decals tin box with 100’s of decals; travel brochures; Websters Mammouth Packet Seeds wood advertising box; TEXTILES:  nice selection of early quilts; table clothes; napkins; vintage clothing; hankies; needle work; dresser scarves; doilies; pillows; BUTTONS:  1000’s of old buttons – Bakelite, brass, glass, military, figural and others, many carded, jars and boxes, a huge collection; Bakelite buckles; glass beaded pillows; ANTIQUES:  McLoughlin Bros. World’s Fair building block puzzle and other picture puzzles; baskets; dolls; Christmas and Halloween items; small oak curved glass display case; crocks and jugs;


Did you notice they spelled ephemera wrong?  Anyway, you all know how much I LOVE vintage ephemera - so this was like a dream come true.  It was so much fun to look at all of the amazing vintage bits up for grabs there.  Alas I am not the only lover of these types of goodies.  There were TONS of people there - mostly dealers which translates into big bucks.  I knew things would go high - especially the vintage Valentines and Victorian Scrap books.   

Mom got a real education as well.  She didn't think others would be interested in these types of things but I tried to tell her it would go high.  The Valentines cards were in various lots but they went for hundreds of dollars...needless to say we did not get any.  

I had hoped to get some of the 30,000+ post cards BUT 3 people got them all...the first guy was buying them for 110 - 250.00 per box (there were about 50-75 boxes).  Then another lady was paying 150.00 a box and finally the last lady took all of them that was left (17 boxes) for 125.00 each.  

So on to the Victorian Scrap books.  I am so pleased to say I got 3 baggies full of individual pieces of "Scrap" plus some Christmas Scrap - including several sheets of the same German Scrap (Victorian Santas) from 1890.    I paid far more than I wanted to but the old fart who was bidding against me honked me off.  I had set a price in my mind on what my worst case scenario price would be and luckily I didn't have to go quite that high so I was pleased.


AND...I was able to get 3 of the Victorian Scrap books I wanted!!!!  I was so excited...I paid dearly for 2 of the 3 but each of the books was special in it's own way.  They are all from the 1890's...one has a few bits from the 1900-1910 era but most are pre-1900.  

They are each in varying conditions.  This first book has some loose pages but most are in tact.  


Here are just a few of the many pages.....


Here is the second one I got...it was the most expensive because it is in pristine condition...no missing pages and only a couple loose pieces in the entire book.  Hundreds and hundreds of pieces of ephemera.  It's a beautiful book!  The image on the front is just stunning...


And here are some of the pages....


Check out this cat German Scrap piece...it's 8.5" tall!!!


I haven't taken photos of the last book yet...it's in the worst condition.  Virtually all of the pages are loose but it too is filled with lovely scrap.  The pages are deteriorating pretty bad so I am going to try to remove the pieces from the pages before they too deteriorate.  

I will be over time scanning each image from all of the books and sharing many with you all.  I can hardly wait till you see all of these wonderful vintage images!  


Thursday, October 2, 2014

You're getting sleepy....

Hi All!  I hope you're having a wonderful start to your Thursday!  I am so excited...Mom and I went to a paper ephemera auction last night and I scored big but that will have to wait - I have to take photos of the goodies I won (yes won - it was a hard fought battle let me tell you).


Today I wanted to share a canvas I made for Altered Pages - they are participating in the 31 Days of Halloween hosted by Smeared & Smudged.  You might remember I participated last year...each day there will be a new Halloween themed project presented by all participants.

AP is also partnering with Art Anthology (paints & Stencils) which is what I used to create this canvas with..

Well I was lucky enough to post on day 1 and here is my creation....  It was inspired by those B rated movies from the 50's.


 and I created a SnapGuide on how I went about making the canvas so you could too!
Enjoy....