Thursday, January 9, 2014

2014 Technique Calendar - February - Mixed Media

2014 Technique Calendar 
February 
Mixed Media
(step by step)

I can't tell you how many people ask me for mixed media posts.  I've posted a few things but folks have asked for a more step by step approach so here goes...

NOTE: Remember, this is a use what you have, make it work moment...
I'll offer a few suggestions for alternative supplies below.

Supplies:

Tag
Paints
Spray Inks
Stamping Inks
Gesso, Embossing Paste or other thick medium - heck even some really thick paint will work.
Stencils (store bought, hand made, die-cut negative, etc.)
Ephemera - bits of paper from books, dictionaries, sheet music, newspapers, etc.
Stamps

Instructions:

1. Start off by spritzing on a desired base color using a spray ink.  

Spray Ink Tip: If you don't have any spray inks you can always make your own by adding a drop or two of reinking ink to a spray bottle mixed with a bit of water. 

Spray Ink Alternative: Now, if you don't have spray inks or reinkers you can make a spray using acrylic paint!  Simply add a few drops of acrylic paint to your spray bottle, add a bit of water - how much is up to you...the more water, the more diluted the spray.  Shake it very well to mix and spritz away!  White and Burnt Sienna are my two favorite colors of acrylic paint to use this way...the white of course adds a nice shabby chic feel to a project while the burnt sienna yields a wonderfully grungy antique look.


2. Once the base color is dry, place a stencil over your tag and give it a few spritzes with a second color of ink.  

Stencil Alternatives: If you don't have any stencils on hand you can hand cut or die-cut a stencil all your own!  It doesn't even have to be made with plastic.  You could make a one-time (or 2-3) time use stencil out of smooth cardstock!  


Don't waste the ink on your stencil, flip the stencil over onto a clean tag so it absorbs the rest of the ink as I did here.


Here are both the positive and negative (flipped over stencils) inkings.  Actually, I think I like the secondary tag (left) better than I do the tag I originally intended to use!


3. If desired, add another layer of ink in the areas that didn't have the original layer.


4. Now it's time to add some stamping!  I started off by using one of my favorite stamps... It's an Inkadinkado script stamps I've had for years.  


I decided to use a bit of Picket Fence Distress Stain on the image and stamped it a couple times here and there.  


Next I stamped a few hearts since it's for February.  You could add more if you like ~ I'm going to stop there as I've got other things planned.


5. Now take a bit of ephemera and tear a few strips ~ in this instance I'm going to use sheet music.  I found some nice areas that had some cool looking notes


added a bit of glue to the back and glued them down to my tag.   Once dry I trimmed off any excess paper hanging over the edges.


6. The next step is going to ground those papers a bit as they just look like they are floating on top of the background.  The technique I am going to use is really easy - jut apply a drop of two of paint to the desired area...


then use your finger to swipe it off to one side or another.


You can see here that I used both bronze and white acrylic paint.  Now the bits of ephemera actually looks like it is part of the tag rather than just sitting on top of it doesn't it?


7. I thought the tag needed a bit of something so I used a piece of sequins waste (a.k.a. Punchenella), ink and my ink blending tool to give the tag a little something extra.  I added this accent in three separate areas - I personally think odd numbers of anything are more pleasing to the eye than even numbers.  Of course this isn't a hard rule, just something I like to use in collage & mixed media.  I'm sure you can find other artists who prefer even numbers.  It's a personal preference thing.  Do what feels good to you.


8. Finally I inked the edges with Distress Ink.  This is optional but I think it gives the tag a finished look.  


Once you are satisfied it's time to decorate the tag with your embellishments.  
In this case the calendar page and my vintage lady.

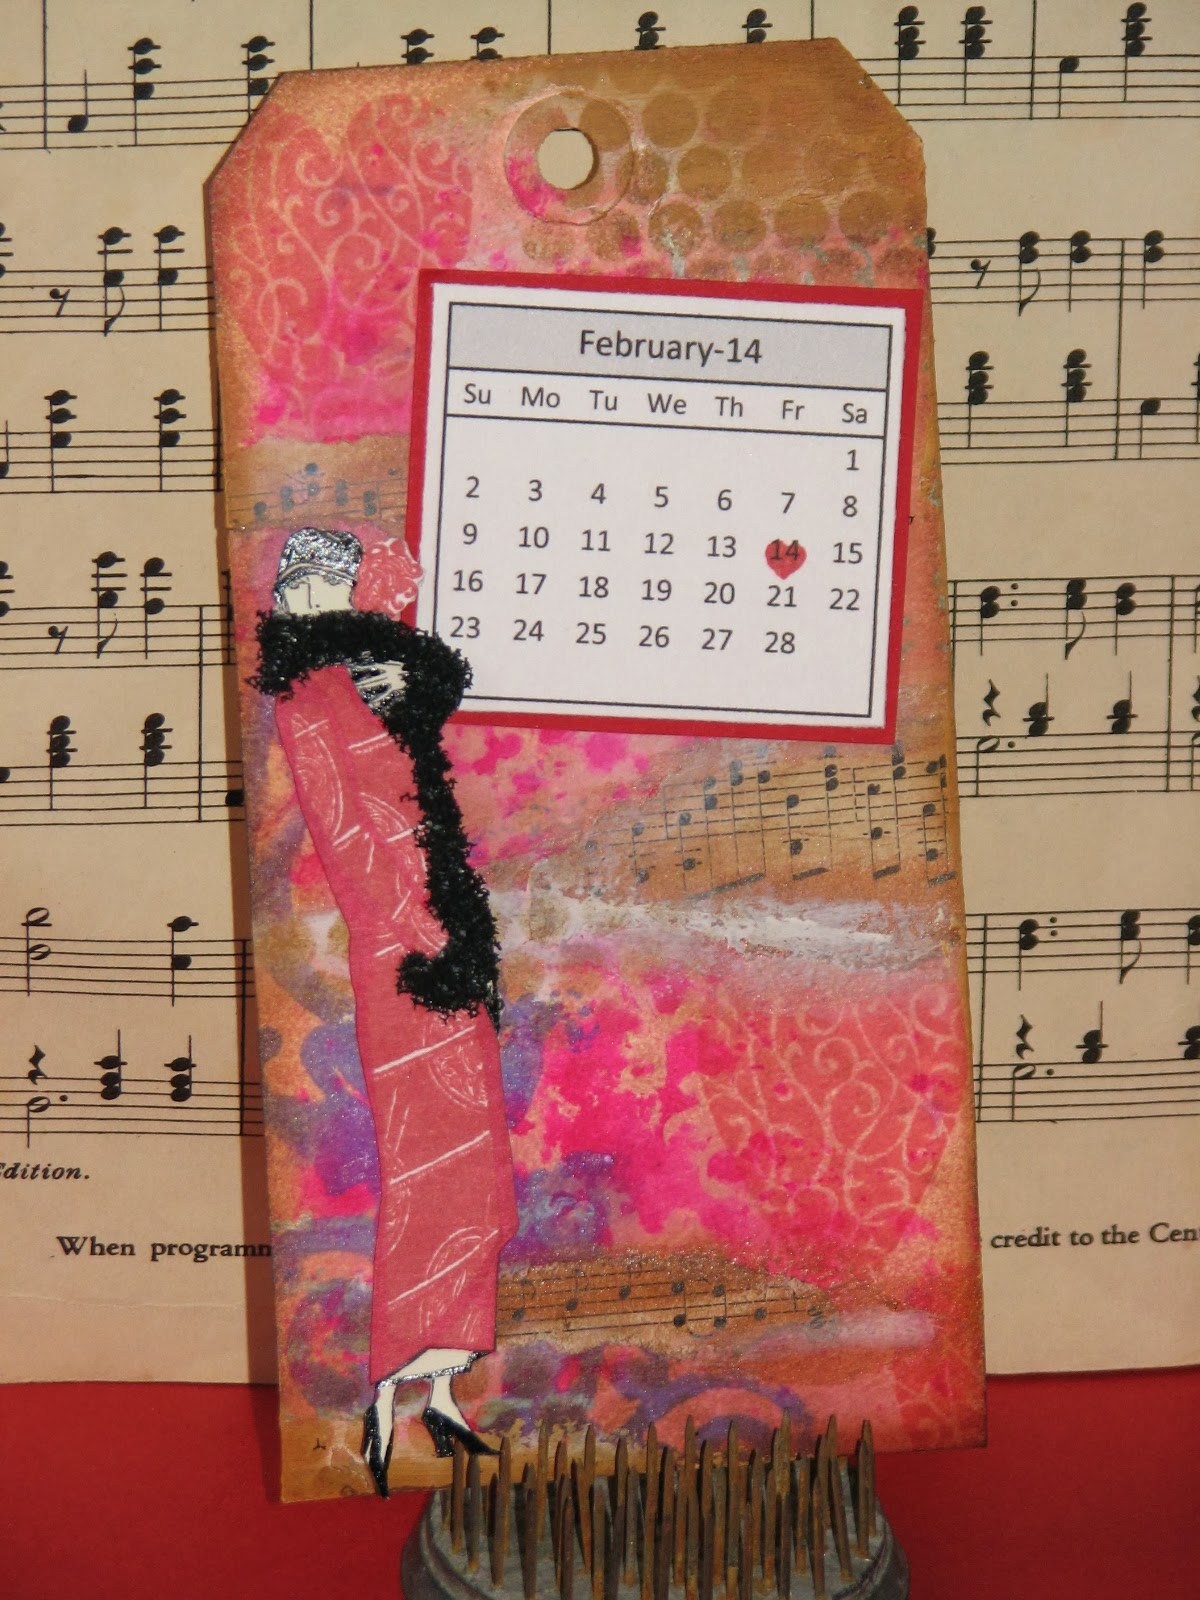
Stamp Credits: Heart - Stampin' Up; Script - Inkadinkado; woman - Hampton Art Stamps


I finished her off with a bit of Black Flower Soft where the fur on her coat was located.  

So does that satisfy your curiosity about dipping your toe into mixed media?
Of course there are all sorts of different media you could use but this gives you an idea of how open this type of art really is.  The possibilities are endless!

So, now it's your turn...
pull out your inks, paints and stamps and dive in!


Wednesday, January 8, 2014

2014 Technique Calendar - January - Faux White Glue Embossing

2014 Technique Calendar 
January
Faux Embossing w/ White Glue


January's technique is a really fun inexpensive alternative to embossing. 
You simply replace white glue with embossing inks, powders, heat tool, heck, even stamps if you want with plain old white glue.
Supplies:
Tag
White Glue (whatever you have on hand)
Acrylic Paint (2-3 colors)
Calendar
Embellishments (if desired)

Instructions:
As far as glue goes you can use any white glue you have on hand.  I thought I had some Elmers left but I couldn't find it so I'm thinkin' I must have used the last of it up on a project before Christmas.  I had a bottle of Aleene's Tacky Glue which works just as well.  Really...the whole point is to use whatever you've got in your stash.
14 Tech Cal - January 001

1. There are a couple ways you can go about your faux embossing.  You could if you choose stamp an image using clear embossing ink or a resist type ink.  This will leave an image for you to "trace" with your white glue.
or
You could simply free-hand desired images with the glue.  This is what I choose to do.  Since this is for January I wanted to make snowflakes (big surprise huh?...after all the snow I'm seeing snowflakes everywhere -LOL!!).

14 Tech Cal - January 003
2. Now comes the hard part...let the glue dry completely.  O.k... I had to cheat a bit.  Mine isn't completely dry but it's been sitting for hours now and I needed to get this posted so let's pretend it's all dry ;)

14 Tech Cal - January 004
3. Next you'll need 2-3 colors of acrylic paint.  I am using metallic silver, blue an white Distress Paints.   Cover the entire tag with your base coat of paint ~ silver in my case.

14 Tech Cal - January 006

Here is my tag all painted & drying...
14 Tech Cal - January 007

4. Once your initial layer of paint has dried, rub your second color of acrylic paint over the first using a sponge or paper towel...pay special attention to the cracks and crevices among your images. 

TIP: I usually use a light and dark paint for these two layers...here I used the light color (silver) with a darker blue over top.  You want the contrast between the two.

You don't want a solid layer of color...just mostly a dry brushed type appearance.


14 Tech Cal - January 008
You can see in this photo how the darker paint really made the faux embossed images pop right off the tag.

14 Tech Cal - January 009

5.  Optional - If desired you can add another dimension to the embossed images by rubbing a third color of paint on the images with your fingertip.


14 Tech Cal - January 011
6. Finish off your tag as desired.  I have in the past used stamped images, collage images, die-cuts, flowers, etc. to embellish my calendar pages.  This year I decided to use a stamped person for each month.  I'm going to try for mostly vintage style people.  I *hope* I have enough for each month but it may be an opportunity to purchase a new stamp or two - LOL!!

And here's my finished January calendar tag...


14 Tech Cal - January 015
(Stamp Credit: Deep Red Stamps Vintage Skating Girl)


a better view of the dimension achieved with the white glue...


14 Tech Cal - January 016

Now it's your turn!

Calendar Tag Book Winners

Thankfully the temps are finally starting to rise ~ we were actually in the teens today instead of the negatives for highs.  The wind chills are still below the 0 mark but at least it's not 40-50 below like it has been!  Indiana just isn't supposed to be like that -LOL!!

Well, the internet is also working like it should be ~ it had been going on and off randomly which made it almost impossible to post ~ I tried multiple times yesterday only to have the internet go off in the middle of the post...it would then boot me off because it was disconnected. 

So, without further delay ~ the winners of the tag books for our Technique calendar are:

(in no particular order)

Shelly Schmidt

Ohhh I do hope to play along this year : ) I always love to see what you create- Thanks for the fun ideas!

Victoria H

Oh this looks like fun and I'm so excited I hope I can play along too

KC

I love you calendars! wahoo awesome giveaway!

Val S

Sounds really interesting, would love to win! Happy New Year to you and yours!

and

debzdogz

WOO HOO!!!!! i promised myself that 2014 was going to be the year i get back to creativity! i have followed your blog for while....and this calendar thing is PERFECT!!!! and thanks for the giveaway chance too!

CONGRATULATIONS!
Please send me your snail mail addies so I can drop your tags in the mail.

Tuesday, January 7, 2014

Altered Pages & Pink Persimmon

Yes, today is Two for Tuesday blog hop at Altered Pages.
This month we are hopping with Pink Persimmon.
If you've not heard of Pink Persimmon before it's a rubber stamp company with some really beautiful stamp images.  Lots of really cool vintage/retro designs which I absolutely adore!  Some of my fav's are the House & Home (check out the awesome sewing & fashion stamps), Antiquated (love them all!!!) and Vintage.
Well, I was lucky enough to play with the following stamps to create my cards: Sweetheart Silk; Hello Vintage Girl and Style Girl.
And here are my projects....

My first card - I like your Style was made using the Sweetheart Silk and Style Girl stamp sets from Pink Persimmon.  Her clothes were stamped on Pink Collage Background (AP1724pink) and the sewing related images are from the collage Antique Sewing (AP468).
I also used a piece of a real measuring tape and a portion of a set of directions from a dress pattern (in the background) as well as lots of vintage lace, findings, etc.


The next card is made using the Sweetheart Silk and Hello Vintage Girl stamps as well as a couple of collage images from the Ladies who Lunch collage sheet (AP477) with a bit of seam binding and a vintage button.  The envelope is a glassine envelope also found at Altered Pages.


And finally  I have a couple smaller cards made from the Sweetheart Silk stamp!
They were stamped on a folded piece of cardstock then trimmed leaving a bit of the fold intact.
The collage images are again from the Antique Sewing collage sheet (link above).
What's even more fun is they fit perfectly inside the ATC sized glassine envelopes!


I hope you've enjoyed my contributions to the hop...
I had lots of fun making them.

Be sure to check out the rest of the fun projects created by the Altered Pages Design Team!

Till tomorrow....
Have a wonderfully inky day!


Monday, January 6, 2014

Blizzard of 2014 - Snow Pictures so far...

WOW - that's all I can say about the massive amount of snow we have.
Normally here in NE Indiana we get about 2-4 inches at a time...on the rare occasion we get 6-8".  Being the eternal kid I'm always excited when they call for lots of snow ~ more often than not I'm disappointed because the storm goes north, south, looses steam before it arrives, etc. 

WELL, I was NOT disappointed this time!!!!
 
We were forcast  to get around 8-12" of snow...
I *think* we got closer to 2 FEET of snow!!!
Now, on top of all the snow we got LOTS of wind which makes for huge drifts!
 
WOOOO HOOOO!!!!!!!!
 
I'm tickled, I love looking at it ~ just glad I don't have to drive in it ;)
 
Now our county is still under a snow emergency which means only emergency, official vehicles on the road so we're all staying home.  Dh & the boys chanced it and did go out to the farm to feed the cows (and leave Bob there to keep an eye on things, take care of the cows, etc) but they had to walk up the lane, then drag a toboggan up to the barn to get the hay and take it to the cows then walk back down the lane.  Thankfully they didn't get stuck and dh made it home o.k.
 
Dh said it was snowed in bad up there, can't get the tractors started cause it's like -12 outside (actual temp - wind chill down in the -20 to -30's) and he didn't want to break it trying to start it.
 
So, here are a few pics here in town...
I'll have to get pics of the farm when I can go out there.
 
The first ones are last night about 5:00 pm still during the storm....


This a.m. about 9:00a.m. after the storm...
The fence is 4 foot tall...at one point the drift goes over the fence!

 
Back fence is 8 foot tall...the snow back there is about 3.5 - 4 feet tall.


Our deck set covered in LOTS of snow...

 
Looking out the back door window...

 
You can't really tell but the drift on the right side by the pole is about 4.5 foot tall...
This is out side the front of the house. 

 
Snow is up to the window sill in Bob's room....
You can see that it's actually over the bottom 2" of the window ...

 
It's supposed to stay in the negatives today & tomorrow then warm up into the teens on Wednesday...but we're supposed to get more snow Wednesday into Thursday then more on Saturday!!!!  This is like the blizzard of '76! (yes, I'm old - lol!)
This is the most winter excitement we've had in a long long time!
 
Going to try to get the calendar page done but our internet keeps going on and off and we're worried about the electricity going out...it's been flickering on and off all day!  I could live without the internet if I have to but I hope the electricity stays on!!!
 
Hope everyone else out there in this is staying warm and safe!!!

Sunday, January 5, 2014

Stamp Garage Sale - New Goodies - Finally!!!

Hi All ~
 
I've been working all day on trying to get the new stamps added to the Stamp Garage sale.  It's been a trial...we're having a terrible snow storm (over a foot on top of what we've already had) and my internet keeps going out!!!
 
Anyway, I *think* I have everything added...some of the photos aren't edited and I didnt' take the time to list all of the mfg. of the stamps but they are there.
 
WHEW!
 
If you're interested, please e-mail me at ronijj at gmail dot com.  Remember it's first come first serve so I'll try to get everything on your list and update it as I pull stamps.  I will e-mail you the stamps left and your total (stamps + shipping).
 
If you have any ?'s please ask away!
 
 
************************************
 
I hope everyone is staying warm and safe!
I'm pretty sure we're going to be snowed in for a few days...
our county is on a Level 1 Snow Emergency...
(only official vehicles allowed on the roads)
so we'll be staying put for a while!
 
Pics tomorrow of our snow :)

Friday, January 3, 2014

Happy New Year (Sticky Embossing) & JFF 35% OFF SALE!!!

Happy (first) Friday
of the brand
New Year!!!
Woo Hoo!!
Today I wanted to share a fun card with you today using Sticky Embossing Powder and Mica D'Lights.  (more about the mica d'lights later).
I started off by stamping my snowflake border stamp several times until my card panel was covered.  I then sprinkled on the Sticky Embossing Powder over the embossed areas....


I pre-heated the embossing gun so the air was really hot -
I have found that the quicker you melt the powder the more sticky it is.


Then I sprinkled on the Mica D'Lights over the entire card.
Mica D'Lights are a USArtQuest product that I simply adore!
Basically it's mica glitter...
I love mica anyway but I think this very fine mica has such a nicer sparkle to it than the plastic stuff.  The shine is divine!  I wish you could see it in person ~ you'd know what I mean. 


I finished it off with a neat little vintage sled & HNY sentiment and the last of my poinsettia die-cuts I cut for the Christmas/Winter plaque I made last month.


AND

I thought I'd let you know that Just For Fun
is having a HUGE sale!!!!

35% off all online retail orders
Now - January 18th

I don't know if you realize it or not but they offer their stamps wood mounted, cling mounted (for use with acrylic stamping blocks) or plain rubber.  You can save BIG time ordering plain rubber (which is what I do.)  That on top of the 35% off - whew...too good to pass up!

I finally have my other box of stamps out of storage so I'll try to get the photos taken this weekend and add it to the Stamp Garage Sale.  I know some people have orders waiting for the rest of the stamps... I'll post when they are up.

Have a wonderful weekend!!!

Thursday, January 2, 2014

Adirondack Paint Dabber - Drying Up!

Hi All...
Over these past few days I've been sorting, organizing and rearranging my craft room.  I'm nowhere near being done but I wanted to share a startling discovery I made.  I was moving my paints to a new box when I dropped one of them...it sounded like a rock when it hit the floor. 


Well, I started opening them up and sure enough
MOST of them had turned to stone!!!!!

As you can see from this selection only one (the terra cotta) wasn't turning into a solid acrylic rock.


Well, I was really upset - after I checked these I also checked my Distress Crackle Paints and those were rocks as well...  They didn't even have a hint of moisture to them so that entire collection (including almost a whole brand new set) went directly into the trash.

I decided that if I was going to get any use from these at all I had better do something with them and quick!  So I pulled out my palette knife and started painting up tags.  Now mind you most of them were too far gone to even get my metal palette knife into but there were a few left that I could still use like a thick gesso.

Some I just smeared the paint onto tags creating lots of texture and depth...


Others I used with a stencil


I even pressed the sticky painted stencil onto a tag


For an interesting look...


I also was playing with the Tsukineko Squeegee...
it was fun because there are different edges you can play with for lots of different designs...


Anyway, I thought I'd give you the heads up just in case you have some Acrylic Dabbers you have sitting around your craft room.  You might want to check them out to see if they are still alive. 

Just a note, we'll be starting the Technique Calendar on Monday (1-6) so you still have a bit of time to choose your calendar & buy/make your tags.

1500 Followers Winner!!

 Thank you all for helping me achieve my final goal for 2013...
Ink Stains reached AND exceeded
my goal of 1500 followers by the end of the year!!
 
Using Random.org I drew a winner for the surprise goodie and that winner is....
 
Julie Case!!
 
I've been a follower for over a year now. Congrats on your reaching your goal! Thank you so much for all the knowledge and fun you provide, you are such an inspiration!

Congrats Julie!
(please e-mail me your snail mail addy)