Monday, October 31, 2016

Happy Halloween!!

BOO! 
Here's a spooky Halloween frame using the "Blackened" technique!
For complete instructions and supply list see:


Have a spooktacular day everyone!!


Friday, October 28, 2016

Mini Matchbox Books & Bookshelf


I wanted to post this yesterday but lots of birthday activities kept me away from home most of the day.  So here it is a day late.  

Matchbox Mini Albums - These are the size of a standard box of matches - approx. 2" x 1 1/2".

Cover - 


Cut a piece of cardstock 2"x 4 1/4"
Score at 1 1/2"; 2"; 3 1/2" and 4"
adhere the 1/4" flap to the inside of the 1 1/2" panel to create the box.

I made a double mat for the front of each box and added one of the mini literature postage stamp from the lite kit.

Mats are as follows -
Large mat 1 1/4"x 1 3/4"
Small mat 1" x 1 1/2"


Next the mini accordion albums -

Cover - 2 x 3 5/8"
Score at 1/8"; 1 5/8; 2"; 3 1/3"
Glue the (2) 1/8" flaps to the inside of the book.  


Inside accordion album -

Cut a strip of cardstock 2" x 12"
Score every 1 1/4"
Fold and adhere to the inside of the book cover.


Insert the book into the matchbox cover.
Repeat 11 more times!


And you'll end up with your own mini library!

Next - the book shelf!


Cut (2) pieces of book board 2" x 7 3/4" for the uprights;
cut (4) pieces of book board 1 3/4" x 3" for the shelves.

Glue the shelf pieces to the uprights with book binding glue. 
TIP: I held it all together with a pair of rubber bands while the glue dries.


Glue a piece of book board to the back of the shelves.


I used the Sizzix Pediments die (3 - glued together).
As luck would have it I just had to shave a small bit off of each end to get it to fit perfectly.

After all of the glue was dry all that's left is to paint it as desired.

Each shelf will hold 5 of the tiny books.

Hope you have fun if you give it a try!!


Wednesday, October 26, 2016

Club Scrap Literature Blog Hop

Welcome Everyone to October's Club Scrap Blog Hop!  If you have arrived from Tricia's amazing blog then you're in the right place!  This month we are featuring the Literature Kit and I must say that when I first received this kit I had an idea that I wasn't sure if I was going to be able to pull off so let's see what you think...

Of course since the theme this month was literature I was thinking books but what type of book???  So I was sorting through some goodies I had laying around in my room, trying to get stuff put away when I came upon a glass jar full of matchbooks and matchboxes that my youngest son got in a box lot at an auction we went to long ago.  He didn't want them so he thought I might be able to do something with them at some point.  It did inspire me but not how you might think....


I made a mini bookcase filled with mini matchbook accordion albums!!  The book case was constructed from book board from assorted Book Board pieces and painted with DecoArt Elegant Finish Metallic Paint (Rich Espresso).  The top decorative piece was cut from chipboard using a Sizzix Die.  It stands less than 9" tall and is not quite 3.5" wide.


Each of the 12 matchbook mini albums was made in 2 pieces - the outside matchbook cover and the inside accordion album.  All of the supplies used (except the ink) was included in this month's kit.  I will share all of the dimensions and how to stuff tomorrow but these pics give you a bit better look at the little albums.


These little gems could be filled with journaled memories, mini photos or even bits of ephemera with a little story about why they are special to you.  Well, what do you think?  I normally give my creations away because I just can't keep everything but I had so much fun making this little book case I think I have to keep it...at least for a while.

Thanks for stopping by...
hope you are inspired to create today!
Your next stop on this fun filled hop is...


and if you get lost along the way
the complete list can be found here...


Have a great day friends!!


Tuesday, October 25, 2016

It's beginning to look alot like winter....

At least my cards are ;)

I thought I'd share a couple pages from the Winter issue of Rubber Stamp Madness which is in the mail or possibly even in your mailbox as I type this up!

Of course this is the Winter issue and I've got 2 chilly cards published in different sections of the magazine.  The first was a tree challenge...a creation which incorporated evergreens somewhere on the design.  


This card is a one layer masked card.  I started off by stamping the back door image (JFF Stamps), masked off the left side then stamped the snow covered pine tree.  It blended in nicely don't you think?  The image was then colored using both Memento Inks paired with a waterbrush and Memento Dual Tip Markers.

The second card was in their Winter Galleria...


This card was made using all Club Scrap images/papers.  It too was stamped then colored with Memento Dual Tip Markers and Inks.

As it happens I have an extra copy of this months magazine that I'd like to share with one of you...just post a comment telling us what your favorite part of winter is.  You have until 10-31-16 to post your comment to be entered to win!

Be sure to check out Rubber Stamp Madness and their newest issue today...


Wednesday, October 19, 2016

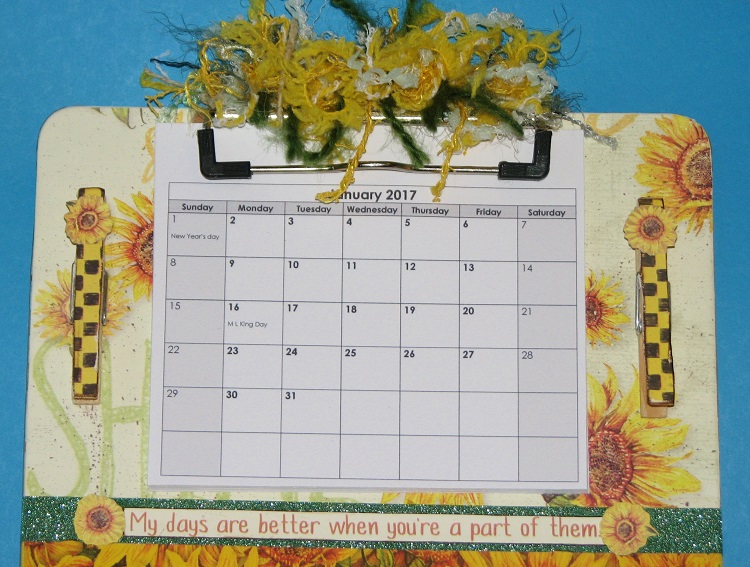
Altered Clipboard Organizer & Journal Gift Set Give Away!!

Welcome Friends!

I hope you're having a lovely day today.  If not I've got a great gift idea that might brighten up your day.  Because Christmas and the holidays are quickly approaching the Club Scrap Artist Team was asked to create a gift for this month's challenge!  I've altered many clipboards in the past but I've never made one into a little organizer station so I figured this was the perfect opportunity!  


I did create the organizer but then I still hadn't used a piece of cardstock I really wanted to so I created a companion journal to go with it!!  Both pieces are created using papers, stamps and embellishments from the Sunflower kit.


Here is a closer look at the organizer...


The top portion of the clipboard holds a 12 month calendar (for 2017) plus there are 2 clothespins that I decorated with a bit of the checkerboard print and a couple sunflowers.


The bottom half has a little pocket that holds note sheets plus a post-it note pad and a small cork board.  The thumbtacks were embellished with some of the pretty crystals that came in the kit as well.


And the accompanying journal has a really fun print on the front with a bit of stamping here and there...


and this on the inside cover.

I absolutely love the papers from the Sunflower kit and thought they would help make any gift beautiful.  What do you think?  Would you like to receive this as a gift.  I know after I finished it I had second thoughts about giving it away but I ordered more paper so I'll be making one for myself - LOL!!    

So, this Sunflower gift set is up for grabs!
All you have to do to be entered to win is comment below.

You have until 10-26-16 to post a comment to be entered to win!

Your next stop on the hop is....


If you get lost along the way you can find the complete list here...


 Have a wonderful day friends!!


Monday, October 17, 2016

Embossing Folder Fun

 Have you played with your embossing folders recently?  This month's technique challenge on the Club Scrap Blog is Embossing Folders and I was so excited when I found out.  I love my embossing folders as there are so many fun ways to use them.  Today I have a couple cards with 2 of my favorite ways.
Of course the first is just plain old embossing but I added a little twist.  Have you ever embossed a particular photo or piece of pattern paper then chopped it all up into little pieces???  Well I did and I love it.  Yes, it takes a bit of time to reassemble it but it really makes for a stunning finished card....


For the first card I used a piece of pattern paper from the Literature kit.  It's a piece of a map from the story Treasure Island!  It was embossed then I cut it into 1 1/4" pieces.  I inked each piece with StazOn Spiced Chai then carefully reassembled so it still looked like a map.  I have in the past re-assembled the pieces in a mixed up order...this is really cool with a gelli plate print or an assortment of them.  It creates such a fun finished card.


The second card I made uses another of my favorite embossing techniques - one in which you ink up the embossing folder (either side) then run your paper through the machine.  I LOVE the impression it creates.  You have all of the texture and dimension of the embossing but you also have the added element of the distressed looking ink transfer.  LOVE LOVE LOVE it!  It was paired with papers from the Crewel & Unusual kit.  

It's your turn!  
Get those embossing folders out and play!

Imagine/Echo Park Mini Travel Album Winner!!!

The winner of the mini travel album is....


Oh man! I love this! Plus, that is my favorite saying "Not all who wander are lost"....feel like I have been wandering my whole life! ;)

CONGRATULATIONS!!!
(Please e-mail me with your snail mail address)

Wednesday, October 12, 2016

October CS Card Sketch Challenge

Happy Day all...Cubbies WON!!!!


YEAH :)  Sorry, couldn't resist!

It was my turn to create a card sketch for the October Card Sketch Challenge on the Club Scrap Forum this month.  Well, you know I don't like to throw anything away so I always have LOADS of scrap paper in my stash.  I thought it would be fun to create a card to help use up some of those scraps and here's what I came up with....

Thanks to Julie I have a wicked cool professional looking sketch to share!!

And here are the cards I created!


Garden Shed Kit scraps + GS Digi Imagine + GA Stamps


Sunflower Kit Leftovers + Sunflower Stamps


Garden Shed Leftovers + GS Stamps & Creative License Sentiment Stamp

As you can see I cut different sizes of scrap for each card - this was to use up what I had leftover from other projects...some pieces larger, some small.  I also treated the seams differently as well - the first card was simply left as is, ric-rack was used on the 2nd and a left over border strip was trimmed down and used for the last card.  This is all about using what you have in your scrap basket.  It's nice to finally get some of those smaller bits used up.

Now it's your turn...do you keep your scraps?  
Do you USE those scraps???  
If you haven't in a while this is a great time to do so.

Stay inky my friends!

Supplies:
Clubscrap.com - Cardstock, Stamps, Digi Images, Embellishments
Imagine - Memento Dye Inks, VersaFine, Pico Embellishers


Tuesday, October 11, 2016

Make a Wish - CAS(E) this Sketch #193

I was playing around with the new Club Scrap kit - Literature - and decided to give a card sketch a try.  I used this weeks sketch from CAS(E) this Sketch #193 pictured below my card...


Isn't that rabbit the cutest thing!


Supplies:
ClubScrap.com - Cardstock, Pattern Paper, Stamps
Imagine - VersaFine - Black; Delicata - Bronze; Dark Brown; Memento Dual Tip Markers (to color the rabbit)

Monday, October 10, 2016

Giant Paper Cutter....

You all know how much I love vintage things.  Well, today I wanted to share a video I made of our vintage paper cutter in action.  This isn't like anything you've ever seen....this is a HUGE paper cutter...an industrial one that was originally manufactured for cutting paper and book board for the printing industry (maybe newspapers too - not sure on that).

It is a 1928 Chandler & Price Guillotine Cutter and weights over 2 tons.  The company that had previously owned it was bought out and the new owners were going to have it hauled off to the junk yard.  It wasn't something we HAD to have for our business but we couldn't let this unique piece of history be hauled off and melted down for the steel.  Dh bought it and we now use it to cut cardboard and industrial tissue paper (we use to package our screen printed items).  It still works like a charm and no more than we use it should last another 100 years.


I hope you enjoyed taking a look into the past as much as I enjoyed sharing it!

Oh and before I forget, the first operator was my DH - Eric and the second one was our youngest son Bob who also works for us.