Sunday, April 27, 2014

ATC's are Done!!!

Wooo Hooo!!!

I just wanted to let you know that the ATC's have been opened, photographed, sorted, packaged, postage and are sitting here beside my desk waiting for the post pick up tomorrow!!!

I am so happy and excited ~ 
with the swap as a whole, 
the ATC's,
to be finished sorting and packaged,
to have them posted 
and
for you to see them!!!

I'll be sharing photos tomorrow...
If you want to be surprised, don't look ~
other wise drool to your hearts content - LOL!!

Now some of you who sent in larger quantities may get multiple cards from some people (no dups)...there seemed to be two groups - those that sent several cards or those that sent 4-5 cards.  The 4's & 5's only went so far which is why you'll get more from some people.

I hope you all had lots of fun making your cards (it looks like you did)
and I hope you enjoy the assortment you get back.

I thank you...
and
Mom thanks you 
for making this such a fun swap!!!

Saturday, April 26, 2014

Pink Persimmon 30% Close Out

Pink Persimmon just announced they were going to stop selling clear stamps :(

Black-chalkboard30Discount
Get your stamps here....
before they are gone!

Friday, April 25, 2014

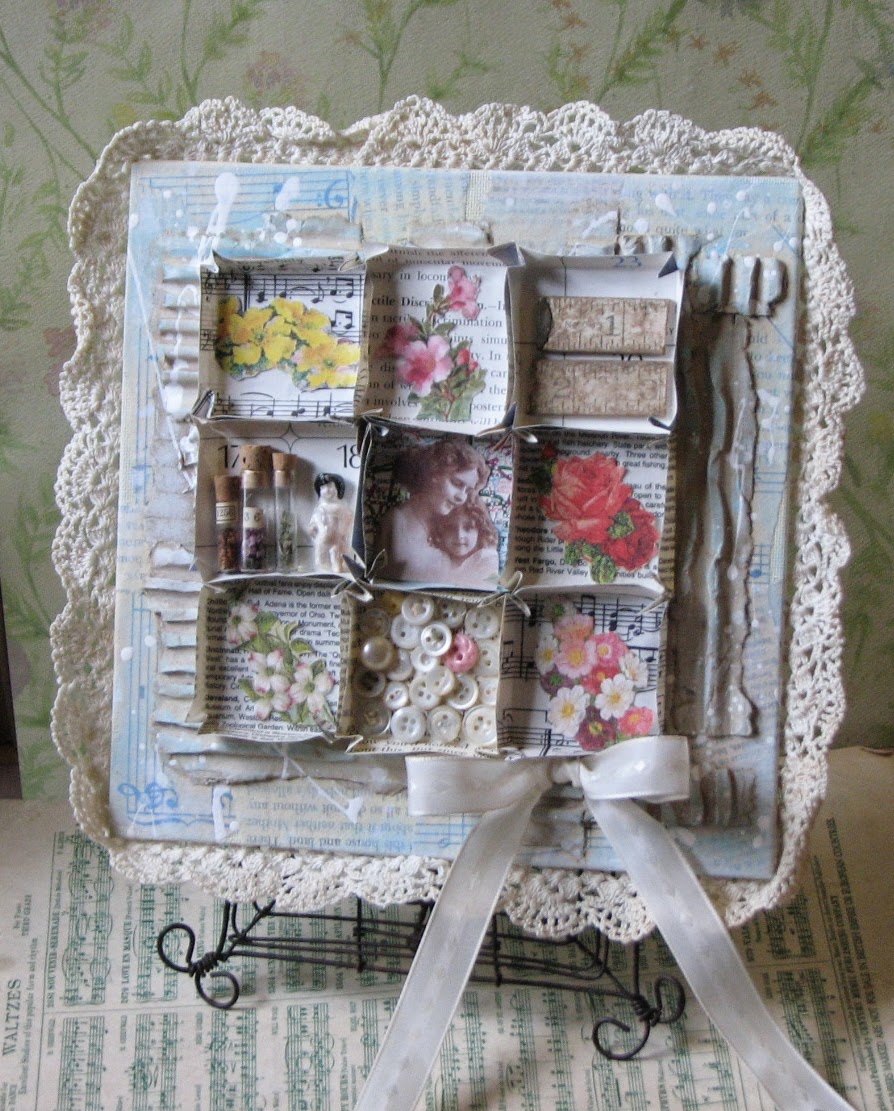
Ephemera Photo Canvas - Pt 2

O.k...  yesterday we left the canvas to dry.


Now we're going to pick it up by creating the little ephemera boxes we're going to affix to the canvas.  To start off with you're going to need 9 pieces of ephemera.  The size will be determined by your canvas.  For this example I'm going to cut the pieces 2.5" x 2.5" square.  For larger canvases you could cut larger pieces for larger boxes or you could still cut the 2.5" squares but add more to your canvas.  It's totally up to you.


Score each of the squares 1/4 - 1/2" on each side.  You're also going to score a diagonal line in each of the corners as shown below.


Crease and fold each of the sides - you're going to pinch the scored corners in towards the center.  You don't need to add any glue - we're going to use them just as they are.  Fold the other 8 squares of paper.


Now comes the fun part...you can add collage images, photos, bits of ephemera, stamped images, or anything you like to each of the squares.  I was originally going to use photos and collage images but I changed my mind after I got going...  I did use several vintage looking flower images (from Altered Pages)


But I also filled one of the boxes with mini buttons...


a few pieces of a foldable ruler and more!


Once you have all of the boxes filled, it's time to start affixing them to the canvas.  You can see here (sort of) where I made an X in the center of the canvas using a highlighter.  This is just to give me a starting point for gluing my first box down.


I started by gluing the center box down then gluing the rest of the boxes in.  When you place them on the canvas you want to make sure that all of the edges are snug against the others.  This will ensure that the walls of the boxes will stand up.


And here's what it looks like with all of the boxes glued down...


You can finish it off any way you like.  I added some vintage crochet lace around the outside and added a bow.    I kept it simple because I wanted the boxes to be the focal point...not a bunch of embellishments.


So there you go...
hope you like it and give it a try.
It's really lots of fun to fill the little boxes.

This is a great idea for gifts because you can use any little goodies in the box so they can be highly personalized for anyone!

Thursday, April 24, 2014

Ephemera Photo Canvas

Today I wanted to start on a canvas that is so versatile...today we're going to be building foundation of the canvas and tomorrow we'll be bringing in the ephemera & photos.

You're going to need the following supplies today:


Canvas (Gameboard or other sturdy foundation)
Ephemera
Corrugated Cardboard
Collage Glue ~ I'm going to be using Dina Wakley Gel Medium
Paints - I'm using Distress Paints
Water

Instructions:

1. Begin by tearing your ephemera into medium/small sized pieces.  Mine are about 2x2 - 3x3 and I have a few longer pieces as well..

2. Adhere your pieces of ephemera to the outside edges of the canvas.  You don't need to worry about the center, we'll take care of that in the next step.  Be sure to let your adhesive dry completely before moving on.


3. Tear the corrugated board into any sizes you want to work with and adhere it to the center portion of the canvas.


I wanted to add a bit of a twist so I glued one large piece of cc to one side of the canvas but on the other side I glued down smaller torn bits in a variety of directions.  Just helps break up the collage and gives it a bit more interest.  Let the glue dry completely.


4. Paint the entire canvas with a unifying color.  I used Antique Linen Distress Paints.  I used this paint because it's got a nice transparent quality - it lets the ephemera show through but it's still got a nice uniform color.

If you don't have Distress paints then you can use regular acrylic paint watered down a bit to make them more translucent.


5. Next I wanted to add a bit of color so I rubbed a bit of Tumbled Glass here and there.  Not real even...just some highlights to bring out the texture of the cardboard.


6. Now I watered down some white paint and flicked it over the canvas.  


I'm going to stop here as it will take a while for all of the layers to dry completely.  Tomorrow we'll pick it up starting off with making photo "boxes" out of ephemera.  You'll also need 9 - 2x2 images - these can be photos, collage images, stamped images, etc.

See you then!

Wednesday, April 23, 2014

Stenciled Alcohol Inks Technique

Today I have a fun Alcohol Ink technique to share with you.  I've been waiting a while to share this but I had to save up enough money to get a very special die I wanted to try with it... Spellbinders Fancy Lattice ~ it looks Moroccan to me but they can call it whatever they like...I LOVE it!


Why this pattern?  Well, I was shopping about 2 months ago and I saw a shower curtain that I LOVED ~ it had such a beautiful pattern on it I just had to try to reproduce it.  Of course I could have used any die but ya know when you get an idea in your head anything else just won't satisfy.  So, I finally got the die and we're all set to go!
Stenciled Alcohol Inks

NOTE: I am using a paper stencil from a die-cut for this technique but you of course could use a plastic stencil as well.  I just got this idea in my head and had to give it a try.  

Supplies:

Alcohol Inks
Die or Stencil 
Glossy Cardstock
Felts & Ink Applicator

Instructions:

1. Cut your paper stencil from a favorite die or you could always use a plastic stencil as well.  


2. Ink up your glossy cardstock using any combination of alcohol inks you're heart desires...


3. Cover your cardstock with the stencil.


4. Apply your choice of Snow Cap; Metal Mixative or darker color of AI over the stencil and inked cardstock.  I am using Snow Cap for this example...


Remove the stencil to see what you've got!
This is exactly what I had in mind when I thought of this...
The shower curtain was very similar in color and the pattern matches perfectly!
I just love it...well worth the wait :)


I tried the same technique with a variety of color combos...all using the same pattern.  You don't have to use the all over pattern idea as I did in the first example.  For the red one I just dabbed the Cranberry AI in the corners...


I tried a few more combinations and I love them all. I did use the same paper stencil for all of the examples.  The alcohol ink soaks into the paper but evaporates quickly so no worries about transferring colors or anything.  The paper never got saturated enough to do it any damage so I think you could use the same paper stencil over and over without having to switch it up.


Now it's your turn!
Pull out your favorite stencil or die and set to work!

Epic Rubber Band Crafts Winner!!!

And the winner is....

Elly!!!

Thank you for the possibility to win this book. It just starting here in the Netherlands.
I would love this for my grandchildren to get busy and work with it.

thank you
Helena

Congratulations Helena!!
Please e-mail me your snail mail addy so I can drop this in the mail for you.

Updates - Swap, Watercolor Paper Comparison, Gelli Plate & more!

Lots going on so I thought I'd give you all an update....

First off on the ATC Swap - I have rec'd all of the envies save one which may be MIA somewhere in the postal system.  The package was tracked entering the system but then there hasn't been any additional information on it...  They are looking and hopefully we'll hear back soon.  After that I will begin sorting - YEAH!!!  I still haven't opened the packages so it's going to be like Christmas opening them all up at once :)

Next I wanted to update you on the watercolor paper comparison.  I ordered a boat load of watercolor papers...way more than I should have actually.  I think I have like 25 different types ~ I went kind of bonkers at Dick Blicks  ~ far too many to choose from - LOL!!  Anyway, I have one more type coming (from Ranger) but it's held up waiting for the Dina Wakley paints to ship.  As soon as I get it I will begin working on comparing them with each other.  I probably won't compare all of them but it will be a nice variety.  I can't wait to see how it shakes out.

Gelli Plate - from all the comments and e-mails it looks like lots of you want to see what it's all about.  Most people have been asking for the basics because they don't have one and are considering it or they haven't opened it since they bought it.  I can and will do that!  I'm thinkin' in the next couple weeks (depending on the ATC swap).

I have a fun project I'm going to start (prob. tomorrow) that would make a neat Mother's Day gift that I think you'll like...rubber stamping, paints, inks, ephemera and more!   If you want to play along you'll need a sturdy foundation and if desired several photos printed 2" square.  There will be room for 9 photos but you don't have to fill all 9 with photos, collage images, ephemera or other bits can be used just as well.

I'll be posting the winner of the rubber band crafts in a few and I'll be posting a fun technique using Alcohol Inks and a paper stencil later this afternoon.  I got a great new die that I've been waiting to use for this technique for a while now, I just had to save up the $'s to get it...now that I finally have it in my hot little hands I can't wait to share it with you!

So that's the latest...

Tuesday, April 22, 2014

Trending Tuesday ~ Moo Cards

This month Altered Pages has teamed up with Unruly PaperArts for a month filled with artsy fun.  Each month UPA focuses on a particular theme - this month being Mail Art & Moos.  They also offer up creative prompts in the way of images and words.  This months prompt was Teacups & Tiaras and the image below...


So I set about making my moo cards.  What are Moos?  Well they are tiny bits of art...I like to think of the as ATC's little brother.  Measuring only 28mm x 70mm (approx. 1 1/8" x 2 3/4") they are like quick little power shots of art.  They don't take long at all to create and other than the size there really are no rules.  You can create to your hearts content without anything to hold you back!

I ran with the creative prompt and created this set of Moo's I called....

It's Tea O'Clock!  


I used several collage sheets from Altered Pages to create this little tea time works: 701 Victorian Tea; 2096 Royalty in Action; 3032 Tea Party and 3033 More Moos (moo card backgrounds). 


Be sure to visit the Altered Pages Artsociates blog to check out the other fun Moo cards created by the AP DT this month.

Have you ever created a Moo card?
Maybe it's time you did.

Monday, April 21, 2014

Gelli Arts Gel Printing Plate - Anyone???

Happy Day Everyone ~
I hope you all had a wonderful weekend!

8in x 10in Gel Printing Plate

Today I wanted to see if anyone out there has a Gelli Arts Gel Printing Plate and if you'd like to see some of my experimenting with it.  I know it's a bit on the pricey side (20.00 - 70.00 depending on the size) but it's re-usable and you can create hundreds and hundreds of prints with just a few tools.

If you don't want to purchase a permanent type gel printing plate you can make your own version at home using gelatin.  There are several receipts out there some for the regular type gel plates and there is also a few receipts for "permanent" gel plates.  Now I've not tried making the permanent type but the regular old gelatin type works great.  The only problem with that one is that you have to store it in the refrigerator if you want to keep it.    Also, from what I've heard the plates made using alcohol smell badly.

So, do you think you'd like to see the Gelli Plate in action or no?  JLMK ~ I'd love to hear your thoughts!

Sunday, April 20, 2014

Happy Easter!!

Hope you all have a blessed day with your family and friends!

Enjoy....