Friday, December 23, 2016

Snowman Hugs


Sending you a little snowman love!

I had so much fun creating this card. Yes, sometimes creating a cleaner simple card is fun but I had such fun making all of the different layers of this card - from the card base layer to the embossed die-cut to the vellum, the layers of the snowman and more. It was nice to dive into the world of ink and just play!

For complete instructions, please see 


Any snow in your area?  We are currently experiencing a warming trend...we still have a nice layer of snow though that will last through Christmas.  Afterwards I'm not so sure because it's supposed to get up into the 40's which is crazy for this time of year in Indiana.  Hope you all stay safe and warm over the holidays!

Tuesday, December 20, 2016

A Bit of Christmas Card Fun

Just wanted to share a few Christmas cards I've made recently...


My all blue nutcracker prince. JFF stamps and he was colored using Memento Dual Tip Markers.


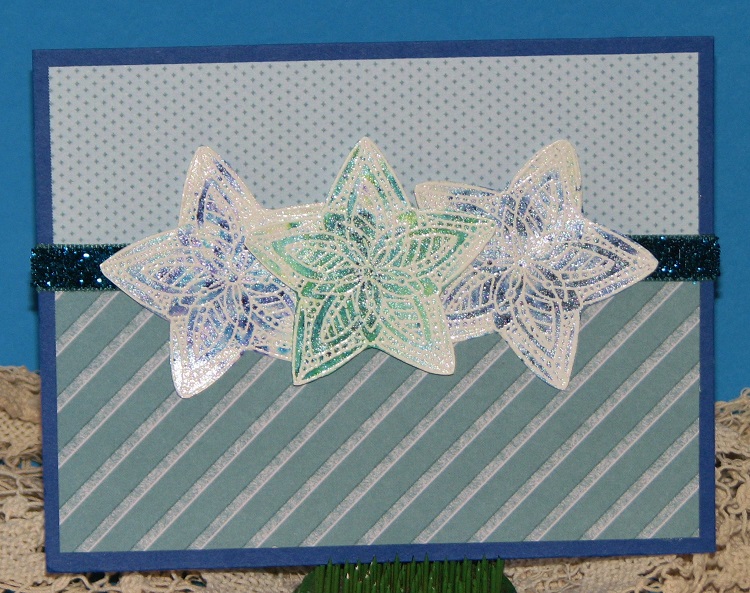
A Stamptangle Star (2 sizes).
The first 2 star cards were made using Brusho Colour Crystals.


This one I colored to highlight the pretty poinsettia hidden in the center of the star.  The stars are actually embossed, colored and several layers stacked.  It's very dimensional IRL but it just didn't show up in the pics.


Supplies: 
Just For Fun Rubber Stamps
Imagine - Ink, Embossing Powders, Markers
Brusho Colour Crystals
Club Scrap - Cardstock


Monday, December 19, 2016

December CS Artist Team Challenge

Welcome to December's Club Scrap Artist Team Challenge!  This month we were invited to participate in one of the many challenges offered on the Club Scrap Forum Challenge section.   There are many challenges to choose from including a Tool and Stash Challenge, a Monthly Lay-Out Challenge, Idea Deck Challenge and even the Card Sketch Challenge which I am a co-author.

I didn't want to cheat and participate in my own card sketch so I decided to do a little challenge combo.  I chose to participate in December's Project USE IT! Challenge which is to make an old or unfinished Club Scrap project and combined it with December's Tool and Stash Challenge which was to incorporate a liquid glitter glue on your card, lay-out or project.   Here is what I came up with....


This is the Clipboard Collage Workshop from the 2016 Club Scrap Retreat.  This is such a fun project because you have a printed sheet with little stitched windows that you fill with various papers and goodies to finish off the collage.  The kit includes papers cut to size plus extra goodies for embellishing.  I choose to use the papers from December's Color of Winter kit plus a few of the items from the workshop supplies, a few die-cut snowflakes and a sled I made using Fun Foam!

I am going to hang this up by my front door for my Dec/Jan welcome sign.  This project was so much fun that I'm thinkin' of making a different collage page for each season so that I can switch 'em up every few weeks. 


The tag, tiny sparklie snowflake stickers, and metal charm snowflakes are from the Shades of Winter kit, the "Hello" die-cut is from the project kit....  I die-cut several snowflakes (MFT Dies) from the Champagne and Blue Metallic papers from the Shades of Winter kit plus a few from the Glitter Cardstock from the Celebrate kit (Jan 2016).  


Welcome letters are cut from one of the metallic papers from the Shades of winter kit as are the berries and "let it snow" piece.  The roses and "find beauty" sentiment are both from the kit contents.


And finally my sled!  I had made some of these before using popsicle sticks BUT they are hard to shape with scissors because the wood splinters so easily.  I had some brown Fun Foam laying on my desk because I had used it to emboss a die-cut (when I couldn't find my embossing pad) and I decided to give it a try.  It worked like a charm and the foam was soooooo much easier to cut and shape than the wood popsicle sticks.  

To participate in the Tool and Stash challenge I applied Stickles Glitter Glue to the centers of the Metal Snowflake Charms and to each of the berries on the center and lower left corner Berry Pieces.

Your next stop on the Challenge Hop is...


and if you get lost along the way you can find the complete list here...


Merry Christmas Everyone!!

Monday, December 12, 2016

Non-Traditional Christmas Cards

It was my turn to pick a challenge for the December Technique Challenge on the Club Scrap blog.  I decided since it was Christmas time it would be fun to create Christmas cards without using Red, Green or Gold.  As an added challenge I thought it would be fun to toss in some Glitz somewhere.

I created 4 different cards using various colors that you normally wouldn't think of as traditional greeting cards for Christmas.  While I was at it I gave myself an extra little challenge to use a color I normally don't use much to see if I could make a card using it....what color is IT?  ORANGE!!!  I normally shy away from bright colors but I did it....


What do you think?

Despite the very bright, un-Christmas like color I think it turned out pretty good.
The stamped image was inked using Electric Orange, Tangelo and Morocco inks.
Do you see all those teensy-tiny gemstones?  Were those ever a PITB to glue down....
They stuck to me more than they did the card - LOL!!
Everything (besides the ink) is from Club Scrap.

If you'd like to see the rest of the cards I made be sure to 
jump over to - December Technique Challenge.

Have you ever made a non-traditional holiday card before? 
What colors did you use?

Friday, December 9, 2016

IC 2017 Artist in Residence Announced!


And yours truly is on that team :)

Please see - 2017 Artists in Residence - for an introduction to each of the members of the team in the upcoming year.  So excited and can't wait to share more Imagine inspired projects of all kinds.

roni-johnson-2017

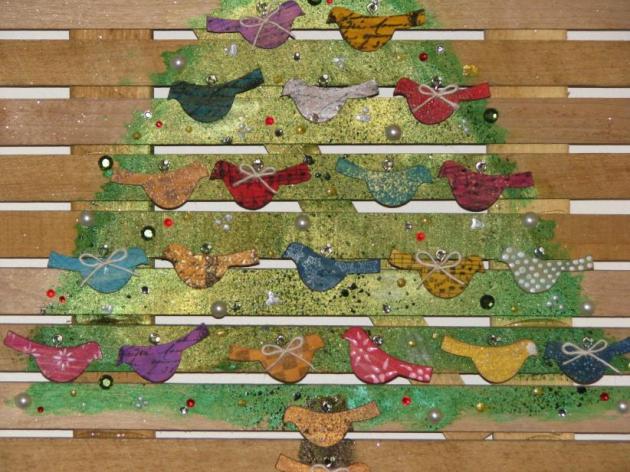
2016_nov_rj_birdadventcalendar_step14


Thursday, December 8, 2016

SIP Challenge #77

Now it's not a sip and paint challenge but it is a fun one...Stamp, Ink and Paper Challenge #77 is a sketch challenge (shown below).  It looked like fun so I thought I'd join in.


I created this card using December's Club Scrap Kit - Shades of Winter.  I have to tell you I LOVE this kit...of course there is blue but the prints are amazing.  The background is one of them.  It's actually an off white embossed print that you can color any ole' way you want.  


I used Silver Metallic ink paired with Paris Dusk Memento Ink.  I randomly sponged each ink on the paper and it turned out amazing.  There is also metallic blue and champaign text weight paper in the kit which I used to cut out the snowflakes (along with some Sparkle Paper).  The blue strip along the edge of the card is the metallic that I added a few faux stitches with my white gel pen.

sip-sketch-challenge-77-800

Supplies:
ClubScrap.com - Shades of Winter - Papers, Stamp, Silver Ink, Sparkle Paper
Imagine - Memento - Paris Dusk; VersaFine - Onyx Black, Sponge Dauber
My Favorite Things - Snowflake Dies, Scallop Stitched Circle
Other - Gel Pen, Sequins, Vellum


Card Sketch Fun

Happy Day friends!  I hope you're all enjoying the season and getting into the holiday swing of things.  I'm woefully behind but hey...I'm still here so that counts for somethin'.

This month was my turn to create the sketch for the December Card Sketch Challenge on the Club Scrap Forum!


This was the sketch I created!

It's a great sketch to use up leftover cut-offs, ribbons, border strips, etc.

And here's what I created....


This card actually utilizes two different pattern papers from the Girlfriends kit.  The first is the flower/chevron paper - so easy to cut short strips from the paper.  They were mounted onto the blue background which amazingly enough already had the horizontal dot stripe!  That stripe looked to me like a piece of ribbon which worked out perfectly!  The sentiment was stamped with Delicata Dark Brown Shimmer ink (really beautiful IRL). 


My second card uses materials from the Paradise kit including a piece of flamingo ribbon, hibiscus border strips and some fun stamps.  The images were stamped using a variety of Memento Dye Inks and I finished it off with a bit of ribbon.

A bit later this month I'm going to share a couple Christmas cards I made using this sketch as well.

Also, several people have asked about the technique calendar which I usually start in January sometime.  I have already started planning and I think I'm going to start it a bit early - shortly after Christmas so if you'd like to play along be on the lookout :)

Friday, December 2, 2016

Christmas/Winter Challenge

Happy December everyone!  It's the beginning of the month and that means a new stamping card challenge at Just For Fun Rubber Stamps.  This month's challenge is your choice of Christmas and/or Winter!    If you stamp a card or any other creation with one or both of these themes be sure to enter it into our challenge for the chance to win a Gift Certificate to the JFF Rubber Stamps on-line store (GC are chosen at random by Random.org).

NOTE: you do NOT have to use JFF stamps in your creation but it would be great if you did!


and here are a few cards I made for a bit of inspiration....


Remember, you can't win if you don't enter :)
Happy Stampin' my Inky Friends!


Wednesday, November 30, 2016

Club Scrap Paradise Blog Hop

Welcome to another fun filled, inspiring Club Scrap blog hop!  This month we are focusing on the kit - Paradise.  Such a bright, beautiful kit that's got some really fun sentiments.   I decided that I wanted to make something that reminds me to relax and be unique all the time so I made a little something to set on my desk that will remind me to do so each day....

Bet you'll never guess what it is....

....

....

....


I created my own desk organizer!  

I thought the bright colors would cheer up any day and that sentiment...how could you not smile after reading that???   These are tubes we have at work that I cut with dh's miter saw.  It was so quick and easy and lots of fun!  I decided to emphasise the bright colors on the pattern papers to decorate the inside of the tubes so I painted them with Lagoon Blue mixed with Sparkle acrylic paints and I added Limeade along the rim.

Once the paint had dried I wrapped each tube with the various pattern papers included in the kit. I then cut off the pizza box top the kit comes in and arranged the tubes how I wanted them to be placed once finished, drew out the pattern and cut out the base.  Each tube was then hot glued into place.  I added the ribbon, flamingo sentiment and "relax" sentiment and finished gluing the tubes together (near the tops of each tub).  I finished it off by wrapping the base of the organizer with the blue ribbon included in the kit just to give it a pretty little finishing touch.

Final step....
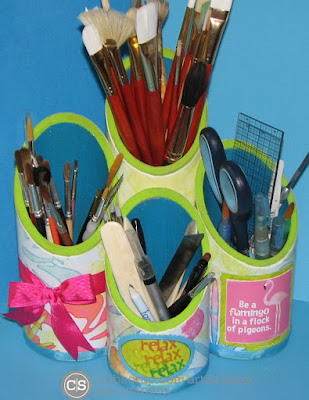

Fill it up!!!

These tubes are large enough to accommodate lots of goodies and sturdy enough to stand up to lots of use and abuse.  


And with the great papers it looks pretty from all sides!

I had lots of scraps from making this project and other cards I made earlier this month so I decided to make a few more cards to use those scraps up....


the "swish" down the center is actually a leftover piece from wrapping up the tubes above.  Made a great focal point in the background.


Strips cut off of the photo mats that I used for cards...
with a bit of stamping makes for a fun card huh?


This is another left over bit from wrapping up the tubes.  I cut out the "pretty part", paired it with some stamped images/sentiment and a few buttons all from the kit.


Hope you've enjoyed this stop on the hop
and find a little inspiration to use in your own creations!

Your next stop on the hop is


and if you get lost along the way
the entire list of designers can be found here:


Thanks so much for stopping by!

Monday, November 28, 2016

Imagine & Flourishes Blog Hop!

Welcome Friends to the joint Imagine and Flourishes Blog Hop!!

Imagine Crafts

We've put together a fun and inspiring artful journey for you to enjoy melding the amazing array of inks, mediums and tools offered by Imagine with the lovely stamp images and sentiments from Flourishes.  Grab a cup of your favorite beverage, sit back and enjoy the ride.  (Complete list of hoppers can be found at the end of this post.)


I was blown away by the stamp sets I received from Flourishes, I just couldn't decide which one to use so I made a card or two using each set...enjoy!


This card was made using the Camellia Love stamp set, Memento Dye Inks, Onyx Black VersaFine and  Memento Dual Tip Markers. 


My Cup Overflows was used for this card along with Imagine's - Cosmic Copper & Dark Brown Shimmer Delicata Ink, Frost Sheer Shimmer Spritz, Onyx Black VersaFine (to stamp main image & Sentiment) and Memento Dual Tip Markers (for the coloring).


Both Let it Snow and Noel were stamped using the It's All in the Details 2 and Monogram Alphabets.

Let It Snow used VersaMark Ink, Silver Embossing Powder, Onyx Black VersaFine, All Purpose Inks & FantaStix to color the images and Danube Blue Memento Dye Ink for the edges.


Noel's background is a combination of Green Encore! metallic ink, Clear Embossing Powder, Memento Dye Inks and Gold irRESISTible Texture Spray.  The sentiment was stamped with VersaFine ink, Green Encore! used for the images and colored with All Purpose Inks then spritzed with Gold Sheer Shimmer Spritz. Golden Glitz was used to color the frame.  


And finally Winter Bouquet stamp set, Onyx Black VersaFine ink, Memento Dye Inks, Memento Dual Tip Markers, Shimmer irRESISTible Pico Embellisher, and Pear Tart Fireworks! spray were used to create this card. 

Thanks so much for stopping by!

Be sure to leave a comment on each stop of the blog hop for your chance to win some wonderful goodies from Imagine and Flourishes!!

Imagine/Flourishes Blog Hop Road Map...


Kren Kurts 

Neva Cole  

Roni Johnson - You Are Here :)

Linda Lucas