This week the Split Coast Stampers featured a pretty cool technique which peaked my interest.
It's called Bokeh Background
(pronounced like bouquet if I'm hearing her correctly in the video).
Apparently it's the technical term for the type of photos where your focal image is clear and everything in the background is fuzzed to the point of colored circles.
Like this....
I've always liked that look but never knew what it was called...or for that matter that it even had a name.
In the SCS technique she used a combination of Gelatos & Ink for her creation but I have been wanting to play with my chalk inks so I decided to pull them out.
If you want to see the original Bokeh Background Technique be sure to click on the name (either above or here).
My version...
I started off just like she did by stamping the sentiment, it really helps with image placement. I stamped my leaf a bit closer to the sentiment because I wanted to go left & down with my dimensional leaf.
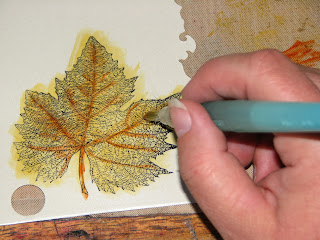
I then pounced some of the Yellow Ochre onto my craft mat and picked up a bit at a time to "watercolor" the image. Yes, the lines will smear a bit because I didn't heat set it to completely dry it. No worries though, soft is good for this portion of the card.
Here's what it looks like at this point...
Now time for dots.
I made a test dot sheet just to see how much ink a pounce would hold and how many dots I could make with one inking. I got 7 graduated dots from one time inking which I thought was pretty cool.
So, I started dotting around...
Do you know how hard it is to purposely make something look random?
It's harder than it sounds - LOL!!
And here are all my little dots...
Next I stamped an image onto a piece of pearl specialty cardstock. It's got built in shimmer which will show through the ink. I covered it with a light coat of the Yellow Ochre.
Then I went in and added some pretty defined lines with Burnt Sienna Chalk Ink
That I went back and blurred a bit.
This ink was also added around the edges and blurred.
I then used Amber Clay Chalk Ink to blend it all together..
Just to show you this same technique will work on regular cardstock I quickly painted a partial leaf image on Georgia Pacific white cardstock. I actually think I like it better but oh well...
I then fussy cut it out and inked the edges with black.
I folded and bent it here and there for a dimensional look and added it to the card with some double stick foam tape.
And here it is....
Stamp Credits: Autumn Leaf - Stampers Best; Sentiment - Club Scrap
Cardstock: Club Scrap Tribal
WAY fun technique and I've got a couple ideas I want to try with this...
I'm thinkin' it's got LOTS of fun potential for alternative ideas.
Can't wait to explore it some more.


Love the technique and great instructions. Beautiful card.
ReplyDeleteVicky Briggs
Great use of the technique. Your card is beautiful!!!
ReplyDeleteThe leaf is beautiful, and colors are lovely for fall! (P.S. I love the photo you use of yourself!)
ReplyDeleteNoreen
Crafty Journal
Lovely card Roni!
ReplyDelete