Monday, July 31, 2017

Frame It! Club Scrap Artist Team Challenge

Hello friends and WELCOME!

Today I wanted to share a fun challenge with you...the Club Scrap Artist Team was challenged to stamp a frame on our project.  Well I decided to share 3 different ideas for stamped frames on cards that I like to use from time to time.  


My first card is pretty straight forward...  I penciled on stamping lines then stamped the flowers over the lines.  After the ink had a chance to dry I erased all of the pencil marks and colored the flowers with a variety of colored pencils.   Glitter was added here and there for a bit of bling.


The next frame was stamped using many different stamps and ink colors. This technique creates more interest and gets your eyes moving over the entire card.  


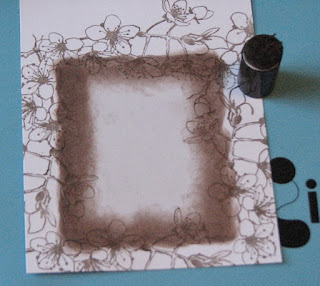
The final stamped frame technique is a bit different.  I cut the card panel to the approximate size I wanted then centered a mask on the card panel.  I stamped my image on the exposed areas of the panel and I also used a sponge dauber to ink around the very edges of the mask.  Once the mask is removed you have a lovely stamped frame on the card panel!  I finished it off with the sweet sentiment, a few stickers, glitter and twine.


While it does take a bit more time to create this frame the finished results are very much worth it I think don't you?  

I hope you've been inspired to stamp your own frame on a card but just in case there's lots more inspiration to be found in this team challenge - Club Scrap Artist Team Challenge - Frames.

The next stop on the hop is...


Supplies:

Club Scrap - Cardstock, Stamps, Embellishments, Book Binding Glue
Imagine - Memento Dye Inks, Sponge Dauber
Masking Paper
Colored Pencils
Glitter

Wednesday, July 26, 2017

Vintage Botany Club Scrap Blog Hop

Welcome friends to the Club Scrap Blog hop...you may have found your way here from Julie's beautiful blog and if not you can find the full list of artists here - Club Scrap Vintage Botany Blog Hop.

The kit this month from Club Scrap is called Vintage Botany and oh my, do I ever love it!  It's beautiful and with the word vintage in the title you know it's got to be great.  Well I knew exactly what I wanted to make...


An envelope album! I love these types of books because there is so much space for photos and journaling.  What made me think of it is I found a whole pack of A7 (5x7) envelopes recently while I was re-organizing. I knew they would make a great album and couldn't wait till I had a chance to put them to use!

I used 9 for this album...of course you can use as many or as few envelopes as you need which makes this so fun and versatile.


These are just a few of the pages....


I added a pull out "card" where you can add photos and journaling as desired.


The cool part is that you can actually put pics on both sides of the envies!


I added this lovely sentiment to the front.
Only thing left is to gather up my photos!

So glad you stopped by...
the next stop on the hop is...


and if you get lost along the way...


Hope you have a crafty day!

Supplies:

Club Scrap.com - Vintage Botany: Cardstock, Pattern Papers, Tabs, Ribbon, Cut-Aparts; Club Scrap Hybrid Ink - Earth; Club Scrap Ink Applicator

Other: 

Chipboard
Prima - Green Twine

Wednesday, July 19, 2017

Stencil Girl & Imagine Blog Hop


Welcome to the Imagine - StencilGirl Blog Hop!
(see the Imagine & StencilGirl blogs for a complete list of artists featured each day.)

I'm so excited to share my creation with you today.  It's a bright bold canvas that captures all of the hopes and dreams of the happy couple (my youngest son and DIL) on their special day.  Their first anniversary is coming up and since Paper is the traditional gift on the 1st anniversary I thought this would fit the bill.


I started this canvas off by applying Dandelion, Lilac Posies and Tangelo Fireworks! Spray to the canvas board. Once it was dry I stenciled on the numerous designs using a mix of Memento Dye Inks and Radiant Neon Inks with a Sponge Dauber (Stencils and Ink colors listed below).

After the inks had dried, I applied Iridescent Blue Creative Medium over another stencil to create a lovely textured pattern that shimmers beautifully when viewed from various angles.

Finally I flicked on Tuxedo Black and Wedding Dress (white) irRESISTible Texture Medium here and there and applied Delicata Black Shimmer Ink to the edges for interest and definition.


Close up showing the various layers of color/texture created by the stencils, inks and mediums.


Another view of the Iridescent Creative Medium showing just a bit of that lovely shimmer.


One lucky winner will receive both 
a $25 Gift Certificate to StencilGirl Products
AND
 a $25 Gift Certificate to Imagine Crafts!

Visit the fabulous designers from both teams and comment for your chance to win! The more blogs you comment on, the more chances you have to WIN! (One comment per blog please.) You have until Sunday, July 23rd at 11:59PM Central Time to leave your comments. Winner will be announced on StencilGirl's Facebook page and Imagine's Facebook page on Monday, July 24th.

Good Luck Friends!!

As an extra little bit of fun I have hidden a word in the canvas ~ not the Past, Present, Future phrase ~ but something else.  Can you find it? If so, please be sure to post it in your comments...you could be the lucky winner of a little something from me if your guess is correct. If more than one person finds and identifies the word correctly I will use Random.org to determine a winner.  Have fun searching!

Supplies:

StencilGirl Stencils:
S435 Alpha Drips
M153 Number Drips
S214 Past Present Future
M058 Urban Insiders Square
M139 Diamond & Triangle Mini

Imagine:
Memento Dye Ink - Tangelo, Dandelion, Lilac Posies, Teal Zeal
Radiant Neon Ink - Electric Green, Electric Yellow, Electric Purple
Fireworks! Spray - Tangelo, Dandelion, Lilac Posies
irRESISTible Texture Medium - Tuxedo Black, Wedding Dress
Creative Medium - Iridescent Blue
Delicata - Black Shimmer
Sponge Dauber
Palette Knife

Other:
BlickArt - Canvas Board
Photo

Tuesday, July 18, 2017

CAS(E) this Sketch #230

Been gone for a bit but now I'm back...thought I'd ease into it with a fun sketch from CAS(E) this Sketch #230....


It's made using papers and stamps from the current Club Scrap kit - Vintage Botanical.  I LOVE this collection...it's very me.  I love the muted colors and subtle patterns. I did a bit of double stamping for the sentiment - the "background" color is Memento Lilac Posies which I also used to edge each individual panel. I really tried to leave it there but I had to add a few sequins for a little glitz.


Have you tried a sketch lately?
It's very refreshing.

Supplies:

ClubScrap.com - Cardstock, Pattern Paper, Stamps
Sequins

Monday, July 17, 2017

A Little Something

Recently the Imagine team was challenged with the theme....  "Itsy Bitsy, Teeny Weeny"   No, I didn't make a yellow polka dot bikini but I did use polka dots....  Lots and lots of them to create this....


The background was stamped using a tiny tri-dot stamp in the Waffel Flower set Wild and Free....


See the tiny stamp above the bird...that's it!


Stamping, stamping, stamping...it's almost zen like going back and forth.


Whew...done stamping.  LOL!

I finished it off just as you would any other card.
If you have the time, give it a try...it's fun and relaxing at the same time!

Supplies

Imagine

Memento Inkpad – New Sprout, Bamboo Leaves, Cottage Ivy, Olive Green, Summer Sky, Bahama Blue, Danube Blue, Love Letter
VersaFine – Onyx Black
Other

Waffle Flower – Wild N Free stamp set
Cardstock – white
Cardbase – navy blue

Friday, July 7, 2017

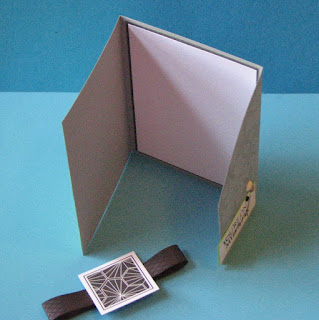
Tri Fold Card Details


If you recall last week I shared my set of 6 tri-fold cards tucked into a fun envelope package.  A few folks have asked for the details so here goes...

Card Base - 5 1/2"  x 10 7/8"
Score @ 4 1/8" and 8 3/8"

Mat 4" x 5 1/4" for the front.

Inside Double Mat (for writing or sentiment)  4" x 5 1/4" and 3 7/8" x 5 1/8"

Band - 1" x 9 1/2"

Decorative Square - 1 1/2" square

Sentiment - These mats vary depending on the sentiment used.

And here are a few more views of the card opened up....


The band removed...this one happens to be ribbon.


Front third opened.


All the way opened. 
I used white for the 2nd mat to accommodate a note to the recipient.


And there you have it!

I repeated the card base 6x then cut up mats in varying patterns to mix and match. The colors, styles and embellishments tie all of the cards together while each are unique in their own way.  Makes for a fun set to give or keep.

All Supplies - Club Scrap.com

Thursday, July 6, 2017

No Sew Upcycled Tote Bag

Happy Day!  Hope you all are having a wonderful day.  I have a fun project for you that is fun, quick and oh so easy!  A "no-sew" tote bag with a little pineapple flair!  Pineapple you say?  Yep, pineapple is the color of the month at Imagine so I thought it would be fun if I colored the tote to resemble the colors of a pineapple.


I was so surprised how much the finished tote will hold!  I stuffed in 4 beach towels, a couple suntan lotions and still had room for more!  I'm thinkin about makin' a few of these puppies for Christmas gifts. They would be so handy for all sorts of things.

Here's a quick run-down on how I did it....


Trim arms & neck to form a "V" in the center.


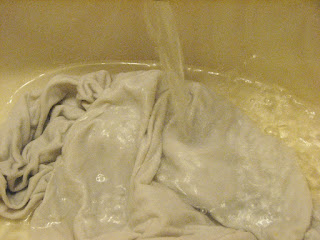
Wet.


Flick a couple colors of green, yellow and gold All Purpose Ink on the wet T.


Scrunch up the shirt and squeeze.
(this will distribute the ink giving it a tie dyed look.)


Lay flat to dry.
Once dry, iron on both sides to set the ink.


Snip the bottom into 1/2" strips about 3-4" up.


Knot and you're tote is done!!
Told you it was easy :)

Supplies

Imagine

All-Purpose Ink – Lemon Yellow, Vegas Gold, Spring Green, Green Apple
Doodlestix

Other

T-shirt
Scissors


Wednesday, July 5, 2017

Vintage Botany

OH MY GOSH... I am so excited... The new kit at Club Scrap this month is - yep, title gives it away - Vintage Botany and is it ever cool!  You all know how much I love everything vintage, well this kit is PERFECT IMO. It is so stinkin cool...  Now I've only seen photos of the kit contents so far but I was able to play with the digital hybrid kit yesterday and this is what I made....


Aren't they wicked?  These images are all on one "sheet" from the Vintage Botany Digital Hybrid Kit.  Although I've never printed on watercolor paper before I thought I'd give it a shot to see how it turned out.  I had a bit of trouble feeding it through my printer but when I finally figured it out it printed just fine...next step, to see how the ink would hold up with various mediums.  I'm happy to say it worked perfectly!


See for yourself....


This is my vintage daisy - I used Prismacolor colored pencils for this image. After I was finished coloring I flicked on a couple colors of green watercolor paint then added some pen work. Since this image was a bit more narrow than the other images I added a piece of gold washi tape to the edge of the card to help center it a bit.


LOVE this image!  Vintage cabbage roses - one of my fav's.  This image was watercolored using Kuretake Gansai Tambi Watercolors.  Love how it turned out. I flicked on a bit of copper watercolor once finished.


For the poppies I used my Stabilo Pastel Pencils.  They blended so nicely on the paper.  Afterwards to pull all of the images together I again flicked on a bit of watercolor and added pen work stitches.


Finally my "make a wish" card was colored using a wash of various blues and a touch of black. I flicked on blue and metallic silver watercolor after it had dried.  I did something a bit different with this pen work by adding a tiny heart, a small dot (along the top) and a hand-written sentiment along the bottom. 


Ya know it's harder to get a nice looking wash than you'd think...


All in all I love how the printed images worked on the watercolor paper.
The printer ink preformed FAR better than I would have imagined.
So very tickled, this opens up a whole new world of ideas.

Hope you like this fun sneak peek at the new Vintage Botany kit...
Can't wait to get my hands on the "real thing" so I can stamp/craft up a storm.

Happy Day Friends!
Stay Inky :)

Tuesday, July 4, 2017

Happy 4th Everyone!!

Happy Independence Day America!!!

Hope you all have a lovely day spent with family and friends enjoying this great day. All of us here in the United States are very lucky to be where we are. Have a fun and safe holiday celebrating the birth of our great country!


Colored using: Imagine Memento Dual Tip Markers


Colored using: Pan Pastels, Prismacolor Colored Pencils


Embossed Background - Sizzix 


White Embossing Powder (Imagine); Brushos Colour Crystals


Background: Memento Dye Inks; Embossing Black & White (Imagine); 
irRESISTible Texture Spray (Imagine)


Background - Brusho Colour Crystals
Stamped Images Colored using Stabilo Pastel Pencils


JFF Stamps: 

America the Beautiful
American Eagle
PAT-Fireworks Burst
PAT-Home of the Brave
Patriotic Block
Patriotic Ribbon
PAT-Statue of Liberty