Thursday, December 31, 2015

Happy Vintage New Year!

Just a few vintage New Year's postcards to share from me to you from my collection...


This card was sent from a son (Chicago) to his mom (Evansville, IN) in 1909...


Sent to Robert (Fremont, IN) from ???? - 1905.


And finally Violet sent this card to Edna (Hastings, MI) in 1907.

Please have a safe evening celebrating the passing of the old year into the new!


Wednesday, December 30, 2015

In the Navy.... Club Scrap Navigation Blog Hop

I was so excited when I saw the papers for the Club Scrap Navigation Kit - it has a lovely vintage Nautical theme!  Since both of my parents and my maternal grandpa were all in the Navy I knew this was the perfect time to honor their service to our country.

I wanted to create a trio of canvases that looked good together as a grouping so I started out by spraying each canvas with blue and green walnut spray ink then added a sprinkle of walnut crystals here and there.  You will also notice I used a thin gold string and small Dew Drops as embellishments on all of the canvases.  I used the dark chocolate map for the background then added torn pieces of the book pattern paper and distressed most all of the edges to help the uniformity.  


I made a canvas for each person - the first is my grandpa.  Awesome photo huh?  


I used three strands of jute to create this knot for beside the photo.  I chose this particular quote for him because I don't ever remember my grandpa being afraid of anything but always funny and happy. Of course that was from a child's perspective....


Next up is my Mom...


Look at that attitude - she still has it!


I chose this "cut-a-part" for my Mom's canvas because she met my Dad while they were in the Navy - stationed at Memphis I believe.  It led her on quite the journey to where she is today.


Finally my Dad - his canvas is the largest because I had the most photos of him.  I wanted to go all out and incorporate lots of layers and elements which also relates back to the sentiment for this canvas...  "The best things in life are the People you LOVE, the places you've SEEN and the memories you've MADE along the way."   Seems so appropriate for him and his time in the Navy/Life.


The bottom photo is the crew he lived/worked with on his ship.


I stamped a few of the stamp images multiple times and paper pieced them back together for a more dimensional look.


This anchor charm holds a photo of my Mom while she was in the Navy
since that's where they met.


I wanted lots of texture so I used a piece of torn pizza box cardboard behind the photos.  I also used some of the same jute from my grandpa's canvas to hold the anchor charm with the picture of my Mom.


and here are all three canvases together.

I hope you've enjoyed this very personal bit of art using the Nautical kit...
It was a pleasure to make them and share it with you.

The next stop on the hop is


if you get lost along the way 
remember you can find the complete hop listing on this post: 


Happy New Year!!!
All the best to you and yours 
in 2016!

Tuesday, December 29, 2015

Stamping All Year Long!!

Woo Hoo...I am so excited - 
I got my copy of Rubber Stamp Madness's new book - 
Stamping All Year Long.  


Why am I excited?  Because I have a card on page 58!


This is a lovely book, a single card is featured on each page with instructions on how each card was created.  The book focuses mainly on scenic stamped cards through out the year.  So if you love scene stamping or would like to know more about it this is the book for you!  You'll find loads of beautiful examples for occasions through out the year.

If you'd like to order a copy you can do so here - Rubber Stamp Madness Store.

Monday, December 28, 2015

Ice Ice Baby!

So did you all have a wonderful holiday weekend?  Ours was great but I have to say I'm glad to get back to a normal schedule...well, until NYE/NYD that is. Holidays are nice but they wipe me out.  Today it's frightful outside...we're getting a nasty little ice storm.  Everything I can see from my window is covered and looks pretty but danged if I'm going out...this is basically what I slipped on last year - sooo not doing that again!

Today I thought I'd ease back into it with a fun card challenge - Can You Case It is celebrating their 100th challenge and I thought I'd join in!  


My little ode to the ice storm...  my little Ice, Ice Baby owl 
here to wish you a Happy New Year.

Just For Fun Rubber Stamps - Owl & sentiment
Echo Park - Papers
Inktense & Prismacolor Pencils
IMAGINE Crafts - Bahama Blue StazOn, Bahama Blue Memento Ink
Glitter

If you have time you should join in on their celebration as well!

CYCI#100

Have a wonderful day everyone!

Blog Followers - Google Change!

Hi Everyone - I just wanted to take a second and let you know about a change Google is implementing. They are doing away with their old ways to follow as explained below so some of you may not be getting e-mails in your in-box or may have dropped off the "follow list". I know there are about 30-40 people effected here at Ink Stains because the follow number dropped off that many dropped over the last few days - unfortunately I don't know who they were to let them know.

So if you're following Ink Stains or any other blog with anything other than a google account you may want to check it out and sign up another way just so you don't miss out on any of the fun.


From Google -

In 2011, we announced the retirement of Google Friend Connect for all non-Blogger sites. We made an exception for Blogger to give readers an easy way to follow blogs using a variety of accounts. Yet over time, we’ve seen that most people sign into Friend Connect with a Google Account. So, in an effort to streamline, in the next few weeks we’ll be making some changes that will eventually require readers to have a Google Account to sign into Friend Connect and follow blogs.

As part of this plan, starting the week of January 11, we’ll remove the ability for people with Twitter, Yahoo, Orkut or other OpenId providers to sign in to Google Friend Connect and follow blogs. At the same time, we’ll remove non-Google Account profiles so you may see a decrease in your blog follower count.

We encourage you to tell affected readers (perhaps via a blog post), that if they use a non-Google Account to follow your blog, they need to sign up for a Google Account, and re-follow your blog. With a Google Account, they’ll get blogs added to their Reading List, making it easier for them to see the latest posts and activity of the blogs they follow.

We know how important followers are to all bloggers, but we believe this change will improve the experience for both you and your readers.

Posted by Michael Goddard, Software Engineer

Friday, December 25, 2015

Merry Christmas!!!

Hope you all have a wonderful day with family and friends.

A few vintage Christmas Cards
from my collection - circa 1950's.
Enjoy...


And a little somethin' to get you hoppin' on Christmas Day...


Thursday, December 24, 2015

Homespun Christmas...

Today I wanted to share one final Christmas card with you before the big day...


A CAS card made using Club Scraps Homemade Holidays.  Each of the cookie cutters was stamped on dark blue cardstock and embossed with gold ep.  They were attached to the card using a bit of burgundy jute.  I added a bit of pen work along the edge for a "home-spun" feel which fits in with Less is More's Homespun Challenge #255/256.


MERRY 
CHRISTMAS 
Everyone!!!

Wednesday, December 23, 2015

Last Minute Gifts - Part 2

Seems like we all need some help with last minute gifts and it just so happens that was one of my challenges for the IMAGINE Crafts blog!


Today's last minute gift could actually turn into several minutes because you might just get carried away like I did with these - Dog Tag Charms!  StazOn inks - both regular and opaques make these charms quick and easy not to mention FUN!


All you need are the dog tag blanks, StazOn Inks, Glaze On (to seal the inks), a few stamps and bit's and bobs to add to the charms.  Originally I started out intending to make 3 tags but ended up with a dozen!!  I don't know how I did it but they just went so quickly and I had so many ideas, I couldn't help myself.

To find the complete directions for these fun charms please see:


Now I would like to share these tags with a few readers.  To enter to win one of these charms, post an answer to this question:   Have you ever made dog tag charms or any altered charms for that matter.

You have until 12-31-15 to enter to win.

Good Luck Everyone!!

Tuesday, December 22, 2015

Last Minute Gift Ideas - Part I

Hey there everyone!  Only a few days left until Christmas!!  Are you ready?  I am - I think?!?!  But you know there are always last minute gifts that pop up here and there.  Luckily that is what the Club Scrap Design Team Challenge is all about this month - Last Minute Gift Ideas.

Here are a few to get you started....

I saw this one on Pinterest a couple months ago and knew I wanted to make a few for my kids.  Since it's just Eric and I at home now I have decided to forgo making Christmas cookies anymore - at least until we have some grandchildren.  We don't eat many cookies ourselves (and end up throwing most of them out) and the kids get sent home with a bag/box of cookies every place they visit - ya know you can only eat so many.  So I've decided to give them "holiday dough" instead!


I left it pretty simple since these are quick last minute gift ideas. All of the papers, stamps and fibers are from the Homemade Holiday kit.   To make the topper I folded a piece of 8.5 x 5.5" maroon cardstock in half; adhered a piece of the "recipe" pattern paper on top.  I mounted my printed poem (below) onto a piece of dark blue cardstock and adhered that to the topper.  I then stamped 3 cookie cutter images, trimmed and added them to the topper as well.  I rolled up the $'s; placed them in a bag and affixed the topper with double stick tape!  I added a spritz of Shimmer Mist just for that extra bit of sparkle.

Easy peasy - rolling and adding the little bows to the money will take you longer than anything else. If you're really sort on time you could just turn the topper into a card and insert the $'s into it.

I have changed the wording on the little poem.  It originally was about gingerbread men which I've never made...unless you count the pre-made rolls of gingerbread (Thank you Pillsbury Man!).  

My little poem goes as follows:

Holiday Dough

Christmas Cookies covered in icing.
Are oh so good and extremely enticing.
I set out to make a dozen or two
but ran out of time - oh what to do?

Instead of the cookies tied up with a bow
I whipped up a batch of your own Holiday Dough.

Now that you have a nifty little gift you're going to need a bag to put it in....


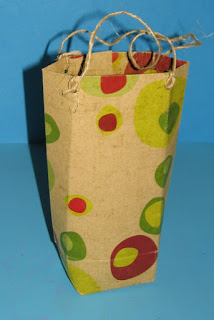
That's where this fun little one sheet of 12x12 paper bag comes into play. I used a sheet from Gnome for the Holidays kit. 


Fold over the top 1 - 2" of cardstock.


Now fold both side edges towards the center.
Secure with clear packing tape.


Fold the bottom edge up 3" - fold & crease.


Open the bottom fold and fold the corners in towards the center making a diamond shape.


Fold the two points into the center and adhere with a piece of clear packing tape.


Punch holes on each side of the bag opening.


Tie on handles and fill!
After the first bag (to figure it all out) the second bag 
took less than 2 minutes to complete.

Really quick and easy
AND
best part is...you can use it anytime!


Monday, December 21, 2015

Blue Christmas Pocket Letter & Brown Paper Wrapping

This past weekend we had the first of our Christmases at Mom's.  I found this lovely Blue Christmas pocket letter in my stocking!


As many of you know Mom loves to make ATC's so she decided to give a Pocket Letter a try.  I think she did an amazing job.  She knows blue is my favorite color so she just went with it.


She filled it with some of my favorite things and tucked in a special hand written note.  This was the best thing I rec'd....well that and she also put a couple of rocks I really wanted in my stocking too - LOL!!  Everyone thought I was nuts to be excited about rocks but you'll see why in the near future ;)


Also, I wanted to share how I did some wrapping this past weekend too.  I have TONS of this "packing" paper from recent gift orders and I just hate to throw it away.  I thought about stamping on it or spritzing with color but I pulled out my shiny green ribbon and wow - it looked so good there laying together I just couldn't do any more to it.  Now I know to most people might find this boring but I thought the simplicity of green and natural kraft color was pretty.  What do you think?  Pretty or boring?  

Saturday, December 19, 2015

Watercolor Christmas Blog Hop

Welcome welcome friends!  Today a few of us are sharing our creations made using the new holiday kit from Club Scrap - Watercolor Christmas - designed by Swarup Murthy.  If you've never seen her art you should really check it out.  Her watercolor creations are beautiful.


I chose to make a holiday planner!  So many planners are made so that they are only usable for a single years details.  I thought it would be nice to have a forever type thing that you could switch pages around and use it for many years to come.  I started off with a lovely set of covers featuring the cardinal and holly print.  Both the front and back covers are made using book board then covered with the green cardstock.


I added several tabbed pages for things like the calendar, card list, baking list, etc.  I free-hand cut the tabs but there are several dies and/or punches out there that would do the trick as well.   Those were affixed to blue page dividers.


Each of those tabbed page dividers are either decorated with a stamped image or sentiment from the kit.


For the pages themselves I did a search for holiday planner pages and OH MY, there are so many out there to choose from.  I decided to use the ones offered at ScatteredSquirrel.com.  Some pages such as the Greeting Card List, Master Gift List and Family Favorites (for baking) will be used over and over again so I only printed a single copy of each.  Other pages such as baking plan, entertaining, wish lists, etc. I printed copies for this year plus several copies for coming years.


Since I used book binder rings I can switch out the yearly pages - which I plan to put at the very back of the book under a tab called Christmas Past.  I have extra copies of other pages under a tab called Christmas Future to be used in years to come.  


There are several fun cut-a-parts included in the kit which are perfect for adding here and there in the book as you can see.  In addition to the printed pages I also included several 6x9 envelopes to help store ideas for hand made gifts, recipes I am going to use and receipts/coupons in the gifts section.   I must say I'm very excited to use this planner next year - I'm hoping it will help cut down on some of the "holiday anxiety" of forgetting things. 

Merry Christmas Everyone!
I hope you all have a lovely holiday season
and 
I wish you all the best in the coming year!

Your next stop on the hop is Kay's blog -


If you get lost along the way the complete list can be found here -

Friday, December 18, 2015

Bokeh Technique w/ Brusho, Nuance & Acrylic Paint

Today I wanted to share a couple of fun cards using the Bokeh Technique which was inspired by this months Technique Challenge on the Club Scrap Blog.

Lisa created her background by using PanPastels but I wanted to see what I could do by using Nuance powders and Brusho Colour Crystals.


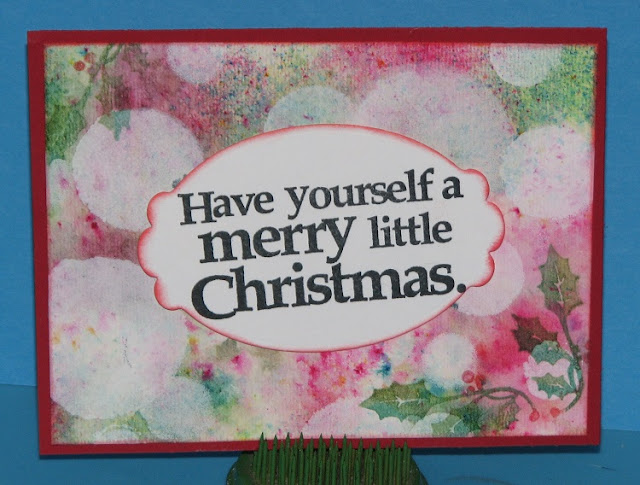
Here is my first card...


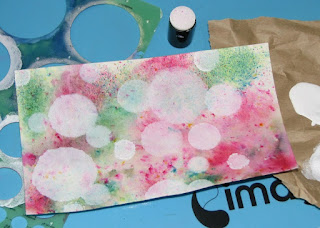
I started off by sprinkling Red and Green Nuance powders onto watercolor paper then spritzing with water.  

TIP: After the paper had dried (I cheated and used a heat tool), I sprayed it with a couple light coats of hair spray.  This seals in the colors so they don't bleed through in later steps.


Next I tried to add circles with a few different types of white ink to no avail.  I just wasn't getting the variety of opacity I was going for.


So I switched to white acrylic paint!  And it worked like a charm.


Next I stamped on a few bits of holly.  I used Memento markers to ink up the image.


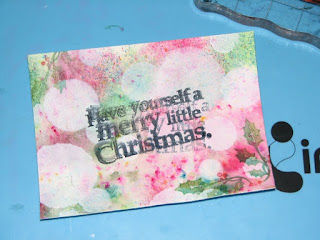
I then went to add the sentiment but wouldn't you know it...I dropped the stamp!  So that's why I added the sentiment stamped on the die-cut ;)  LOL!!  I left both of today's cards pretty simple so the bokeh technique could shine.


My second card was made in a similar fashion but the image was stamped first; colored with a nice selection of Brusho Colour Crystals then the Bokeh Technique was applied over the top.  I didn't spray the BCC with hair spray because I wanted to show you how the colors would come through in the circles for a totally different look.  

Pretty fun how the colors amplify where the acrylic paint was applied - huh?  IRL the individual cyrstals of color really come through the white.  It's amazing how many colors make up a single "color" of Brushos.

So there you go...if you have time, give it a try.
The Brushos/Nuance powders paired with Acrylic paint 
adds a whole new dimension to this technique.