Pages

Thursday, February 28, 2019

Bunny Hop into Spring!


I, like so many others, am ready for Spring!
I thought this little bunny hopping among the vines and flowers (in the background) was a perfect way to welcome Spring onto the scene!

Be sure to stop by and enter your creation with any type of square for your chance to win!


The Color of Spring Shaker Box Card


Rinea and Crackerbox & Suzy Stamps have teamed up for a fun filled month of stamping/foiled goodness!  Today I wanted to share a shaker box card I made using the "Color of Spring" sentiment and "Tree Blowing Flowers".  I paired these gorgeous stamps with the Peacock and Pastels Variety packs!


Supplies:

Rinea - Pastels Foiled Paper Variety Pack, Peacock Foiled Papers Variety Pack
Crackerbox & Suzy Stamps - Tree Blowing Flowers, Color of Spring
Imagine - On Point Glue, VersaFine Clair Ink
MFT - Stitched Circle In/Out Diecuts
Double Stick Foam Tape
Packaging Materials (acetate)
Micro Beads


#showmeyourshaker
#doodlespaperplayground

Wednesday, February 27, 2019

Have You Heard About Shimmer Stix?

Hello Friends

Do you know what day it is????
(I love that camel!!)

So, have you heard the news about Shimmer Stix from Imagine?
Oh my....I think they are my new favorite product!
It's the same shimmery goodness in Sheer Shimmer Spritz BUT it's in a handy, dandy tube with a sponge dauber apparatus on the end.


I created this card by using the Shimmer Stix to blend the inks together and pull them down the panel.  Hop on over the the Imagine blog - Learn How to Blend Ink using Shimmer Stix - to see how I did it.  There are also a couple photos showing the amazing shimmer!!


Tuesday, February 26, 2019

Library Paint Along Creation

Hello my inky friends!  
I hope you're having a good week so far.  

Today I wanted to share a painting I made last night....


Mom, Morgan and I went to the library's craft night last evening and we did a Bob Ross paint-along.  It was really fun.  This is what I created and it's the first time I've ever worked with oil paints.  We had lots of fun and I really like how it came out.  Near the end I gave up following him and started doing my own thing.  I'm not very good at following directions in art, I just like to run with it and see where it all goes.

I have to say that I love using a big brush (ours was 1.5" - he was using a 2") and I loved using a palette knife!  That's what I used for the rocks and much of the beach area.  Wicked fun!

Now I think I may have to buy some oil paints and keep going ;) LOL!!
Like I don't already have enough irons in the artsy fire huh?

Monday, February 25, 2019

Shaker Madness!!

Last weekend I decided to play with shakers...
I went a bit crazy as you'll see....


This is a Unity Stamp Co birthday cake stamp that I cut out the center and filled with shaker goodness from Doodles Paper Playground.  This blend is from the Birthstone collection....February Amethyst.


I spread some On Point Glue as an aura for the candles - added a bit of glitter and some of the birthday blend sequins.


Another Unity stamp - I LOVE this bunny!!
It is filled with the "Cozy" Sparkle Blend. 


New die-cut I recently acquired - he's so stinkin' cute, gonna make these for Easter.
His tummy is filled with "Copper Penny" Sparkle Blend.


I LOVE this one...cause it's blue ;)
Unity Stamp Co set of stamps which were stamped using the new StazOn Pigment Ink on the acetate piece.  The shaker bits are Blue Over You Sparkle Blend!


Finally a Gina Marie die-cut that I turned into a shaker.  
We're Turning One Birthday Sparkle Blend inside and out.

Told you I went crazy with shakers!

#showmeyourshaker #sparkleblends #doodlespaperplayground

Supplies:

Doodles Paper Playground - Sparkle Blends Sequins Mixes - Cozy, Blue Over You, We're Turning One, Copper Penny, Birthstone Collection February


Sunday, February 24, 2019

Make a Peacock Mardi Gras Mask with Rinea Foiled Papers!!

Hello Friends!  

Mardi Gras is drawing near and I wanted to share this fun peacock mask I made with Rinea Foiled Papers....


Fun huh?
And it's so easy to make and personalize.


Step 1 - Make a foiled paper sandwich of foiled paper, cardstock, foiled paper. This will help add some stability to the finished mask so it will hold it's shape.

Step 2 - Cut mask in desired shape. I made a "swish" up at the top to be stylish (from behind) and to support the peacock feathers.  


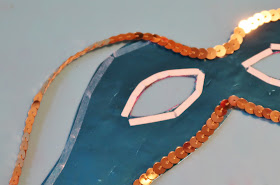
Step 3 - Apply Tear It! Tape around the edges.


Step 4 - Remove the tape piece by piece and press on the sequin trim.


all the way around the mask and eye holes.


WOW, look at that shine!


Step 5 - Make peacock "eyes".  I cut the blue eye by die-cutting a heart from Sapphire Starstruck Foiled Paper and trimmed off the bottom point.  Next I cut a circle from Jade/Jade Starstruck; ovals from Marigold and Voilet and Emerald Starstruck foiled papers.  


Step 6 - Add shredded foiled papers to the back of the eye for fringe.
Trim the fringe to the desired shape.


Step 7 - Mount the peacock feathers to the mask. Add any additional embellishments - in this case I added a flower gemstone and  curled Violet and Gold Starstruck foiled paper strips.  

Step 8 - Mount a dowel rod behind the curled papers. 


Dazzling peacock feathers and curls....


Supplies:

Rinea - Peacock Variety Pack (Sapphire, Violet, Emerald)
Various shredded bits of foiled papers

Imagine - Tear It! Tape
On Point Glue

Other - Sequin Trim, Cardstock, Flower Gemstone

Thursday, February 21, 2019

It's Hip to be Square

Hello my inky friends...

The current challenge over at the Lost Coast Designs blog is

Use a square somewhere on your card - it could be one of the cool square stamps from Carmen's Veranda, a square die-cut, square embellishment, etc. There must be some stamping on the card somewhere though to qualify for the prize!

This is my first creation for this challenge...


Eye (see how I did that - Lol) used the Eye Chart and Eye Chart Square (stamp) for this card. I wanted to keep it fairly monochromatic so I used blues and grey for all of the elements. 

Wouldn't you like to join in on the fun?


Supplies:

Lost Coast Designs - Eye Chart
Carmen's Veranda - Eye Chart Square
Imagine - VersaFine Clair Inks


Wednesday, February 20, 2019

Club Scrap Cobblestone Cards

Hello Friends...

I was recently asked to be the guest designer at Club Scrap using their Cobblestone Card Kit!  


Each kit comes with materials to make 12+ cards. There are 3 sets of 4 cards which they provide instructions for making the basic cards...as a guest designer we can kick it up a notch or two and do our own thing.  This is what I came up with...


My first card was made using the flip open design that was designed in the kit - I used the stamps and stone stencil for the front and one button instead of two.


The second card was made in the same format but I left off the buttons and turned it on it's side.


My next card was a Z on it's side fold with a little metal leaf charm tucked inside.


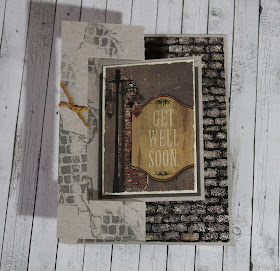
I decided to incorporate a flip panel on the get well soon card.
Don't you just love the Cut-A-Parts included in the kit?


The next set of cards were Double Z folds which I decided to spice up a bit...


I wanted to use some embellishments from past kits. I found this lovely canvas tag that took stamping very well using VersaFine Clair Verdant ink. Inside I used a grey envelope and tucked another tag inside.  The stone in the corners was made using the stone stencil and Bronze Creative Medium...gives a wonderful texture and a lovely metallic glow.


I went all out with the stamping on the second Double Z card...  I stamped all sorts of goodies on the grey panel and added a corrugated tag and fancy medallion with a bit of deep blue ribbon to accent the grey.


The next two cards are quite a departure from the Double Z. 
I wanted to keep with the double theme here but made the two panels open opposite of each other.


With a nifty message inside.


I know...this looks nothing at all like the Double Z. I actually used the cream card from the Z to create the brick wall.  It was colored initially with a variety of Brusho Color Crystals then I ran it through a brick embossing folder. I added a few inks on top here and there to create a more realistic look.  A few gold threads and die-cut ivy and you've got yourself a pretty cool looking card.


The final set of cards were new to me...Brick Cards - they actually looked like bricks when they are stood up!  I made the first 2 cards following the directions but with lots more stamping added and a mix and match approach to the Cut-A-Parts.  I also again added embellishments from my stash.


See - a stand up brick...pretty cool huh?


This one was stamped and die-cuts added...


Again for the final 2 cards I veered away from the instructions and did my own thing.
These two cards were what I initially envisioned for the cards...vintage southern charm. I actually made the final two cards with New Orleans in mind.  

The first is a shaker card with the front of a vintage brick home in mind....side walk, stone work, ivy, the whole nine yards.


And this to me is a night on the town.
Stamping, watercolor, and glitter...all rolled into one.


I hope you've enjoyed my version of the Cobblestone Card Kit and find inspiration here and there for your own cards.

Supplies:

Club Scrap - Cobblestone Card Kit & Stamps; Embellishments, Fibers, Tags, etc.
Imagine Crafts - VersaFine Clair Inks, On Point Glue; Tear It! Tape
Sizzix - Die-cuts
Gold Thread
Marabu Aqua Inks
Extra Fine Glitter
Sequins