Like all techniques, there are hundreds of ways to make a masterboard. Today I just wanted to share a stamped masterboard.
I start off by gathering all of the stamps I might want to incorporate into a masterboard. It might be 3-4 stamps or it could be 10-15. It just depends on the look you're going for.
Begin by stamping the largest image first. In this case I started off stamping the bird cage. The size of your beginning piece will determine how many times you stamp each image. I am using a 12x12 sheet of cardstock so I stamped it 7 times. You will notice that some of the images are stamped off the edge. This will make for a completely usable finished masterboard.
Ink color choices are up to you. Some people prefer to stamp everything in black so that they can color the individual images once the masterboard has been cut. I knew I wanted to use several colors of ink so that no additional coloring was needed once I cut it up.
After you've got your initial image down, continue stamping additional images and/or text as desired. The number of images and spacing is also up to you. Some people prefer evenly spaced stamped images in specific design patterns....mine is more random and filled. I even have a bit of over lapping in some areas which is o.k. too.
Here is a close up of my masterboard.
All of the images used are from the March Club Scrap kit - Paris Flea Market which I'm excited to share was my idea for a kit (more on this later).
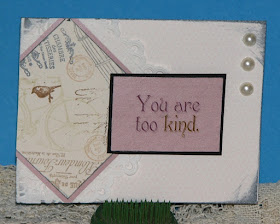
So after you have your masterboard stamped, it's time to cut it up! YES, I said cut it up...that's the whole idea behind the MB. So I cut mine into several pieces - a couple slightly smaller than A2 card size, others smaller. The larger pieces will be used for backgrounds while the smaller pieces will be used as accent pieces. All in all I made 11 cards out of the single 12x12 masterboard.
The card at the beginning of the post used one of the larger 4" x 5.25" pieces. The rest of the cards are shown below....
These are the other cards made using the 4" x 5.25 sections.
I cut a strip of the masterboard into 3" x 3" squares.
These two pieces were smaller sections of the masterboard...
And finally the left-overs were used to make these cards.
The card above is a small 3x4 gift card.
And my final card is my attempt at conquering white space. Every time I look at it I want to stamp the heck out of the top but I have refrained (so far).
So, there you have it...one example of what a masterboard can be. I hope you give it a try...it really is a fun technique for making LOTS of cards in a very short amount of time.
Supplies:
ClubScrap.com - cardstock, rubber stamps, pearl buttons, fleur de lis brad, lace paper doily, ribbon, cut-aparts
IMAGINE Crafts - Memento Dye Inks
Other - faux gemstone strips, sticky back pearls, twine, sequins, die-cuts, mini paper flowers


I love this and I love the randomness of it. Don't know why I'd never thought to do this! Think I'll have to purchase some large 12X12s in white and cream and try this out. I love that you can get so many cards from it. Thanks for another great idea! Anne
ReplyDeleteIt's a great idea and I love all your finished cards. Even the last one looks fine with all that white space!
ReplyDeleteWOW what a stunning array of cards Roni!! You excelled at this challenge for sure!!
ReplyDeleteI have often wondered why this idea hasn't caught on more in the States. I've been making masterboards for about three years, but only because I "hang out" with a lot of European stampers. This is lovely and shows what can be done. I always know the sizes I want to cut mine, so once it's created, I turn the masterboard over so I don't try to influence the cut because I might "like" one area better than others.
ReplyDeleteWhat a super fun set of cards, Roni! And so many and all wonderful.
ReplyDeleteomg HMM use temp tacky tape to put scrap papers on a board - pre cut to card sizes - and then stamp ;)) no having to worry about "deciding" on the cuts - its predetermined and random and uses up scrap paper - love love love this board idea and allthe examples
ReplyDeleteI really love the stamps from this kit. You made a great Master Board and amazing cards!
ReplyDeleteAwesome cards!!! Love them!
ReplyDeleteLilian
The Leaf Studio
Lovely master board and love the cards you've made from them!
ReplyDeleteBoy...you got some serious mileage out of your master board! Nicely done!
ReplyDelete