Happy New Year Everyone!
I hope you all had a wonderful time last evening welcoming in the new year...be it in person or in dreamland (like I did). I had planned on having the boys and their fiance's over but things changed yesterday afternoon so dh & I ended up having a quite evening with our 4 legged boys - LOL!!
Today I wanted to share the instructions for the One Page Brag Book I shared yesterday during the Reunion Club Scrap Blog Hop.
So I challenged myself to make a mini album out of a single sheet of cardstock for the base and here's what I came up with... This shot is the book opened up...
And here it is completely closed - it measures approx. 4" x 5.25" - small enough to tuck inside your purse and a perfect little gift idea for mailing or giving to friends and family.
Basic Book Supplies:
1 sheet of heavy cardstock
Scor-Pal or Bone Folder & Ruler
Scissors
Instructions:
1. Score your 12x12 piece of cardstock at 2" and 7".
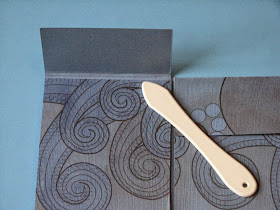
2. Turn the paper a quarter turn and score at 4", 4 1/8", 8 1/8" and 8 1/4". The photo below is what your piece of cardstock will look like...2 horizontal and 4 vertical score lines.
I know the 1/8" scores sound funky but by the time you add photo mats, photos and any flat embellishments you'll need that extra 1/8" so the book closes properly.
3. The next thing you'll need to do is cut the 1/8" sliver of cardstock from between the 2" sections on the top and the 4" sections along the bottom as shown. That's it...3 Steps and you're done!!! How cool is that?
Now all you need to do is add your photos. I also included photo mats and some stamping here and there to add a little spice but it's totally up to you how simple or fancy you want to make the book. I added a ribbon to the book as the closure that was covered with the matted quote on the front of the book. When I was messing around with the design though I had another thought - you could score the left quote flap 1/4" as shown below...
Close up all of the flaps
and fold it shut like a book leaving the flap open...
Then fold the flap down to hold it shut! I was thinking a round Velcro hook and loop dot (it's so quick & easy) or possibly one of the twisty string closures - you know where you have a circle on the flap and a circle on the front then wind the string around. Or even a thin magnetic closure.
I was also thinking it would be fun to make several of these little books and house them in a small case just like the small children book sets. You could focus each book on a different family member, a different holiday, maybe make 12 - one for each month of the year. The possibilities are simply endless!
Another possibility I want to explore further is to make and attach small accordion pages to the fold down pages for loads more photo or journaling space. I'm sure I'll need to re-work the score lines to accommodate the additional paper/photos but it shouldn't be too hard to figure it all out. When I do I'll be sure to share those new measurements in case you'd like to make one yourself.
Anyway, I hope you give it a try and make a few for yourself or others. Be sure to leave a comment on yesterday's post - Reunion Club Scrap Blog Hop to be entered to win the brag book I made using that fun kit!


Fab tutorial! Thank you! I love the little brag book!
ReplyDeletebeautiful. i can see making several of these for gifts. We have a wedding coming in 10 mo LOL
ReplyDeleteRoni, this is so fun!! Thanks for sharing and I never would have guessed, one page!! Oh the possibilities!! Think of all the fun books we could make!!
ReplyDeleteAwesome tutorial! I bookmarked it so I can make one this weekend. Thanks for the great details!
ReplyDeleteGorgeous creation Roni - you are so clever with this sort of stuff! I struggle with paper folds lol! Hope you had a lovely New Year Karen x
ReplyDeleteGreat tut - TFS!!
ReplyDeleteRoni, thank you for sharing all your creations and I wish you a wonderful and even more creative 2015
ReplyDeleteHelena
j'aime ce genre de petit projet, qui me rappelle le maze bock.. j'ai hâte d'essayer - vos papiers sont superbes ! merci pour tout ce que vous partagez, je ne comprends pas toujours, n'étant pas parfaitement anglophone, mais vos visuels sont très bien expliqués ! Meilleurs voeux pour 2015, pour vous et vos proches.. Amitiés de France, un accro à votre blog, Nicky
ReplyDeleteThanks for the tut Roni!!
ReplyDeleteAnother great book!!
I LUV this little book, Roni! Will definitely make one...
ReplyDelete