Pages

Tuesday, February 28, 2017

Alpha Stencil Fun...

Welcome Welcome!!

Each month the Club Scrap Artist Team is challenged to create a project using a specific technique, theme or product. This month the team was challenged to use a really fun set of Alphabet Stencils!


I had such fun using them creating these cards using the Succulents kit.


These stencils are really cool because of their large size. 
They work so well for making cards and scrapbook pages.


Hello love....  Stamped & fussy cut my succulents, Fireworks! shimmery dye ink spray on the background and "Hello" inked using 3 different colors of green Memento Dye Inks.


Mr. Gnome wishing you a Happy Birthday. I inked the HB and stamped the sentiment on the background paper then fussy cut Mr. Gnome & all of the succulents.  You can't really tell from the photo but everything was mounted using various layers of foam tape so it's very dimensional.  A much more fun card IRL.


And Thanks for always being there.  I realized that I had the thanks stamp after the card was finished and stamped it over top the stenciled thanks...I love how it turned out.  Looks like I planned it that way huh- LOL!!


I am planning on making a couple wedding LO's soon using them as well.
I can't wait to share them with you all.

The next stop on the hop is...


and if you get lost along the way,
the complete list can be found here:


Supplies:

Club Scrap Stencils
Be sure to take advantage of the 50% off sale going on NOW!!!


Imagine:

Memento Dye Inks
Fireworks! Spray
VersaFine Inks
Sponge Daubers


Friday, February 24, 2017

Hen to Lily

I know...look at the title and What the Heck????

Have you ever looked at a stamp and thought - OMG - that looks like a ______!  Well I had one of those moments earlier this month when I was stamping a card using one of the hen stamps from Club Scrap's Succulent kit.  

I was working on a card and I messed up the image because I had inky fingers...(turned out I saved it by just cutting it out instead of using as is).  But as I was looking at it I realized it looked just like a water lily - at least it did to me anyway.  Well, I pulled out a few supplies and started playing and check it out....


I played around with my gelatos & watercolor crayons.
The crayons worked much better.


With a few defining watercolor strokes


the lilies came to life!
I added a bit of water and.....


What do you think?
Waterlilies right?


Supplies:


Club Scrap - Cardstock, Stamps
Lyra - Watercolor Crayons
Watercolor Brush


Thursday, February 23, 2017

2017 Texture Calendar - August

August in Indiana is hot...really hot - usually we get into the 90's and even 100's with 80-100% humidity. I live in an area where there are many lakes, creeks and ponds and you can usually find people enjoying the water on these hot summer days.  The texture technique I have for you today fits in with that theme VERY well! 


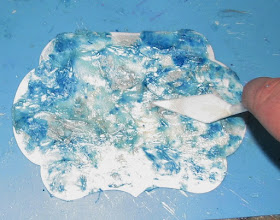
Parched Pigments is a fun technique using some very simple ingredients...glue and a pigment powder of your choosing.  Depending on the colors you can make this look like water (as I did today), lava, molten chocolate, etc.  Have fun, experiment and enjoy!


Start off by spreading glue over the page.


Sprinkle one or more powder pigments over the glue.


I used a Turquoise, Iridescent Blue and Silver.


Pounce the glue/powder about to spread the powders around.


Now heat!

This will take a while and it does stink but the results are worth it.  Can you see the giant bubble I'm getting?  That's what you want...basically you're cooking all of the water out of the glue really fast so you're going to have lots of giant bubbles which form a sort of glue skin.  I normally work from one side to the other but whatever works for you.


When all of the white glue is gone - the skin will look translucent.
Let it cool a minute or so and then you can push the skin around or leave it as is.


I pushed mine around a bit to make it look like waves in the water.


And then you need to let it dry/cure.  I leave mine set overnight just to make sure it is set good.


Add the calendar and you're set!


I was actually testing some glues and I had to show you this example I made. It was created on a "messy tag" (tag made when I pick up excess medium from my craft mat) using a purple and blue iridescent powders.  LOVE how it turned out with the pink (from the tag) showing through.

Have fun!

Wednesday, February 22, 2017

Club Scrap Succulents Blog Hop

Welcome Friends to the Succulents Club Scrap Blog Hop!!

This month's kit (see the full kit in the supply list) Succulents has been so much fun to work with that I have almost used it up completely!!!  That's saying something because there is so much included in the kit.

Sticking with my resolution for this year of making a wedding album for the kids I have completed not one but TWO, 2 page scrapbook layouts!  I am so pleased with how they turned out...


Crazy

This lo features Morgan and her sister Maddie getting their hair done the morning of the wedding.  They went to Morgan's stylist that she's been going to for quite some time which was nice because they were all having so much fun together.  That is why I chose the little sentiment strip - "I love people I can be crazy with."


The large photo has a hidden burlap tag that can be pulled out for journaling.


Beautiful

This lo features various pics of Morgan being helped into her dress by her Mom and Grandma.  I left room for her to journal on both pages.


I hope you have enjoyed my creations!
Your next stop on the hop is 


and if you get lost along the way
the complete list may be found here:


Supplies:


http://www.clubscrapshop.com/succulents.aspx


Tuesday, February 21, 2017

2017 Texture Calendar - July

Welcome back to another installment of the Texture Calendar!  We are up to July and being from the US I thought it only appropriate to celebrate the RW&B - I was looking around my studio looking for nice RWB items and spotted my stripe twine. PERFECT!


Embedding twine, ribbon, fibers, yarns, lace, etc. are perfect for creating texture on a project! Depending on the size and amount of materials you add you can create a lot or a little texture perfect for whatever you are working on.


Since this calendar page is July, I am using red/white; blue/white and white twine.
I cut it to approx. 12-18" (I only had a short piece of the white).


I started off by spreading around a dollop of Sparklie Collage Pauge over the calendar page.


The white twine was then randomly placed on the page.
I used the paint brush to push the twine down into the glue.


And this step was repeated for the blue 


And red twine.


I had some tiny gold and silver sequin stars in my stash so I sprinkled a few of these over the page as well.  The final step was to let the glue dry....mine took about 14 hours to dry.  It will just depend on how much glue you use and the weather conditions.


Add the calendar and you're all set!


Sunday, February 19, 2017

Cards Cards and More Cards

Just havin' fun working on some cards using Club Scrap Kit - Succulents.

Normally I'm not a pastel person but I love the soft colors of this kit.  I am also totally in love with Succulents now...  I've even been on the lookout for a few real ones to brighten up our home.  I don't currently have any plants because in the past we've always had cats that like to eat anything green and alive in our house.  It was a habit I guess that we can change since we don't have anymore felines sharing our space.

Anyway, here are my creations...


This card was made for a fancy fold challenge...


Lovin' that huge Hen print...
After I was finished I realized the ink didn't quite match..
oh well, it was the last thing I added and wasn't going to redo at that point.


The following cards were made using Club Scrap's Card Making Idea Deck.
It was for a challenge as well...they pull a card from the deck (of 52)
(this card was Queen of Diamonds) and you make your cards using 
the diagram.  It was the first time I played and it was fun!


This particular card made 2 "Z" fold cards


And 2 regular cards.


I have been on a gemstone kick lately if you couldn't tell - LOL!!

Hope you're having a great weekend!!