Pages

Tuesday, January 31, 2017

Faux Batik

Each month the Artist Team at Club Scrap given a challenge...it could be a kit challenge, theme or even a technique challenge which is what we have this month. The technique is Faux Batik! I love this technique, there are so many variations but they all leave you with beautiful results.


My cards were created using 2 different methods...  The first set of cards were made using the traditional method of layering stamped n embossed images with color.  After I was finished adding images and color I ironed to remove all of the embossing.


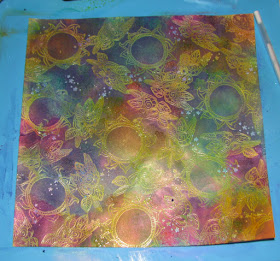
The second technique I used was a bit more complicated.  I was experimenting and came up with this idea.  For this example I spritzed on a bit of Sky Blue Fireworks spray. I then stamped the dragonflies and embossed with clear EP.  I then colored the wings with a darker Fireworks spray and colored the bodies with markers.  After that ink had dried I used a VersaMark pen to color just the areas I had colored - the wings and body.  Sprinkled on EP and embossed.


Next I added more color using Dandelion Fireworks! I know it looks green here but it was very much the gold you see in the highlights.  I then embossed flowers, and colored them in with markers, then VersaMark pen and embossed each flower a 2nd time to seal in the marker coloring.


After all of that embossing I spritzed the final coat of color then ironed off all of the embossed areas leaving the results you see above!  It's a time consuming process but it resulted in some really unique and lovely finished cards.

Hope you've enjoyed what I have to share with you...
Your next stop on the hop is


and if you get lost along the way you can find the complete list here 


Supplies:

Club Scrap.com - Color Me Happy cardstock, pattern paper, rubber stamps, Cut-A-Parts
Imagine - Embossing Powder, VersaMark Ink Pad, VersaMark Pen, Fireworks! dye spray, Memento Markers, Memento Dye Inks

Friday, January 27, 2017

Tea Stained Cardstock Techniques

Today I have a fun technique for you...
well, actually 3 techniques all stemming from


This is the first technique I'd like to share with you...
Tea Spritz


I started off by boiling up a batch of really strong tea.
I have to tell you it made my entire craft room smell wonderful!


So I filled a mini squirt bottle with the tea


and misted it over the stencil several times 
letting each layer soak into the paper before adding the next.
This prevented the tea from bleeding under the stencil.


My next card was made using plastic wrap!


I pulled off a sheet that was twice as big as the card panel.
Scrunched it up a few times,


Added some tea


The scrunched it on the cardstock and let it dry naturally (overnight).


I love the light and dark veining it creates!


Finally, this one is my favorite!
It created a beautiful mottled pattern.


I tore open one of the tea bags and sprinkled the tea leaves over the cardstock.
I also added a bit of the tea to really moisten the leaves/paper.
It was left to dry overnight.


And this is how it turned out!
The areas where there was more tea turned out much darker.
I just love it!

So there you go...
3 different techniques to help create entirely different looks 
...with tea!


Supplies:

ClubScrap.com - Cardstock, Stencil, Stamps, CutAparts, Embellishments
Imagine - VersaFine - onyx; Memento Dye Ink - Bamboo Leaves, Danube Blue, Tangelo
Tea

Thursday, January 26, 2017

Farm Girl Glue Book


Art Journals are all the rage at the moment and if you’re like me you would love to make one BUT the journaling part is holding you back. I have honestly tried several times to try and get into the whole art journal thing…I took a class, scoured Pinterest, read blog after blog about how much fun it is but I just can’t get past the words. 

When Amanda challenged us to create a project centering on Planners or Journals I decided to give something new (to me) a try….a Glue Book! It is like an art journal without the stress of journaling. I can create, ink, stamp and get as messy as I want without having to come up with any of the deep, meaningful, soul searching messages found in so many art journals. I can simply glue pictures into a book and enjoy the process of getting inky.

Welcome to my “Farm Life” glue book adventure!

Directions:


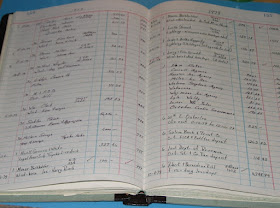
1. The first step to is choosing a book to use as the foundation. I love vintage ephemera so I decided to use this old ledger as my glue book.  I tore out some of the pages to make room for the new “stuff” I was going to be gluing to the pages.


2. I gathered images I wanted to glue into my book, my spatula and Creative Medium.


3. I started off by spritzing on a bit of Summer Sky Fireworks! Spray.

4. Glue pictures down as desired.  This is the fun part…there are no rules, just enjoy yourself.


5. Embellish the page as desired…doodling, stamping, embossing, etc.  It’s all fair game.


This is how my title page turned out.  Yes it’s wrinkle-y but that’s o.k…it doesn’t matter, it’s a glue book!


Finished Eggs Glue Book spread.


Finished Funky Chicken spread.

I'm going to continue to add pages to the glue book through out the year...I will share as I finish them up.  Oh and I'm adding pics of other aspects of farm life rather than just animals.  I found some really cool apron pics I wanted to include as well as "farm decor" type images as well...mostly things I want to make at some point.  I think as I collect more and more pics this might turn into an art journal/inspiration/idea book.  Just because I keep finding more and more things I want to add to it.

That's the beauty of a glue book...it can be whatever you want it to be.  So if you want to get into art journaling but are put off by the journaling part maybe a glue book is for you too!

Supplies:

Imagine:


Other Supplies:
Journal, Washi Tape, Pictures
Artistic Outpost – Birds of a Feather
VivaLasVegas – Collage Stamps

Wednesday, January 25, 2017

Club Scrap Color Me Happy Blog Hop

Welcome to the Club Scrap Blog Hop for January 2017!!!

This month we are working with the lovely kit - Color Me Happy! Such a beautiful kit deserves to be well loved and this month I stepped out of my comfort zone and scrapped a LO!!  Whoo Hooo...I feel so accomplished. Actually, this is part of my New Year's goal...I'm going to make an album for my kids for their wedding so this is LO #2 (my first was this one - Live Life in Full Bloom).


I started off by stamping the background with a variety of images from this months kit using Delicata White Shimmer ink.  I spritzed on Mister Huey's Opaque White ink.  I added various layers of the papers and border strips from the kit.  Both the lime green and teal papers were stamped again with stamps from the kit.


I love this pic of the kids leaving the church...
as Man and Wife :)


I thought this was a perfect sentiment for such a lovely occasion.


I stamped a few multi-layer dragonflies - made with a combination of vellum and a bit of cardstock for the bodies. I colored each one on the back side to give it a softer color and sprinkled them across the lay-out using double stick tape so they looked as if they were hovering above the page.  I found a heart doily in my stash that I tucked behind one of the pics just for the fun of it.

So there you go...
What do you think? 
Not too rusty at this scrapbooking thing.
Such beautiful papers make it easy.


And I thought this would be a fun kit to play with Mr. Gnome!
Of course he's done up in his finest, feelin' a little frisky with a flower in his cap!

Hope you've enjoyed what I have to share...
Your next stop on the hop is


and if you get lost along the way
the complete list can be found here:


Supplies:

Color Me Happy Club Scrap Deluxe Kit

Imagine - Delicata Ink, Memento Dye Ink
Mister Huey's Opaque White Spray
Other - Vellum

Monday, January 23, 2017

2017 Texture Calendar - May

If you've been following along with the Texture calendar that April's calendar was "April Showers" and of course that means  they bring "May Flowers" which is what I have for you today!

We are going to add texture by embedding dried flowers into modeling paste.  I chose modeling paste because it creates it's own texture as well as being a perfect "cement" for the flowers themselves.  If you don't have modeling paste a general collage glue will work as well.


Let's begin!


I started off by gathering the items I wanted to embed in the modeling paste.  Today I'm using a variety of leftover dried flowers from other projects and some green patina mica flakes.


Just another look at the flowers...


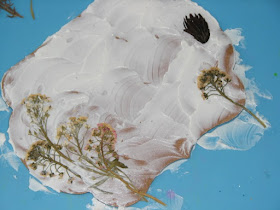
Spread a nice layer of modeling paste over the page.

Begin gently arranging the flowers as desired.

Push the flowers into the modeling paste by lightly pressing them down into the paste.


Keep going until you are satisfied with the flowers.


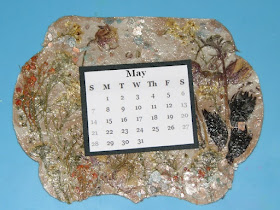
Sprinkle on the mica flakes and gently press them into the paste as well.  Set aside to dry.  Depending on how thick the layer of paste is it could take a few hours to over night which is how long I left mine to dry.  If desired you can mist with Acrylic Sealer or apply a layer of collage medium to protect any bits that might be sticking up out of the modeling paste from breaking off.  I chose to apply a layer of Shimmer Creative Medium not necessarily for the protection but for the shimmer aspect.

If desired, you could go ahead and add various color mediums, stamping, etc. over this base layer of texture or you could simply use it as is which is what I did.


This technique works with all sorts of things besides flowers and mica. 
Look around in your supplies to see what bits you have left over...
you'll be surprised at all the fun stuff you can embed to create texture.

Friday, January 20, 2017

Congratulations President Trump...

In honor of President Trump taking the oath of office and VP Pence (a fellow Hoosier!!!) here are a few patriotic cards I made because I'm proud to be an American and happy to live in this wonderful country.


God Bless us All!!!

Wednesday, January 18, 2017

Hand Carved Stamps

In December I saw a fun post on facebook from a lady that hand carves stamps.  She was doodling on one of the stamps she carved (a moose) and it looked so cool I just had to have one for myself! So I went in search of and found her shop on Etsy... hoffeeandanuffin

Of course when I got to her shop I couldn't just stop at the moose....


In addition to the darling moose I also picked up a fun little sewing machine, owl, moustache (that looks great on the moose and owl) and that nifty granny square!  


I've already used the granny square on an upcoming post for Imagine and it turned out great! I can't wait till I can share it with you all. 


I also had her make an "Ink Stains" stamp that I'm going to use on the back of cards and tags. The photo isn't the best but you get the idea.  It is amazing in person.  

So, if you're in the market for some fun new stamps be sure to check her out...I'm sure you'll be as tickled with them as I am.  OH and in case you're wondering...no, I'm not getting paid to share her site...she doesn't even know I'm doing so.  I just love to pass on great product info when I can.  

Have an inky day my friends!

Tuesday, January 17, 2017

2017 Technique Calendar - April

Just like the old wives' tale, Indiana in April really does have showers...lots and lots of them which is why I chose this textured technique for today's calendar page.


I wish you could see and feel this in person.
It's not only fun to make but there are real layers there that just beg to be touched.


You'll need to gather your supplies before hand because you have to work quickly while the glue is wet.  You need: tissue of some sort roughly 3-4x the size of your calendar page, white glue that dries clear, spray ink or other liquid colorant, and if desired micro beads, glitter or other add-in.  You'll also want a pair of gloves if you don't want to have ink-stained fingers ;)


Crumble the tissue multiple times to break down
the fiber and create lots of wrinkles.


Pour a good amount of white, clear drying glue onto your calendar page.
Spread the glue out over the page - don't worry if you have lots of extra glue.
It will get used in the next step.


No in between pics sorry - my fingers were all inky & glued.

Working quickly, spread the glue over the entire surface of your page, smoosh the tissue into the glue soaking it through. Immediately spray with one or more colors of ink and massage into the tissue.  While the glue is still wet, gently push the soggy tissue paper around trying to push all of the paper onto the page.  As you do so you will begin creating layers of tissue and color that really won't be visible until the tissue has dried.


While the glue is still wet, sprinkle on any additives.
In this case I used clear micro beads and a micro bead/glitter mix.


These beads are so much fun!
Now let the page dry.


I made a few "rain drops" and dots to add to embellish the page using Pico Embellishers. Unfortunately the lighter blue raindrops blended in so well with the spray inks that they didn't show up so I ended up not adding them to the page.


 Add the calendar and any additional embellishments you desire.


These are just a few pics trying to show you the texture
and dimension created by the glue/tissue.


Now it's your turn!
Have fun gettin' inky!

Supplies:

Imagine - Fireworks! Spray - Bahama Blue, Sky Blue, Danube Blue; irRESISTible Pico Embellisher -  Danube Blue
Glue, Micro Beads, Tissue