Pages

Wednesday, November 30, 2016

Club Scrap Paradise Blog Hop

Welcome to another fun filled, inspiring Club Scrap blog hop!  This month we are focusing on the kit - Paradise.  Such a bright, beautiful kit that's got some really fun sentiments.   I decided that I wanted to make something that reminds me to relax and be unique all the time so I made a little something to set on my desk that will remind me to do so each day....

Bet you'll never guess what it is....

....

....

....


I created my own desk organizer!  

I thought the bright colors would cheer up any day and that sentiment...how could you not smile after reading that???   These are tubes we have at work that I cut with dh's miter saw.  It was so quick and easy and lots of fun!  I decided to emphasise the bright colors on the pattern papers to decorate the inside of the tubes so I painted them with Lagoon Blue mixed with Sparkle acrylic paints and I added Limeade along the rim.

Once the paint had dried I wrapped each tube with the various pattern papers included in the kit. I then cut off the pizza box top the kit comes in and arranged the tubes how I wanted them to be placed once finished, drew out the pattern and cut out the base.  Each tube was then hot glued into place.  I added the ribbon, flamingo sentiment and "relax" sentiment and finished gluing the tubes together (near the tops of each tub).  I finished it off by wrapping the base of the organizer with the blue ribbon included in the kit just to give it a pretty little finishing touch.

Final step....


Fill it up!!!

These tubes are large enough to accommodate lots of goodies and sturdy enough to stand up to lots of use and abuse.  


And with the great papers it looks pretty from all sides!

I had lots of scraps from making this project and other cards I made earlier this month so I decided to make a few more cards to use those scraps up....


the "swish" down the center is actually a leftover piece from wrapping up the tubes above.  Made a great focal point in the background.


Strips cut off of the photo mats that I used for cards...
with a bit of stamping makes for a fun card huh?


This is another left over bit from wrapping up the tubes.  I cut out the "pretty part", paired it with some stamped images/sentiment and a few buttons all from the kit.


Hope you've enjoyed this stop on the hop
and find a little inspiration to use in your own creations!

Your next stop on the hop is


and if you get lost along the way
the entire list of designers can be found here:


Thanks so much for stopping by!

Monday, November 28, 2016

Imagine & Flourishes Blog Hop!

Welcome Friends to the joint Imagine and Flourishes Blog Hop!!

Imagine Crafts

We've put together a fun and inspiring artful journey for you to enjoy melding the amazing array of inks, mediums and tools offered by Imagine with the lovely stamp images and sentiments from Flourishes.  Grab a cup of your favorite beverage, sit back and enjoy the ride.  (Complete list of hoppers can be found at the end of this post.)


I was blown away by the stamp sets I received from Flourishes, I just couldn't decide which one to use so I made a card or two using each set...enjoy!


This card was made using the Camellia Love stamp set, Memento Dye Inks, Onyx Black VersaFine and  Memento Dual Tip Markers. 


My Cup Overflows was used for this card along with Imagine's - Cosmic Copper & Dark Brown Shimmer Delicata Ink, Frost Sheer Shimmer Spritz, Onyx Black VersaFine (to stamp main image & Sentiment) and Memento Dual Tip Markers (for the coloring).


Both Let it Snow and Noel were stamped using the It's All in the Details 2 and Monogram Alphabets.

Let It Snow used VersaMark Ink, Silver Embossing Powder, Onyx Black VersaFine, All Purpose Inks & FantaStix to color the images and Danube Blue Memento Dye Ink for the edges.


Noel's background is a combination of Green Encore! metallic ink, Clear Embossing Powder, Memento Dye Inks and Gold irRESISTible Texture Spray.  The sentiment was stamped with VersaFine ink, Green Encore! used for the images and colored with All Purpose Inks then spritzed with Gold Sheer Shimmer Spritz. Golden Glitz was used to color the frame.  


And finally Winter Bouquet stamp set, Onyx Black VersaFine ink, Memento Dye Inks, Memento Dual Tip Markers, Shimmer irRESISTible Pico Embellisher, and Pear Tart Fireworks! spray were used to create this card. 

Thanks so much for stopping by!

Be sure to leave a comment on each stop of the blog hop for your chance to win some wonderful goodies from Imagine and Flourishes!!

Imagine/Flourishes Blog Hop Road Map...


Kren Kurts 

Neva Cole  

Roni Johnson - You Are Here :)

Linda Lucas

Sunday, November 27, 2016

Sunflower Calendar Winner!!


The winner of the Sunflower Journal and Calendar Organizer is....

Mary Holshouser!!


I would be thrilled to win this prize.
I keep an open monthly calendar on the
end of my dining room table. As I pass
by it many times a day I can see where/when
I need to be in the next few days. this
clipboard would look so much more elegant
than my plain calendar (one of those giveaways
from some company) and I could keep some
important items there as well - change them
up as new things come in.
the hop was great. Amazing things that
people can use to make other amazing things.
thanks


CONGRATULATIONS!!
(please e-mail me your snail mail addy)

Saturday, November 26, 2016

It's Christmas Thyme & Give Away

If you haven't guessed that's the Holiday kit from Club Scrap....Christmas Thyme and I LOVE it!  The stamps for this kit are simply beautiful and the colors are so pretty together.  For my little part of this Christmas grand tour I decided to take an old project - Up, Up & Away - Art on a String and put my Ink Stained spin on it....


O.k....I know, it does look like an unassuming box.
A pretty box but still...


Did you notice it had a lid??

Go ahead...

lift off the lid....


And the front panel falls down to reveal a fun little accordion scrapbook!!!


Both sides of the album have been decorated, just waiting for Christmas pictures!!


Now how's that for a fun little surprise???


The inside of the box and box lid are decorated as well :)

As luck would have it, I have a 2nd Up, Up and Away Project kit which contains the book board, Up, Up and Away papers, and embellishments and written instructions to complete the original project (shown below).


and I even have a link to several alternative ideas for this project - I Love Club Scrap Projects.

So many fun ideas to create this project or you might figure out something totally new like I did!  If you'd like a chance to win this extra Up, Up and Away Project kit simply post a comment to be entered to win.  You have until December 3rd to enter to win.  Good Luck Friends!

Your next stop on the hop is


and if you get lost along the way,
the complete list can be found here:


Merry Christmas Everyone!!

Thursday, November 24, 2016

Happy Thanksgiving!!


Sending wishes for a Peaceful Thanksgiving
with family and friends


I am so grateful for you all!


Happy Thanksgiving!!


 Thankful for all of you Ink Stained friends
living outside of the United States as well!!!
Have a great day!


Monday, November 21, 2016

Wintery Fun Cards

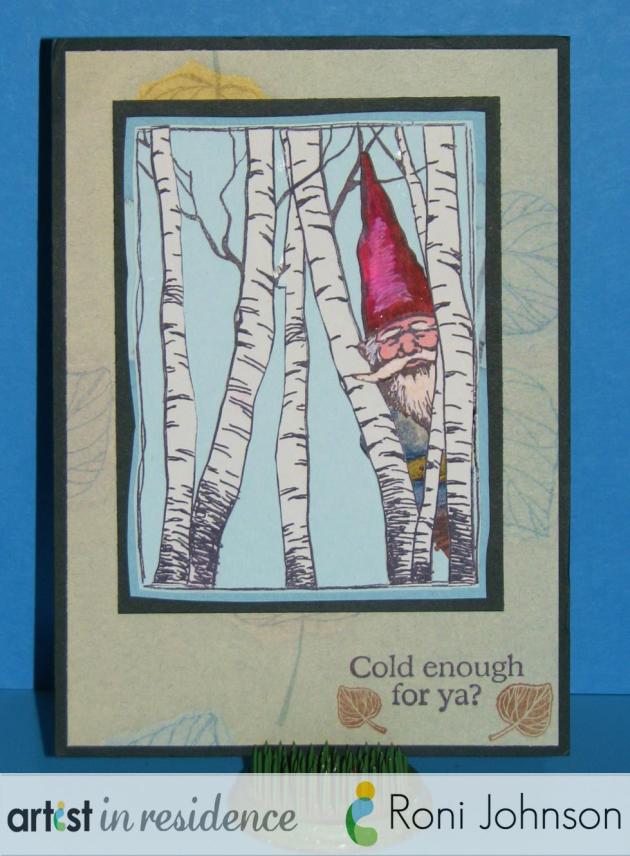
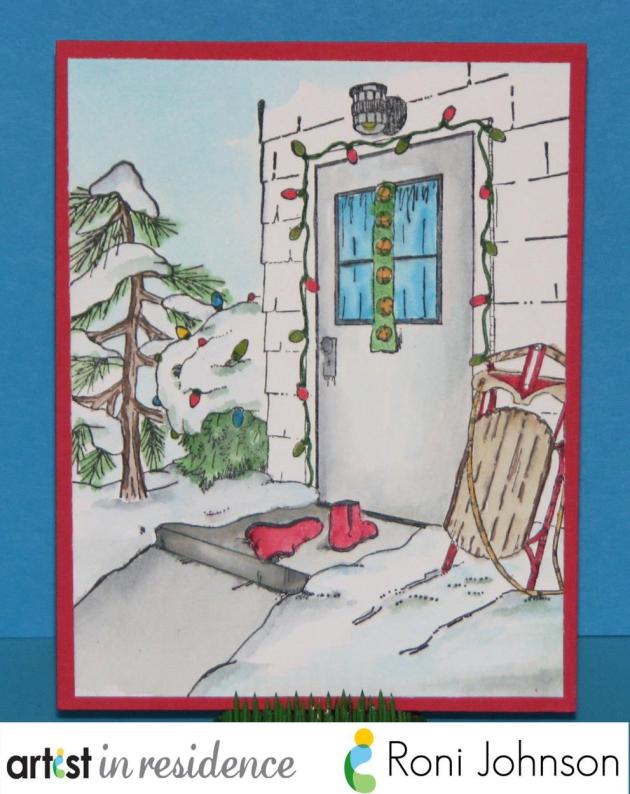
My cards that were recently published in Rubber Stamp Madness are being featured on Imagine's blog today!!

Handmade card featuring layered pieces featuring a gnome in an aspen grove with the sentiment "Cold Enough For Ya?" by Roni Johnson.Handmade card featuring a watercolored image of red boots on the stoop of a home decorated with holiday lights, snow all around and a sled left next to the door by Roni Johnson.

For more info, please see....

Friday, November 18, 2016

Fairy Tales... Club Scrap Artist Team Challenge

Each month the kind folks at Club Scrap challenges the Artist Team with a variety of themes.  This month they challenged us to use one or more images from the stamp sets Enchanted Forest or Girlfriends paired with one of my favorite embellishments the Sparkle Stickers from the Sunflower kit!
Well did I ever have fun! Why?  Well, I thought it would be fun to pair this challenge with the November Technique Challenge from the CS Blog as well!  What is the technique???  Smooshing colors - paints, inks, oil pastels, etc. onto cardstock using your acrylic block.  I LOVE this technique...you can achieve such pretty random patterns and it's different every single time!

Here's what I came up with....


My first card was made by pouncing ink onto my stamping block then spritzing with Shimmer Mist.  I stamped 2 different images onto the oval and stamped the magic wand on the card base using silver metallic ink.


This card background was made by spritzing Fireworks! shimmer spray onto my stamping block and stamping onto the cardstock.  I love how the "shimmer" in the spray created marbled lines through out the color.  It's hard to capture with a camera but you can see a bit about what I'm talking about in the blue area.  It's really pretty IRL.


My final card was made by applying Violet Crush, Parisian Pink, China Blue and Silver Extreme Glitter acrylic paint onto a stamping block.  Again I spritzed with Shimmer Spritz gave the paint a swirl then stamped it onto my cardstock.  You wouldn't think so but the texture left by the combination of the paint and silver glitter paint is amazing.  It doesn't show up in the photo but the white stamped frame has a piece of acetate that the sentiment is stamped on and raised off the surface of the actual card...almost like a shaker card without the shakie stuff.  The Sparkle Stickers are VERY dimensional so I need to raise the frame/sentiment off the card so it didn't interfere with the gems.


I hope you've enjoyed your visit here at Ink Stains.  
The next stop on the hop is...


If you get lost along the way the complete list can be found here:


Thanks for stopping by!

Supplies:

ClubScrap.com - Stamps, Sparkle Stickers, Cardstock
Imagine - Memento Dye Inks, Shimmer Spritz, Fireworks! Spray, VersaFine, StazOn Ink, Silver Delicata
Acrylic Paint, Acetate, Twine

Thursday, November 17, 2016

Curtain Call - At Home

Been at home yesterday and today instead of at work...we're having a new furnace installed.  It's a good thing because of course we want to be warm but it's expensive and there's never a good time for unexpected expenses right?

So I saw a fun challenge in my e-mail box last night that inspired me to play with a new stamp set.  Curtain Call is having a challenge called "At Home".


Here is my creation!  Don't ya just love that little house stamp? It's from Club Scraps Christmas kit - Christmas Thyme.  Such a fun kit...  This house is so cute and so much fun to color, I really enjoyed making this card.  I was inspired by the theme at home of course but I also really liked the color combo of greens, yellows and blue from the challenge.


This is a close up of the house...don't know if you can tell from the photo but I stamped the wreath and flower box foliage a second time and pop-dotted it off the background.  Looks so neat IRL.


Supplies:

ClubScrap.com - Papers, Stamps, Tag, Ribbon
Imagine - Memento Markers, VersaFine Onxy Black Ink; Delicata Dark Brown Shimmer; Sponge Dauber
Glitter

Friday, November 11, 2016

Monoprint Turkey Feathers

One of my favorite techniques is monoprinting.  If you're like me though you might not have the time to drag out all of the supplies and a big printing plate which is why I LOVE the Mini Gelli Plates!  I used the small hexagon Gelli Plate to create some fun "turkey feathers" for my holiday place settings. Instead of paints I used Memento Luxe inks - they have a wonderful opaque finish but dry quickly and since they are ink pads there is no messy clean up that you have with paints.


For complete details on how I created the feathers and silverware holder/place cards check out....

'


All in all it took me about half an hour to print (with ink) enough paper to cut out about 50 feathers.  Really not long at all when you think about how long it takes to print with paints because of all the dry time in between the various print layers.  I know some people worry about staining the Gelli Plate when using inks but I didn't have any staining with the Memento Luxe Inks.  I stamped the original print plus one or two ghost prints each time I inked the plate.  If there was any ink left I simply wiped it away with a damp towel.  Quick and easy!

Wednesday, November 9, 2016

Pretty in Pink - Card Concept #61

Today after work I was able to get a bit of stamping in - yeah!!  I had an e-mail in my inbox about the current challenge at the Card Concept...Pretty in Pink.  Inkspiration strikes and I made this card....


I made the background by spritzing Shimmer mist onto a piece of glossy cardstock. I then sprinkled a tiny bit of Fuchsia Color Burst Powder.  Hit it with the heat tool and let it do it's thing.  The combo of the Shimmer Mist, heat and glossy cardstock created some interesting circles and patterns as it dried. Unexpected but very cool.   The flamingo (from the current Club Scrap Kit - Paradise) was stamped and embossed onto the background.  I then stamped on the leaves which were colored using Memento Dual Tip Markers.


I was very inspired by the theme Pretty in Pink since it matched the flamingo and it's accompanying sentiment so well. I was also excited to be able to try out the Fuchsia Color Burst for the first time...it matched perfectly much to my pleasure!  I used my own version of clean and layered....  it's pretty clean for me and has a few layers in the die-cuts.

Supplies:

ClubScrap.com - Cardstock, Rubber Stamps
MFT - Oval & Scallop Stitched Oval Frame
Imagine - Shimmer Mist, VersaMark, VersaFine - Black, Black EP, Memento Dual Tip Markers
Color Burst - Fuchsia

Friday, November 4, 2016

How many days till Christmas???

Well this little birdy has the answer!

I want to share my little bird advent calendar with you today....


I made this entire thing from scratch!  I am so proud of it, I love how it turned out...now I just need some grandkids to share it with ;)  LOL!!  I created the "pallet" from scraps of lumber my dad had in his scrap barrel.  I painted the tree onto it using Fireworks! sprays and decorated each bird differently using a variety of Imagine products.  Imagine offers the little wood birds along with loads of other fun shapes.  All were inked in some fashion, either directly from the ink pads or using a spray ink.  Then the fun begins...some are stamped, some are stenciled, while others were decorated using one or more of Imagine's texture products (Pico Embellisher, irRESISTible Texture Sprays, etc).  The possibilities are endless.  I was having so much fun decorating them that I actually decorated them differently on each side.

For a complete supply list and detailed instructions, please see:


Wednesday, November 2, 2016

Up for a Harvest/Give Thanks Challenge??

Well that's the theme this month on the JFF Stamps Blog and here's what I created...


Both are made using some of the new autumn themed Stamptangle images...


If you'd like to enter please do so!
Everyone is welcome to enter and 
the winner is chosen at random and you don't need to use a JFF stamp.